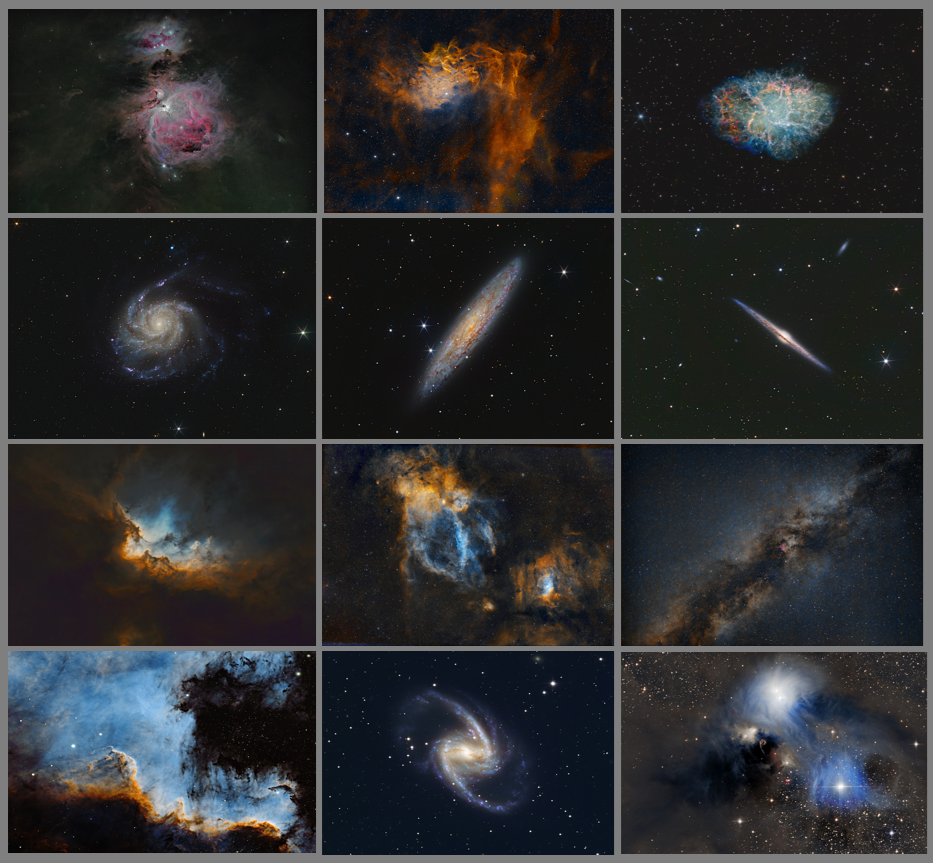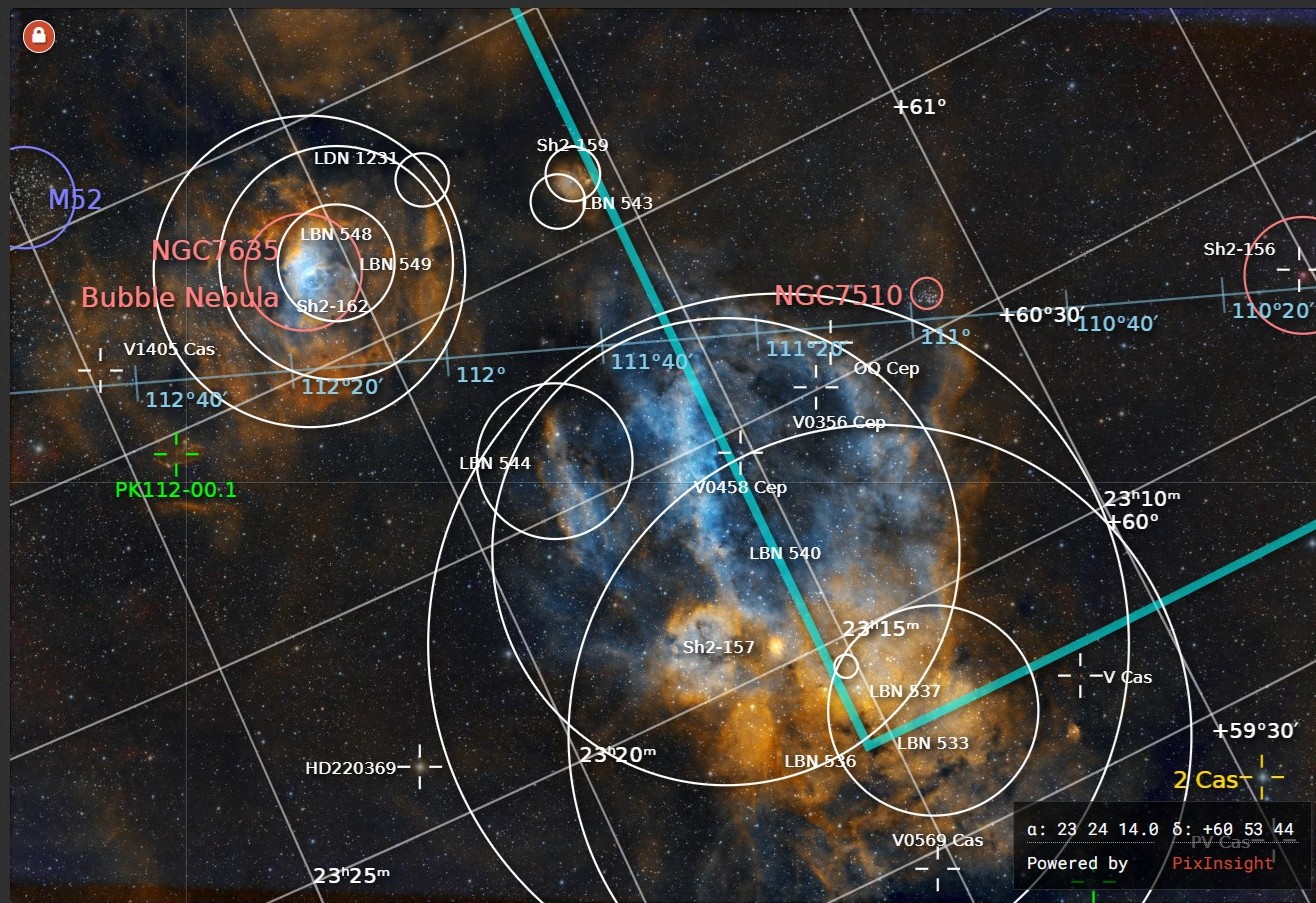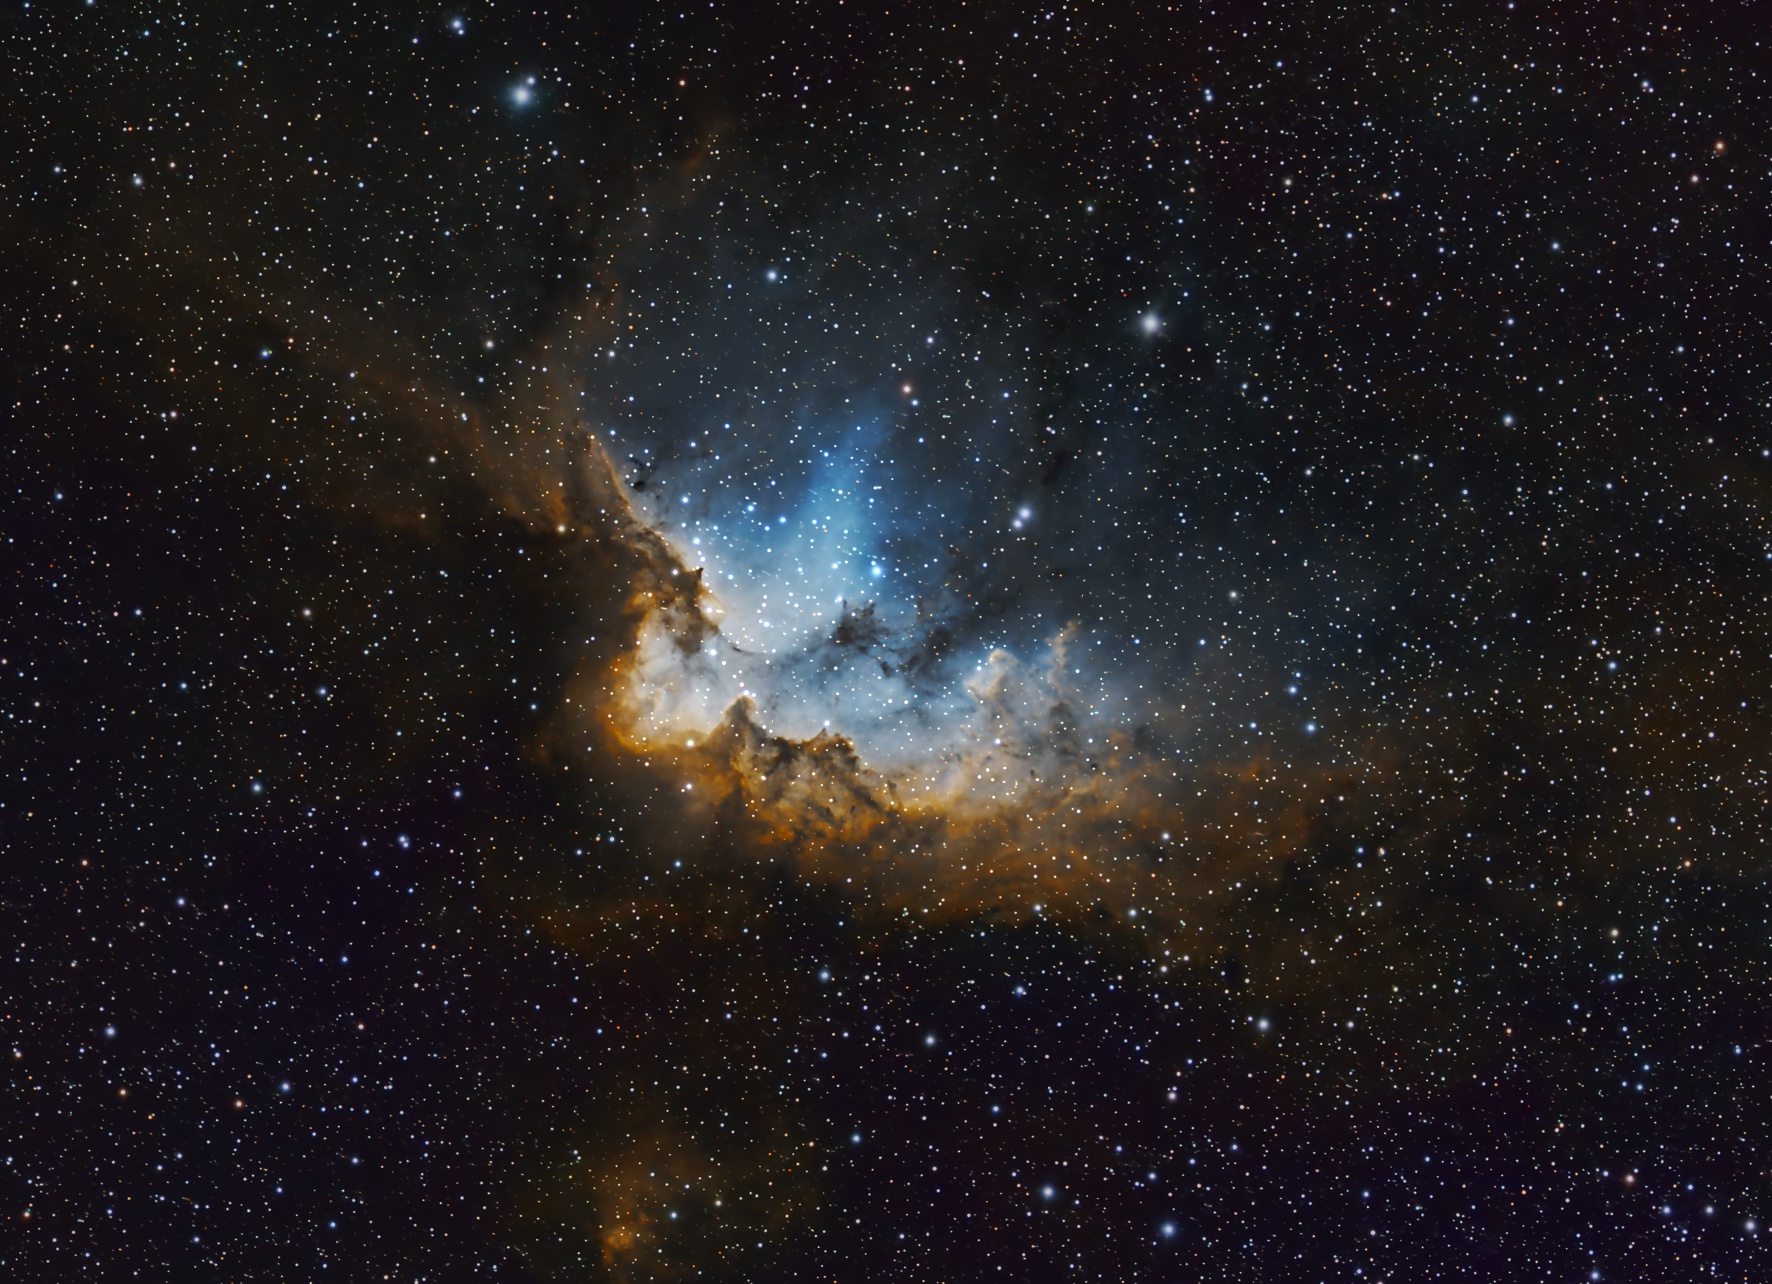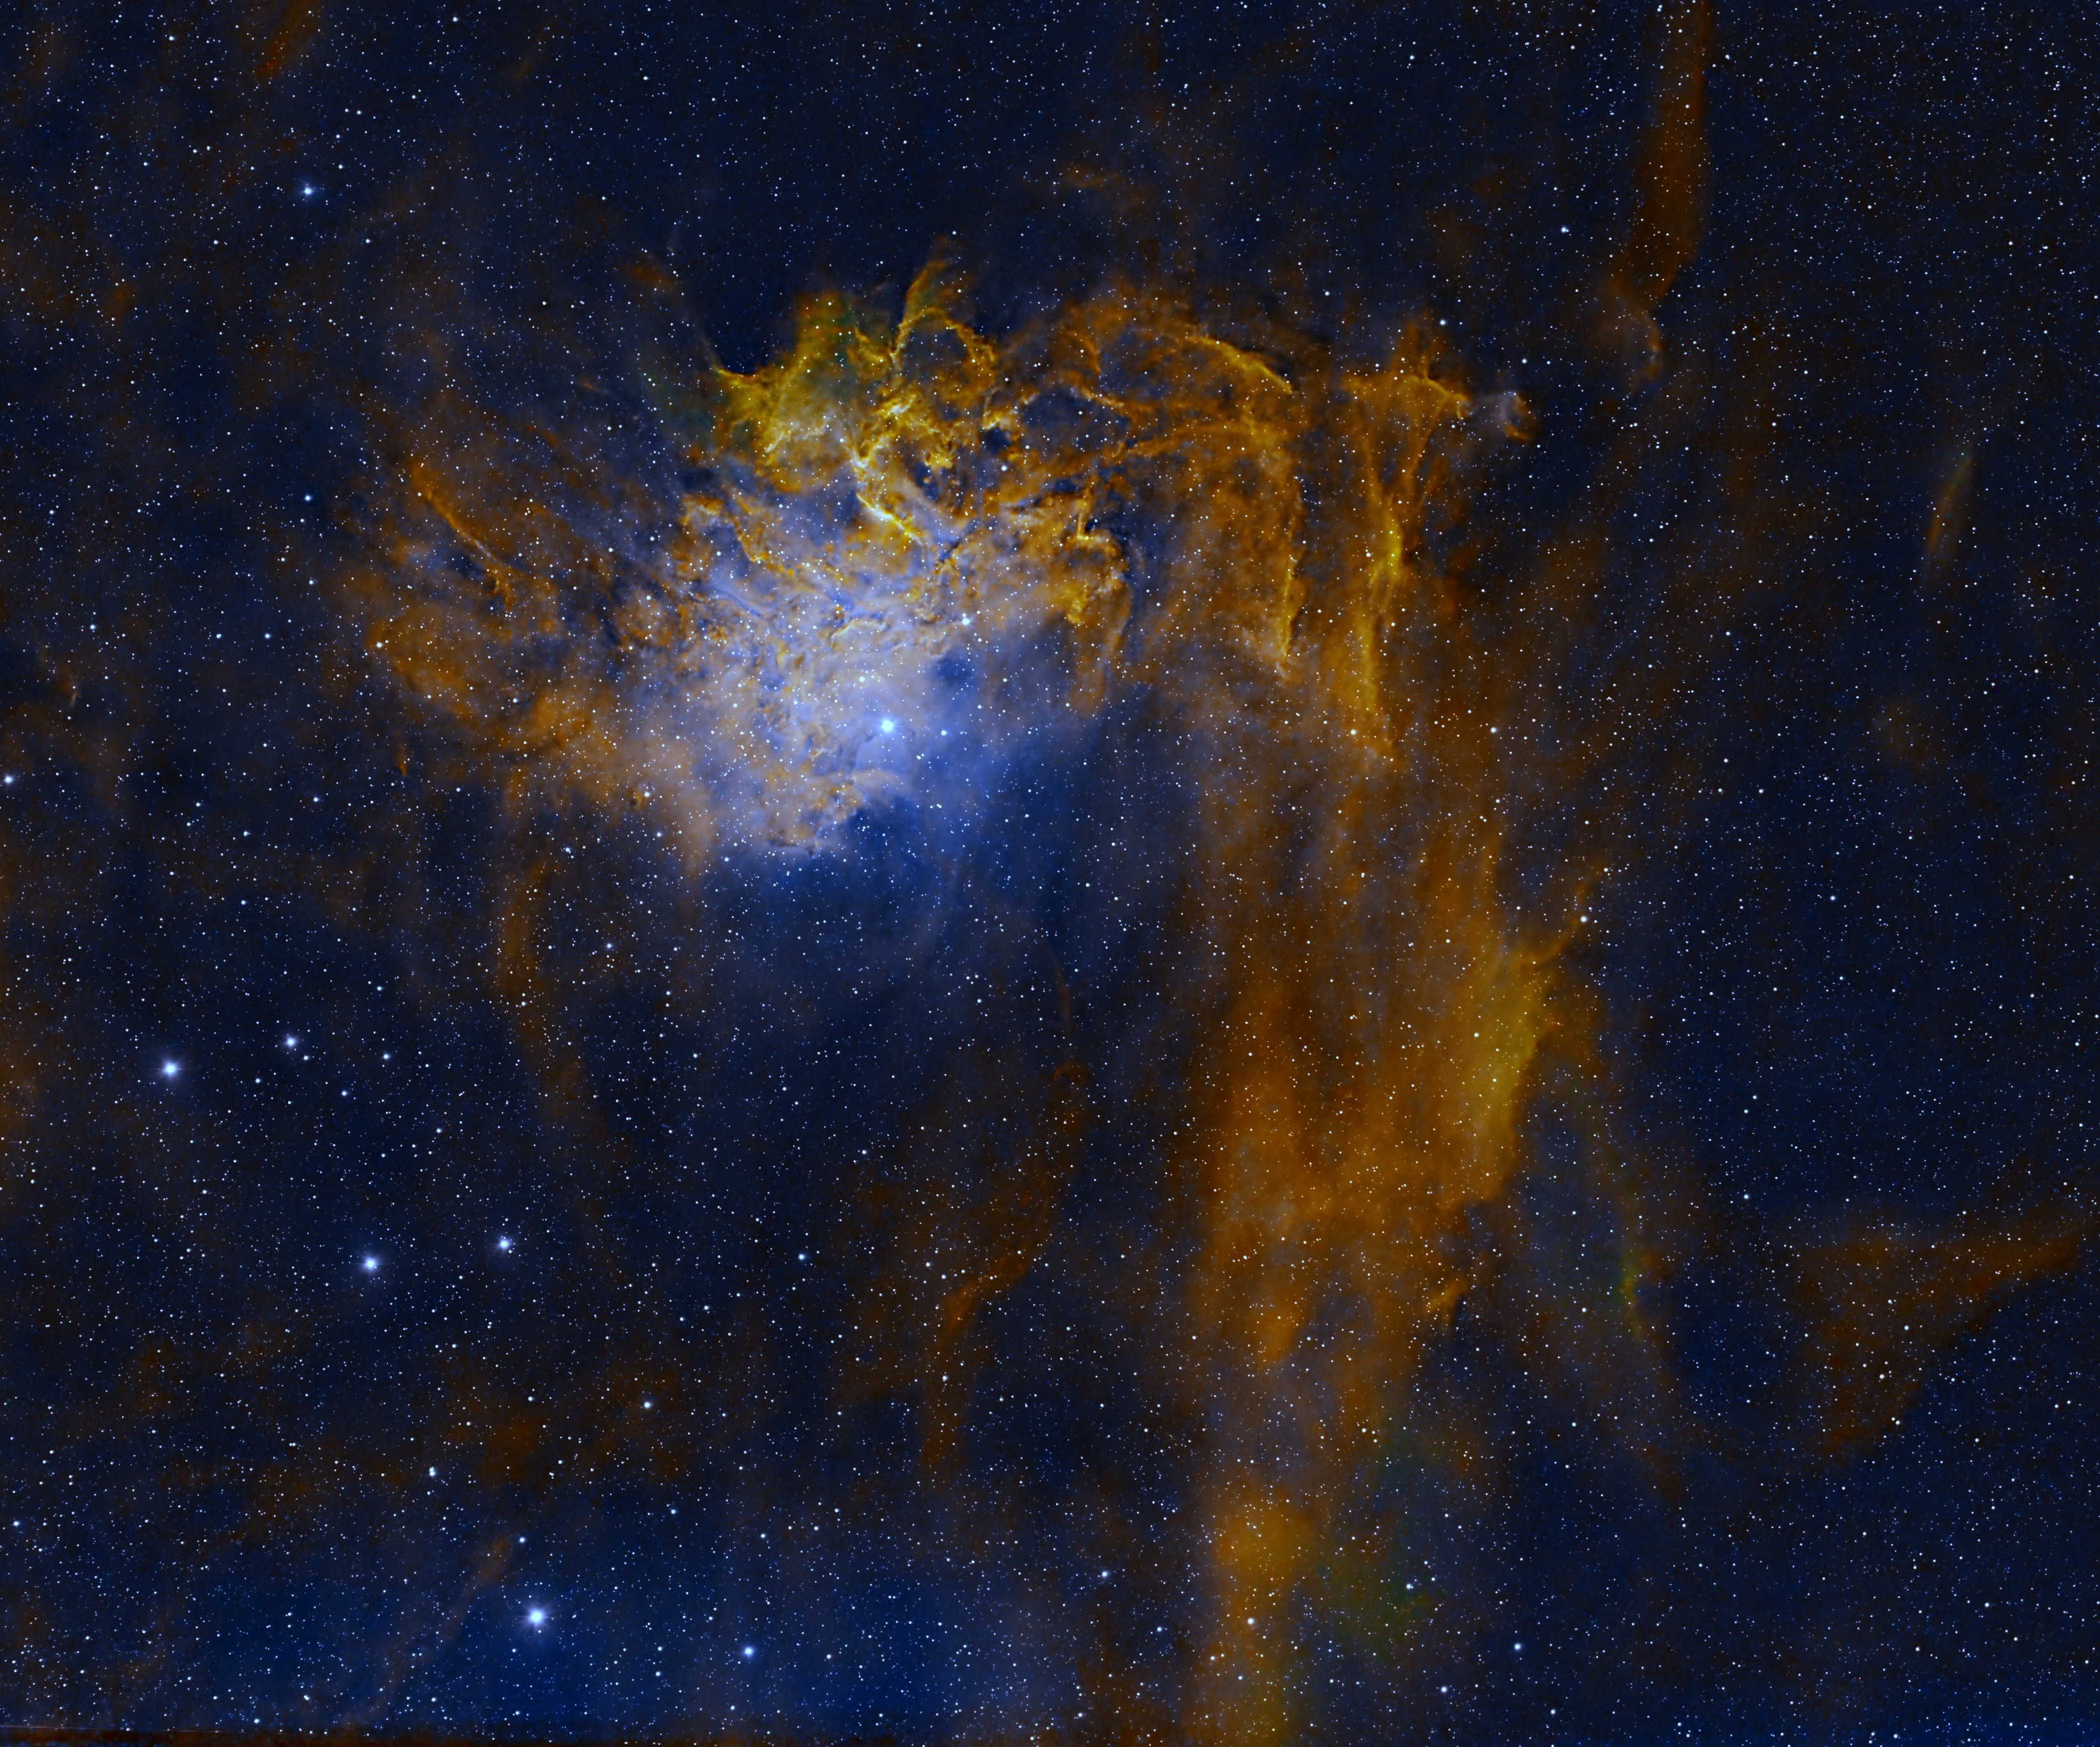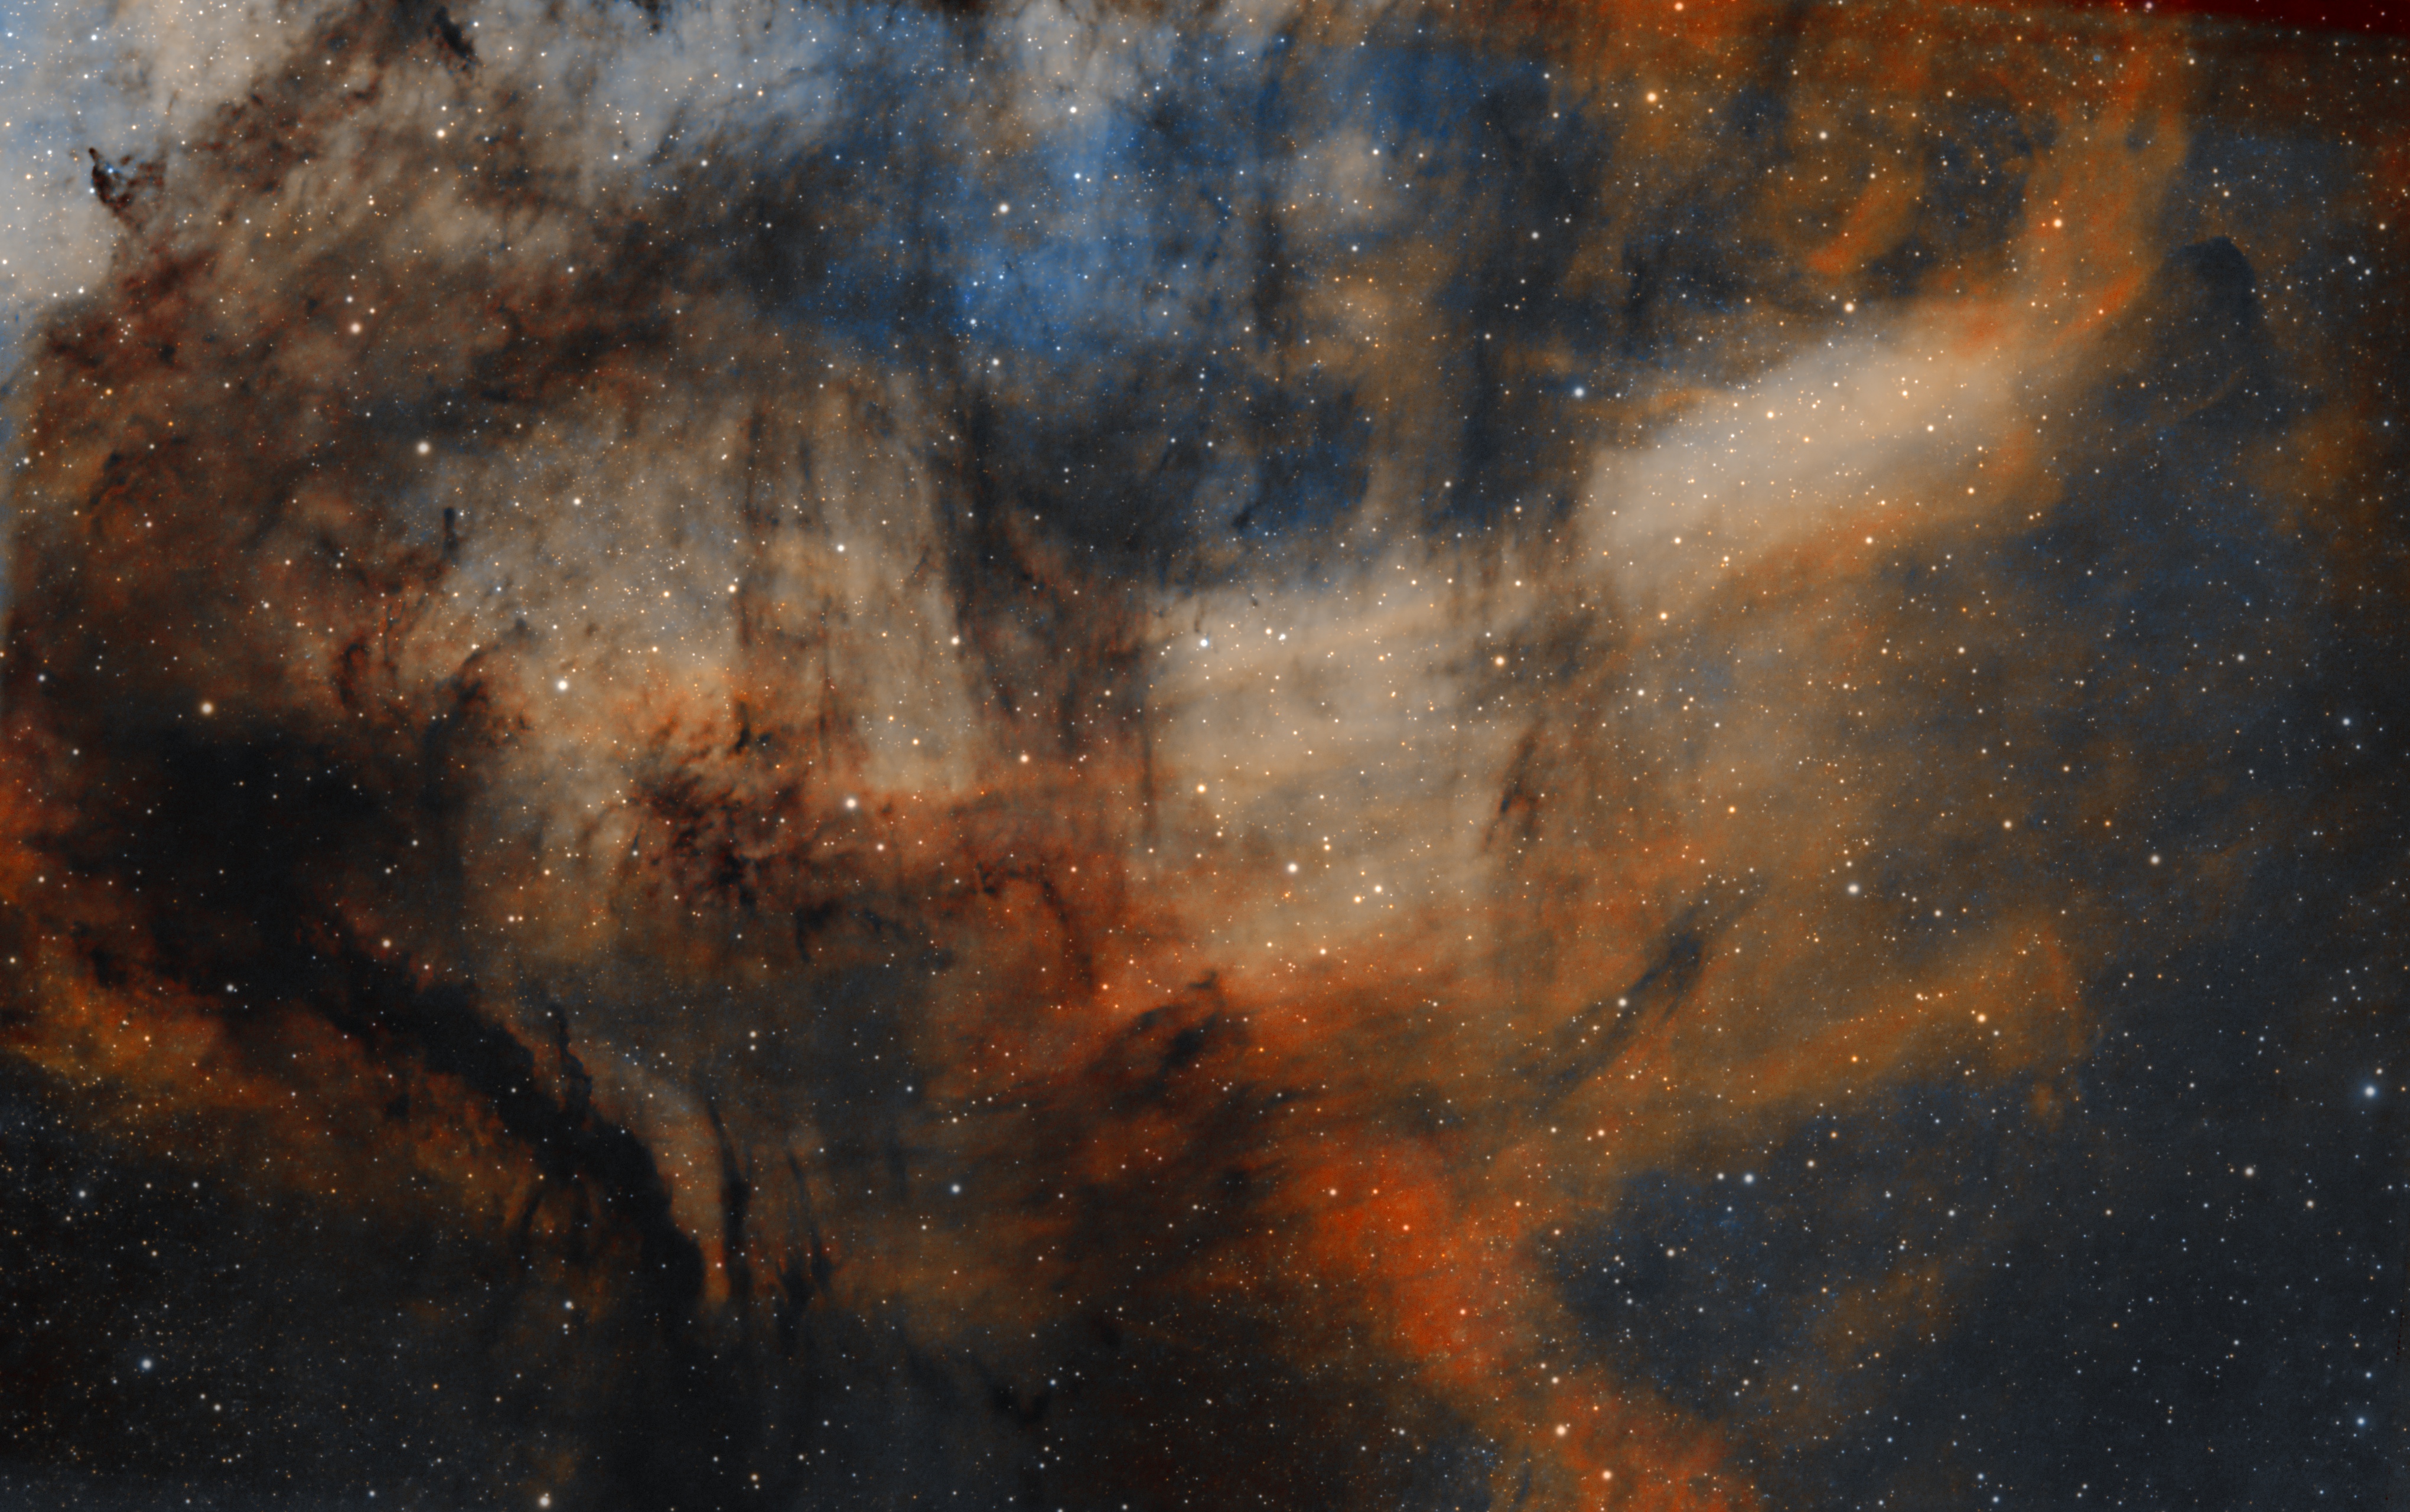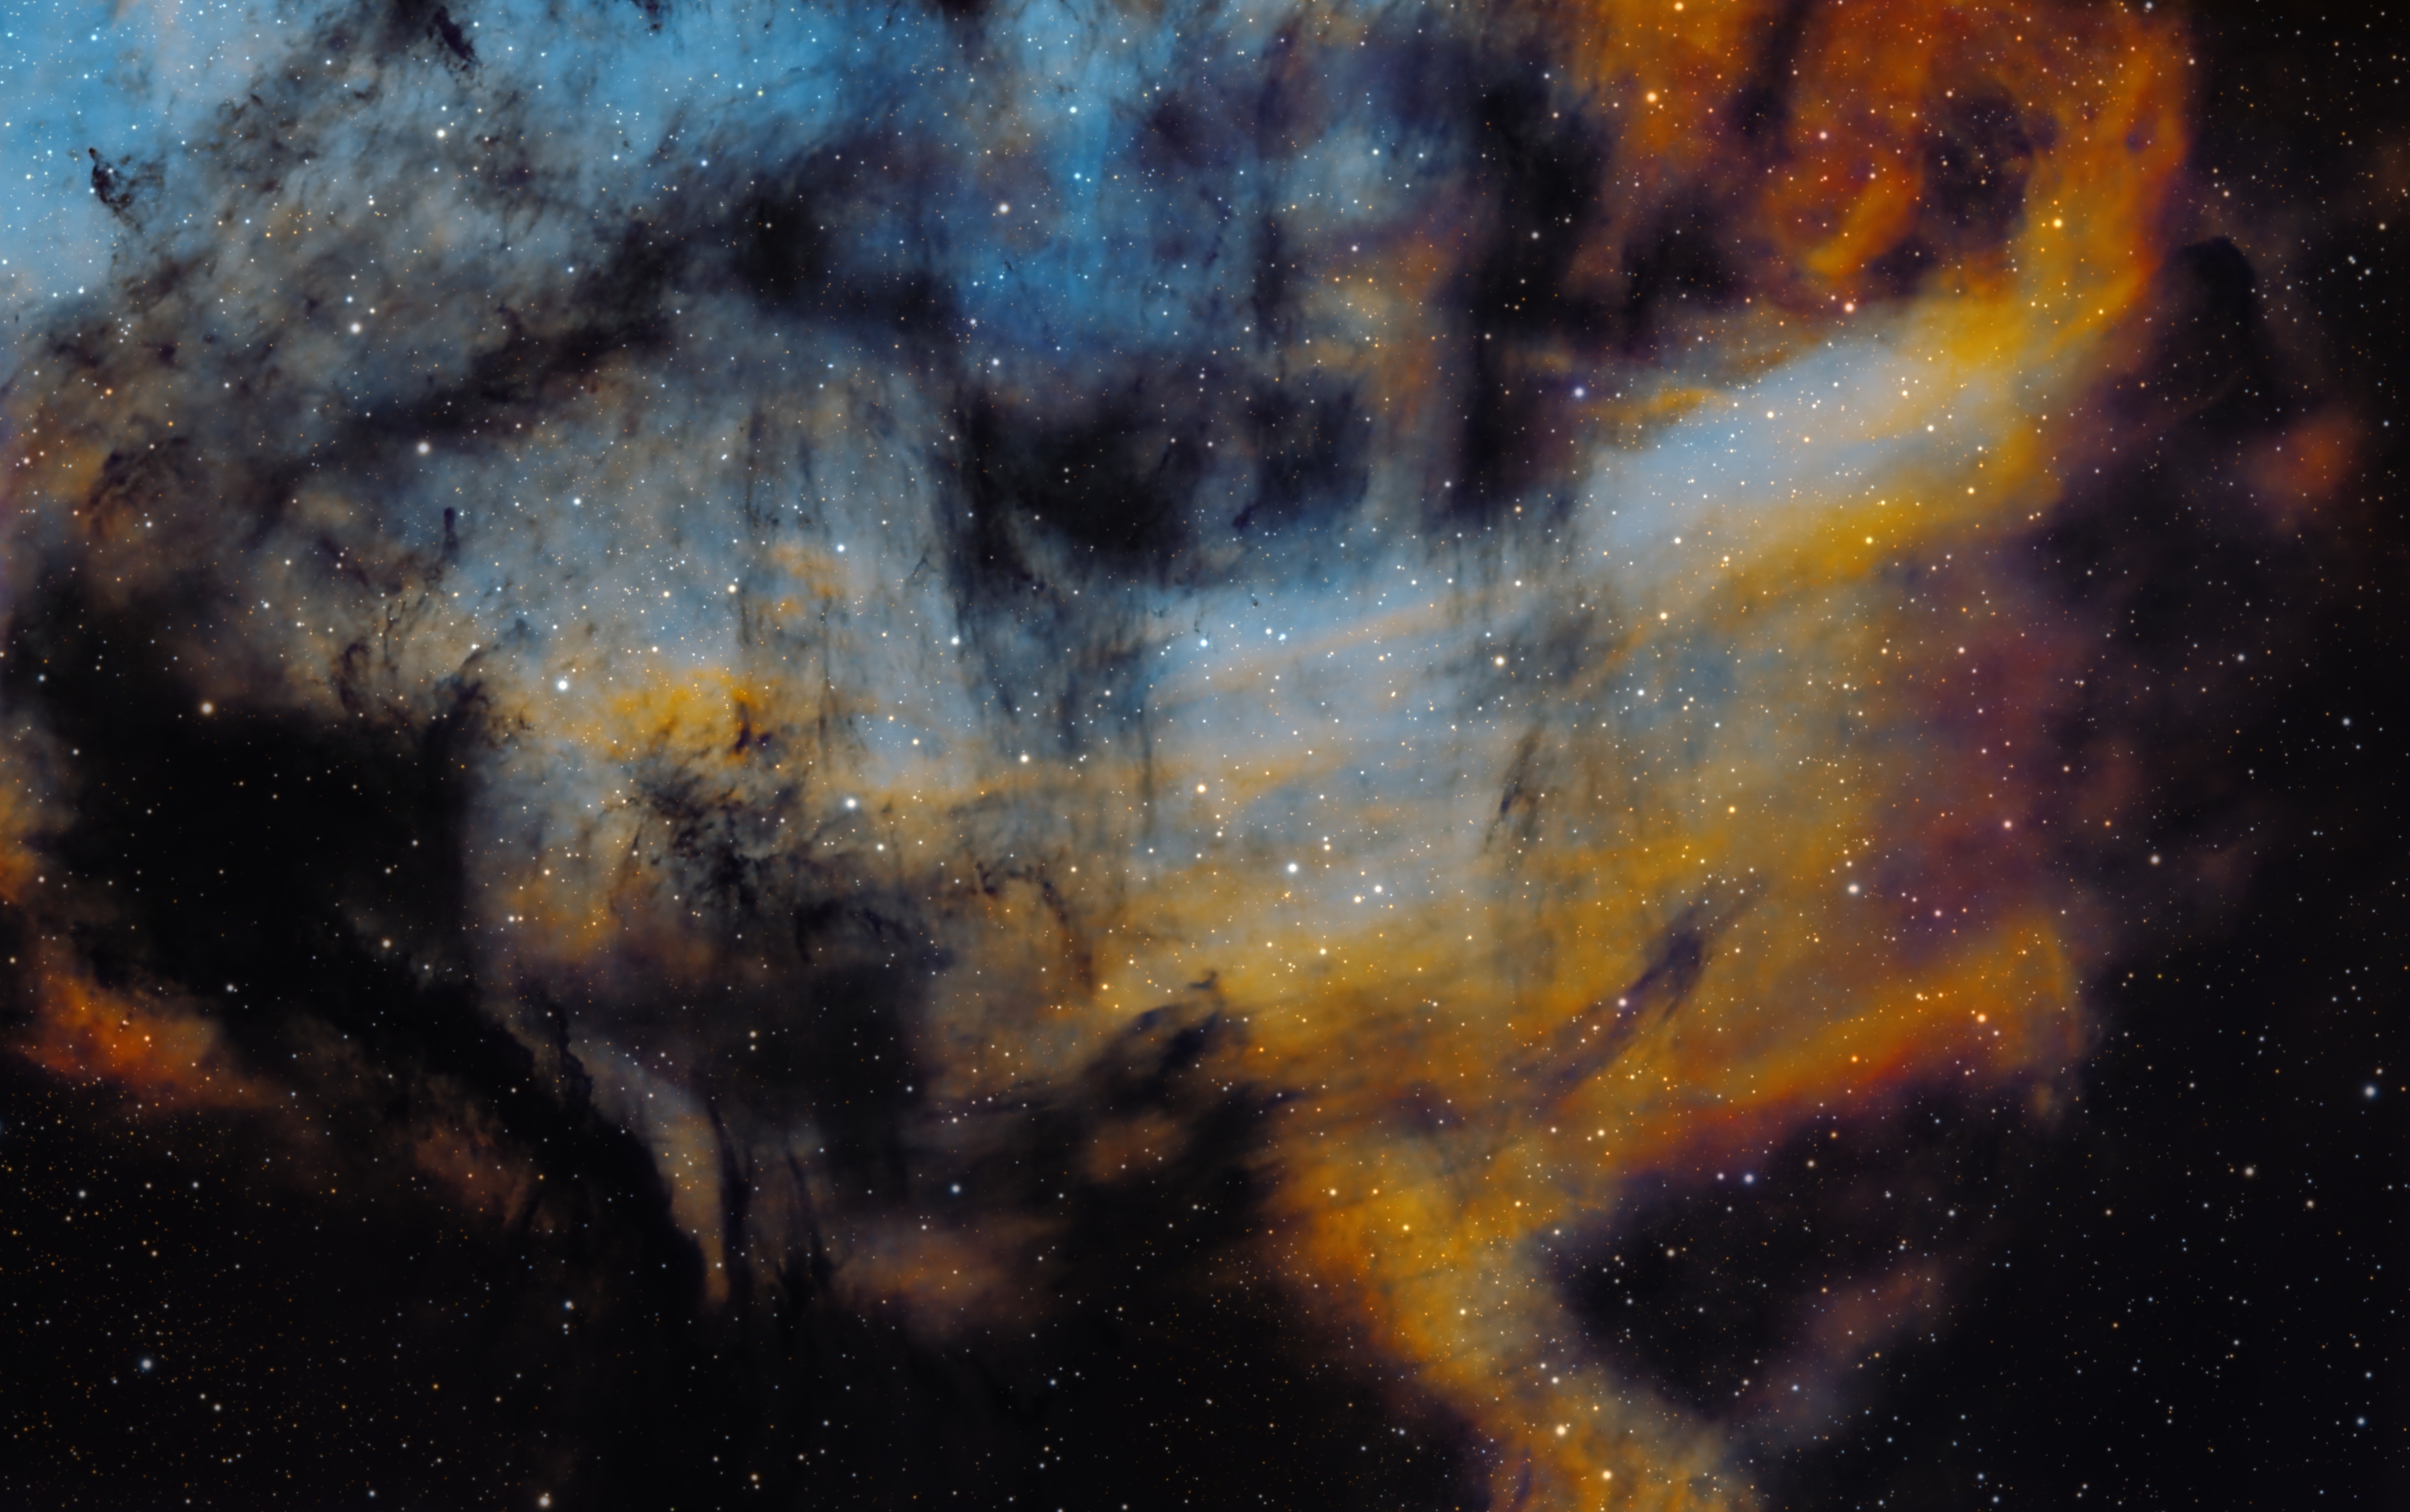
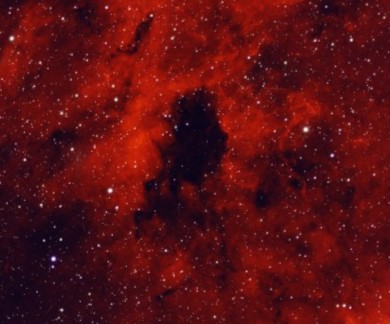
As previously outlined, my new imaging location at Castle Farm Observatory, Somerset, provides views mainly to the West and North, thus (for the moment) eliminating my usual seasonal targets at this time of the year in and around the Orion constellation. Therefore, wanting to explore something new shortly before Christmas, I chose a less popular target in the West within the myriad of objects that make up the exciting Cygnus X Molecular Cloud Complex. As one of the largest and most active star-forming regions in the Milky Way galaxy, the area is also dominated by many large HII regions that inevitably means narrowband imaging and on this occasion Barnard 343.
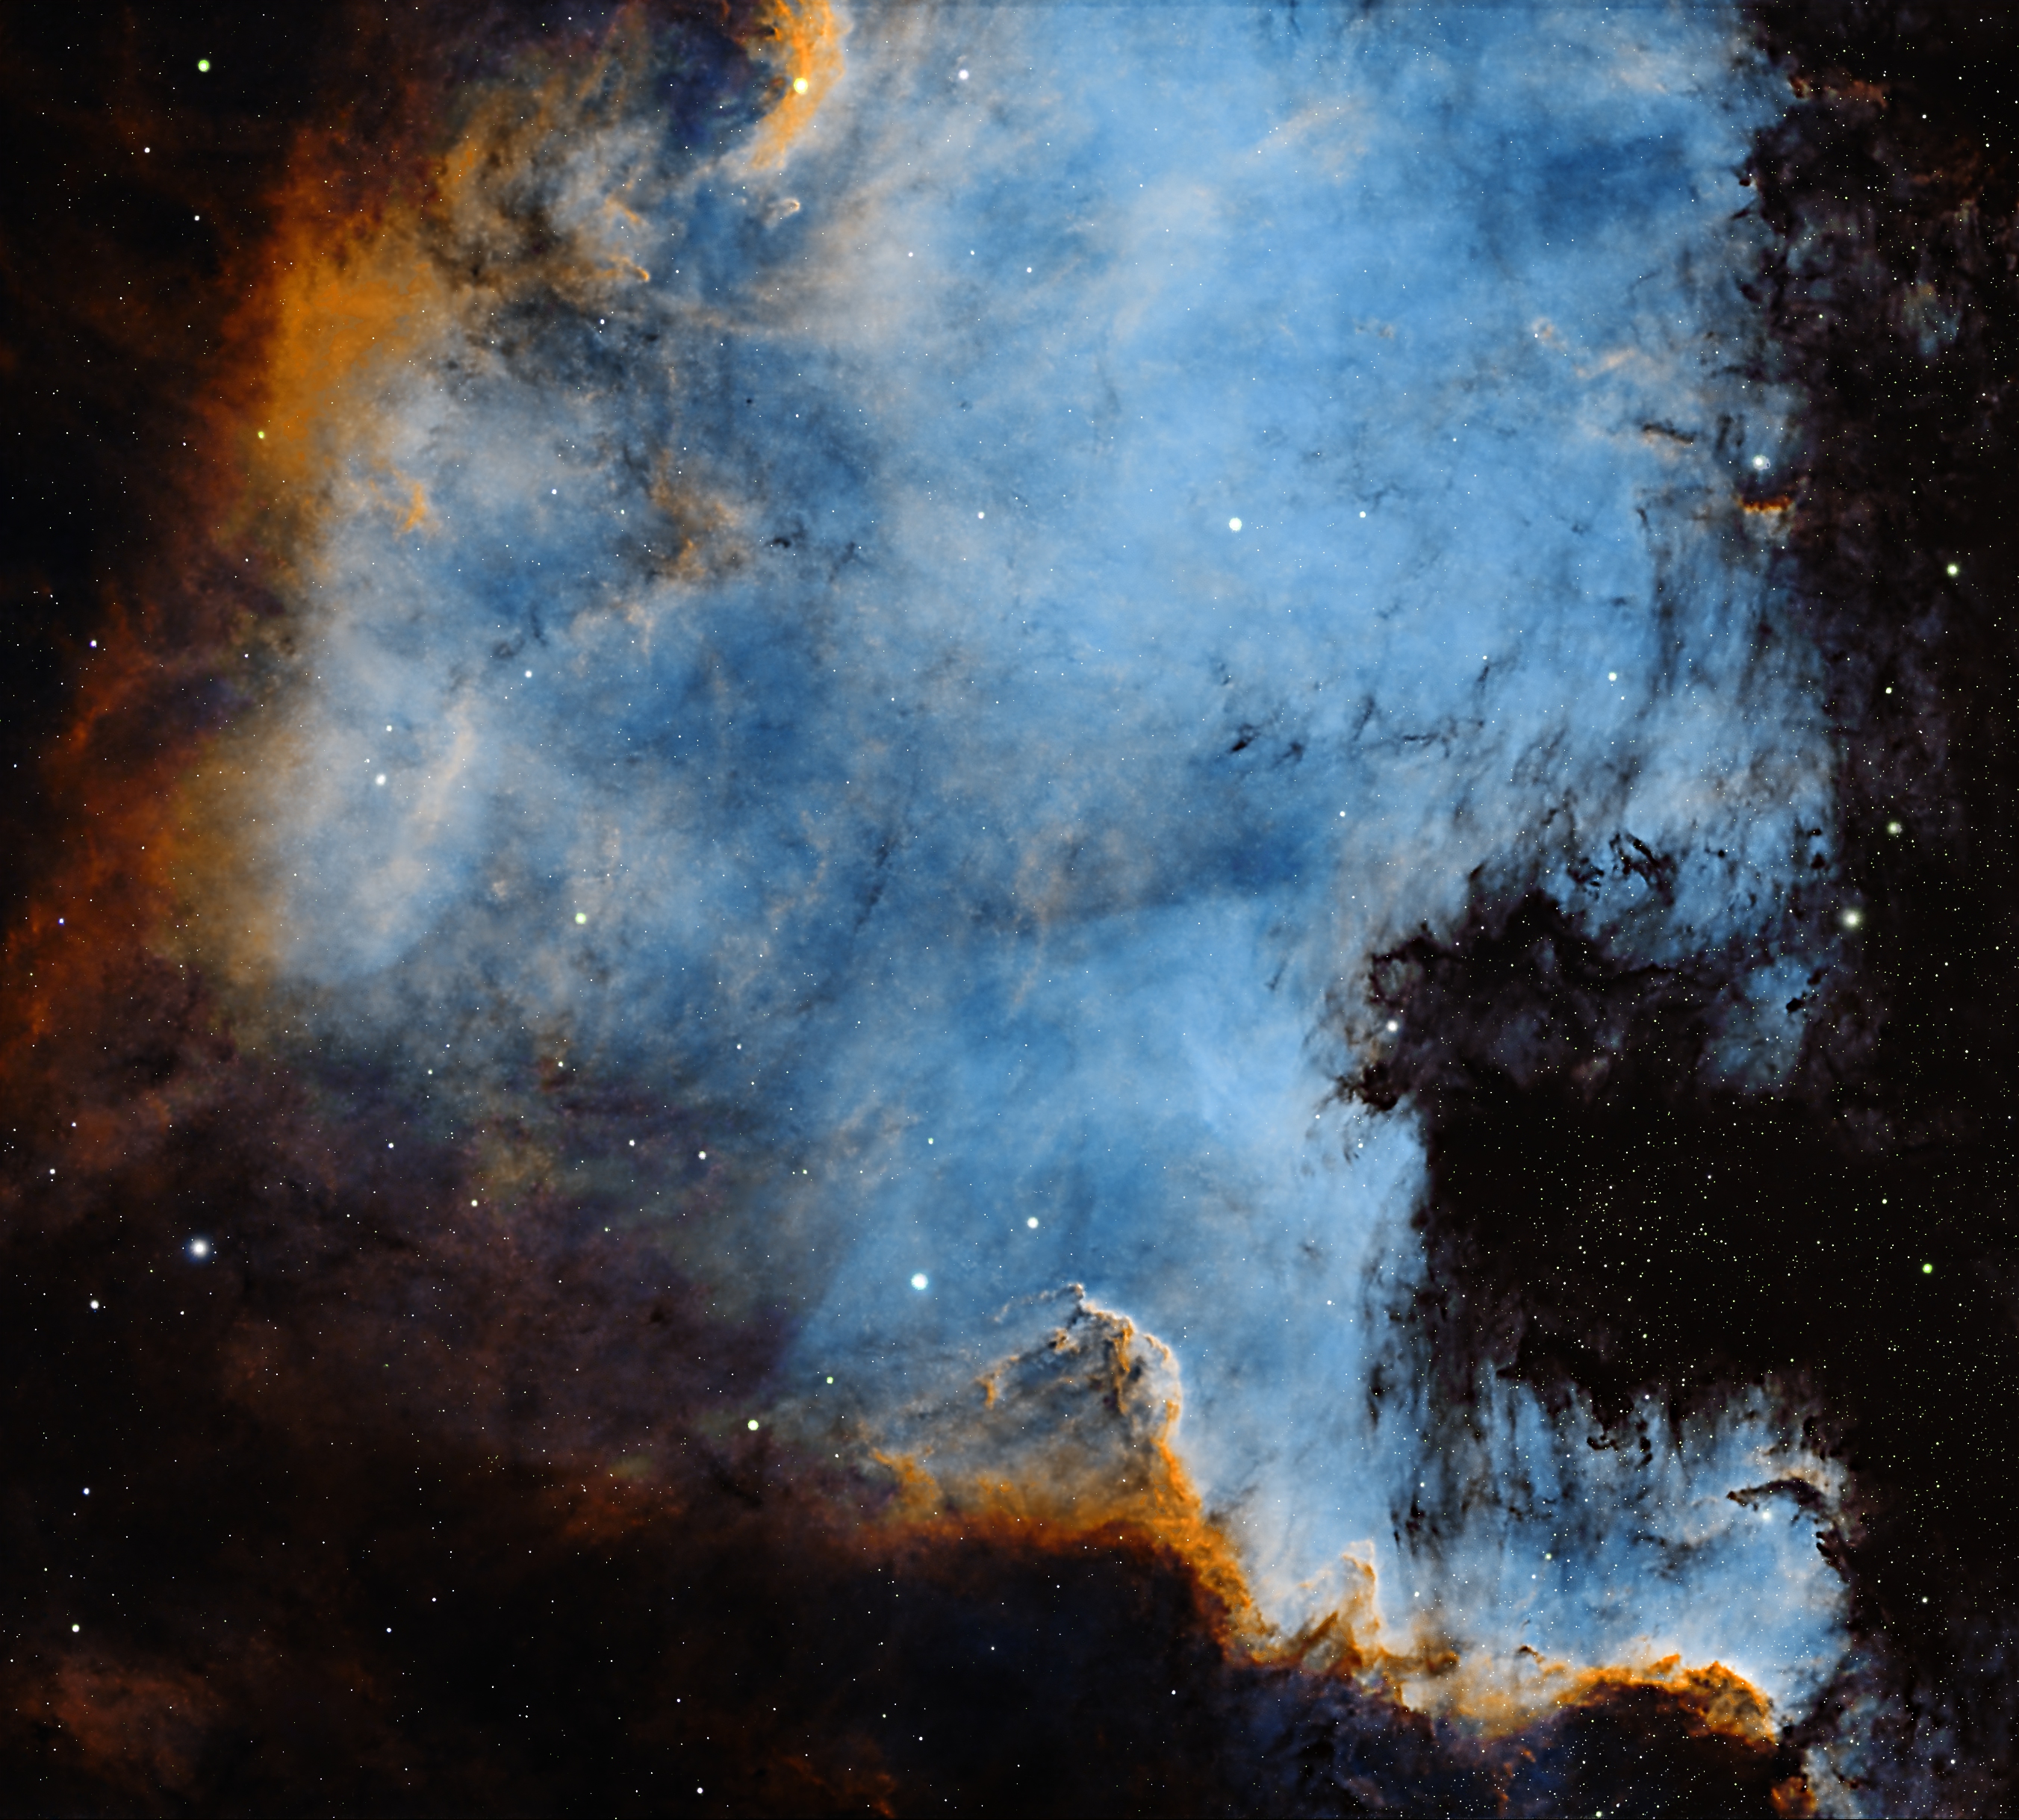
B343 is a dark nebula formed of dense clouds of cold gas and dust but being a widefield image, the adjacent area also incorporates a vast, complex HII region. It’s an interesting subject but unfortunately difficult to process, due to its notorious “brown soup problem”. The issue is not signal strength but colour separation and contrast, which if not controlled turns everything brown and muddy! Sure enough, this was the initial outcome using a conventional Hubble SHO palette, that inevitably led me down various rabbit holes to find a solution, for which unusually on this occasion I decided to engage the help of Artificial Intelligence (AI).
AI came to astrophotography in a big way when Russel Croman first developed StarXterminator in September 2021, followed by NoiseXTerminator May 2022, not just to simplify hitherto complex techniques but also to improve the outcome. However, it was shortly before Christmas in 2022 with the launch of AI driven BlurXTerminator, that everything really changed – for more information refer to RC-Astro..
BlurXTerminator is an AI-powered astrophotography tool that removes blur caused by atmospheric turbulence, tracking errors, and optical imperfections, restoring fine detail and sharpness in astronomical images and much more. The subsequent impact on astrophotography has been profound. Some argue that the resulting images are unrealistically altered using BlurXTerminator but I closely followed Russel’s explanations on how it works and I am satisfied that image integrity is conserved, whilst at the same time significantly helping the user to produce better images. In short, it has since been nothing less than a revolution in astrophotography.
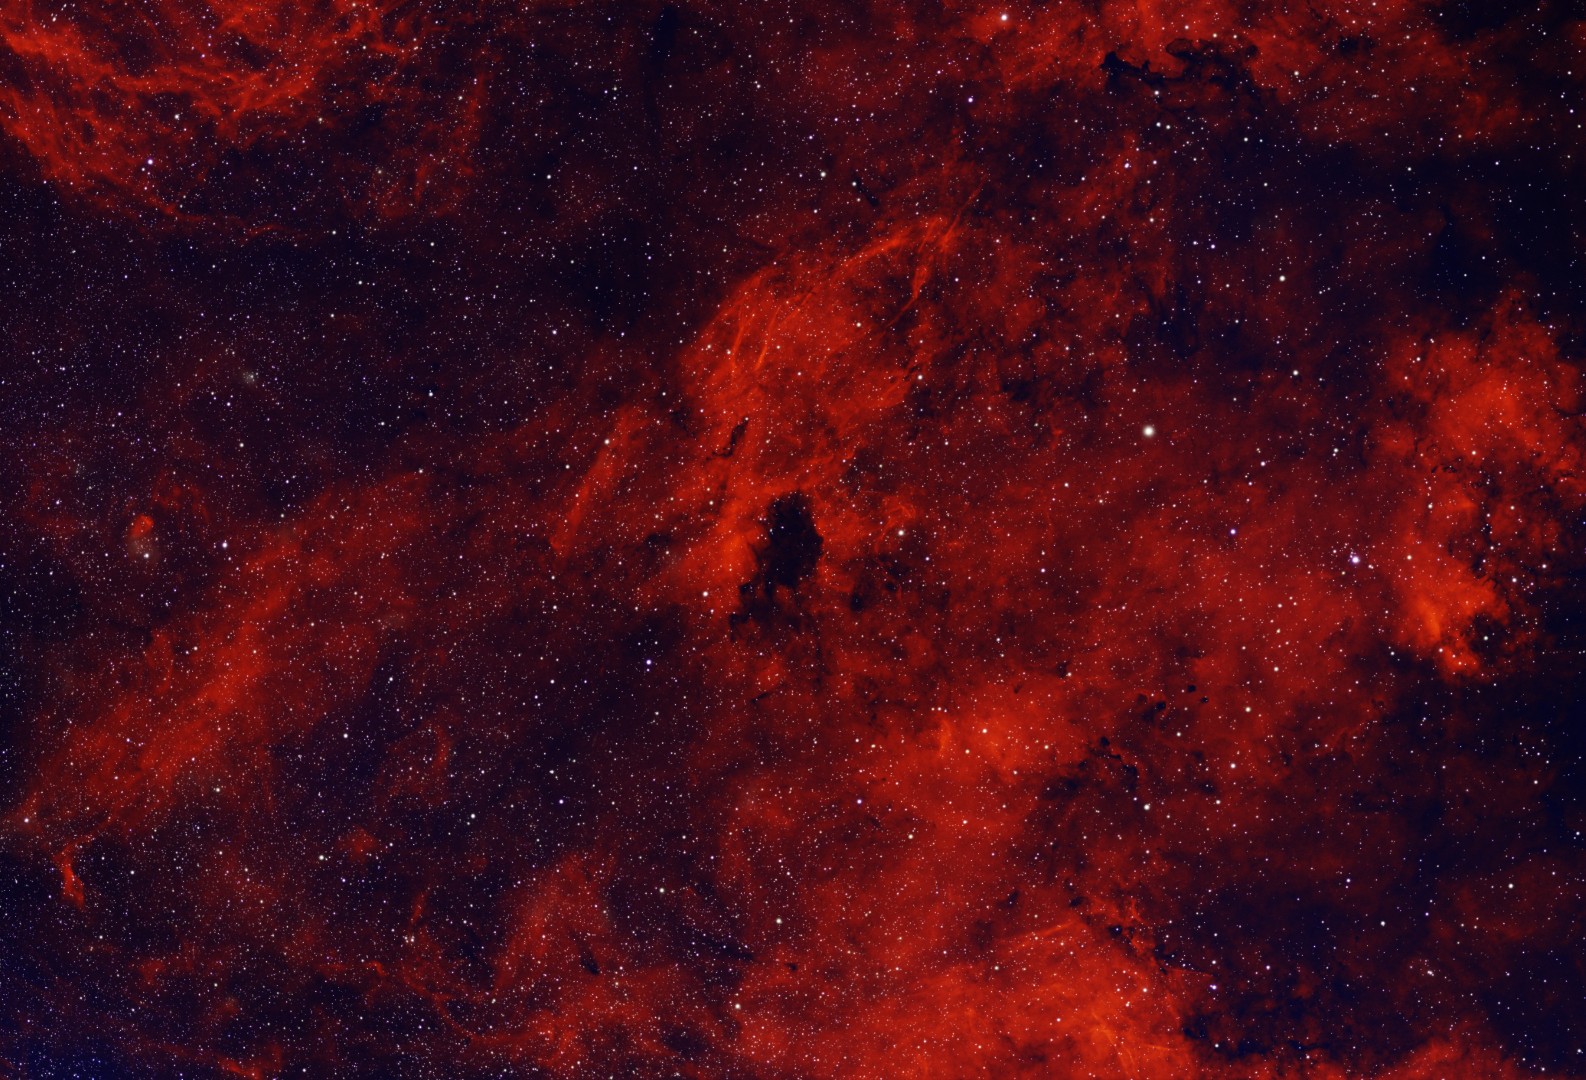
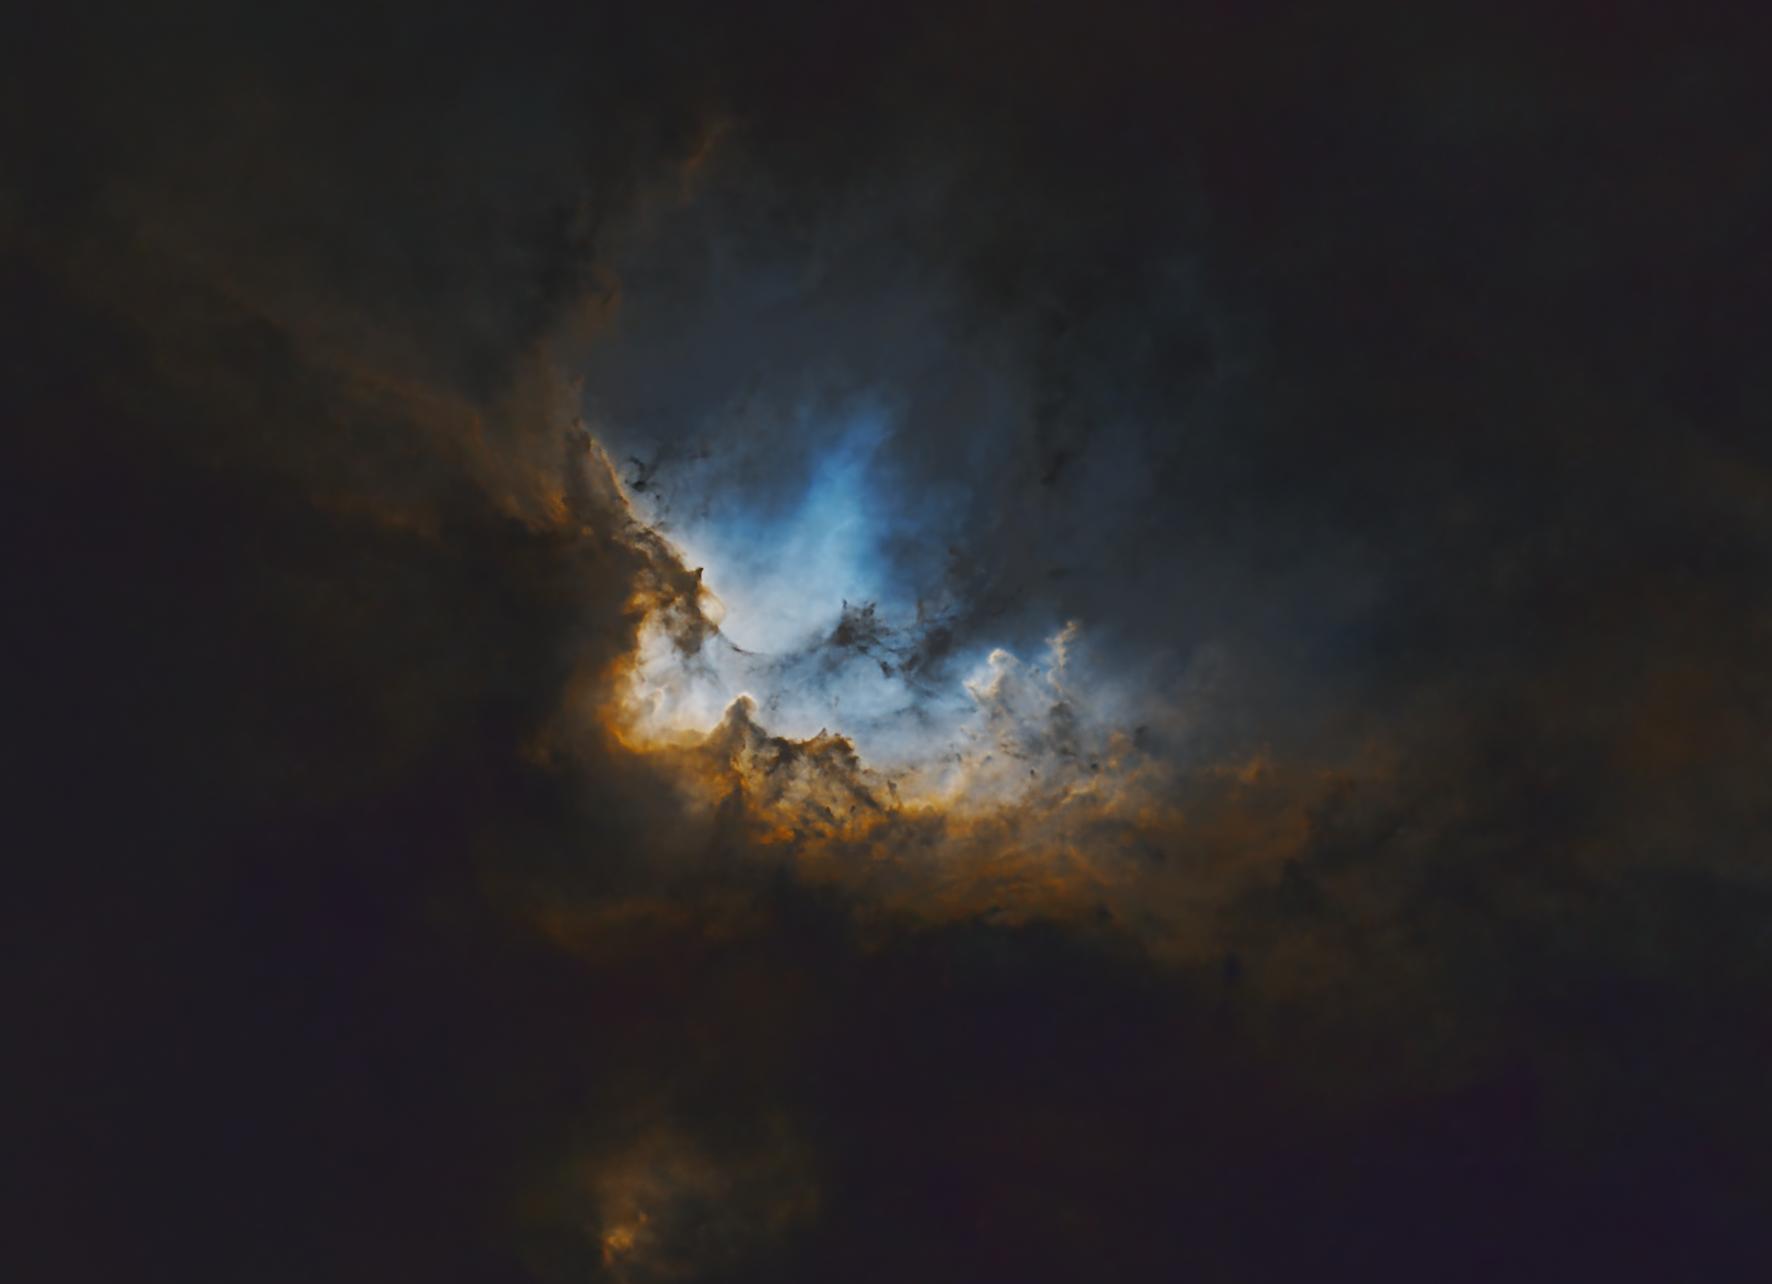
Subsequently general use of AI has burgeoned and now seems set to go to another level. In the case of eliminating the said ‘Brown Soup’ problem, I therefore turned to the popular Large Language Model (LLM) ChatGPT, which was surprisingly helpful (see SHO image at top of the page, HOO version below & ChatGPT text below). Appropriate technical knowledge will always be essential when pursuing the often-difficult hobby of astrophotography but I’m no Luddite and happy to use whatever helps me get the best result, including AI as well old-fashioned guidance from more experienced imagers. The impact of such an approach, matched by the many technical advances over the past decade can be clearly seen in everyone’s images today and bodes well for the future of this hobby.
Out of interest, below are the results of the three questions I asked ChatGPT regarding Barnard 343, the answers reproduced below were helpful, exciting and perhaps of some concern?
| TELL ME ABOUT BARNARD 343? + ANSWER: Barnard 343 is a dark nebula complex in the Cygnus region of the Milky Way. It’s made primarily of cold, dense interstellar dust that blocks background starlight Those inky-black lanes and cracks are the nebula itself — not empty space The glowing orange and blue areas around it come from nearby emission nebulae, mainly ionized hydrogen and oxygen Why it looks so dramatic: – Barnard 343 sits in front of extremely rich star fields, so the contrast is striking – The dust forms filaments, knots, and folds, shaped by turbulence, magnetic fields, and nearby stellar radiation – The color palette comes from narrowband imaging (often mapped in SHO or similar schemes) Scientific context: – Part of the Cygnus molecular cloud complex, one of the most active star-forming regions near Earth – Dark nebulae like B343 are stellar nurseries — dense pockets can eventually collapse to form new stars – – Catalogued by Edward Emerson Barnard in the early 1900s during his pioneering photographic sky surveys How to “read” the image: – Black regions→ dense dust (future star-forming material) – Orange/gold→ hydrogen emission (H-alpha / S-II) – Blue/cyan→ oxygen emission (O-III) or reflected starlight – Speckled background→ Milky Way stars |
| PROVIDE THOUGHTS ON HOW I MIGHT BEST PROCESS BARNARD 343 SHO IMAGE? + ANSWER: You want: – Cool cyan/blue H-alpha background – Warm golden sulfur structures – Deep neutral dust lanes – Minimal magenta/green contamination 1. Start with the Right SHO Mapping Classic SHO often looks dull for dark nebulae. Try one of these instead: Recommended Mappings Modified Hubble (best starting point): R = SII G = 0.8×Ha + 0.2×OIII B = OIII Or warmer dust-friendly mapping: R = SII G = Ha B = OIII × 1.2 👉 The key is keeping Ha dominant in green, not split evenly. Normalize Channel Strength Before Combination Barnard regions exaggerate imbalance. Before combining: Match median background levels Stretch OIII slightly more than Ha Slightly compress SII highlights In PixInsight: LinearFit → Ha as reference Then mild HistogramTransformation 3. Control the “Brown Soup” Problem This is the #1 issue with B343. Fix: – Reduce red+green overlap – Increase blue separation In PixInsight Use PixelMath: R = SII G = 0.85*Ha B = 1.1*OIII 4. Star Handling (Critical in B343) Stars easily ruin color balance here. Recommended workflow: – StarXTerminator / StarNet – Process nebula color fully – Re-add stars desaturated 30–50% – Slight blue bias to stars only 5. Final Colour Refinement (This Makes the Image) What to aim for visually: Component Desired Color Dust lanes Neutral / slightly cool SII regions Warm gold Ha glow Cyan-green OIII Blue-teal PixInsight: – CurvesTransformation Boost blue saturation – Slightly reduce red saturation – SCNR only on green, amount 0.4–0.6 FYI – I adopted #3 to “Control the “Brown Soup” problem, which worked well |
| WHAT IS THIS IMAGE (Without telling ChatGPT it was B343)? + ANSWER: This image feels like a vast, living tapestry of the cosmos—dark, velvety space threaded with glowing amber and blue filaments. The wisps look like interstellar clouds slowly colliding and unravelling, as if time itself is drifting through them. There’s a quiet sense of scale and mystery here: tiny pinpricks of stars scattered across immense clouds of gas and dust, hinting at both stellar birth and ancient remnants. It’s beautiful in a solemn, awe-inducing way, reminding you how small and fleeting everything feels against the backdrop of the universe. |
| IMAGING DETAILS | |
| Object | Barnard 343 |
| Constellation | Cygnus |
| Distance | 2,000 light-years |
| Size | 10 arc minutes (dark nebula only) |
| Scope | William Optics GT81 + Focal Reducer FL 382mm f4.72 |
| Mount & Control | ZWO AM5 + ASIair |
| Guiding | William Optics 50mm guide scope |
| + ZWO 120MM Mini | |
| Camera | ZWO ASI294MM CMOS sensor |
| FOV 2.87o x 1.96o Resolution 2.50”/pix Max. image size 4,144 x 2,822 pix | |
| EFW | ZWOx8 EFW & 31mm Chroma Ha, OIII, SII 3nm & RGB filters |
| Capture & Processing | ASIair & PixInsight v1.9.3 Lockhart |
| Image Location & Orientation | Centre = RA 20:13:30.22 DEC +40:15:10.4 Top Left = North |
| Exposures | Ha x 27 + OIII x 20 + SII x 22 @ 300 sec Total Integration Time: 5hr 45min |
| @ Gain 120 & 30 Offset 21 @ -15oC | |
| Calibration | 5 x 300 sec Darks + 10 x NB Flats & Dark Flats @ ADU 32,000 |
| Location & Darkness | Castle Farm Observatory, Wookey, Somerset – UK Typically Bortle 4 |
| Date & Time | 10th & 16th December 2025 @ +18.00h |
| Weather | Approx. ❤oC RH >=<60% 60 to 10% waning |