Soon after embarking on my astrophotography adventure just over two years ago it became apparent that after getting the basics right – polar & star alignment, focus, image capture etc. – the Holy Grail of imaging is increased exposures times, thereby collecting more of those elusive photons that have travelled across the Universe. The first step to achieving this goal is tracking, which since purchasing my AZ-EQ6 mount in 2015 I have been successfully improving over time, on a good day achieving 180-second exposures and from time-to-time resulting in some decent images. However, the light from DSOs is often very feint and can require much longer times, which is easier said than done.
At the same time as acquiring the aforesaid mount and a William Optics GT81 telescope I also purchased a William Optics 50mm guide scope, with which I intended to start guiding and thus push exposures above my 3-minute barrier. Despite these aspirations, through a combination of events and my unease about the apparent difficulty of guiding, the guide scope has remained unused – until now. Having recently purchased a dedicated Starlight Express Lodestar X2 guide camera, I have finally been emboldened enough to give it a try.
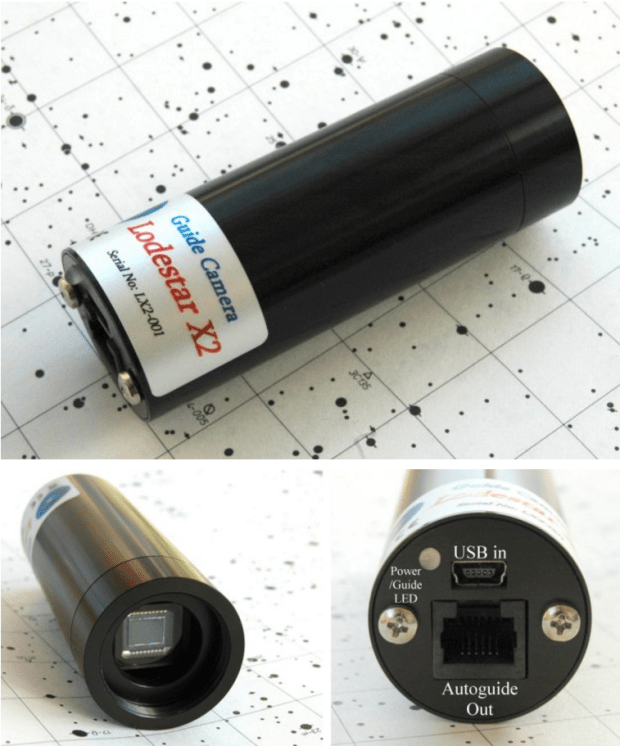
Starlight Express Lodestar x2 Guide Camera can be used either via the mount’s ST4 port or via ASCOM and the computer for pulse guiding.
I initially struggled to set up the guide scope and get the guide camera working together. In particular obtaining focus proved very difficult; like the GT81 the guide scope focus turns out to be achieved within a very short distance that is measured in fractions of millimetres, which in this case required the insertion of an extension tube.

Reminiscent of the Space Shuttle on its Boeing 747 transport plane! The William Optics 50mm guide scope + Lodestar X2 guide camera neatly mounted atop the GT81 imaging scope using the integral rings.
Thereafter the big challenge, which I had previously avoided, was to start using the very popular PDH guiding software; Push Here Dummy (PHD) is named tongue-in-cheek by its original creator Craig Stark and is an amazing but somewhat intimidating piece of software.
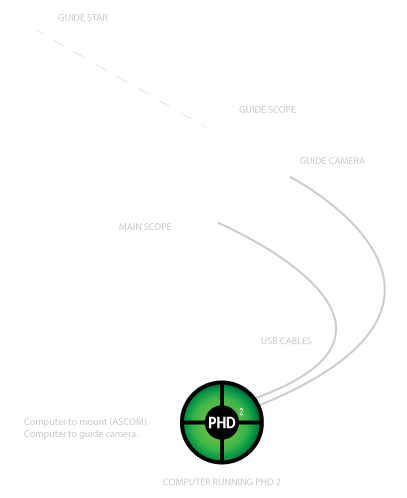
The principle is simple – find a star within the FOV and use it as a fixed reference point from which to assess and then correct small tracking errors in order to achieve better tracking, which thereby maintains pinpoint accuracy and enables longer exposure times, thus avoiding trailing of the sky and the objects being imaged. Its use is regarded as something of a dark art but I have finally grasped the nettle with some success. After months of clouded skies followed by an almost fatal equipment failure (see here for more), a period of exceptionally good weather and clear skies since late August provided the ideal opportunity to get to grips with this challenge that has so far eluded me.
At first I used a couple of sessions to overcome some past problems and ensure that everything was stable and worked well for basic tracking and imaging, in particular:
- Repair and improve the imaging camera’s AC/DC adapter lead;
- Where possible improve all other leads and connections – once bitten …..! In this respect I have significantly re-arranged and tidied up the many power, control and camera leads, which has included the addition of right-angle USB / mini-USB camera connectors that now makes plugging-in easier and produces less strain on the connections i.e. more secure. Simple, cheap and something I should have undertaken long ago;
- Revisit EQMOD-ASCOM in order to achieve more robust tracking – especially reviewing the star alignment procedures;
- Fit the guide scope using the rings incorporated onto the GT81 OTA, subsequently re-balancing the equipment and improve the mount’s feet positioning.
At this point I spent a couple of nights just playing with the equipment and in particular EQMOD-ASCOM, so as to obtain the best possible alignment; having suffered an enforced absence from imaging I just wanted to have some fun again too. At the end of this process, first using SynScan for polar alignment before switching to EQMOD-ASCOM + Cartes du Ciel for star alignment, I successfully produced a good 10-star alignment model which was then saved for future use. The resulting images already showed some improvement but I still had to tackle PHD. With unusually good weather I decided to leave the final set-up outside under cover, thus preserving the settings for a shot at the aforementioned task of guiding next time. In the interim I then needed to read the operating instructions and watch numerous videos on the use of PHD.
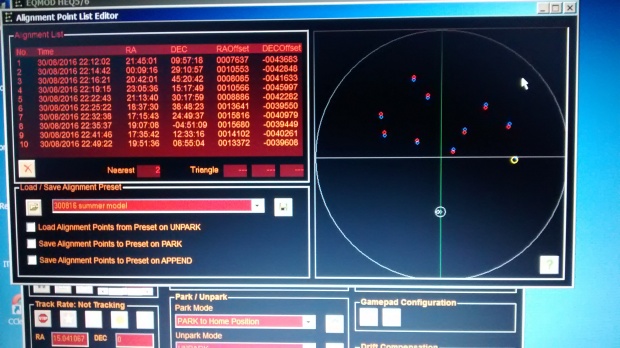
EQMOD-ASCOM 10-point alignment model. With an obstructed view of the northern sky by my house, all points are inevitably located in the southern quadrants.
Like so much of amateur astronomy, I will forever be grateful for the time and effort given by others to help those like me pursue our hobby. The material, videos and responses to my forum queries on guiding have as usual been nothing short of outstanding and very, very helpful. It’s still been difficult to get going but without the help and support of others it would be a complete non-starter. In this respect I’d like to pay credit to SGL and the Open PHD Guiding forums.
Armed with this knowledge I have since undertaken a few sessions using PHD2 with reasonable success, achieving exposure times of 5-minutes and more. Changing conditions and different objects make it necessary to continually finesse guide settings throughout the night and between nights and it’s already obvious that there’s much more to learn. Such adjustments are not always linear or empirical in nature and will often only come from gut feel (experience).
I have chosen to use ASCOM pulse guiding, though my equipment also has ST4-ports which I had initially intended to use due to its apparent simplicity. I am unable to argue the pros and cons of each method but there seems to be an overwhelming preference for pulse. What I do understand (I think) are the greater subtleties that can be obtained with the pulse guiding technique and in particular, the co-ordination it provides with ASCOM, thereby ensuring PHD and the mount communicate with each other to provide essential directional information as well as guiding. I am still investigating the impact of various BRAIN settings but through trial-and-error have progressed since my first guiding session.
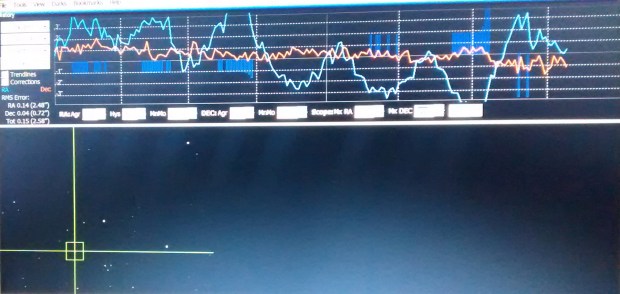
First Pass: early guiding results 30th August 2016
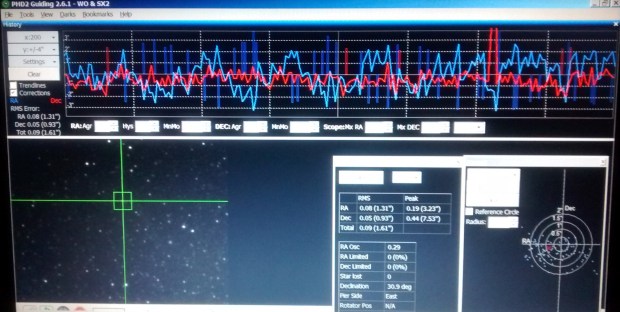
Getting better: most recent guiding results 12th September 2016
Calibration of PHD is frustratingly slow and it seems that even after successfully completing the RA-procedure can still fail during the subsequent DEC / backlash clearance. After calibration use of the PHD Guide Assistant can then provide more help in achieving the best settings for the given set-up and conditions, though it is also very slow. However, once completed PHD is fantastic and so far has run well during the night, even when changing objects. Furthermore, I’ve also studied and experimented with the PHD Drift Align tool and am hopeful that by using this I may soon be able to both dispense with SynScan altogether and improve polar alignment, hitherto my imagining nemesis as I cannot see Polaris from my location – a very exciting prospect – what’s not to like?
Starting a sequence of experimentation I chose a familiar but hitherto difficult DSO object to image that should benefit from longer exposures. Having by now reached late-summer / early autumn, there were a few old favourites around such as the Veil and North America nebulae but for these trials I decided to go for the low hanging fruit of M27 or Apple Core nebula AKA Dumbbell nebula.

My previous image of M27 in August 2014!
With limited success I imaged this planetary nebula in my early days of astrophotography but with its 8.0’ x 5.6’ size and apparent magnitude of +7.5, I found it difficult to obtain good detail and colour. However, even without guiding the improved set-up and alignment produced better results at 3-minutes and with +5-minute guided exposures the images immediately showed very noticeable improvement.
The images were taken on four different nights starting on 23rd August and finished on 8th September, during which time the sky was clear and the weather warm with very low humidity, though by the end seeing conditions had started to deteriorate due to the impact of the emerging 1st quarter Moon. All images have been cropped to the same size of 700 x 500 pixels or 2% of the original FOV i.e. an object size of about 0.20%! Given this very small size M27 really is at the limit of the GT81 telescope.
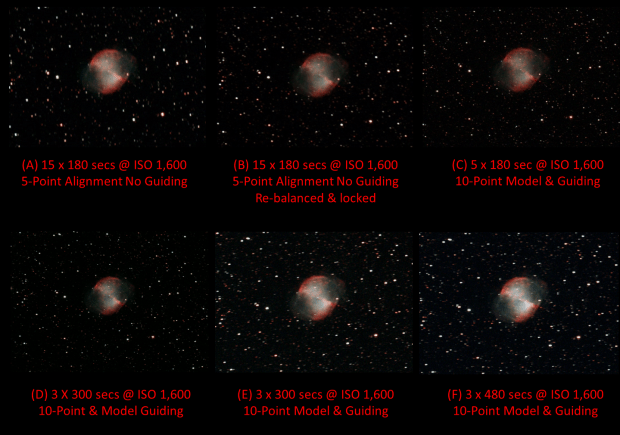
Strictly speaking the images are not fully comparable as the aggregate exposure times are not equal but nonetheless I think the results demonstrate the positive impact of guiding. The final two images are guided but do show greater star distortion, particularly at 8-minutes. I suspect this may be due to the period over which the mount was left outside and would probably have benefited from some alignment tweaking before imaging re-commenced – lesson learned; the severe cropping ratio has also magnified any problems that would probably be less obvious in a larger widefield image. There’s obviously room for improvement but I’m very happy with these early results which I can hopefully now build on.
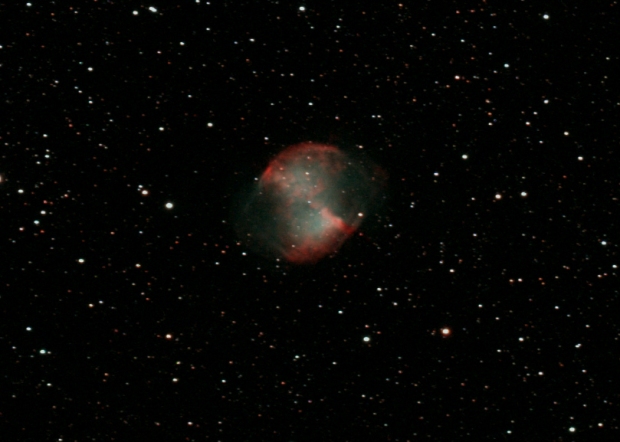
M27 Apple Core Nebula – my first and favourite guided image | William Optics GT81 + 50mm guide scope & 10-point EQMOD-ASCOM star alignment model | modded Canon 550D + field flattener & Starlight Express Lodestar X2 guide camera | 3 x 300 secs @ ISO 1,600 & full calibration, 3.3% cropped image| 30th August 2016
Unfortunately there is some downside to the longer exposures obtained from Fairvale Observatory: potentially more aircraft tracks and cloud plus more extended imaging time is unavoidable but overall it is, as expected, a major leap forwards for my astrophotography. There’s still much to learn and improve with the technique but for now I am delighted to say that after nearly two years I am at last successfully guiding – would you Adam & Eve it?

Pingback: Overspill | WATCH THIS SPACE(MAN)
Pingback: Reflections – 2016 | WATCH THIS SPACE(MAN)
Pingback: Spinning Plates | WATCH THIS SPACE(MAN)