Cygnus Hat-Trick

The Cygnus constellation is rich in potential astrophotography targets and since the return of astronomical darkness I’ve bagged three objects from this area with my new widefield Samyang 135 rig: Cygnus Loop, Sadr Region & Crescent Nebula, and the Western Veil & Pickering’s Triangle. As the Cygnus season now draws to a close – in my case disappearing northwards behind my house – I was ready to snap one final Cygnus object using my main William Optics GT81 rig but then looked closer and realised using the Samyang 135 rig with careful framing there was another a more ambitious possibility. 

The original object in question was SH2-119 AKA the Clamshell nebula, an emission nebula somewhat overlooked by photographers.  Nevertheless, imaged in narrowband there’s plenty of structure to see throughout the nebulosity that makes up the two ‘shells’, whilst the bright magnitude +5 star 68 Cygni might be likened to the pearl at the centre, which would work well with the 81mm William Optics field-of-view.  But deploying with care the much wider field-of-view of the Samyang 135 and it’s possible to include the North America and Pelican nebulae as well, just! 

With some difficulty (weather) I finally managed to obtain 13-hours integration time over 6-nights, which has resulted in a pleasing SHO image (see main image at the top of the page – below is a dynamic version processed using PI PixelMath), once again demonstrating the capacity of this small but powerful lens.  Personally, I find bringing all three objects together within a much larger field-of-view creates greater context, resulting in a more interesting image overall – in football parlance you might call it a hat-trick of nebulae! 


 IMAGING DETAILS
ObjectsNorth America Nebula (NGC7000) + Pelican Nebula (IC5070 & IC5067) + Clamshell Nebula (SH2-119)
ConstellationCygnus
Distanceapprox. 2,600 light-years
Size  3.0o
Apparent Magnitudeapprox. +4 to 8  
  
Scope  / LensSamyang 135 @f2.8  
MountSW AZ-EQ6 GT + EQASCOM computer control & Cartes du Ciel
GuidingSky-Watcher EvoGuide 50ED
 + Starlight Xpress Lodestar X2 camera & PHD2 guiding
CameraZWO1600MM-Cool mono  CMOS sensor
 FOV 7.5o x 5.67o Resolution 5.81”/pix  Max. Image Size 4,656 x 3,520 pix   
EFWZWOx8 EFW & 31mm ZWO LRGB & 7nm Narrowband filters 
Capture & ProcessingAstro Photography Tool + PHD2 + Deep Sky Stacker, PixInsight v1.8.8-12, Photoshop CC, Topaz Denoise
Image Location  &         OrientationCentre  RA 21:06:17.698      DEC +43:58:35.414                         Left = North   Top =West  (original rotated 90o)
ExposuresHa 61 x 300 sec, OIII 54 x 300 sec, SII 41 x 300 sec Total Integration Time: 13hr 00 min     
 @ 139 Gain   21  Offset @ -10oC    
CalibrationDarks 10 x 300 sec,  15 x Ha OIII SII flats & flat darks  
Location & DarknessFairvale Observatory – Redhill – Surrey – UK        Typically Bortle 5-6
Date & Time24th 28th 29th September 2nd 5th 6th October 2022  @ +20.30h  
WeatherApprox. <=12oC  RH  >=75%                  🌙 +80%

A New Perspective

It’s been nearly two years since acquiring my Samyang 135 lens but since then it’s unfortunately only had limited use in combination with my modded 550D DSLR.  Whilst impressed with the results from this set-up, my main objective has always been to combine it with my ASI1600 mono camera for some serious widefield astrophotography but as that was being used with my William Optics refractor it just didn’t happen, until now.  After upgrading to a ASI294MM Pro camera in May, at last I was finally able spend the early part of this summer working on a new Samyang 135 + ASI1600 rig and now that astronomical darkness is (just) back I recently managed to catch a few photons with this new set-up of the large SNR Cygnus Loop.

I originally purchased a x2-ring Astrokraken 3D-printed clamping system for the lens + DSLR combination from Philippe in France but since then he’s tweaked the design.  In particular x3 built-in M4 nuts have been incorporated on either side of each of the two main lens clamping rings, for the purpose of attaching ancillary equipment, which for me has been a game changer.  I therefore bought a new x3-ring Astrokraken bracket, with the said bolt holes, around which to build my new rig: 

  • The two main clamping rings that hold the lens have a shoe immediately above the lens, to which I’ve fitted a Sky-Watcher EvoGuide 50ED guidescope (not yet working), with the rear third ring holding the ASI1600 mono camera & EFW. 
  • I swapped the Canon lens bayonet adapter for a bespoke M42 screw adapter, in order to ensure a more secure attachment, thus reducing any potential lens-camera movement at this critical point of the image train.  
  • I’m continuing to use the excellent Astrokraken micro-focuser, which consists of a ring that clamps onto to the lens’ focus ring, with two small bolts above that make contact with either side of the guidescope shoe, so that when turned the focus ring can be adjusted either way to obtain focus, which is then locked when completed.  So far I’ve found the micro-focuser to work very well with this lens, assisted by the addition of an Astrokraken Bahtinov mask which is inserted into the front of the lens casing.  
  • Using this lens with the ZWO ASI1600MM-Cool camera and EFW, the backfocus guideline is 44mm, which I was able to achieve by adding an Altair T2 variable locking extension ring set to 17.5mm = 44mm minus 26.5 (camera + EFW).  
  • With my Chroma filters now being used with the new ASI294MM Pro camera, I purchased another ZWO 31mm x8 EFW and brought my ZWO 31mm filters out of retirement. 
  • Finally, using the new M4 nut holes I’ve added a Baader Skysurfer III RDF on the left-hand side of the Astrokraken bracket system to help with sky navigation and framing. 

After bolting the Astrokraken with the lens, camera and said components to a Losmandy plate it makes a very nice compact rig, that is easy to handle and store.  Notwithstanding, as they say – the proof of the pudding is in the eating: SEE top-of-the page for original image & below for 50% crop.  

Whilst the recent heatwave produced clear skies, it was far from ideal here for astronomy and was further hampered by a full moon.  However, with only just over two hours integration time and a few Dark calibration files, I’m still impressed with the outcome of this quite amazing lens.  It is very pleasing to capture the entire Cygnus Loop comfortably sitting within the lens’ FOV – for information on this FOV and comparisons go to this previous WTSM blog HERE.  For me context is important with astrophotography and in this regard the astronomical perspective this lens produces is outstanding, no wonder it is so popular.  I just love working with this FOV and can’t wait for better conditions for greater integration time and more widefield targets to point this wicked little lens at.

 IMAGING DETAILS
ObjectCygnus Loop
ConstellationCygnus
Distance2,400 light-years
Size  3.0o
Apparent Magnitude+7.0  
  
Scope  / LensSamyang 135 @f2.8  
MountSW AZ-EQ6 GT + EQASCOM computer control & Cartes du Ciel
Guiding – Not UsedSky-Watcher EvoGuide 50ED
 + Starlight Xpress Lodestar X2 camera & PHD2 guiding
CameraZWO1600MM-Cool mono  CMOS sensor
 FOV 7.5o x 5.67o Resolution 5.81”/pix  Max. Image Size 4,656 x 3,520 pix   
EFWZWOx8 EFW & 31mm ZWO LRGB & 7nm Narrowband filters 
Capture & ProcessingAstro Photography Tool + PHD2 + Deep Sky Stacker, PixInsight v1.8.8-12, Photoshop CC, Topaz Denoise
Image Location        & OrientationCentre  RA 20:52:28.01      DEC +31:14:56.186                         Right = North   Top = East 
Exposures27 x 180 sec Ha, 20 x 180 sec OIII Total Integration Time: 4hr 21 min     
 @ 139 Gain   21  Offset @ -10oC    
Calibration5 x 180 sec Darks  
Location & DarknessFairvale Observatory – Redhill – Surrey – UK        Typically Bortle 5-6
Date & Time9th & 10h August 2022  @ +22.00h  
WeatherApprox. 27oC   RH <=50%                  🌙 96% Full Moon

The Cone, Fox Fur & Christmas Tree

Projecting a line from Bellatrix to Betelgeuse a similar distance beyond to the east (left) by eye, to the northern extremity on Monoceros is one of late winter’s treats.  Located about 2,500 light years from Earth is the star forming region NGC 2264, consisting of the Christmas Tree Cluster (an open cluster), the nearby so-called Cone Nebula and in between the Fox Fur nebula.  I first imaged these objects in 2014 and again in 2018 but now armed with better skills and equipment, a return to this rich area of the night sky which is full of HII, reflection and dark nebula was long overdue + I had a plan to obtain greater detail and colour than was hitherto achieved.

Location of NGC 2264 Christmas Tree Cluster et al based on Wikisky image

Key to the plan was greater integration time and with 13h 25minutes obtained over three nights at the end of February, this established a solid data foundation.  As ever with all broadband images, there’s an endless choice of permutations combining wavelengths to form a final image and inspired by the work of others, I used the popular SHO Hubble Palette but adapted here by using synthetic SII and OIII channels in PixInsight’s Pixel Math to enhance the related colours: SII = (Ha*0.30+SII*0.70) & OIII (Ha*0.40+SII*0.60+OIII).  The resulting final image has exceeded my expectations, as the colours and details here now successfully highlight the aforesaid central objects as well as the wider complexity and beauty of flowing dust and gases that abounds in this region, which also includes NGC 2261 Hubble’s variable nebula, NGC 2259 open cluster and the emission nebula LBN 902.

NGC 2264 starless version shows detail more clearly
Conventional HOO image version of NGC 2264 widefield

 IMAGING DETAILS
ObjectsNGC 2264 – Christmas Tree Cluster, Cone Nebula, Fox Fur Nebula + NGC 2261 Hubble’s variable nebula, LBN 902 emission nebula & NGC 2259  open star cluster
ConstellationMonoceros
Distance2,500 light-years
Size  ~2.5o total
Apparent MagnitudeVaries    
  
Scope William Optics GT81 + Focal Reducer FL 382mm  f4.72
MountSW AZ-EQ6 GT + EQASCOM computer control & Cartes du Ciel
GuidingWilliam Optics 50mm guide scope
 + Starlight Xpress Lodestar X2 camera & PHD2 guiding
CameraZWO1600MM-Cool mono  CMOS sensor
 FOV 2.65o x 2.0o Resolution 2.05”/pix  Max. image size 4,656 x 3,520 pix   
EFWZWO x8 EFW & 31mm Chroma Ha, SII & OIII filters 
Capture & ProcessingAstro Photography Tool + PHD2 + Deep Sky Stacker, PixInsight v1.8.8-12, Photoshop CC
Image Location              & OrientationCentre  RA 06:40:55.725      DEC +09:53:45.407                         Top is 280o E of N  i.e. Right = approx. North     
Exposuresx39 Ha , x83 OIII,  x39 SII @ 300 sec Total Integration Time: 13hr 25 min     
 @ 139 Gain   21  Offset @ -20oC    
Calibration5 x 300 sec Darks + 15 x Ha, OIII, SII Flats & Dark Flats    @ ADU 25,000
Location & DarknessFairvale Observatory – Redhill – Surrey – UK        Typically Bortle 5-6
Date & Time26th, 27th February & 7th March 2022  @ +19.00h  
WeatherApprox. <4oC   RH >=70%                  🌙 approx.. New Moon

2021 The Year In Pictures

Every year since 2014 I’ve published a retrospective blog of my astrophotgraphy year just ending called Reflections. It’s been a useful task that enables me to bring together the best and sometimes the worst of my images, in order to consider the good and bad points + progress made + set some objectives for the coming year. Eight years on, after which I believe I’ve now reached at least a respectable level of imaging and processing, I’ve decided to stop this format for the time being.

Notwithstanding, at this time of the year I also produce an astrophotography calendar for members of my family, which consists of the better images from the year just ending; I think they like them and certainly all use the calendar during the coming year. Moreover, I also recently started to compile a video of the said calendar images set to appropriate music, which we all watch together prior to seeing the actual calendar. It’s a great way to present the images, which look really stunning on today’s large Smart TV’s and is fun to watch with the family too.

The video for this last year 2021 can be viewed on YouTube HERE and below is a brief very general overview of each image. More detailed background information and imaging details for those interested can be found in relevant blogs posted on this site during the past year.

2022 CALENDAR

A new set of filters, improved processing techniques and access to data from a telescope at a dark sky site in New Mexico, USA (shown by an asterisk *) contributed to an exciting astrophotography year in 2021.                  

FRONT COVERThe Carnival of Animals: Special processing of the inner region of the Rosette Nebula highlights the ‘animals’ or Bok Globules – clouds of dust undergoing gravitational collapse as part of the process of new star formation.  
JANUARYLDN-1250 Dark Nebula*: Dark or absorption nebulae are a type of interstellar cloud which are so dense they obscure or absorb visible light emitted from objects behind or within and thereby contrast with the general light flux of the Universe as dark areas.  
FEBRUARYCTB-1 Supernova Remnant*: The overall structure of this supernova remnant is that of a circular shell, with a conspicuous rupture towards the north (lower right of image).  The main red Ha-shell is composed of multiple interlocking filament limbs, with a blue / green OIII arc along one side.  
MARCHJellyfish Nebula: Locatedin the Gemini constellation some 5,000 light years from Earth, this is a remnant of a supernova that took place during the past 30,000 years. With a diameter of 70 light-years, the object is visually speaking nearly twice the size of a full moon.     
APRILMarkarian’s Chain: The Virgo cluster consists of more than 2,000 galaxies, within which Markarian’s Chain forms a J-curve string of bright galaxies that share a common motion through space.    
MAYM13 Great Globular Cluster of Hercules*: Consisting of several hundred thousand stars and 145 light-years in diameter, M13 is considered to be the finest cluster in the Northern Hemisphere.  
JUNECave Nebula*: Located along the plane of the Milky Way is the diffuse emission nebula referred to as the Cave Nebula.  The Cave at the centre is critically located at the boundary of the Cepheus molecular cloud and the hot, young stars which ionize the surrounding gases to great effect.  
JULYOrion Widefield: Framed around the area of Orion’s Belt, the Horsehead Nebula and the Great Orion Nebula, look hard and the refection nebula M78 can also be seen in the lower left corner.    
AUGUSTElephant’s Trunk Nebula*: A very large emission nebula, the so-called Elephant’s Trunk Nebula is rightly viewed as one of astrophotography’s most iconic images. The ‘trunk’ itself dominates the centre of this image and is illuminated from behind by a bright star forming region.  
SEPTEMBERM31 Andromeda Galaxy: The full benefit of new filters, improved guiding, clear skies over 6-nights and extensive use of new processing techniques can be seen in my best image yet of Andromeda.      
OCTOBERButterfly Nebula: Situatedwithin the Orion Arm of the Milky Way is the Gamma Cygni nebula, a diffuse emission nebula surrounding the star Sadr.  Either side of the dark rift which divides the image from top to bottom are two large bright areas that together form the so-called Butterfly.  
NOVEMBERM33 Triangulum Galaxy: Like it’s neighbour Andromeda, better data and processing has produced an exciting new image of M33 this year, the red areas highlight Ha-rich star-forming regions  
DECEMBERFlying Bat & Giant Squid Nebula*: This very faint OIII emission nebula Ou4 required an imaging time of 40-hours.  For obvious reasons Ou4 has become known as the Giant Squid Nebula which, moreover, lies within the much larger SH2-129 HII emission region or the Flying Bat Nebula.     

HAPPY NEW YEAR + CLEAR SKIES IN 2022

Dark Art

Somewhat tongue-in cheek, astrophotography is often referred to as something of a dark art and to be fair it sometimes seems that way, particularly when it comes to processing.  My main interests in astrophotography are Deep Sky Objects such as emission nebulae, galaxies and planetary nebula but have long aspired to capture a more elusive category that abounds throughout the Universe – dark nebula.

Popular with astrophotographers, emission nebulae consist of vast clouds of ionised gases and regions of interstellar dust which reflect light from the said gases and or from stars and stellar nurseries that lie within – depending on their make-up the results are colourful in both broadband and narrowband wavelengths.  Dark or absorption nebulae are also a type of interstellar cloud but are so dense they completely obscure and / or soak-up visible light emitted from objects behind or within, which as a result contrasts with general light flux of the Universe forming large dark regions.  Because of their darkness they are usually faint, hard to see and moreover, difficult to image, especially from locations with light pollution.

The Horsehead Nebula is a dark nebula that has formed a part of my previous images but I’ve only imaged an isolated dark nebula once before – Barnard 142-3, which for obvious reasons is also known as the E-nebula (see above & here).  Larger more complex dark nebulae require much darker skies to image than prevail at Fairvale Observatory, such as in New Mexico, USA where the Deep Sky West observatory is located and on this occasion has produced my first ‘serious’ image of a stand-alone dark nebula.

Cepheus & the aproximate location of LDN 1250 image indicated by the red square

Lynds Dark Nebula (LDN) catalogue of dark nebulae was compiled by the eponymous Beverly T. Lynds in 1962 and is based on the study of red and blue photographic prints from the National Geographic-Palomar Observatory Sky Atlas. Situated in the north close to Polaris, the constellation of Cepheus has a number of dark nebulae, of which LDN 1250 is part of a huge complex of dark nebula surrounded by dust and scattered light from the stars of Cepheus.

LDN 1250 luminance – RGB wavelengths are also strong

Imaged here in LRGB the features come out well in all wavelengths, however, such are the subtleties of the dark nebula components I found processing difficult and required plenty of ‘dark art’ techniques.  The final image at the top of the page shows to good effect the main dark nebula, togeher with widespread but less opaque nebulosity and star colours, as well as some distant galaxies lurking in the background that together has produced a satisfying and very interesting outcome.

 IMAGING DETAILS
ObjectLDN 1250 & 1251
ConstellationCepheus
Distance1,000 light years
SizeMain nebula approximately 1o  ~ 17 light-years
Apparent Magnitude–  
  
Scope Takahashi FSQ 106  FL 530mm  f/5  +  Moonlight Nightcrawler focuser  
MountParamount MyT
GuidingYes
CameraQSI 683-WSG8    KAF-8300 full frame CCD sensor   5.4nm pixels  
 FOV 1.94o x 1.46o   Resolution 2.1”/pix.   Image array 3326 x 2,507 pix   
ProcessingDeep Sky Stacker,  PixInsight v1.8.8-7,  Photoshop CS3, Topaz Denoise
Image Location &             OrientationCentre  –  RA 22:28:54.702      DEC +75:09:45.158                    
North = Up
 
Exposures23L  + 18R +  16G + 17B x 900 secs  @ -15C
Total Integration Time: 18hr 30min     
Calibration41 x 900 secs Darks   x 50 Bias  &  x16 LRGB Flats   
Location & DarknessDeep Sky West – amateur hosting facility near Rowe, New Mexico  – USA    SQM Typically >= 21.7
Date & TimeQ4  2020    


Cosmic Eruption

Originally thought to be a planetary nebula, Abell included this object in his catalogue as Abell-85 but later in 1971 it was revised as a supernova remnant (SNR) and renamed CTB-1, thus also denoting it as a radio source.  The overall structure is a circular shell with a conspicuous rupture towards the north (bottom right of image).  The main red Ha-shell is composed of multiple interlocking filament limbs, with a blue / green OIII arc along one side (see main image above).

I experimented extensively processing the data because of its overall complexity and is an interesting object, which is therfore also presented below as greyscale Ha-wavelength only and starless versions.  The main Ha and OIII data is shot at long 1,800 second exposures, which together with RGB adds up to a whopping 29 hours of integration time. However, CTB-1 is an extremely faint object, which probably still requires considerably more time – I’ve seen somebody else’s 61-hour integration which they described as “not enough” and despite the quality of their image I’d probably have to agree.  

CTB-1 is a very exciting object, which might have been what Douglas Adams had in mind when creating Milliways or The Restaurant At The End Of The Universe in the Hitchhiker’s Guide, from which such spectacular events could be ordered to view with your meal! 

 IMAGING DETAILS
ObjectCTB-1  (Abell-85)
ConstellationCassiopeia
Distance10,000  light-years
Size 35 arcminutes ~  100 light-years
Apparent Magnitude–  
  
Scope Takahashi FSQ 106  FL 530mm  f/5  +  Moonlight Nightcrawler focuser  
MountParamount MyT
GuidingYes
CameraQSI 683-WSG8    KAF-8300 full frame CCD sensor   5.4nm pixels  
 FOV 1.94o x 1.46o   Resolution 2.1”/pix.   Image array 3326 x 2,507 pix   
ProcessingDeep Sky Stacker,  PixInsight v1.8.8-8,  Photoshop CS3
Image Location &             OrientationCentre  –  RA 23:59:19.402      DEC +62:25:39.406   
North = bottom right                    
Exposures29 Ha &  20 OIII x 1,800 secs  @ -15C 18 R  17 G  19 B x 300 secs Total Integration Time: 29hr     
Calibration48 x 1,800 secs Darks* x47 Bias  &  x16 HaOIII +LRGB Flats *RGB scaled to 300sec  
Location & DarknessDeep Sky West – amateur hosting facility near Rowe, New Mexico  – USA    SQM Typically >= 21.7
Date & TimeQ3  2020    

It’s All Relative

escher

I spent the first half of this year reading Walter Isaacson’s biography of Albert Einstein, which apart from providing a fascinating insight into the man and his work, whetted my appetite to understand better the science.  Following previous success studying astronomy courses online, I set out to find a suitable programme to achieve this goal.  As a result I enrolled for Understanding Einstein: the Special Theory of Relativity run by Professor Larry Lagerstrom of Stanford University, USA, which after two months I have just completed.spacetime

The course is a good mix of qualitative and quantitative information, which at times has been quite challenging but nonetheless proved very worthwhile. The lecturer is very clear and thorough, an essential quality when dealing with this difficult and often bewildering subject.  Einstein’s paper On the Electrodynamics of Moving Bodies outlines the Special Theory and was just one of four published at about the same time in 1905 (“The Miracle Year”) which included: Brownian motion, Mass-energy equivalence (E=Mc2) and The Photoelectric Effect, the latter of which won him the Noble Prize.  At the end I now feel I understand the basics of Einstein’s ground breaking science properly, which apart from being interesting provides valuable insight and understanding of the Universe and related issues of space and time.

300px-world_line-svg

During this period I have also been thinking about how to improve my astrophotography and the way forwards.  I’ll be on the learning curve for years to come and accept that there’s much I can still improve on using current equipment and processes but after more than 2-years astroimaging, mostly with a DSLR camera, I feel I have reached something of a crossroads and need to change tack in order to achieve more meaningful advances once again.  Inevitably this is likely to mean new equipment and most likely a move to LRGB / Narrowband format.  In the interim, whilst I consider the options, I have also been researching suitable capture / sequencing software, post-processing techniques and programmes.  I am concerned that this will result in another level of complexity but I think it has to be done in order to progress – watch this space.

Continuing a trend that’s been apparent for the past year, clear nights have been something of a rarity since mid-September; this is a concern if I am to pursue astrophotography to the next level.  However, high pressure was unusually dominant over Fairvale Observatory during the last days of November and cold, clear skies have provided good conditions for astronomy at last.

img_20161130_234303293

Getting better – PHD2 screen 30th November 2016: DEC is good but room for improvement with the RA settings. The impact on tracking and image quality is noticeable.

Whilst I have certainly not fully mastered guiding I am now routinely using PHD2.  This in itself has probably been the major breakthrough this year, which with the aforementioned clear skies I wanted to take full advantage of.  Hidden within PHD2 I have also discovered and am now starting to experiment with the on-screen drift align routine, with reasonable results; using the gamepad for mount control and a new wireless link with my tablet computer, I can also make focus and alignment adjustments at the mount without returning to the computer each time.

As a result I have dispersed with the SynScan handset for alignment and can now completely set-up and control imaging with the computer and tablet; this is nothing short of a revolution which I am hopeful will greatly increase set-up time as well as improving control and tracking accuracy – yipee!  Even with average guiding results I am now achieving good exposures of 5-minutes or more and therefore decided to put this success to work and re-image some winter wonders over three, yes three, consecutive nights at the end of November.

nov-objects

Imaging targets between 28th & 30th of November 2016 – for descriptions & previous images taken of these objects click on the following list of names: (1) M45 Pleiades (2) Barnard 33 The Horsehead Nebula & NGC 2024 Flame Nebula (3) M42 Orion Nebula (4) NGC 2244 Rosette Nebula (5) NGC 1499 California Nebula (6) IC 405 Flaming Star Nebula

The night sky at this time of the year contains many of my favourite objects, but surprisingly I had not imaged some of the chosen targets for more than a year or two and it was both enjoyable and pleasing to reacquaint myself again.  With a new perspective gained from this exercise, the progress I have made with equipment and techniques is more apparent.  Notwithstanding, it’s time to move on – everything’s relative.

Picture saved with settings embedded.

M45 Pleiades, Taurus constellation: 12 x 300 sec @ ISO 800 | 28th November 2016

Picture saved with settings embedded.

NGC 2014 Flame Nebula & Barnard 33 Horsehead Nebula, Orion constellation: 15 x 300 sec @ ISO 800 | 28th November 2016

Picture saved with settings embedded.

M42 Orion Nebula & M43 De Mairan’s Nebula, Orion constellation: 2 x 300 sec @ ISO 800 | 28th November 2016

Picture saved with settings embedded.

NGC 2244 Rosette Nebula, Perseus arm of Milky Way, Monoceros region: 21 x 300 sec @ ISO 800 | 29th November 2016

Picture saved with settings embedded.

California Nebula, Perseus constellation: 12 x 300 sec @ ISO 800 | 30th November 2016

Picture saved with settings embedded.

IC 405 & 410 nebulae: 15 x 300 @ ISO 800 | 30th November 2016

Notes: all images taken using a William Optics GT81 refractor telescope + PHD2 guiding + modded Canon 550D DSLR & x0.80 field flattner @ ISO 800 with full darks + bias + flats calibration and processed in Deep Sky Stacker & Photoshop CS2  

Forbidden Fruit

sonof

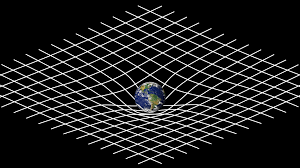
Soon after embarking on my astrophotography adventure just over two years ago it became apparent that after getting the basics right – polar & star alignment, focus, image capture etc. – the Holy Grail of imaging is increased exposures times, thereby collecting more of those elusive photons that have travelled across the Universe.  The first step to achieving this goal is tracking, which since purchasing my AZ-EQ6 mount in 2015 I have been successfully improving over time, on a good day achieving 180-second exposures and from time-to-time resulting in some decent images.  However, the light from DSOs is often very feint and can require much longer times, which is easier said than done.

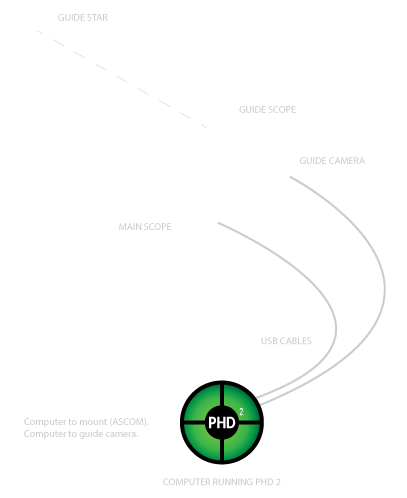
At the same time as acquiring the aforesaid mount and a William Optics GT81 telescope I also purchased a William Optics 50mm guide scope, with which I intended to start guiding and thus push exposures above my 3-minute barrier.  Despite these aspirations, through a combination of events and my unease about the apparent difficulty of guiding, the guide scope has remained unused – until now.  Having recently purchased a dedicated Starlight Express Lodestar X2 guide camera, I have finally been emboldened enough to give it a try.

sx2

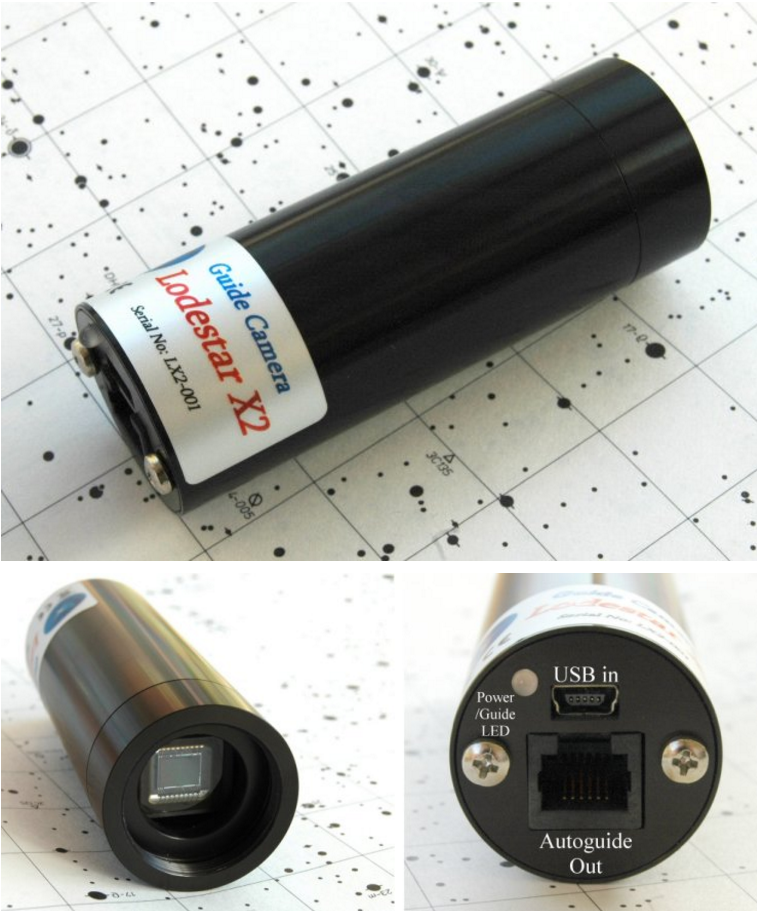
Starlight Express Lodestar x2 Guide Camera can be used either via the mount’s ST4 port or via ASCOM and the computer for pulse guiding.

I initially struggled to set up the guide scope and get the guide camera working together.  In particular obtaining focus proved very difficult; like the GT81 the guide scope focus turns out to be achieved within a very short distance that is measured in fractions of millimetres, which in this case required the insertion of an extension tube.

img_20160902_173811432

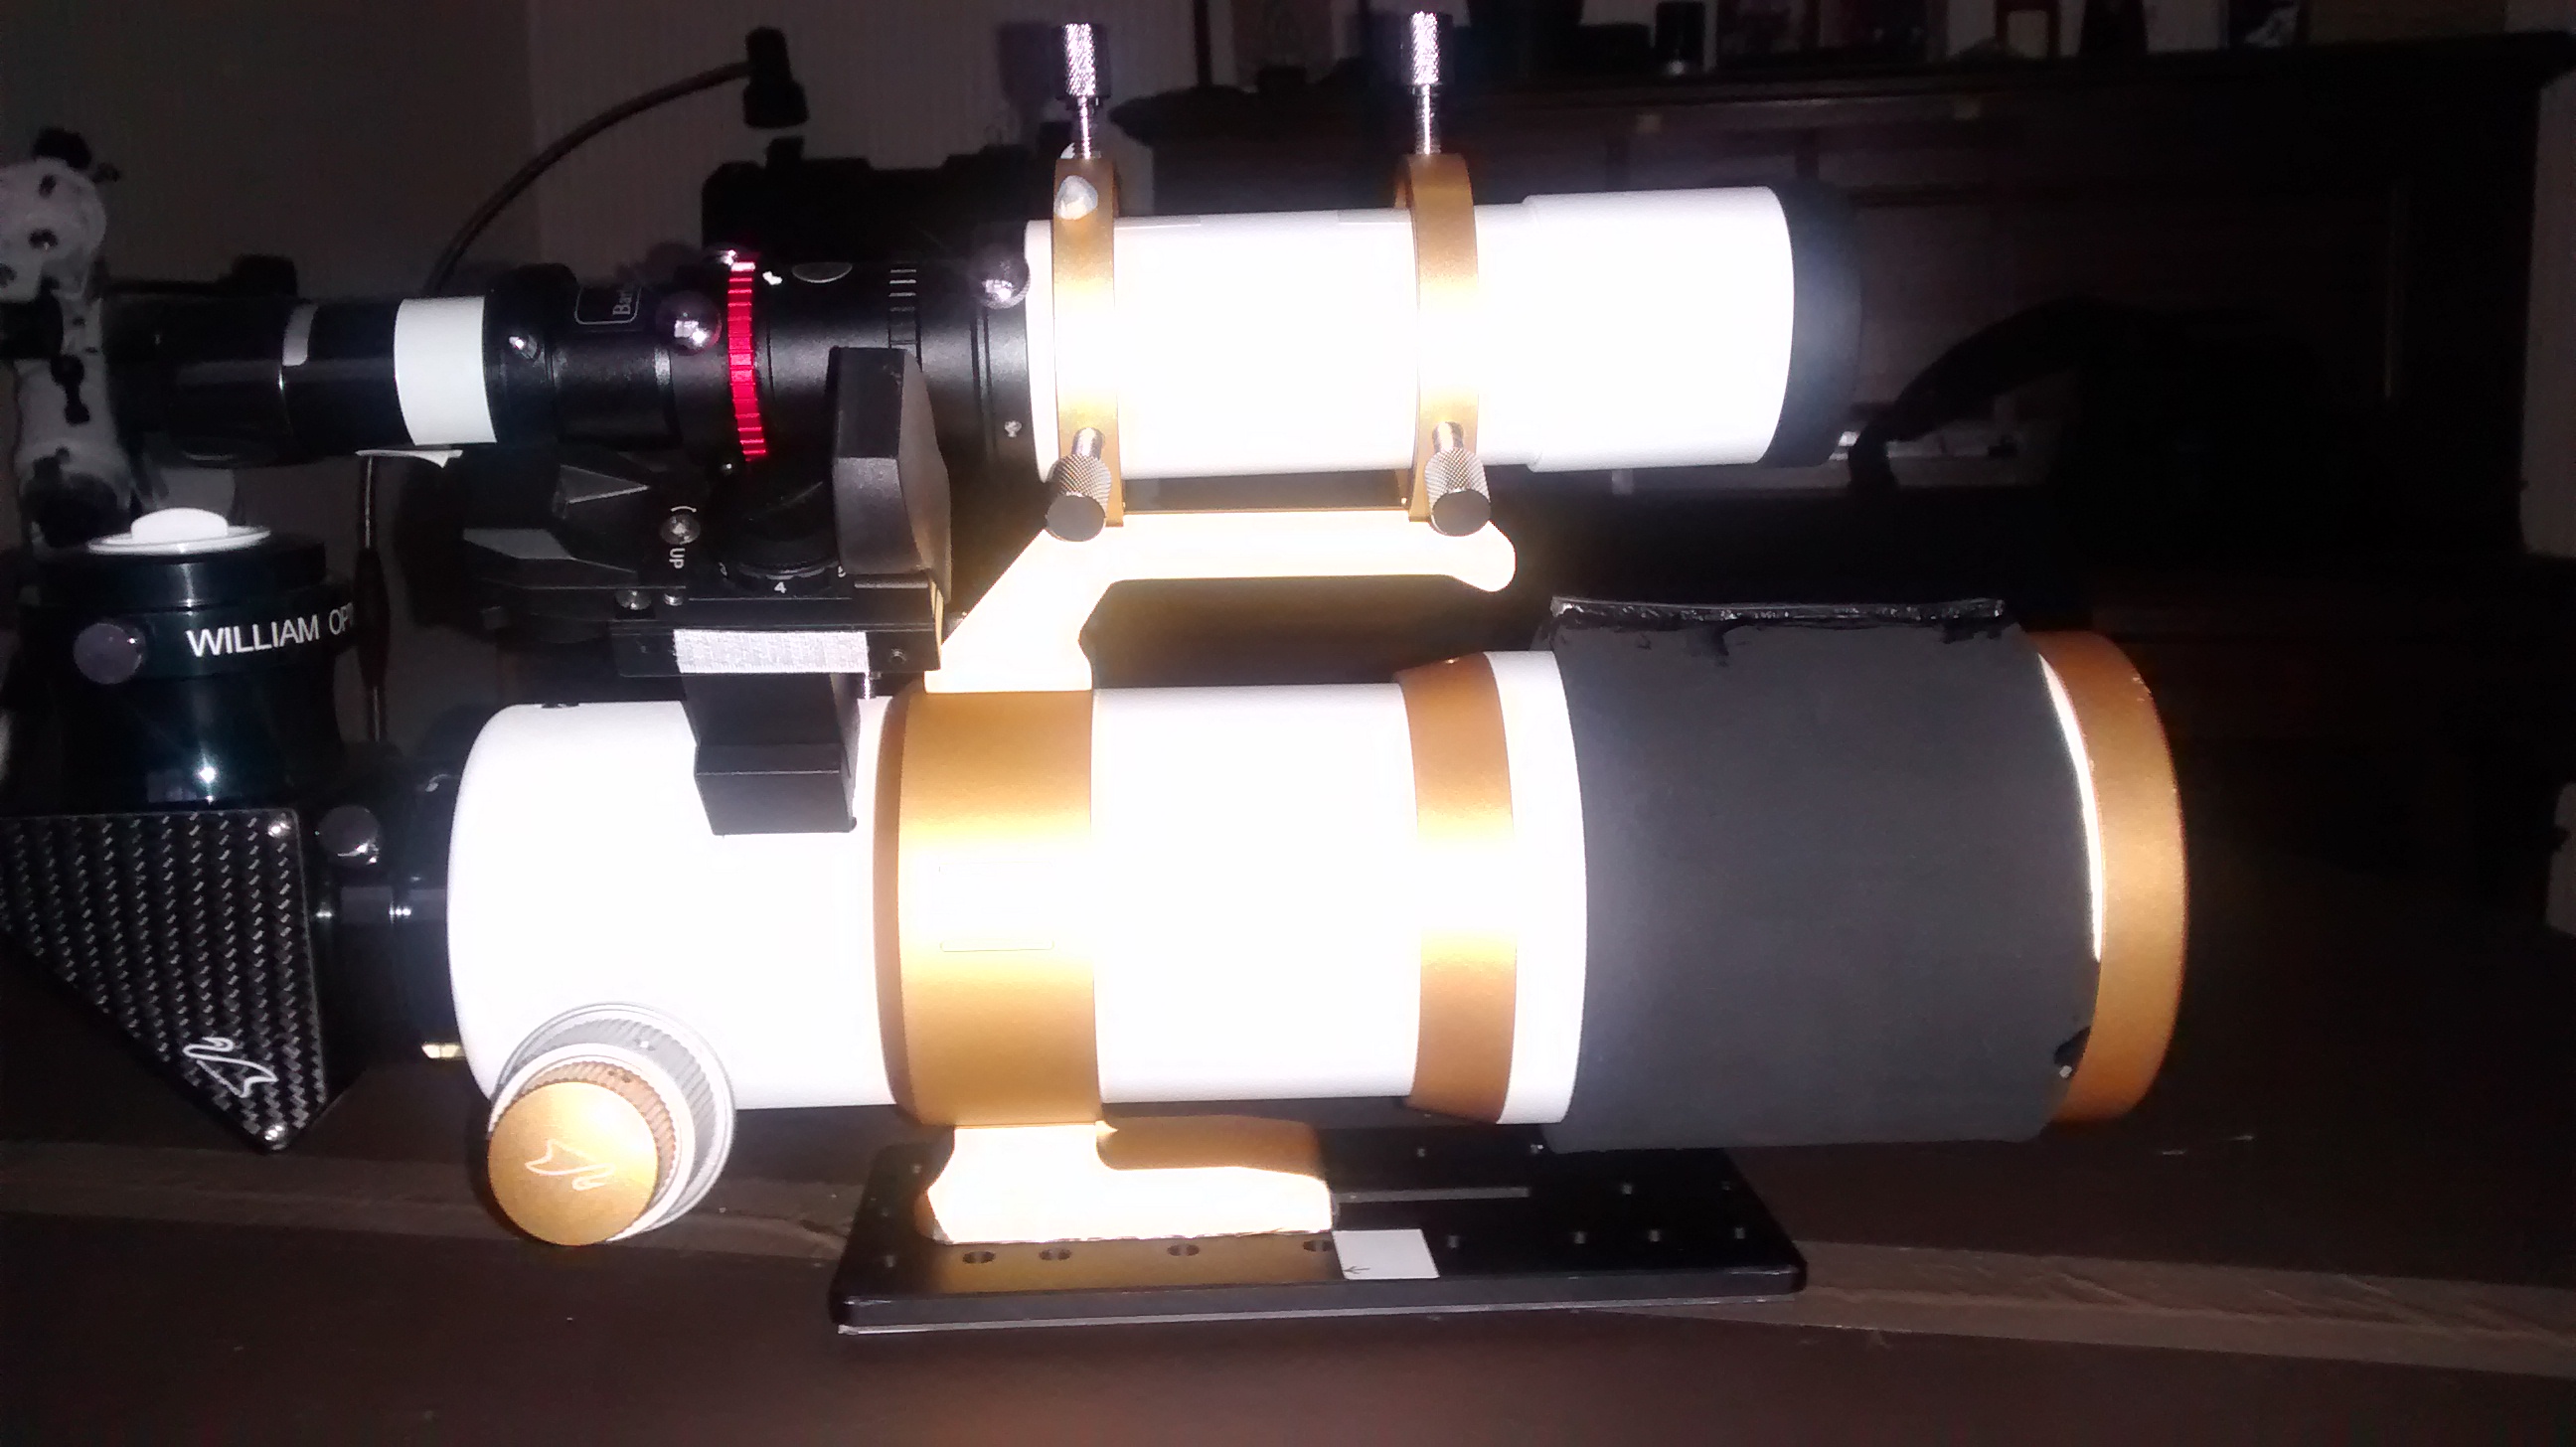
Reminiscent of the Space Shuttle on its Boeing 747 transport plane! The William Optics 50mm guide scope + Lodestar X2 guide camera neatly mounted atop the GT81 imaging scope using the integral rings.

Thereafter the big challenge, which I had previously avoided, was to start using the very popular PDH guiding software; Push Here Dummy (PHD) is named tongue-in-cheek by its original creator Craig Stark and is an amazing but somewhat intimidating piece of software.

option1


The principle is simple – find a star within the FOV and use it as a fixed reference point from which to assess and then correct small tracking errors in order to achieve better tracking, which thereby maintains pinpoint accuracy and enables longer exposure times, thus avoiding trailing of the sky and the objects being imaged.  Its use is regarded as something of a dark art but I have finally grasped the nettle with some success.  After months of clouded skies followed by an almost fatal equipment failure (see here for more), a period of exceptionally good weather and clear skies since late August provided the ideal opportunity to get to grips with this challenge that has so far eluded me.

At first I used a couple of sessions to overcome some past problems and ensure that everything was stable and worked well for basic tracking and imaging, in particular:

  • Repair and improve the imaging camera’s AC/DC adapter lead;
  • Where possible improve all other leads and connections – once bitten …..!  In this respect I have significantly re-arranged and tidied up the many power, control and camera leads, which has included the addition of right-angle USB / mini-USB camera connectors that now makes plugging-in easier and produces less strain on the connections i.e. more secure.  Simple, cheap and something I should have undertaken long ago;
  • Revisit EQMOD-ASCOM in order to achieve more robust tracking – especially reviewing the star alignment procedures;
  • Fit the guide scope using the rings incorporated onto the GT81 OTA, subsequently re-balancing the equipment and improve the mount’s feet positioning.

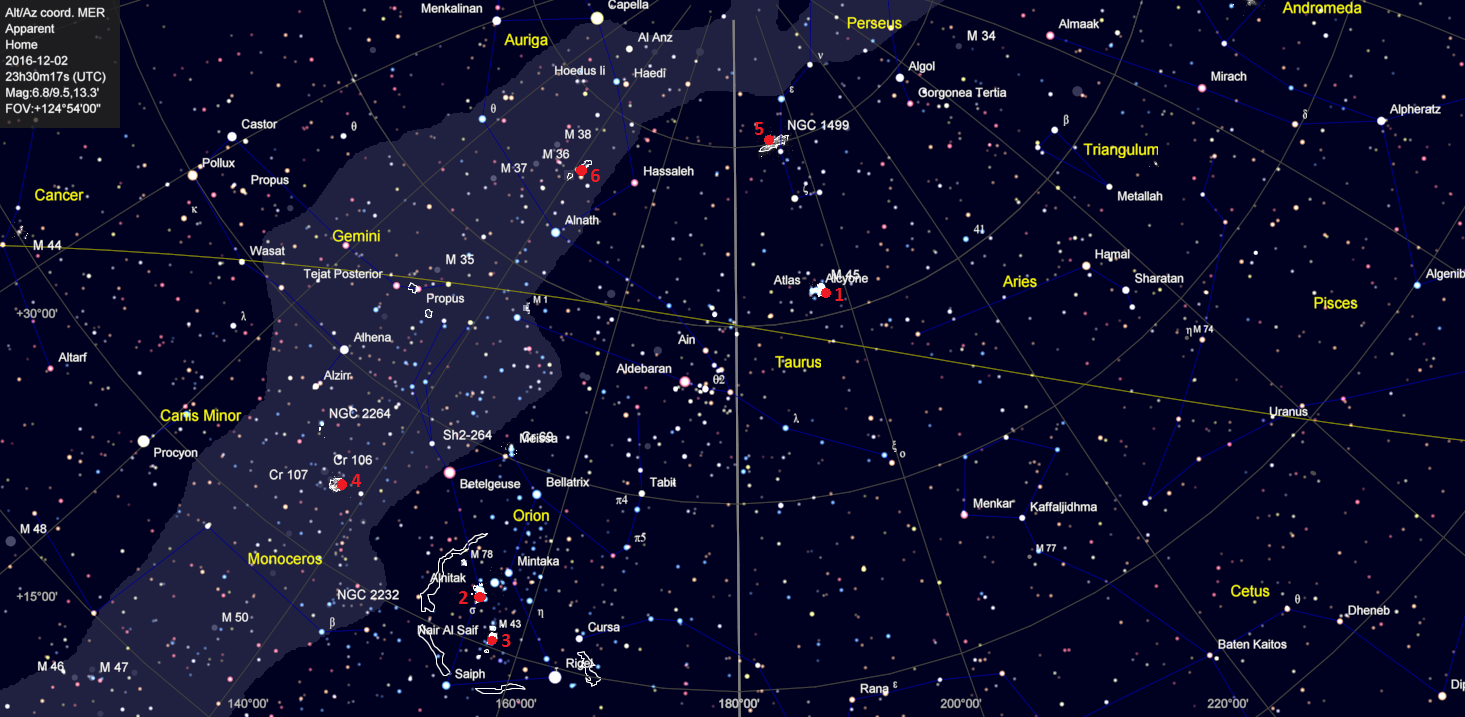
At this point I spent a couple of nights just playing with the equipment and in particular EQMOD-ASCOM, so as to obtain the best possible alignment; having suffered an enforced absence from imaging I just wanted to have some fun again too.  At the end of this process, first using SynScan for polar alignment before switching to EQMOD-ASCOM + Cartes du Ciel for star alignment, I successfully produced a good 10-star alignment model which was then saved for future use.  The resulting images already showed some improvement but I still had to tackle PHD.  With unusually good weather I decided to leave the final set-up outside under cover, thus preserving the settings for a shot at the aforementioned task of guiding next time.  In the interim I then needed to read the operating instructions and watch numerous videos on the use of PHD.

img_20160911_213525309

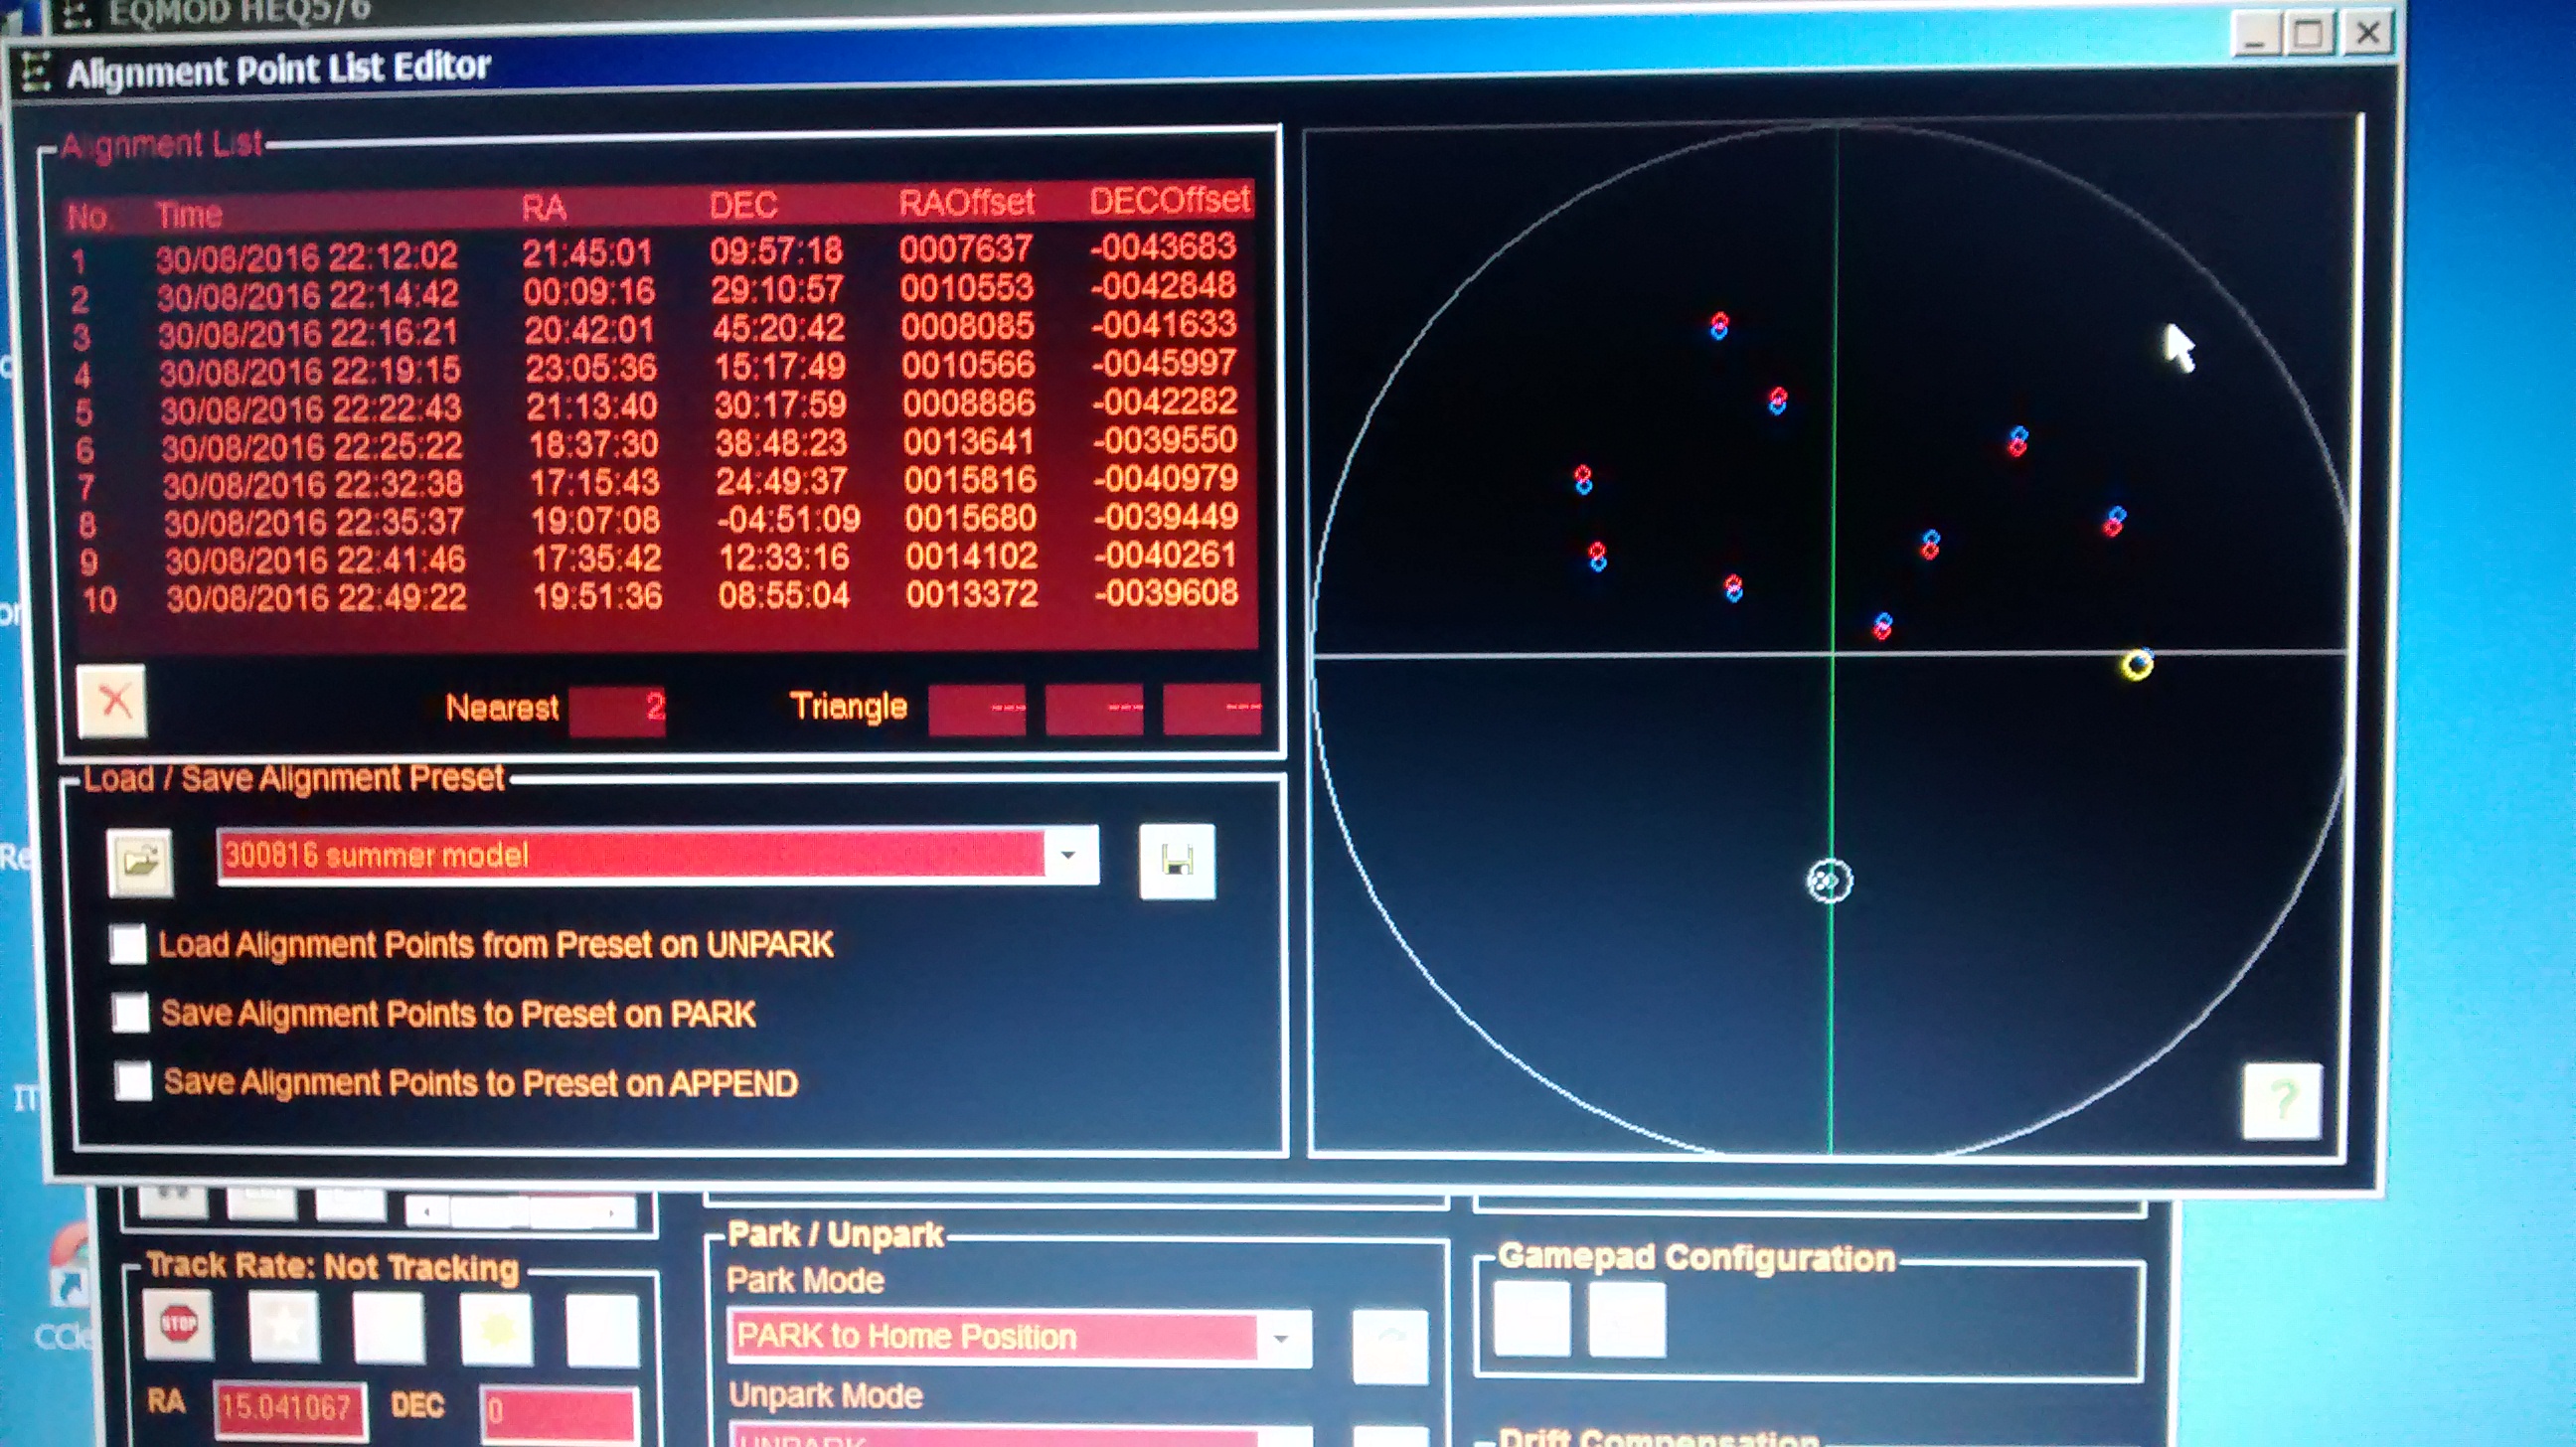
EQMOD-ASCOM 10-point alignment model. With an obstructed view of the northern sky by my house, all points are inevitably located in the southern quadrants.

Like so much of amateur astronomy, I will forever be grateful for the time and effort given by others to help those like me pursue our hobby.  The material, videos and responses to my forum queries on guiding have as usual been nothing short of outstanding and very, very helpful.  It’s still been difficult to get going but without the help and support of others it would be a complete non-starter.  In this respect I’d like to pay credit to SGL and the Open PHD Guiding forums.

Armed with this knowledge I have since undertaken a few sessions using PHD2 with reasonable success, achieving exposure times of 5-minutes and more.  Changing conditions and different objects make it necessary to continually finesse guide settings throughout the night and between nights and it’s already obvious that there’s much more to learn.  Such adjustments are not always linear or empirical in nature and will often only come from gut feel (experience).

I have chosen to use ASCOM pulse guiding, though my equipment also has ST4-ports which I had initially intended to use due to its apparent simplicity.  I am unable to argue the pros and cons of each method but there seems to be an overwhelming preference for pulse.  What I do understand (I think) are the greater subtleties that can be obtained with the pulse guiding technique and in particular, the co-ordination it provides with ASCOM, thereby ensuring PHD and the mount communicate with each other to provide essential directional information as well as guiding.  I am still investigating the impact of various BRAIN settings but through trial-and-error have progressed since my first guiding session.

img_20160831_000920crop2-large

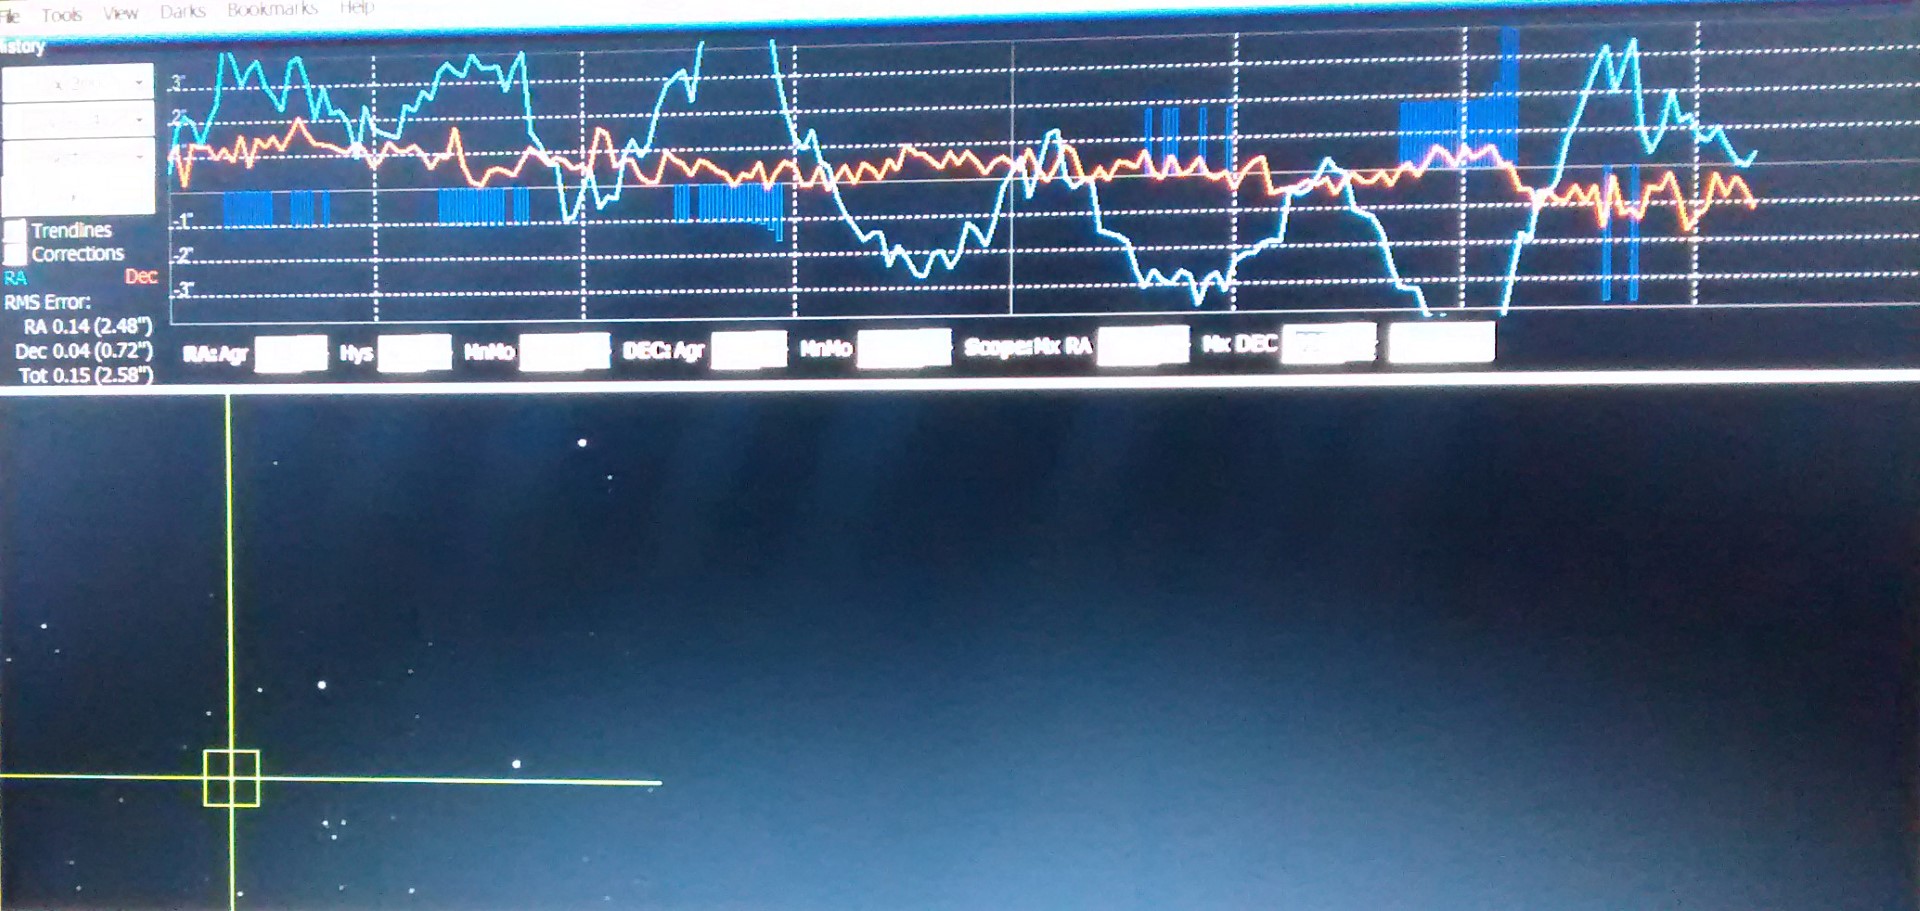
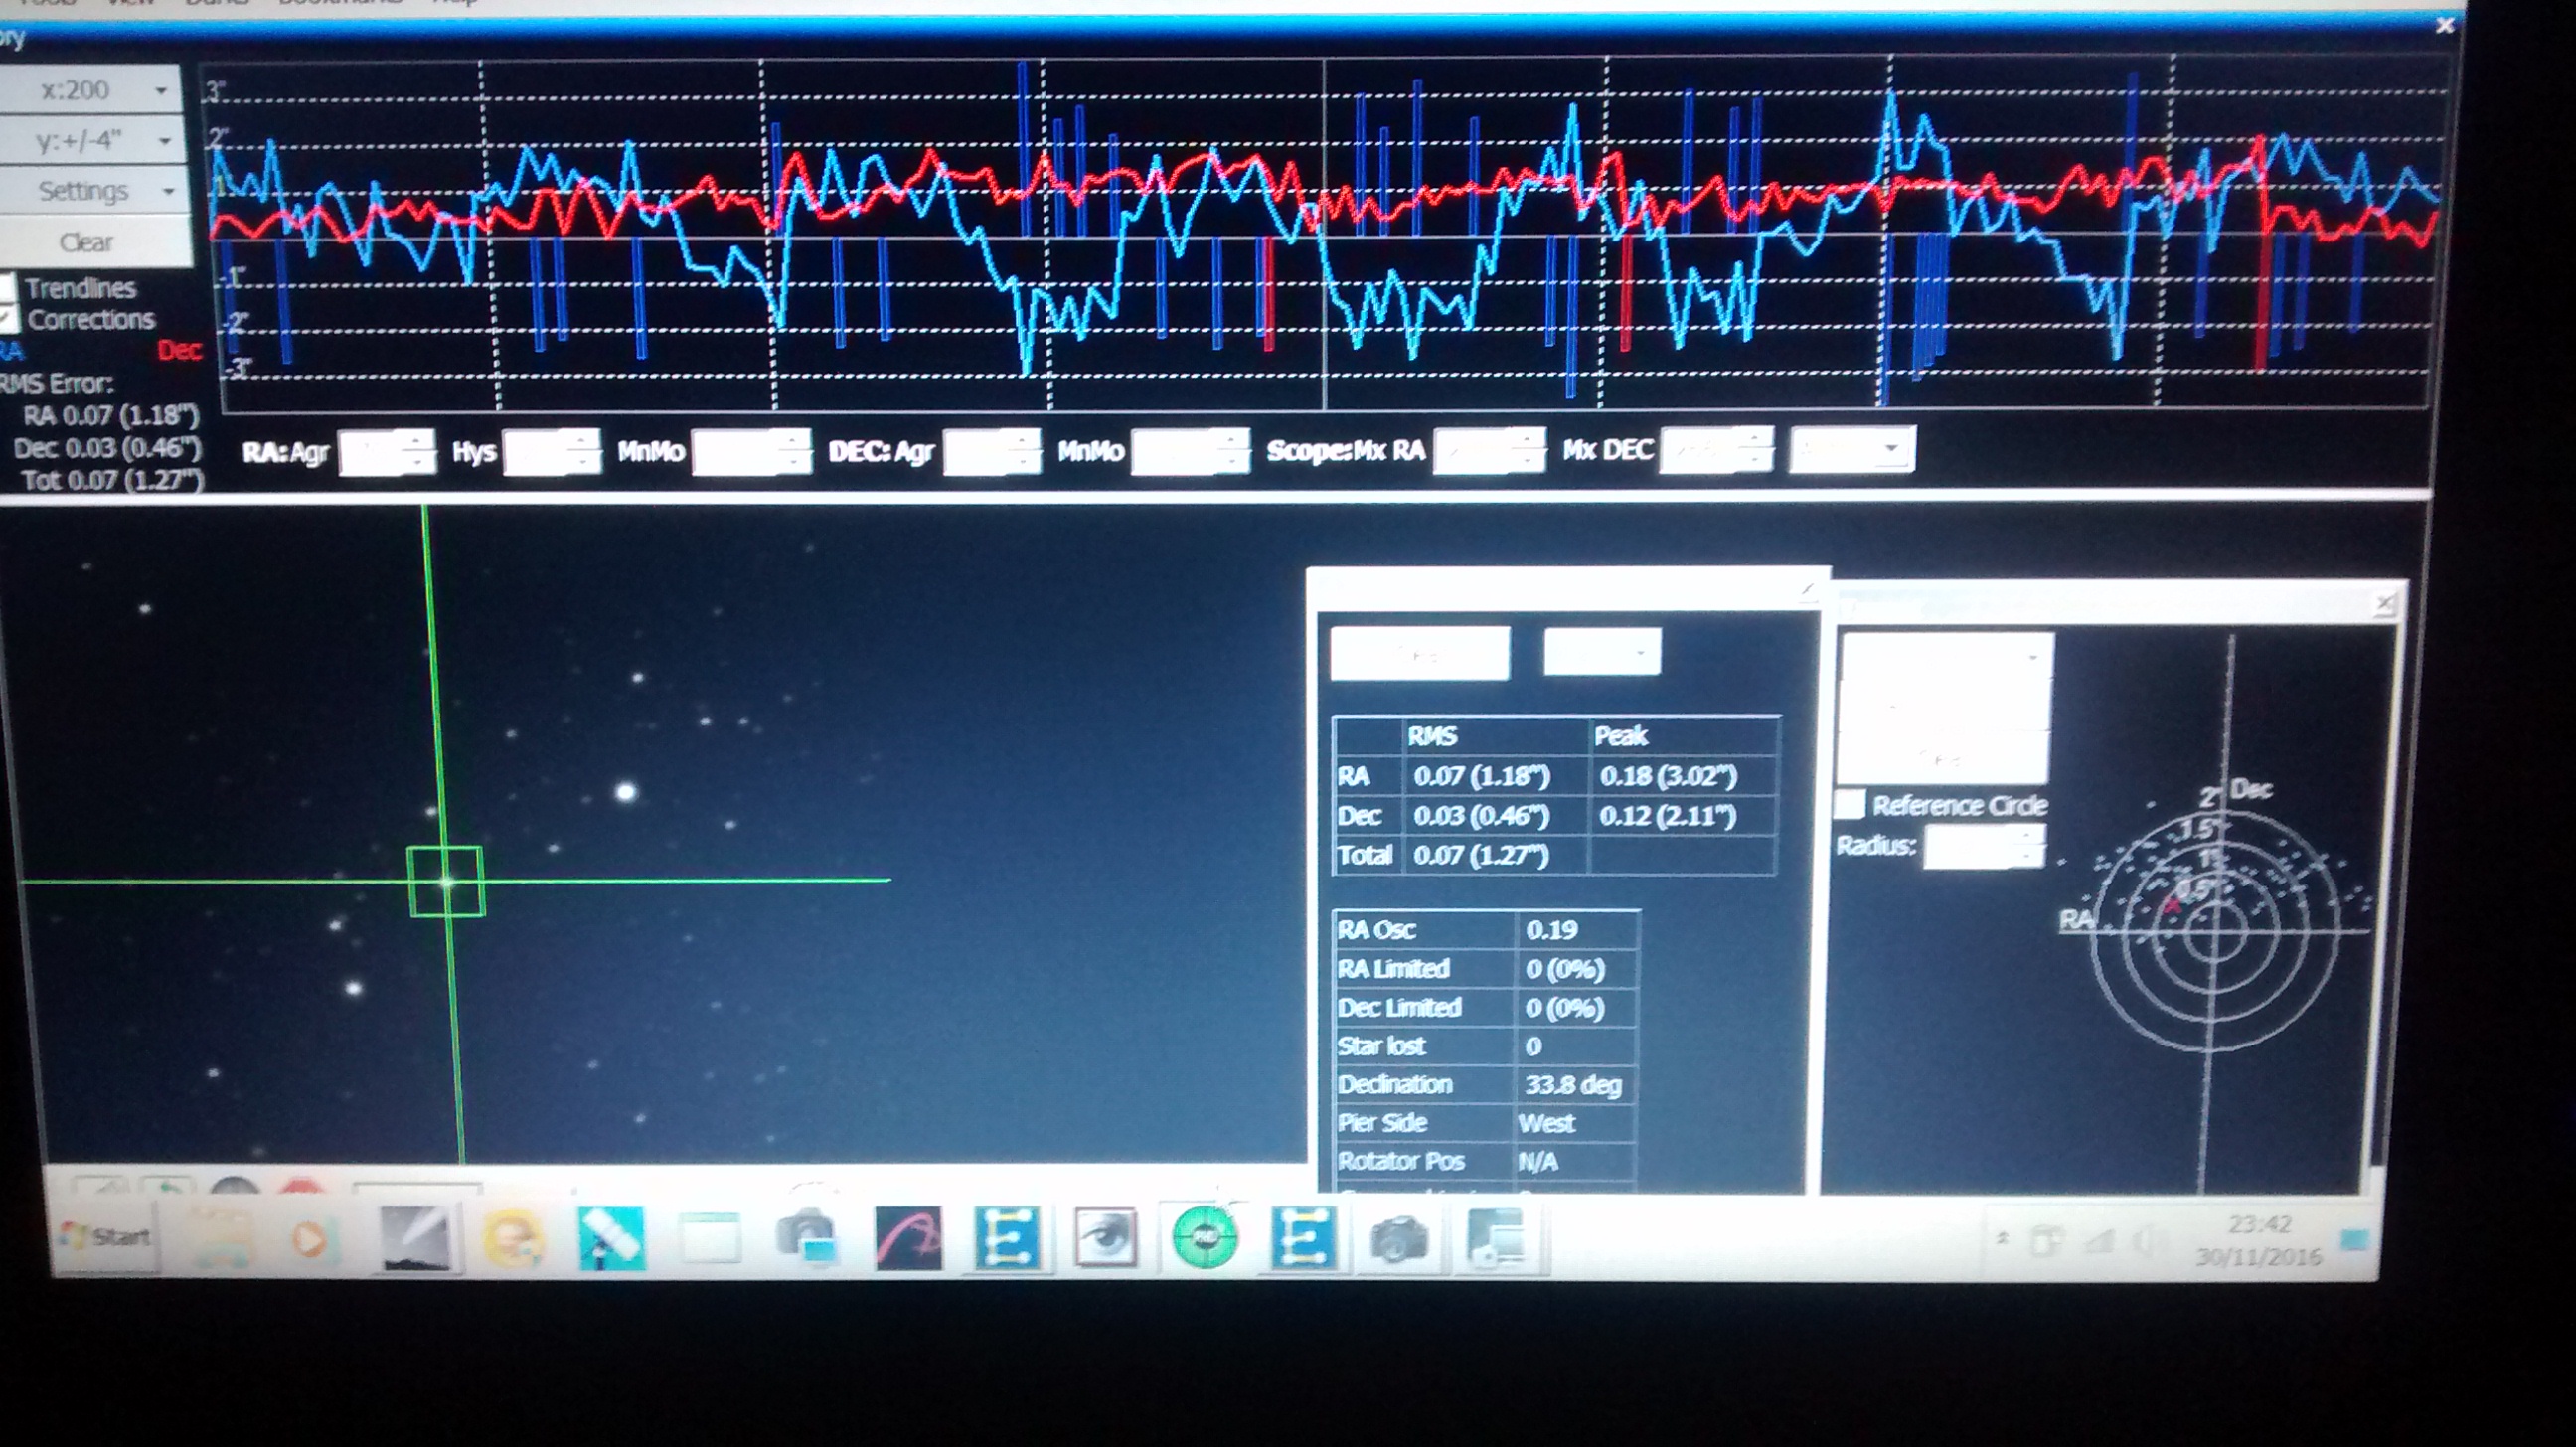
First Pass: early guiding results 30th August 2016

img_20160912_014945688crop-large

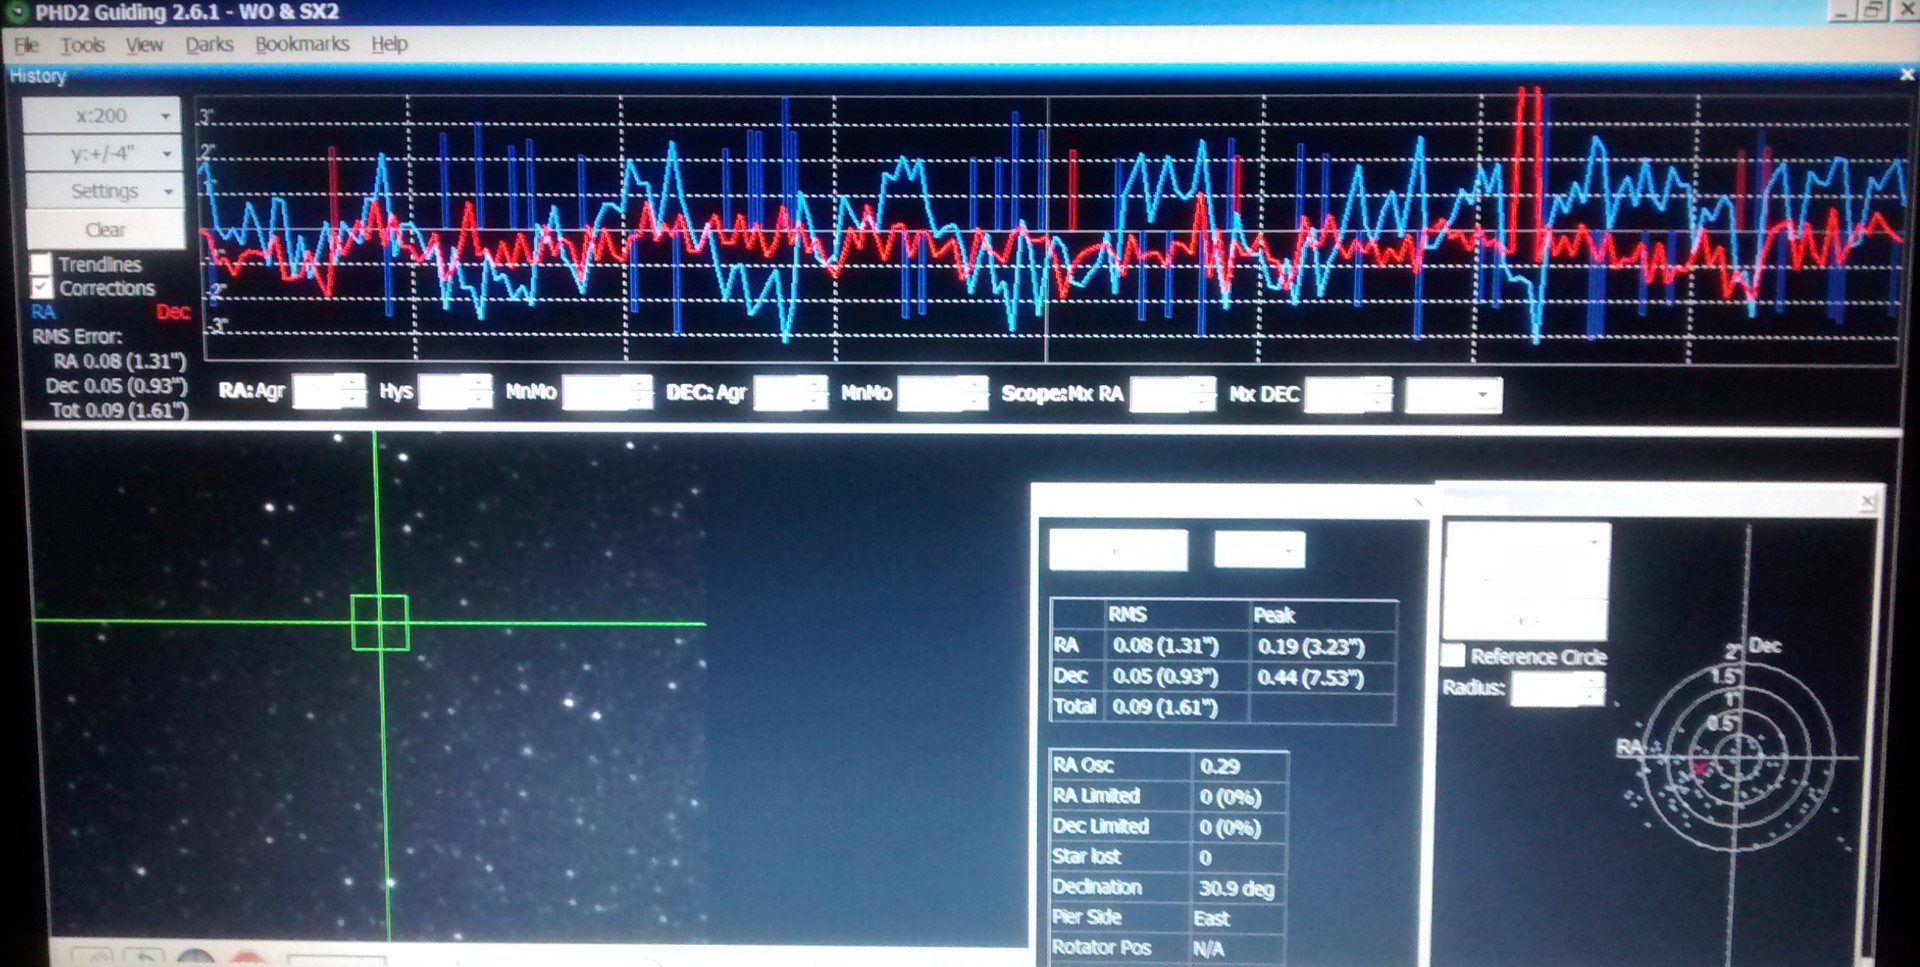
Getting better: most recent guiding results 12th September 2016

Calibration of PHD is frustratingly slow and it seems that even after successfully completing the RA-procedure can still fail during the subsequent DEC / backlash clearance.  After calibration use of the PHD Guide Assistant can then provide more help in achieving the best settings for the given set-up and conditions, though it is also very slow.  However, once completed PHD is fantastic and so far has run well during the night, even when changing objects.  Furthermore, I’ve also studied and experimented with the PHD Drift Align tool and am hopeful that by using this I may soon be able to both dispense with SynScan altogether and improve polar alignment, hitherto my imagining nemesis as I cannot see Polaris from my location – a very exciting prospect – what’s not to like?

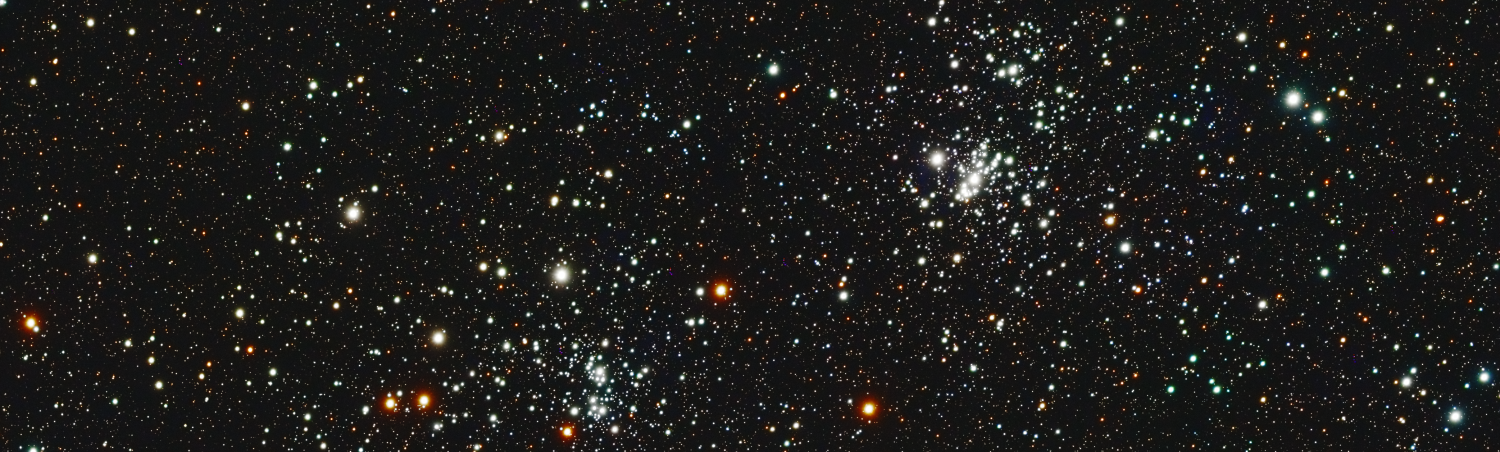
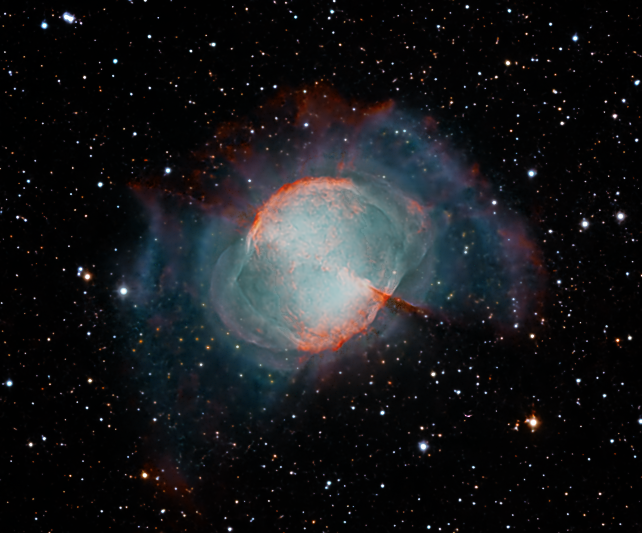
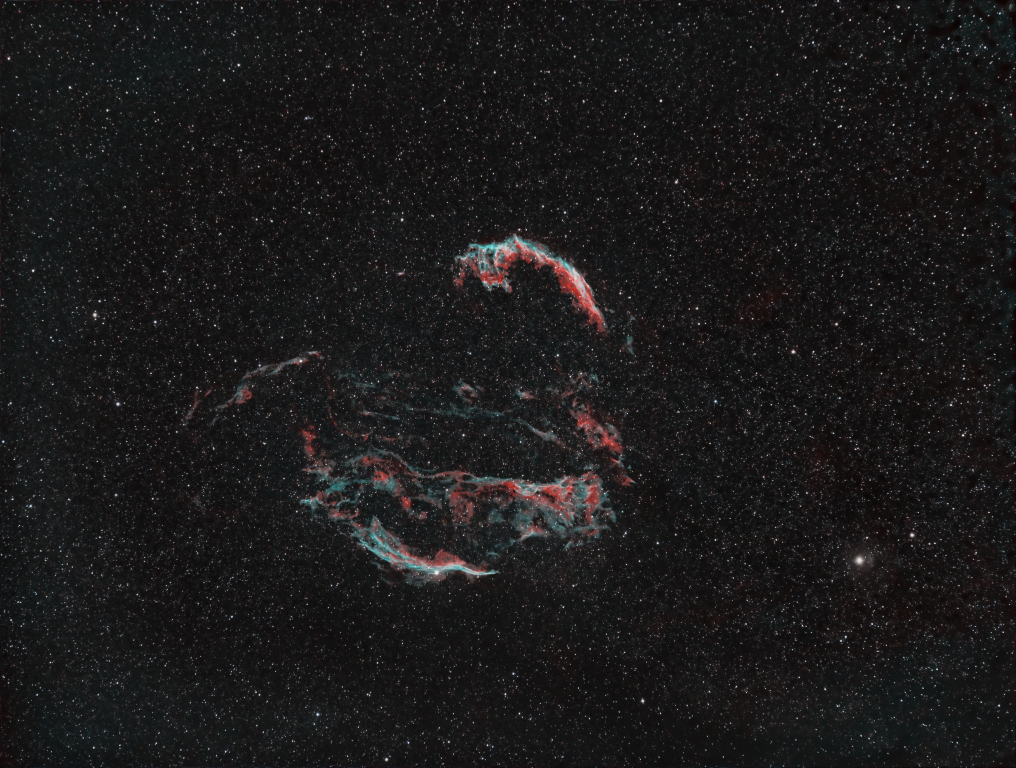
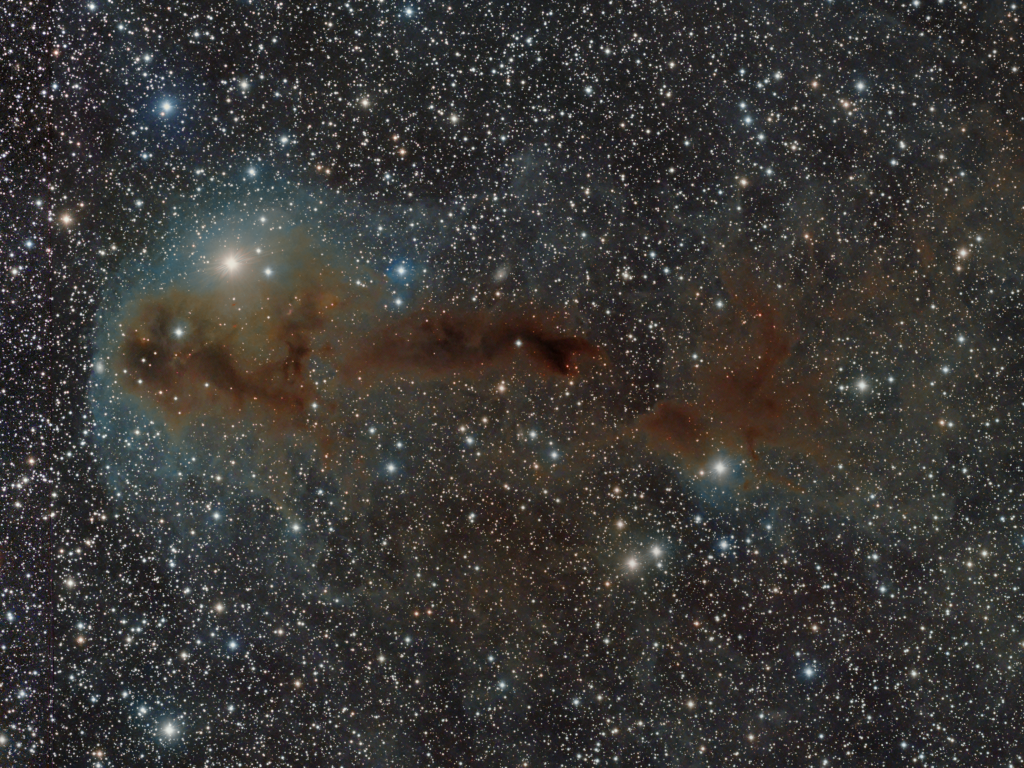
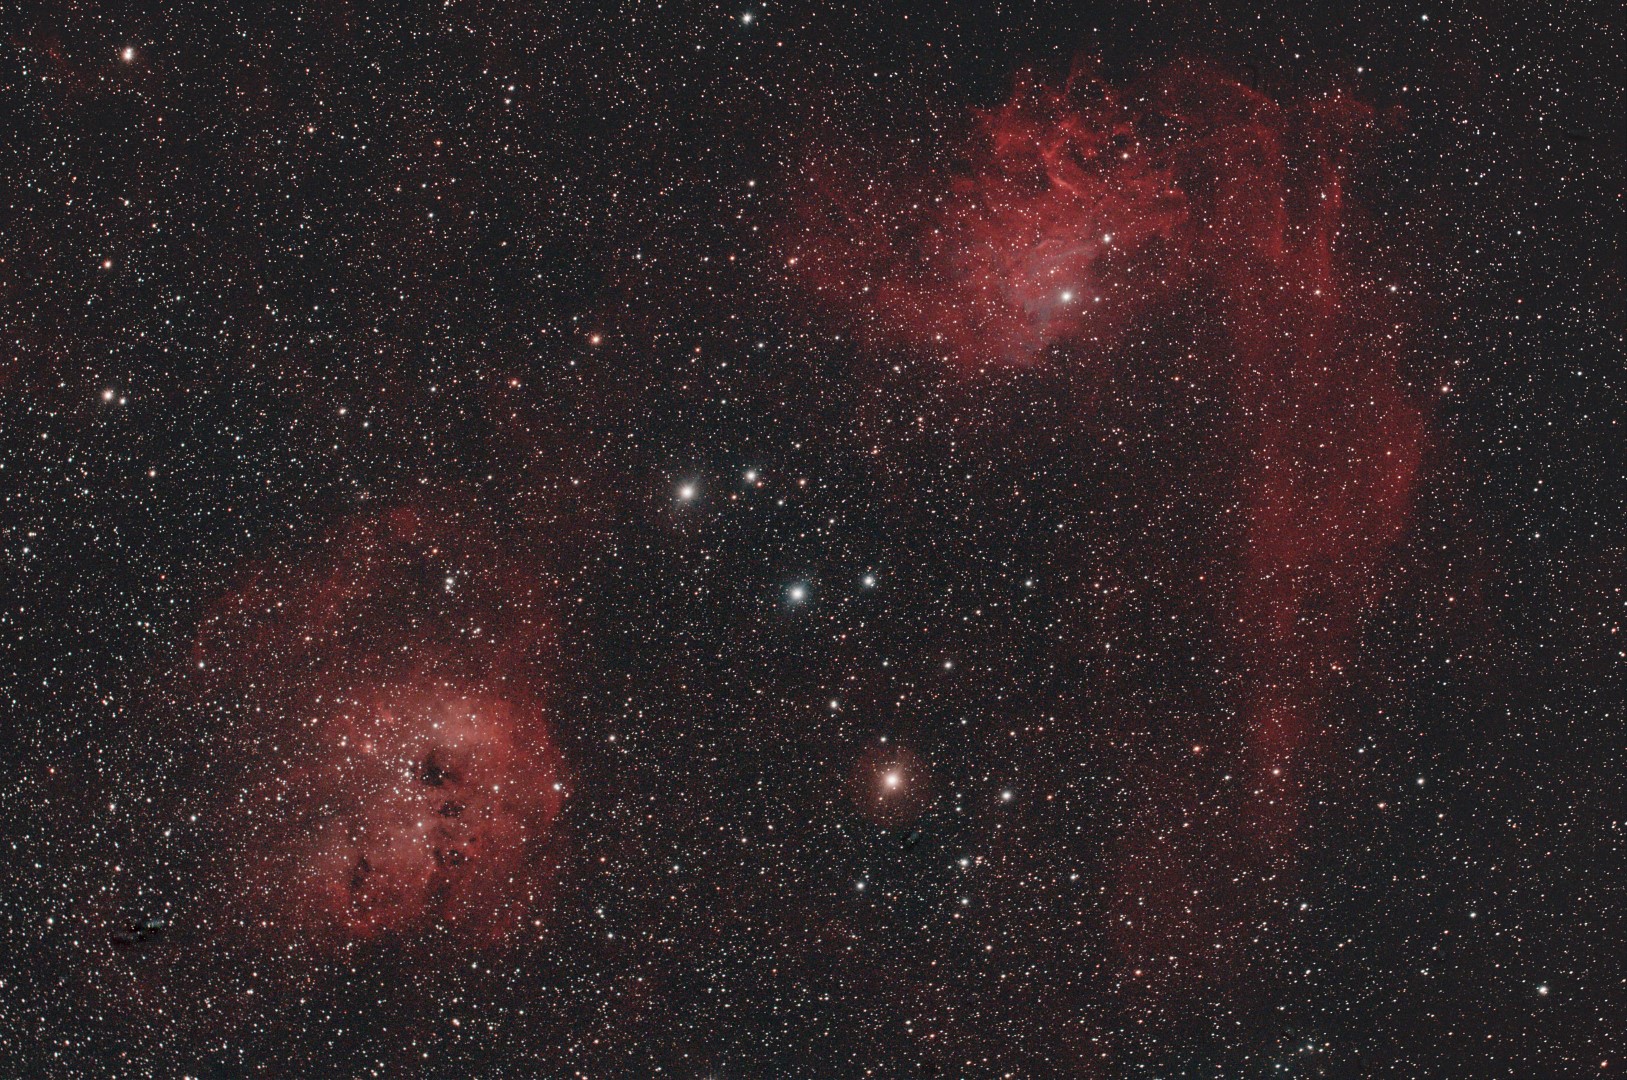
Starting a sequence of experimentation I chose a familiar but hitherto difficult DSO object to image that should benefit from longer exposures.  Having by now reached late-summer / early autumn, there were a few old favourites around such as the Veil and North America nebulae but for these trials I decided to go for the low hanging fruit of M27 or Apple Core nebula AKA Dumbbell nebula.

m27-170814-dss

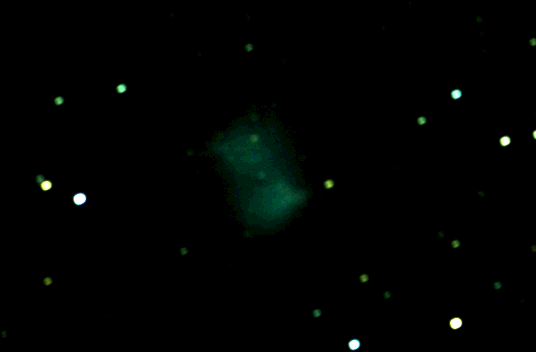
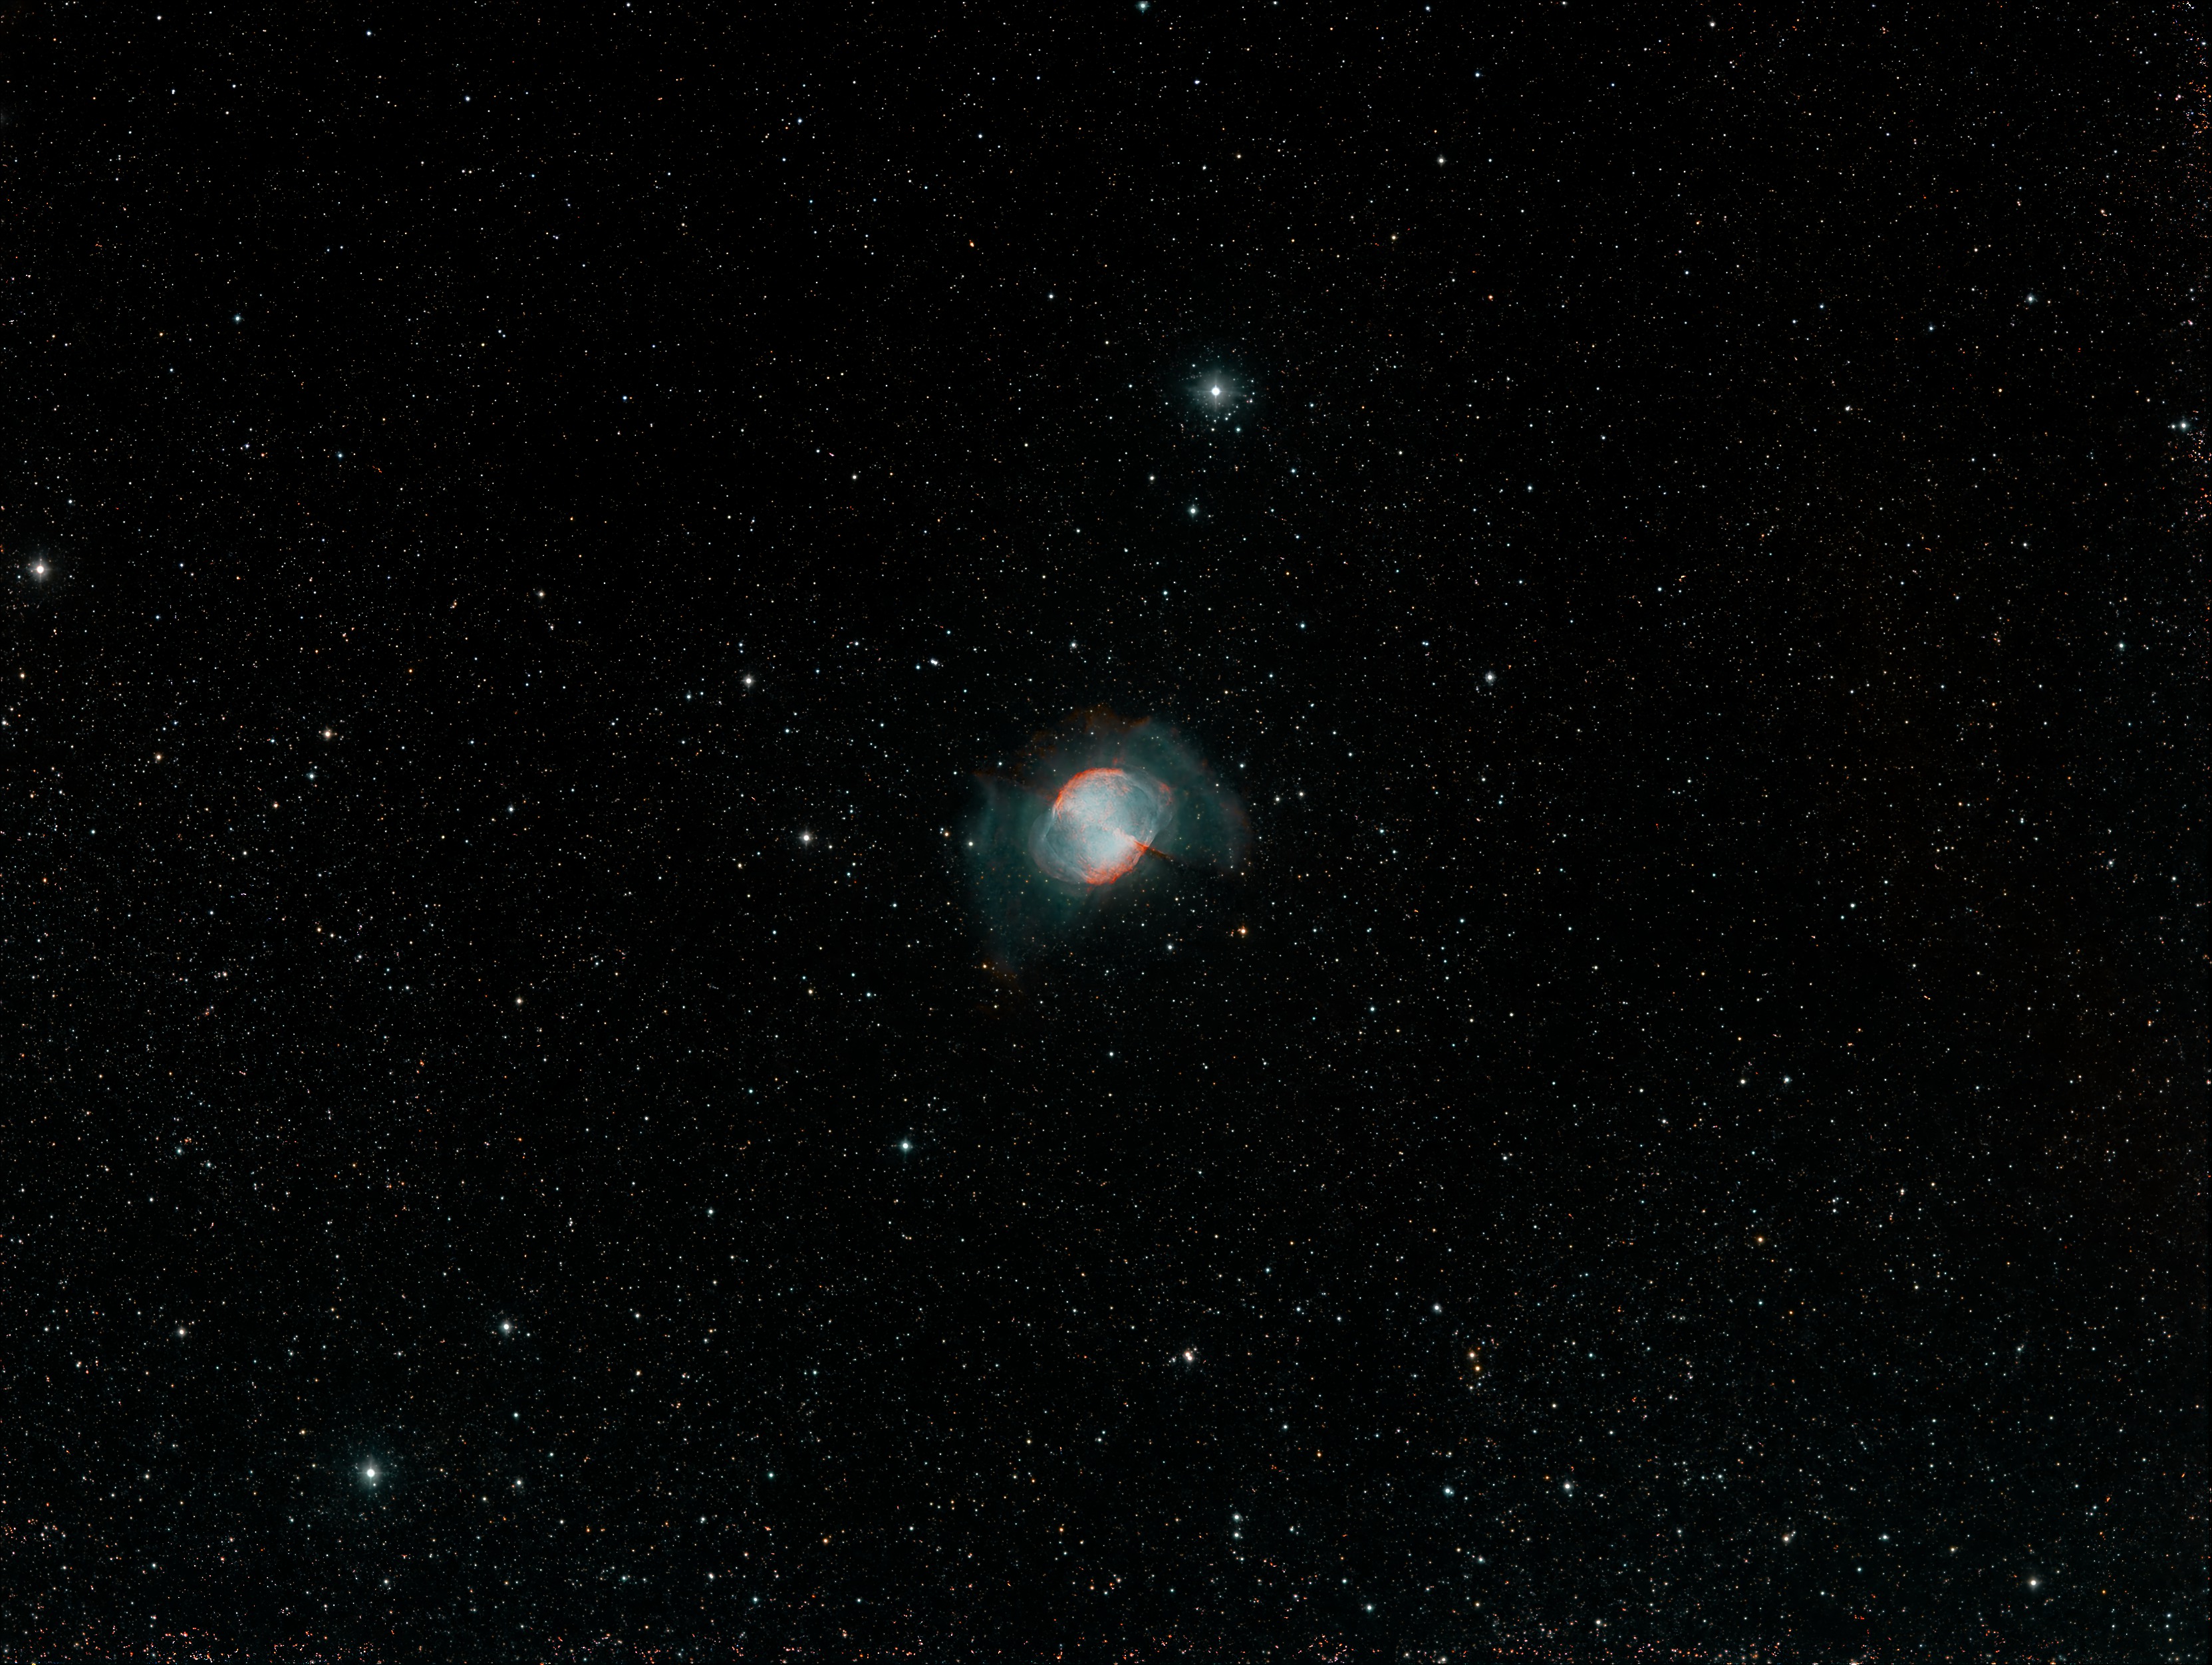
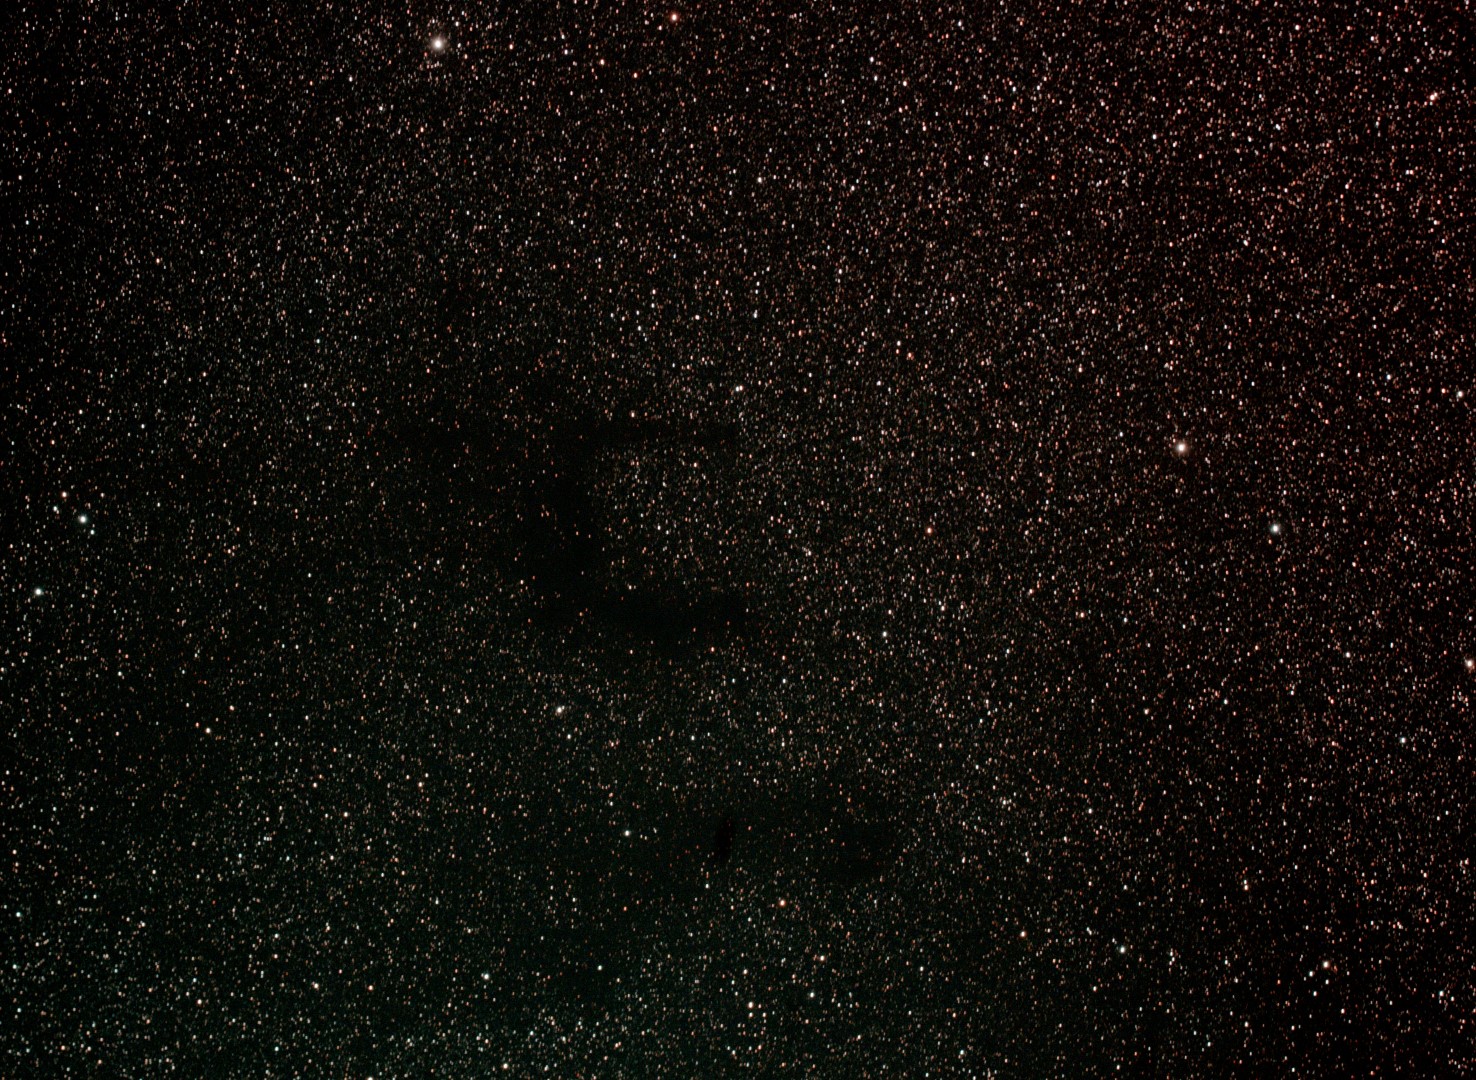
My previous image of M27 in August 2014!

With limited success I imaged this planetary nebula in my early days of astrophotography but with its 8.0’ x 5.6’ size and apparent magnitude of +7.5, I found it difficult to obtain good detail and colour.  However, even without guiding the improved set-up and alignment produced better results at 3-minutes and with +5-minute guided exposures the images immediately showed very noticeable improvement.

The images were taken on four different nights starting on 23rd August and finished on 8th September, during which time the sky was clear and the weather warm with very low humidity, though by the end seeing conditions had started to deteriorate due to the impact of the emerging 1st quarter Moon.  All images have been cropped to the same size of 700 x 500 pixels or 2% of the original FOV i.e. an object size of about 0.20%!  Given this very small size M27 really is at the limit of the GT81 telescope.

m27-comps-paintfile-cropped

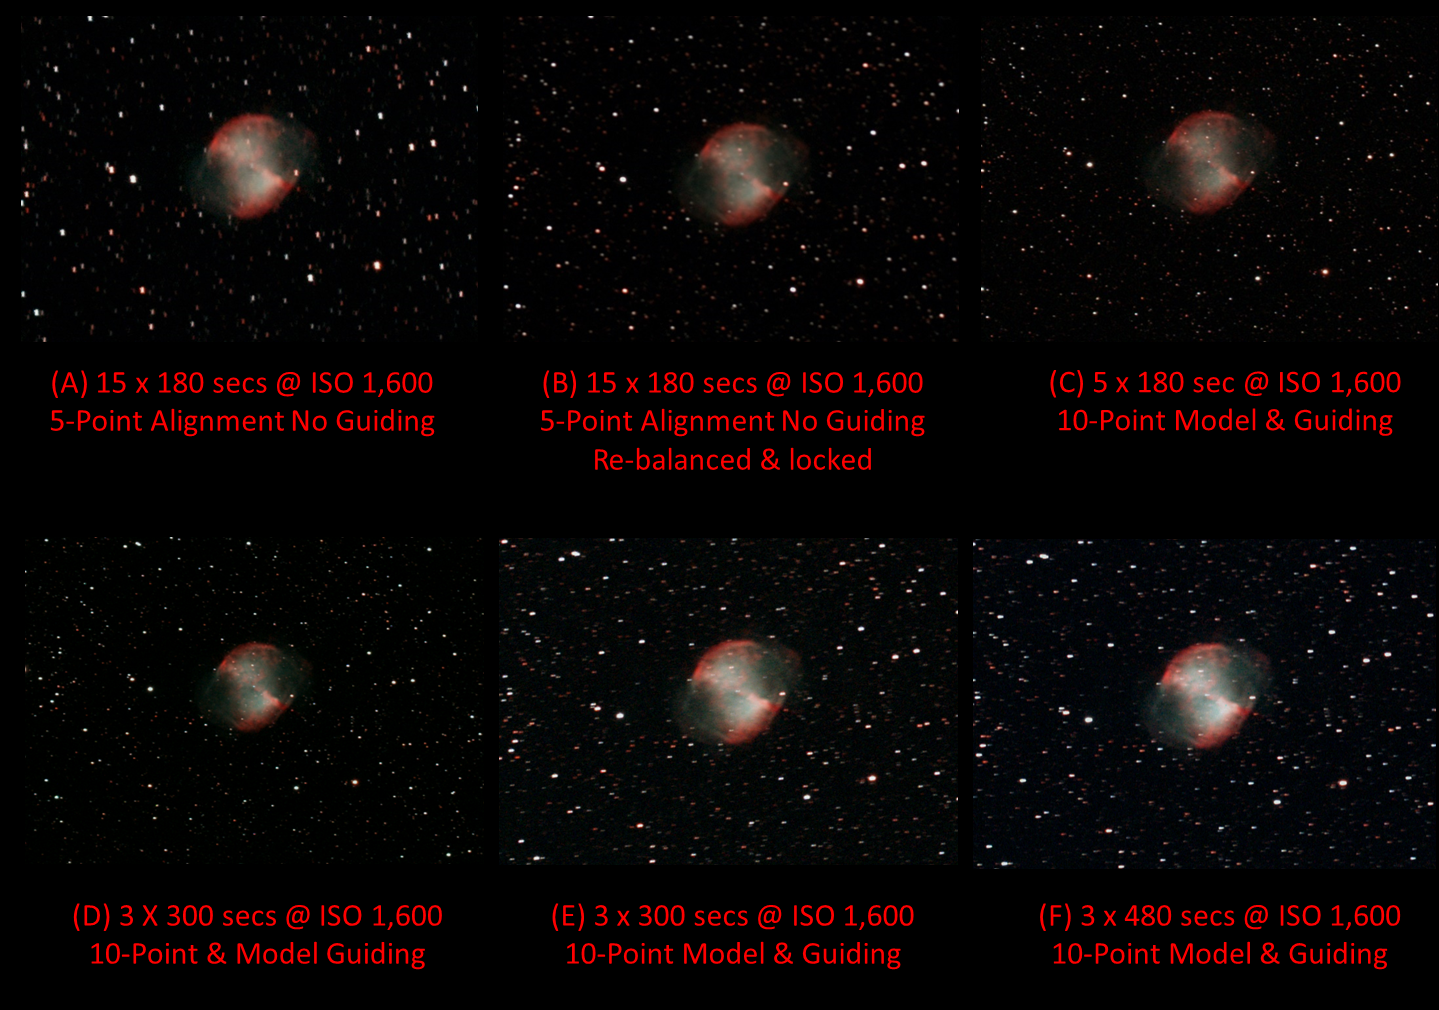
Strictly speaking the images are not fully comparable as the aggregate exposure times are not equal but nonetheless I think the results demonstrate the positive impact of guiding. The final two images are guided but do show greater star distortion, particularly at 8-minutes.  I suspect this may be due to the period over which the mount was left outside and would probably have benefited from some alignment tweaking before imaging re-commenced – lesson learned; the severe cropping ratio has also magnified any problems that would probably be less obvious in a larger widefield image.  There’s obviously room for improvement but I’m very happy with these early results which I can hopefully now build on.

Picture saved with settings embedded.

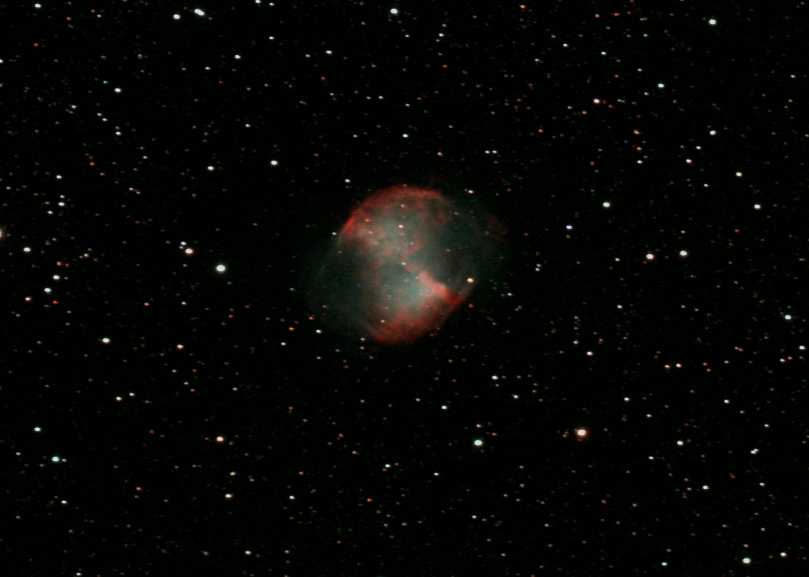
M27 Apple Core Nebula – my first and favourite guided image | William Optics GT81 + 50mm guide scope & 10-point EQMOD-ASCOM star alignment model | modded Canon 550D + field flattener & Starlight Express Lodestar X2 guide camera | 3 x 300 secs @ ISO 1,600 & full calibration, 3.3% cropped image| 30th August 2016

Unfortunately there is some downside to the longer exposures obtained from Fairvale Observatory: potentially more aircraft tracks and cloud plus more extended imaging time is unavoidable but overall it is, as expected, a major leap forwards for my astrophotography.  There’s still much to learn and improve with the technique but for now I am delighted to say that after nearly two years I am at last successfully guiding  – would you Adam & Eve it?

Dark Matters

download

After some months I have just finished reading Walter Isaacson’s outstanding biography of Albert Einstein.  I don’t know how the author, as far as I know a scientific layperson and writer of the equally good Steve Jobs biography, is able to pull together Einstein’s thoughts and theories in such an engaging and comprehensible manner that provides both insight and understanding into his scientific thinking, life and personality.

Besides the implications his work already has for nuclear physics and astronomy, even in the 21st Century we are only just starting to understand and confirm concepts that were either predicted or implied by his work of uniquely pioneering theoretical physics in the early part of the last century – much of which is still difficult even to comprehend, let alone understand.  In the world of astronomy two of Einstein’s predictions have only recently been shown to actually exist, with very exciting implications for our understanding of the Cosmos: gravitational lensing and earlier this year, confirmation of the presence of gravitational waves – ripples in the fabric of space-time itself!

abell370_hubble_960

Einstein vindicated: In the constellation of Cetus, the galaxy cluster Abell 370 abounds with evidence of gravitational lensing – imaged here in 2009 by the Hubble Space Telescope

During his early work Einstein battled with 19th Century scientists who continued to believe in the presence of the so-called ‘aether’, as proposed by Isaac Newton in 1718 – an undefined substance that supposedly filled the void in space and was responsible for the transmission of electromagnetic and gravitational forces.  Subsequently Einstein’s Special Theory of Relativity was able to explain such effects without the presence of the aether but there remained problems that were finally borne out in 1924 by Edwin Hubble’s evidence that contrary to the prediction of Einstein’s work and previous astronomical theories, the Universe was in fact expanding.  However, though serious these observations did not prove to be the end for Einstein’s work, merely the beginning of even more incredible theories that have even greater and more profound implications for the Universe.

History_of_the_Universe.svg.png

As a geologist by training, my background is scientific and I continue to follow with interest related developments across a broad spectrum.  My perception, which I think is justified by facts, is that we are again experiencing something of a quantum change in our understanding of physics at the moment.  No ‘new Einstein’ has yet emerged, though Stephen Hawking perhaps comes close and there are many bright minds still struggling to understand what it all means – certainly we seem no closer to a unified theory.  At the ‘very small’ scale the increase in particle types since I last studied science in the 1970s is staggering, recently culminating in confirmation of the Higgs boson at the Large Hadron Collider (LHC) in Geneva; almost certainly there’s more to come from the LHC but I’ve already lost track (no pun intended) of what makes up matter.

330px-CMS_Higgs-event

In the meantime, ever since Hubble’s expanding Universe bombshell, the world of physics has struggled to provide an explanation of what’s happening, except to say that for expansion to happen 95% of the Universe must consist of stuff we don’t know about, that is arbitrarily (and misleadingly) called Dark Matter (27%) and Dark Energy (68%), which have theoretical properties of mass and energy that would explain why the Universe is expanding; I find this exciting and even amusing.

Ilc_9yr_moll4096

Our earliest view of the Universe – the Cosmic Microwave Background, formed some 380,000 years after Big Bang 13.8 billion years ago.

As I get older I look upon the world with increased wonder and ask all the same big questions as everyone else.  I still find science itself exciting as we continue to unlock nature’s wonders but have increasingly had a suspicion that despite the incredible discoveries made by mankind, we are really only scratching the surface of what’s going on.  The prospect that there is still so much we do not know also provides many possibilities for what is really happening; a consoling thought as I move towards old age!  I believe it’s humbling for science that they (we) only know what 5% of what the Universe is made of.  Notwithstanding, like Deep Thought’s answer to the question “what’s the meaning of life the Universe and everything?” in Hitchhiker’s Guide to the Galaxy (answer = 42), it will keep thousands of scientists, their computers and the media gainfully employed for many years to come.  In the meantime, perhaps I can already help them?

download (1)

Early on in my astroimaging odyssey I discovered an interest in Deep Sky Objects, in particular nebulae. I find their very nature beautiful, as the birthplace of new stars and matter itself their science is also fascinating – as Moby puts it We Are All Made of Stars. There are numerous types of nebulae of equally diverse origin, with a complex variety of delicate forms that can be both enthralling and beguiling.  Generally they are made of gases and dust that emit types of light that often cannot be properly seen with the naked eye and only captured by photographic methods using various sophisticated imaging techniques, such as modified cameras or narrow band filters; their very elusiveness is part of the attraction.  I have been fortunate to photograph a number of these features and never get tired of their science and beauty.  However, there are other types of nebulae that are quite different.

Whereas the ‘common’ nebula is fundamentally based on activity that results in the emission or reflection of light, their other ‘ relations’ are the result of a quite opposite process.  In this case so-called dark or absorption nebulae are clouds of dense interstellar dust that obscures or scatters light from nearby objects behind, such as stars or emission and reflection nebulae, resulting in large, unusually dark patches in the sky.  I’ve imaged a few of these features before, where in the case of Orion such a process has produced Barnard 33, better known as the Horsehead Nebula – a dark interstellar dust region in the shape of yes, a horse’s head.  Recently I set out to image another less famous but equally exciting dark nebula.

Other than resorting to solar astronomy, the period of summer sometimes seems like something of a barren period, further compounded by short nights and the absence of astronomical darkness.  Notwithstanding, look closely and there’s plenty happening and, if you’re lucky, it’s possible to work into the night enjoying the warmth of the season too; I’ve recently been able to stay out in a shorts and T-shirt until past 3.00 a.m. – compare that to January – apart from the comfort there’s also no sign of the astronomer’s enemy, dew.  This year my wife has grown and strategically placed two night flowering plants close to my equipment, which on warm evenings produce pleasant aromas that waft across Fairvale Observatory whilst I’m working.  What’s not to like?

IMG_20160823_212657779 (Medium)

Night Phlox (Zaluzianskya Capensis). Though quite this small plant produces a strong smell of violets at night.

IMG_20160823_212515224 (Medium)

Nicotiana Alata. This large plant produces a strong, fragrant smell.

Whilst there’s no Orion (though it has made an appearance in the east from at about 3.00 a.m. since late August) or Taurus (also rising shortly before Orion) with all their iconic features, instead the summer arm of the Milky Way passes across the sky from about 8.00 p.m. presenting numerous opportunities of its own in the early part of the night.

Aquila b142

This time my targets were Barnard 142 & 143, located just west of the star Tarazed in the Aquila Constellation.  Roughly equivalent to the full Moon in size distance and some 2,000 light years away, both are dark nebulae which viewed together against the dense background of stars in the Milky Way clearly make the shape of the letter E – shown first below in inverted colour.

Picture saved with settings embedded.

Previously I’ve been too busy looking for the more conventional DSOs but at some 30 arc minutes, the E Nebula – as it is known – is another excellent imaging target for the William Optics GT81 field-of-view.

B142_143 Stacked  080816L3CL.jpg

E Nebula, AKA Barnard 142-3 in the Aquila Constellation.  William Optics GT81 FD & modded Canon 550D + 0.80x Field Flattener | 15 x 180 sec @ ISO 1,600 | 26th August 2016

B142_143 Stacked  080816L3CLcrop.jpg

E Nebula, Barnard 142-3 Dark nebulae

It turns out there are many such dark nebulae, so I hope to be imaging others in the future. I wonder what Einstein would have made of these and moreover, the hypothesis of Dark Matter & Energy?  It seems that once again he may have foreseen such developments and their possible existence may ironically even be found to relate to the cosmological constant used in his original General Theory of Relativity.

The Eagle Has Landed

“It is never wise to let a piece of 
electronic equipment know that you are in a hurry” (Murphy’s Law)

Following months of unusually protracted cloud cover during the winter and a short, though productive imaging period that can be measured in weeks, I have been unable to carry out any astrophotography since early May, when for inexplicable reasons everything went pear-shaped!  The problem started on the 9th May and it’s taken me 3-months to solve!  This and other events have therefore resulted in a noticeable paucity of WTSM activity – sorry.

After an earlier successful dry-run with the equipment in preparation for Mercury’s solar transit, a few days later at the very moment the transit started when I switched on the camera, Cartes du Ciel and EQMOD-ASCOM froze and, despite my best efforts, could not be restarted i.e. no images.  With the next transits not due until 2019 and thereafter 2032, this was a missed opportunity at best but as subsequent efforts failed to rectify the problem I’ve reached moments of despair.

I have used the same equipment and software successfully for nearly two years, in particular assigning the same USB COM-ports to avoid potential conflicts; experience of others shows ASCOM can be particularly fickle with the assignment of a COM port.  After some discussion via the EQMOD Yahoo forum group there was consensus that the problem was probably a software conflict or driver issue.  Somehow this didn’t seem right to me given the background described but with no alternative ideas I reluctantly set out to clean up the laptop and update all relevant software and drivers: ASCOM, Cartes du Ciel, EOS Utility etc.  Unfortunately there was no improvement, so I checked and checked again, including all connections and wires but with no success.

I had only queried the problem with the EQMOD Yahoo group convinced that this was where the problem existed and these were after all the experts.  With by now the limited darkness of summertime  nights upon us, despair setting in and my daughter’s wedding to attend to, I put everything aside for a few weeks: (a) for practical reasons, and (b) in order to restore some enthusiasm – hopefully.  At this point, somewhat late in the day, I decided to post a query on Stargazers Lounge; can’t think why I didn’t try before but there you go – the experience and help on SGL has almost always been very helpful and positive.

Almost immediately ‘Smudgeball (AKA Neil) from Scotland responded with a similar experience that turned out to be a very small break in the DSLR mains adapter insulation.  On inspection I could find no such damage to my adapter but it was worth a try, though holiday travel then delayed acquiring a replacement for another few weeks.  Immediately on my return I obtained a new adapter which on testing indoors with the equipment produced a successful outcome – BINGO!  Soon after I was able to get outside once again and at last undertake some astrophotography, phew.  Despite my resolve and perseverance there have been times I’ve really felt like giving up completely and I am still getting over the frustration of these drawn out events.

acdc

AC/DC DSLR power adapter: How can something as basic as this cause so much disruption?

Whilst this was going on I did manage to carry out some planetary observing – with Jupiter, Mars and Saturn all around it was too good to miss.  For a while I have been aware that astrophotography has been distracting me from looking at the night sky itself; it seems strange but you get so tied-up with imaging and forget to look up – I hope to avoid this trap in the future.  Unfortunately the re-awakening of my observing interest only served to highlight the poor quality and range of some of my eyepieces.

After some research and another query on SGL I purchased an Explore Scientific 20mm 68o Maxvision eyepiece, which I thought would fit well in between my existing 32mm and 6mm eyepieces. The Maxvision is very well made but like many high-end eyepieces nowadays is quite bulky. However, the eyepiece has an unusual rubber twist-up eyecup, which though ingenious limits eye relief for those, such as myself, wearing spectacles and narrows the field-of-view.  As a result I exchanged the Maxvison eyepiece for Explore Scientific 5-element 20mm and 10mm 70o eyepieces, which provide much better eye relief and is therefore more suitable for my circumstances.  At this time I have not used either of these but as they are more conventional in design, with good access to the top lens for viewing, I am very hopeful they will do a good job.

IMG_2532 (Medium)

Explore Scientific 20mm eyepiece – good access to the wide angle top lens element provides good eye relief and full use of 70 degree FOV

I routinely watch second-hand equipment on the SGL and UK Astronomy Buy & Sell websites, which has resulted in some timely purchases in the past, including my modded Canon 550D camera and Vixen Polarie.  From experience I find it pays to know exactly what you might be looking for and what a good price might be, in order to act quickly if necessary.  There is great demand for popular items such as the Polarie which tend to go very quickly.  Buoyed by much positive online comments I was recently lucky to see and successfully acquire a Tele Vue 2.5x Powermate, just 3-minutes after it was posted!  I’ve only had brief use so far but it’s already obvious that this is an excellent piece of kit; being parfocal vignetting is eliminated and with great optics it’s noticeably a quantum improvement on a Barlow.

IMG_2534 (Medium)

Additions to the family: Explore Scientific 10mm & 20mm eyepieces and 2.5x Powermate

With the return of astronomical darkness on July 20th and the prospect of Fairvale Observatory able to function again, I have been keen to get back out.  Imaging targets are mixed at this time of the year but I’ve just managed to bag three exciting new objects.  The so-called Pillars of Creation are perhaps the iconic image of modern astronomy, inevitably captured best by the Hubble telescope.  These towering columns of illuminated cosmic dust are situated within M16 or Eagle Nebula, in the constellation of Serpens, which at this time of the year is located low in the southern sky, just above the ecliptic at about 25o – not an ideal but too tantalising not to give it a try.

M16stellcrop

At 7-arcseconds in size and +6.0 apparent magnitude, the Eagle is a decent target for the William Optics GT81.  Unfortunately as it’s been some time since the last session and my old nemesis of polar alignment wasn’t too good on this occasion, which combined with its low altitude and lack of guiding was always going to be a challenge.  Notwithstanding I manged to get a reasonable sequence of images that show the shape of the ‘bird’ and even the general nature of the Pillars at the centre of the nebula, though inevitably exposures were short and minor star trails are evident.

M16 Stacked 070816cropL2GX2SLpcrop copy

M16 The Eagle Nebula: William Optics GT81 & modded Canon 550D + FF | 15 x 180 sec @ ISO 1,600 + darks | 7th August 2016

M16 Stacked 070816cropL2GX2SLpcropinverse copytxt

After all the trauma of the past few months it was a satisfying result and later that night I was able to capture two more interesting objects, more of which another time – watch this space.   It’s fair to say that for now the eagle had in more than one way well and truly landed, though given the preceding difficulties and eventual solution it was more like Apollo 13 than 11!

apollo11apollo13