Going Big – Widefield Imaging

After considering the limitations created by UK weather, I chose to purchase a Samyang 135 f/2 lens last year, rather than typically moving to a larger aperture / focal length scope.  Unfortunately because of the aforesaid poor weather conditions that have since prevailed its use has so far been restricted.  However, after literally months at last the clouds briefly relented over Surrey recently and I was able to get a couple of hours imaging the Orion constellation.

I really enjoy the widefield aspect of astrophotography, particularly without resorting to a mosaic which is too often impractical given the lack of favourable imaging conditions in the UK.  Such images can produce another perspective of favourite targets previously imaged with a telescope or are just fascinating in their own right.  For the moment I’m using the Samyang lens at f2.8 with a modded Canon 550D, manual focus and no guiding but eventually intend to pair it with a mono CMOS camera.  This combination results in a whopping 9.45o x 6.30o field-of-view, no-less than 11x that of my standard William Optics GT81 and ZWO1600 set-up.  Whilst using the lens at its maximum f/2.0 aperture would be even better, stopping down to f2.8 improves focus quality and removes any possibility of vignetting.

In this instance I chose to frame the image around the area of Orion’s Belt and the Great Orion Nebula M42 but such is the lens’ extensive field-of-view that M78 and part of Barnard’s Loop have also sneaked into the lower left corner.  Even though this was something of a ‘quick & dirty’ session resulting in just 112 minutes integration time, looking closer at M42 (see cropped version) the detail and colours achieved with this lens has far exceeded my expectations.   As well as the detail of M42 and the Horsehead Nebula, I’m also impressed at how well the lens has dealt with the usually difficult large bright stars of Orion’s Belt & others in the image. 

The quality produced with this small lens is quite extraordinary and it is definitely one of my star astronomy purchases.  Going forwards the challenge will be to find suitable targets that can fill its very large field-of-view, as well the inevitable wait for clear skies!

DSLR IMAGING DETAILS*
ObjectOrion: M42, Horsehead, M78 & Barnard’s Loop
ConstellationOrion
Distance243 to 1,360 light-years
Size594o2
Apparent MagnitudeVaries
  
Lens / Scope Samyang 135 f/2  
MountSW AZ-EQ6 GT + EQASCOM computer control & Cartes du Ciel
GuidingNo Guiding
CameraCanon 550D modified
 FOV 9.45o x 6.30o Resolution 6.45”/pix      
Capture & ProcessingAstro Photography Tool + PHD2 Deep Sky Stacker, PixInsight, Photoshop CS3 & Topaz Denoise AI
Image Location  &             OrientationCentre  RA 05:36:48      DEC -03:11:30.4               
Right = North   Top = West     
Exposures & Aperture56 x 120 sec  @ ISO800 Total: 1hr 52 min F2.8   
Calibration5 x 120’ Darks,  20 x 1/4000 sec Bias  20 x Flats         
Location & DarknessFairvale Observatory – Redhill – Surrey – UK        Typically Bortle 5-6
Date & Time3rd February 2021  @ +22.00h  
WeatherApprox. 6oC   RH +85%                  🌙 67% waning
*For high resoluton image go to Astrobin HERE and click on image

Reflections 2020

After starting astronomy in 2014, Watch This Space (Man) was launched shortly thereafter as a personal record of my then nascent astronomy journey.  Apart from the main blog about my progress or otherwise, links to other astrophotographers, astronomy tools, astronomy weather, scientific papers etc. can also be found on this website; I was suprised to see that to-date 152 items have been published on this site.

I always like to hear from others – comments, questions, help or just to say hello – and can be contacted via: graham.s.roberts@gmail.com  or just leave a comment at the end of any item if you prefer.

Vistor map 2020: In this most difficult of years for everyone, it’s especially heartening to see so much interest from all corner’s of the world and hope to see you and others again in 2021 – Clear Skies!

REFLECTIONS is a review of my astronomy and astrophotography during the past year, together with some thoughts on possible future developments.  

2020 Overview, Images & Goals for 2021

For the world 2020 was a year like no other.  Notwithstanding the obvious problems and dire consequences of Covid-19 for everyone, there have been surprising benefits for astronomy.  Although I am retired, under lockdown there was even more time available for hobbies.  Furthermore, as I live close to Gatwick and Heathrow airports + underneath numerous high altitude long-haul overflight paths, a massive reduction in air travel resulted in a very obvious improvement in seeing conditions, which was confirmed by guiding results.  Located in a Bortle 5 to 6 area I ordinarily achieve at best average RMS error guiding of 0.90” to 1.50”/pixel, guiding improved markedly during lockdown to between 0.50” to 0.75”/ pixel.  Of course such seeing conditions also resulted in better quality imaging itself and on a number of occasions I was able to achieve integration times of 10-hours or much more over a number of nights.  The result was better images but less of them and inevitably, a lot more cloud throughout the rest of the year!

Having previously got to grips with plate solving, using the new CdC planning function I intended to develop the use of mosaics this year.  However, such is the weather in the UK (see above) that it’s obvious to me that creating mosaics is probably not the best use of what imaging time we get.  Undeterred, during January I planned and shot a 15x panel mosaic of Barnard’s Loop in Ha-wavelength.  Unfortunately the unpredictable occurrence of patchy cloud invalidated some of the panels, though I was finally able to compile a 7x panel mosaic of the upper easterly section of Barnard’s Loop – see below.  Notwithstanding, there were lessons learned: (i) restrict mosaics to one or two panels and / or (ii) where wider view images are required use a wide FOV set-up rather than a large mosaic.

Most of my other objectives for 2020 turned out to be pipedreams e.g. a new observatory or perhaps a larger telescope or dual rig.  Despite this there were important developments on other fronts.

After eventually coming to the conclusion that mosaics were probably an unwise way to go considering UK conditions, it became clear that a suitable high-quality camera lens might produce similar coverage with less imaging time and hassle.  Thus also inspired by the images of others on the SGL Forum using such equipment, I set out to build a new rig based around the excellent Samyang 135 f2 lens.  This project remains work-in-progress but so far using the lens with a bespoke 3D printed rig and micro focuser made by Astrokraken and a modded DSLR, it’s apparent that this lens produces excellent widefield images in a relatively short time.

Initial Samyang 135 f2 set-up with modded DSLR

With the time and ‘opportunity’ afforded by lockdown throughout most of the year, I finally decided to do something about improving my processing, namely learning PixInsight.  Unfortunately the rumours were correct – it is a steep learning curve and altogether a less than user friendly software.  However, after many weeks of toil and expletives I’m pleased to say I can now process an entire image with PixInsight, the impact of which has been nothing less than profound.  However, whilst PixInsight is an excellent processing facility, I’ve come to the conclusion that it is often best used together with other process software where appropriate for specific tasks:

  • Deep Sky Stacker for calibration, alignment and stacking; the equivalent PixInsight process is just too complicated and time consuming;
  • Photoshop can be very helpful finessing colours and stretching (Levels & Curves);
  • Starnet++ is useful for creating starless images, which then help to get the best from processing nebula separately before re-combining with the stars;    
  • Topaz AI Denoise has been very effective and easy to use for noise reduction and sharpening at any point during the workflow.                      

This combination for processing has turned out to be something of a game changer and almost certainly was the most important astrophotography development of the year for me, which augurs well for 2021 and beyond. 

Favourite Images

Continuing with the theme of less is more, I imaged just 13 objects this year – of which three were experimental & three with a DSLR – but still with a total integration time of 80 hours (2019 17 objects & 65 hours, 2018: 25 objects & 43 hours).  Having worked through many of the astronomer’s favourites by now, images in 2020 consisted of: a new approach to old favourites, difficult / small objects for my equipment e.g. galaxies or less popular and widefield targets. 

I’m pleased to say that most of these images turned out well and it’s difficult to choose a favourite.  The so-called ‘favourites’ below therefore represent those images from this year that portray an important development in my astrophotography journey. More detailed reviews of these and all other images from 2020 can be found in specific articles that can be accessed using the links found below or via the Blog Index, located under the dropdown menu ABOUT.  

Heart Nebula: Although imaged in 2018, this version has been re-processed using mainly PixInsight, thus transforming the original SHO Hubble Palette image from something rather dull to one with warm, vibrant colours, as well as much great detail – demonstrating the significant impact of my new PixInsight based processing abilities.   

LBN 325: Numerous emission nebulae populate this small part of a very extensiveHII-Region, which forms an exciting LRGB image.  Processing was complex and difficult, in order to bring out exciting features that abound in this spectacular but less popular area of the Cygnus constellation. Integration time of 10-hours was obtained over three nights and is my first LRGB image processed using PixInsight.       

M63 Sunflower Galaxy:  At 12.6’ x 7.2’and apparent magnitude of +9.3,this small flocculent galaxy in the Canes Venatici constellation is a challenge for my equipment. However, with 8 hours 20 minutes exposure over three nights in April and careful processing, the all-important detail within the galactic disc is clear.  Topaz Denoise AI and Gigapixel software played an important role in maintaining the colour and delicate detail in this +50% cropped image.     

Taken from last year’s REFLECTIONS 2019:

“Although you never know, I don’t see any major breakthroughs in the coming year”.  Just goes to show what I know, fewer but better images were obtained in 2020:

RECORD CARD 2020

GoalSpecifics / ResultsOutcome
Improve image captureFurther Improvements in overall quality + much longer integration times + better guiding accuracy = less but better images.MUCH BETTER    
Better processingUsing PixInsight software combined with Photoshop, Starnet++ and Topaz Denoise AI has led to major processing improvements and much better final images.      MUCH MUCH BETTER  
Widefield ImagingInitial results from new imaging rig based around Samyang 135 f2 lens were very promising but there’s more to do.BETTER    

My main objectives for 2020 were largely fulfilled (see above), so what about 2021?

  • Imaging:  Other than maintaining the aforesaid improvements achieved over the past two years – guiding & longer integration times – two items that still need to be addressed are: (i) upgrade filters to remove star bloating and all round better images, (ii) improved focussing.   
  • Widefield: Complete Samyang-rig build and switch from DSLR to CMOS mono camera.  
  • Consolidate processing improvements: Whilst the move to PixInsight and other software was very successful in 2020, I’m still only scratching the surface of what’s possible.
  • Upgrade mono camera – there’s a new generation of colour CMOS cameras starting to appear, hopefully soon to be followed by their mono equivalents !

Hardly a year I and the rest of the world will want to remember, though more than ever astrophotography played a big role in providing relief from the trauma going on around us all. 

The major increase of integration times achieved and the use of PixInsight has proved transformative for my astrophotography and will justify returning to reimage some old favourites in future years.  I had often thought about upgrading my OTA to something bigger but given the lack of a permanent observatory here at Fairvale Observatory, combined with long periods of bad / cloudy weather, the penny finally dropped and I now have high hopes for the little wonder that is the Samyang 135 f2 lens when I complete its set-up in 2021.                

Looking back I have to be happy with my astrophotography in 2020 but more importantly, look forwards to an even better year which holds great promise building on the positive developments of the past 24-months.  Moreover, I hope for the sake of everyone that we will be able to deal with Covid-19 soon and return to something of a normal life once again.  These are big ambitions and I hope that WTSM’s Reflections 2021 will record such success.

Watch this space!


ASTROPHOTOGRAPHY INDEX OF 2020

To access each blog, click on the title required below highlighted in RED:

JANUARY & FEBRUARY – Jinxed: Barnard’s Loop Mosaic (+ NGC 1333 reflection nebula & LDN 1622 Bogeyman Nebula)

MARCH – Nice but Dim: Medusa planetary nebula / Abell 21

MARCH & APRIL – Return of the Lion: Leo Triplet M65, M66 & NGC 3628

MAY – Galactic Bloom: M63 Sunflower Galaxy

JUNE – Canine Capers: M51 Whirlpool Galaxy

AUGUST & SEPTEMBER – The Big Picture: First Light Samyang 135 f/2 NAN, Cygnus & Veil Nebula 

OCTOBER – Reach For The Sky: LBN 325 emission nebula

NOVEMBER – Swan Adventures: NGC 6914 reflection nebula

DECEMBER – Image Redux: HST re-processing – Pacman, Heart, Rosette, NAN & California Nebula

Image Redux

An astrophotography image is clearly the sum of its parts, which can broadly be defined as: Equipment – Image Capture – Processing.  Much attention and money is given to the first two items but it’s easy to overlook the importance of processing, I should know I’ve done it for years!  With time on my hands this year during Covid-19 & lockdown, I have at last turned my attention to this most critical of items to very good effect.  Hitherto I’ve used Deep Sky Stacker (DSS) for calibration & stacking, before moving to Photoshop for all other processing, which has usually produced satisfactory results.  However, I’ve often thought more might be obtained from the data by using more powerful software combined with an improvement of my overall skills.

On taking up astrophotography it’s a shock when first looking at the camera’s data, which will usually produce a dark almost featureless image, represented by a very narrow, steep image histogram – a graphical representation of the tone and light collected by the exposures.  This is because most of the image of the night sky will of course be dark, with precious few photons arriving from distant objects being photographed contained only within the said narrow histogram – the trick is to tease them out during processing in the so-called digital darkroom, thereby revealing the image within. 

In the right hands Photoshop is an excellent tool for post processing but it’s no coincidence that most accomplished astrophotographers are using PixInsight (PI), for good reason: it is dedicated to astrophotography, is very powerful, whilst at the same time being very flexible.  Unfortunately the learning curve for PixInsight is steep but from my recent experience very much worth the effort.  Metaphorically speaking, I’m in the foothills of using PixInsight but now with sufficient knowledge to process images from start to finish, I have already successfully tackled complex LRGB images LBN 325 and NGC 6194.  Subsequently I’ve turned my attention to re-processing old narrowband data, which first time round produced unsatisfactory results using Photoshop; this being as much the user as anything else.

Whilst PixInsight was the principal software for this re-processing, it was used in conjunction with Photoshop to achieve certain affects and other newly acquired dedicated software for specific tasks: Starnet++ to produce starless images and Topaz Denoise AI for noise reduction and sharpening. Using the HST palette in all cases, the workflow (see table at the end) was adapted for each image depending on the characteristics of the object.  Before (top) and after (below) images are shown beneath, together with links to the original blogs for more background and imaging information.

NGC 281 Pacman Nebula, August 2019:  Whilst the initial HaOO bicolour image looked good I struggled to do the same with the SHO version.  However, the transformation after re-processing with PI is, as they say – a whole new ballgame.  Vibrant colours have emerged from the previous somewhat gloomy image, together with detailed internal structures.  Although somewhat artistic in character, I particularly like the starless version which is shown at the top of the page.

IC 1805 Heart Nebula, August 2018:  Like Pacman the original bicolour processing was also successful but SHO much less so.  Re-processing has brought out warm colours and details around the inner edge of the heart-shaped nebulosity but it is the striking blue inner region which highlights Melotte-15 at the centre that steals the show.  Here fierce stellar forces associated with superhot, young open star clusters, model the adjacent dust clouds into features analogous to those of the Eagle Nebula’s Pillars of Creation.

NGC 2244 Rosette Nebula, February 2018: The Rosette was the most difficult data to re-process and therefore turned out to be the most satisfying.  Similar to the Heart Nebula, the rose-like dark nebulous outer region and bright inner edge frames the dramatic, somewhat translucent pale blue inner area.  Therein billowing, cloud-like blue nebulosity shows off various internal features, which include an open star cluster at the centre and the so-called Carnival of Animals marching across the lower right quadrant.  Altogether new processing has transformed this image into something rather special.        

NGC 7000 North America Nebula, August 2017:  Although very happy with the original SHO image processed using Photoshop, the revised version is not so much better but different.  Use of the SCNR function and subsequent PI and Photoshop colour adjustments have introduced greater detail overall, as well as produced more delicate colours, especially the diaphanous blue  nebulosity around the ‘Gulf of Mexico’

NGC 1499 California Nebula, October 2017:  In this case re-processing has brought out greater structure throughout the nebula and, to a lesser degree, improved the overall colour.  However, the nature of the object, limited integration time and relative lack of what is faint OIII and SII data has probably limited the final impact.    

Frankly I found PixInsight a complete pain to understand and use initially, however, with the help of online videos, tutorials and the recently published excellent Mastering PixInsight book, I believe the results more than justify the effort and speak for themselves; overall I’m very pleased with the outcome, which far exceeds my expectations.  Notwithstanding, going forwards I can’t see PixInsight being my only processing software (though it could be) but it almost certainly will now become my main choice for post processing, where necessary supplemented by Photoshop and other packages dedicated to specific tasks.  It’s a case of using the right tool for the job and the wider combination outlined provides much more flexibility, as well as producing excellent results.  All I need now are clear skies!

OUTLINE HST NARROWBAND WORKFLOW*

ACTIONCOMMENT
Alignment & StackingDeep Sky Stacker

NON-LINEAR PRE-PROCESSING
Dynamic Crop  All stacks
Dynamic Background Extraction (DBE)  Gradient removal
RGB Combination  SHO Hubble palette
Linear Fit   
Background Neutralisation   
Colour Calibration-1  
Deconvolution (sometimes)Not used here but can be if necessary
Noise ReductionUse ACDNR or Topaz DeNoise AI
Histogram TransformationNon-linear stretch

 LINEAR PROCESSING
Curves Transformation (CT)Preliminary to bring out colours but not too strong
Colour Calibration-2 
SCNRRemove Green Hue
Magenta star adjustmentIf present + use PixelMath script
Starnet++Separate Nebula & Stars  
(a) Curves Transformation & / or
(b) Colour Saturation
Colour punch Apply Range Mask to accentuate specific areas
Photoshop – selective coloursFurther specific colour adjustment
Re-combine starless & stars imagesPixelMath script + experiment with proportions  
Final adjustments where necessaryDBE + CT + ACDNR or DeNoise AI + Linear / Curves adjustment
 * PixInsight processing unless stated otherwise 

Swan Adventures

I first visited the constellation of Cygnus soon after starting astrophotography, inevitably to image the Veil Nebula and North America (NAN) & Pelican Nebula, or parts thereof.   As my abilities and equipment improved I’ve often returned to each of these popular targets, in the hope of obtaining a better image each time and I’m sure I will continue in this pursuit.  However, such is the draw of these iconic objects that it’s easy to overlook other equally exciting targets within the same constellation.  

Last year (2019) my attention was drawn to such a target in the form of DWB 111 or the Propeller Nebula, which I successfully imaged and thereby ignited my interest in the rich, very large HII-region of Cygnus (see above), within which imaging possibilities are almost endless.  I therefore recently went back during this September to image two less popular targets located within the aforesaid HII-region; I had already imaged the NAN and Veil Nebula again in early September, on which occasion using my new Samyang 135mm f2 lens set-up to obtain wide-field shots.

After first imaging LBN 325 and other emission nebulae across the adjacent area, I turned my attention to a neighbouring part of the said HII-region of Cygnus, likewise found in the quadrant of Cygnus defined by the stars Deneb – Sadr – Delta Cygni.  Similarly this area is full of numerous emission nebulae but furthermore here strikingly intercalated with dark nebula, star clusters and in particular reflection nebulae.  Most prominent of these near the centre of the image is NGC 6914, vdB 131 & vdB32 (Main image top-of-the-page), which are conspicuously highlighted by associated bright blue nebulosity.  Dotted throughout the rest of the image the use of HaLRGB picks out many other blue and rare yellow refection nebula and stars that all together make for an exciting image (Ha starless image above).  Such is the quality and vastness of this part of Cygnus for potential image targets that I feel sure I’ll be coming back to this region for many years to come.

 IMAGING DETAILS
Category / Object Reflection Nebula  NGC 6914
ConstellationCygnus
Distance6,000 light-years
Size2.5o x 1.90o
Apparent Magnitude?
  
Scope William Optics GT81 + Focal Reducer FL 382mm  f4.72
MountSW AZ-EQ6 GT + EQASCOM computer control & Cartes du Ciel
GuidingWilliam Optics 50mm guide scope
 + Starlight Xpress Lodestar X2 camera & PHD2 guiding
CameraZWO1600MM-Cool mono  CMOS sensor
 FOV 2.65o x 2.0o Resolution 2.05”/pix  Max. image size 4,656 x 3,520 pix   
EFWZWOx8 + ZWO LRGB & Ha OIII SII 7nm filters 
Capture & ProcessingAstro Photography Tool + PHD2 +  Deep Sky Stacker + PixInsight + Photoshop CS3 + Topaz AI Denoise
Image Location              & OrientationCentre:   RA 20h 25’ 23.097”       DEC +42o 22’ 41.092”                      Top of image = approximately North     
Exposures36 @ 300 sec Ha  +  37 x LGB  36 x R @ 180 sec Time: Ha 3hr LRGB  7hr 21min  =  Total 10hr 21 min   
 @ 139 Gain   21  Offset @ -20oC    
Calibration5 x 300 sec Ha + 10 X 180’ LRGB  Darks,  20 x 1/4000 sec Bias  10 x  HaLRGB Flats               @ ADU 25,000
Location & DarknessFairvale Observatory – Redhill – Surrey – UK        Typically Bortle 5-6
Date & Time17th 20th 21st September 2020  @ +21.00h  
WeatherApprox. 15oC   RH = 45- 70%                  🌙 New – 22% waxing

Reach For The Sky

In September I returned to the Cygnus constellation, popular for The North America and Veil Nebula at this time of the year but elsewhere often overlooked by astrophotographers.  In particular the vast HII-region that is located around the Deneb-Sadr area which contains an abundance of exciting imaging opportunities, this time my target was LBN325 which contains numerous Ha emission nebulae, a dark nebula and a supernova remnant. To capture these features at their best, I chose to shoot, process and then combine separate HaOO narrowband and RGB images for the first time.     

Integrating RGB data for better star colours and narrowband data for nebulosity turned out to be tricky but by removing the stars from the narrowband nebulosity and then processing the starless image before combining with RGB image manually eventually worked out well (see top-of-the-page image).  However, the narrowband and broadband data had respectively been taken either side of the Meridian without plate solving and unfortunately my manual alignment was on this occasion poor.  However, with careful cropping I was eventually able to able to align and combine each of the images, though at the cost of losing 25% of the overall field-of-view which did not overlap; see full size Ha-image below with interesting features along left and right edges which had to be cropped out to align the final narrowband and broadband images.

In addition to LBN325 there are a large number of other notable features (see Image Details table at the end & Nico Carver’s annotated image below – green outline delineates areas of my image).  In addition to the many Ha emission nebulae, the most noteworthy are the dark nebula Barnard 345 and a large section of the Supernova Remnant G082.2+53.  Some 100 light-years in total diameter, this OIII-rich feature is unfortunately too faint to be picked out in my image, which would require significantly more OIII data to be seen.  Looking further afield of the image the continuing richness of the adjoining area cannot be overstated, which is beautifully seen in Nico Carver’s accompanying image (Northwestern Cygnus by Nico Carver is licensed under a CC BY-SA 4.0 License) – an 8-pannel 46-hour mosaic!  I can only dream of such work but certainly hope to return to this area again when possible, in order to enjoy more of the exquisite objects that can be found across this truly exciting area of Cygnus.  But for now there’s another story about this image.

For some time I’ve known that I had to improve my processing skills and to this end purchased PixInsight software at the beginning of the year. Very few of the best astrophotographers do not use this processing software but PixInsight has a notoriously steep learning curve and no doubt like many others I gave up after a few days!  I can unequivocally say that PixInsight is by far the most user unfriendly software I’ve come across in nearly four decades; there’s no denying it’s abilities but the developers clearly gave very little thought to its users.  Nonetheless, spurred on by the need to improve my images and the ‘opportunity’ of more time that Covid-19 has provided us all recently, I returned to PixInsight a number of times over the summer and slowly made progress.

Cropped HaLRGB M101 practice image from scratch – using Pixel Math to add Ha has worked within the galaxy but unfortunately seems to have spread into other areas too!

Using my existing data for M101, I first spent many days working through the calibration and integration process, which can only be described as exhausting!  Undeterred and in an effort to speed up matters, I moved on to Batch Processing, which though helpful only partially assists the overall task of pre-processing and inevitably put PixInsight aside again in order to find renewed enthusiasm to continue.  From this initial experience I had already come to one conclusion – that I would not be using PixInsight for calibration and integration, continuing for now with Deep Sky Stacker and possibly later switching to either Astro Pixel Processor (APP) or Astro Art, both of which get good user reviews.

From the results of others it’s clear that PixInsight is a route to better images and there is no shortage of online tutorials and books but hitherto I’d not found one that worked well for me.    Online tutorials by Light Vortex Astronomy are an excellent learning aid but tricky to work with on screen and Harry’s Astro Shed video tutorials were also helpful but I needed a book on the matter to read, thumb through and casually refer to when needed.  Then I got lucky!

It was my good fortune that in May a new text by Rogelio Bernal Andreo (AKA ‘RBA’) Mastering PixInsight became first digitally available and then in September was published as a book. The work is divided into two well thought out and presented volumes:

  • A comprehensive, easy-to-follow and understand description of how to use PixInsight
  • A reference guide providing more in-depth information on specific PixInsight processes

The two volumes come as a boxed set, are well bound and illustrated and for the first time (from my point-of-view) form an accessible, easy to use and helpful text on PixInsight.  RBA deserves every success with this outstanding book(s) which I believe will transform the otherwise torrid experience of learning PixInsight.  Armed with RBA’s Mastering PixInsight, Light Vortex Astronomy online tutorials, Harry’s Astro Shed and a other online videos, I’m pleased to say that I am now at last able to use PixInsight for processing and LBN325 is my first image; I should also mention Shawn Nielsen’s excellent Visible Dark YouTube channel, which demonstrates a number of very useful techniques.

As my first attempt to use PixInsight for processing, I’m pleased with the outcome of LBN 325 but realise there’s still much more to learn and, aside from the framing error, it’s clear that even more integration time is needed to get the best of LBN325 and its companions.  Going forwards PixInsight and Photoshop both have their respective strengths and weaknesses and judicious use of various techniques from each is probably going to yield the best results.  For now, at least, I feel the considerable time put into learning PixInsight is starting to pay off and I’ve finally turned a corner with my processing.

 IMAGING DETAILS
ObjectLBN325 & 326 +  Barnard 345 &  SNR G082.2+5.3 DWB 156, 167, 165, 168, 170, 176,
ConstellationCygnus
Distance5,000 light-years?
Size>2o
Apparent MagnitudeNA
  
Scope William Optics GT81 + Focal Reducer FL 382mm  f4.72
MountSW AZ-EQ6 GT + EQASCOM computer control & Cartes du Ciel
GuidingWilliam Optics 50mm guide scope
 + Starlight Xpress Lodestar X2 camera & PHD2 guiding
CameraZWO1600MM-Cool mono  CMOS sensor
 FOV 2.65o x 2.0o Resolution 2.05”/pix  Max. image size 4,656 x 3,520 pix   
EFWZWO x8 + ZWO LRGB & Ha OIII SII 7nm filters 
Capture & ProcessingAPT + PHD2 +  DSS + PixInsight +  Photoshop CS3 + Topaz Denoise AI
Image Location            Centre  RA 20h 18’ 42.55”     DEC +46 25’ 03.12”        
ExposuresNB 300 sec x 53 Ha & x 38 OIII       BB 60 sec x 49 R, x 35 G & x 50 B Time: NB 7hr 58 min   BB 2hr 14 min  TOTAL 9hr  49 min   
 @ 139 Gain   21  Offset @ -20oC    
CalibrationDarks 5 x 300 sec & 10 X 60’    20 x 1/4000 sec Bias   5 x Ha & OIII Flats  10 x LRGB Flats     @ ADU 25,000
Location & DarknessFairvale Observatory – Redhill – Surrey – UK        Typically Bortle 5-6
Date & Time9th 13th & 14th September 2020  @ +21.00h  
WeatherApprox. 15-20oC   RH <=60%                  🌙 20% waning


Nice But Dim

Abell 21 Combo All 2018 2020 RGB FINAL CROP (Large)

Contrary to appearance, a planetary nebula is not a planet but a emission nebula, an expanding shell of glowing ionized gas discharged from a red giant star at the end of its life.  At this late stage of stellar evolution the star runs out of fuel to burn, with the result that the outer layers are blown away and expand into space typically in the shape of a ring or bubble.  At the centre of the planetary nebula is the remnant of the star, which is left as a White Dwarf.

JEL_ITV_ElementFormation_BG-Plate_Updated_23Oct17

The term “planetary” nebula is therefore completely misleading and derives its name from none other than William Herschel, in an era when such objects were thought to look like planets.  We now believe some 10,000 planetary nebulae exist throughout the Milky Way, though only 1,500 have been identified (see NASA HST images below), including M57 the Ring Nebula and M27 the Dumbbell Nebula both popular amongst astrophotographers.

HST PNSuch objects are usually short lived and unfortunately small and faint, making them a challenge for smaller telescopes and Bortle 5-6 skies, such as I have at Fairvale Observatory.  However, I recently decided to return to the Medusa Nebula, a planetary nebula which I previously had imaged as a test in February 2018.  On that occasion the integration time was limited to only 75 minutes (see below), now the objective was to build on the previous data and thereby hopefully improve the image quality.

Abell 21 RGB 2018 Final (Large)

Combining the data from 2018 with that of 2020 resulted in a significant increase in total integration time to just over 5-hours, with the impact on the final image clearly noticeable (see top-of-the-page cropped and below uncropped – showing the difference in alignment between pre-plate solving 2018 & 2020 data), mainly in the form of reduced noise and better colour saturation.  I am a little surprised that the improvement was not greater but perhaps it’s a case of either (a) considerably more time is still required, particularly in the weak OIII wavelength,  or (b) it’s really too much of a challenge for my equipment?

However, looking at other images of the Medusa Nebula and considering its size and very low surface brightness, it’s obvious this is one of the more difficult planetary nebula objects to image and all things considered I’m happy with outcome new of this new version.

Abell 21 Combo All 2018 2020 RGB FINAL

IMAGING DETAILS
Object The Medusa Nebula  AKA Abell-21,  Sharpless 2-274 or PK205+14.1
Constellation Gemini
Distance 1,500 light-years
Size Approx.. 12’ x 9’
Apparent Magnitude +15.99
 
Scope  William Optics GT81 + Focal Reducer FL 382mm  f4.72
Mount SW AZ-EQ6 GT + EQASCOM computer control & Cartes du Ciel
Guiding William Optics 50mm guide scope
  + Starlight Xpress Lodestar X2 camera & PHD2 guiding
Camera ZWO1600MM-Cool mono  CMOS sensor
  FOV 2.65o x 2.0o Resolution 2.05”/pix  Max. image size 4,656 x 3,520 px   
EFW ZWOx8 + ZWO LRGB & Ha OIII SII 7nm filters 
Capture & Processing Astro Photography Tool + PHD2 +  Deep Sky Stacker & Photoshop CS3
Image Location              & Orientation Centre  RA 05:55:38      DEC 01:59:40  @20.49h                     

Image rotated 180o for presentation Top = South     

Exposures 37 x 300 sec  Ha, 25 x 300 sec RGB

Total Time 5hr 10 min   

  @ 139 Gain   21  Offset @ -20oC    
Calibration 5 x 300 sec Darks  20 x 1/4000 sec  Bias  10 x  Ha & OIII Flats  

@ ADU 25,000

Location & Darkness Fairvale Observatory – Redhill – Surrey – UK        Typically Bortle 5-6
Date & Time 11th February 2018  + 2nd &  3rd March 2020  @ +21.00h  
Weather Approx. 5oC   RH <=75%                  🌙 +29% waxing

Jinxed

Picture saved with settings embedded.

It seems the start of the year has been jinxed, resulting in something of a mixed bag for my astronomy but thankfully not without some positives.  A combination of illness, house decoration and some quite awful weather, really curtailed the possibility of any significant astrophotography projects.  Despite these difficulties, in the few moments that were available I have managed to carry out some useful experiments which hopefully lay the foundations for greater things the future – clear skies permitting!

Following the success of my first mosaic in 2019, I decided to undertake something more ambitious over the winter, inevitably returning to Orion – specifically Barnards’s Loop.  Unseen with the naked eye, the camera discloses the presence of this large arc of ionized gas that is approximately centered on the Orion Nebula, so large that only a conventional wide field camera lens can usually capture the entire Loop.  To obtain a higher quality image using a telescope it’s therefore necessary to create a mosaic.  With this in mind and keen to expand – physically and metaphorically – my use of the mosaic technique, Barnard’s Loop seemed a worthy object.

BLoop Mosaic PLan

I planned and compiled my previous mosaic of the Heart & Soul Nebula manually but following the recent addition of a mosaic tool to Cartes du Ciel (CdC), which importantly also integrates with my image capture software Astro Photography Tool (APT), this time I was able to plan a 14 (2×7) panel mosaic to image Barnard’s Loop (see accompanying CdC plan above) and the adjacent region.  With the ability to vary the overlap and mosaic size up to 10 x 10 panels, once constructed using the CdC mosaic planning the related data is saved to a file, which can then be imported as a series of custom objects into the Point Craft plate solving section of APT; each object is defined by its central RA and DEC co-ordinates.  Thereafter, using the plate solving function, the camera and scope are centered one-by-one on each panel for imaging, either manually or by writing a suitable script to automate imaging.

Given the size of the undertaking and difficulties with weather at this time of the year inevitably limiting imaging time, plus the strong Ha-nature of Barnard’s Loop, I chose to confine imaging to only Ha subs, which would pick-out the feature well and thus form a good basis for compiling the final mosaic.  The project started well on 3rd January when I was able to complete imaging the three panels covering the central sections of the large upper arm of the arc, unfortunately thereafter it all went downhill – mostly!

As Orion and therefore the Loop moved inexorably westwards, imaging time became increasingly restricted, further compounded by poor weather and when it was clear, poor seeing conditions.  Thus acquisition of the remaining panels became more and more difficult, with many of the resulting panels of only poor quality.  All-in all I managed to image twelve of the total 17 panels, adding three to the original plan to incorporate the lower ‘tail’ located between Saiph and Rigel.  Whilst the said panels covered the entire feature, such was the poor quality of many they could not be used to achieve the final aim of the project – a Ha-image of the entire Barnard’s Loop.

Using Microsoft’s ICE software, the upper section of the Loop came together well but I’ve not been able to incorporate the middle and lower sections which were of low-quality.  I’m quite pleased with the general outcome but consider the project has demonstrated that very large mosaics of this scale are an unlikely proposition at Fairvale Observatory given UK weather conditions and lack of a permanent a setup required to maximize imaging opportunities.  Notwithstanding, I believe up to four panel mosaics should be OK – we shall see.

Subsequently the weather was very bad and very, very wet, so unable to image I reprocessed NGC 1333 from last year, which at the time had not come out well.  I’d previously noticed that for some reason images had been exhibiting poor quality in the corners, where for no obvious reason stars showed trailing in the processed stacks – though not in the original subs. The solution, thankfully discovered via the Deep Sky Stacking Forum, was to change the Stacking Alignment setting from Automatic to Bilinear and bingo, all was well.

NGC 1333 LRGBx CropF2

NGC 1333 is a colorful reflection nebula located within the dark nebula Rho Ophiuchi, a vast area of gas and dust which is one of the closest star forming regions to the Solar System.  In order to evaluate its potential for my equipment I collected just over two hours of LRGB data in January 2019. As previously noted, at the time I was disappointed with the outcome but I now think the revised image processing indicates that with much greater integration time this object could work with more subs – watch this space.

As the bad weather continued throughout most of February there have been very few clear skies but on two such nights I managed brief imaging tests of two other January / February objects which I hope to return to in another year.  First of these was another dark nebula Barnard 22, illuminated from behind by the reflection nebula IC 2087. With total LRGB imaging time of just 1hr 24 minutes the processed image was extremely noisy but it was good to see the broad outline of B22 framed well within my FOV and suggests it too could be a viable object for another day.

Finally, with the daffodils already blooming, it was clear that winter was going to be a disappointing time for serious astrophotography, however, I was still able to attempt one final object before the winter night skies receded beyond the western horizon for another year.  Surprisingly I had hitherto overlooked this object, visually located just beyond the upper edge of Barnard’s Loop, which though difficult is fortunately also strong in the Ha-wavelength.  Lynds’ Dark Nebula (LDN) 1622 AKA the Bogeyman Nebula, describes the somewhat jinxed period I’ve experienced but this time fortuitously brought my earlier work together (x4 panel mosaic below: The Bogeyman – lower left + upper Barbard’s Loop + M78 – top right).

Picture saved with settings embedded.

Despite my best efforts I was unable to see the Bogeyman when framing the image in APT even after stretching but fortunately it still turned out well.  I noticed that most other successful images were mainly undertaken in HaRGB, however with limited time before the clouds again inevitably rolled, the few RGB subs obtained failed to add much colour to my image on this occasion.  Notwithstanding, with much greater integration time the final Ha-image holds great promise.  Furthermore, the said image could be incorporated into the upper main section of the Barnard’s Loop, together with the M78 reflection nebula, to finally make a complete and worthy mosaic image consisting of six panels – see main image at the top of the page and detailed x4 panel mosaic above.  Contrary to the name, on this occasion the Bogeyman completed the jigsaw and saved the day!

IMAGING DETAILS
Object Barnard’s Loop
Constellation Orion
Distance 1.434 light-years
Size 10o  ~300 light-years  
Apparent Magnitude 5
 
Scope  William Optics GT81 + Focal Reducer FL 382mm  f4.72
Mount SW AZ-EQ6 GT + EQASCOM computer control & Cartes du Ciel
Guiding William Optics 50mm guide scope
  + Starlight Xpress Lodestar X2 camera & PHD2 guiding
Camera ZWO1600MM-Cool mono  CMOS sensor
  FOV 2.65o x 2.0o Resolution 2.05”/pix  Max. image size 4,656 x 3,520 pix   
EFW ZWOx8 + ZWO LRGB & Ha OIII SII 7nm filters 
Capture & Processing Astro Photography Tool + PHD2 +  Deep Sky Stacker & Photoshop CS3
Image Location              & Orientation Various     
Exposures 10 x 5 x 300 sec  Ha

i.e. 25 minutes / panel or total time: 4hr 10 minutes   

  @ 139 Gain   21  Offset @ -20oC    
Calibration 5 x 300 sec Ha, OIII & SII  Darks,  20 x 1/4000 sec Bias  10 x  Ha, OIII & SII Flats               @ ADU 25,000
Location & Darkness Fairvale Observatory – Redhill – Surrey – UK        Typically Bortle 5-6
Date & Time Panels 2, 3 & 4  January 3rd 2020  @ +21.00h

Panels 5, 6, 7, 8, 9 &14  January 18th 2020  @ +20.0h

Panels 15*,16 & 17* January 19th 2020  @ +19.45h  

*rejected

Weather Approx. 2oC   RH <=80%                  🌙 30% waning
IMAGING DETAILS
Object NGC 1333 refection nebula 
Constellation Orion
Distance 1,000 light-years
Size 6’ x 3’
Apparent Magnitude 5.6
 
Scope  William Optics GT81 + Focal Reducer FL 382mm  f4.72
Mount SW AZ-EQ6 GT + EQASCOM computer control & Cartes du Ciel
Guiding William Optics 50mm guide scope
  + Starlight Xpress Lodestar X2 camera & PHD2 guiding
Camera ZWO1600MM-Cool mono  CMOS sensor
  FOV 2.65o x 2.0o Resolution 2.05”/pix  Max. image size 4,656 x 3,520 pix   
EFW ZWOx8 + ZWO LRGB & Ha OIII SII 7nm filters 
Capture & Processing Astro Photography Tool + PHD2 +  Deep Sky Stacker & Photoshop CS3
Image Location              & Orientation Centre  RA 03:29:07 (23?)      DEC 31:28:14  @ +19.16h                     

Top = North     

Exposures 6 x 300 sec  L&B 7 x 300 sec R&G

Total Time: 2hr 10 min    

  @ 139 Gain   21  Offset @ -20oC    
Calibration 5 x 300 sec Ha + 10 X 300’ RGB  Darks,  20 x 1/4000 sec Bias  10 x  HaRGB Flats               @ ADU 25,000
Location & Darkness Fairvale Observatory – Redhill – Surrey – UK        Typically Bortle 5-6
Date & Time 28th January 2020  @ +19.15h  
Weather Approx.?       RH <=?                 🌙 9% waxing
IMAGING DETAILS
Object Lynds’ Dark Nebula (LDN) 1622  AKA Bogeyman Nebula
Constellation Orion
Distance 500 light-years
Size 1o   ~10 light-years?
Apparent Magnitude ?
 
Scope  William Optics GT81 + Focal Reducer FL 382mm  f4.72
Mount SW AZ-EQ6 GT + EQASCOM computer control & Cartes du Ciel
Guiding William Optics 50mm guide scope
  + Starlight Xpress Lodestar X2 camera & PHD2 guiding
Camera ZWO1600MM-Cool mono  CMOS sensor
  FOV 2.65o x 2.0o Resolution 2.05”/pix  Max. image size 4,656 x 3,520 pix   
EFW ZWOx8 + ZWO LRGB & Ha OIII SII 7nm filters 
Capture & Processing Astro Photography Tool + PHD2 +  Deep Sky Stacker & Photoshop CS3
Image Location              & Orientation Centre  RA 05:55:38      DEC 01:59:40  @20.49h                     

Image rotated 180o for presentation Top = South     

Exposures 19 x 300 sec  Ha, 4 x 300 sec RGB

Time: Ha only 1hr 35 min   Total 2hr 35 min   

  @ 139 Gain   21  Offset @ -20oC    
Calibration 5 x 300 sec Ha + 10 X 300’ RGB  Darks,  20 x 1/4000 sec Bias  10 x  HaRGB Flats               @ ADU 25,000
Location & Darkness Fairvale Observatory – Redhill – Surrey – UK        Typically Bortle 5-6
Date & Time 17th January 2020  @ +20.50h  
Weather Approx. 16oC   RH <=75%                  🌙 29% waning


Reflections 2019

The website Watch This Space (Man) began in 2015 as I started out in astronomy and is a record of my personal journey, comments and thoughts.  Apart from the main blog, the website also contains links to other astrophotographers, astronomy tools, astronomy weather, and scientific papers etc., which can be accessed from the top menu.

Whilst there is a photo gallery of my work in this website, an overview of the better images can be found in the My Astrophotography FLICKR album, which can be found in the GALLERY menu.  Furthermore, this year I took the plunge and joined the Astrobin community, where my images can be found using the appropriate link also in the GALLERY menu.

Heat Map 2019

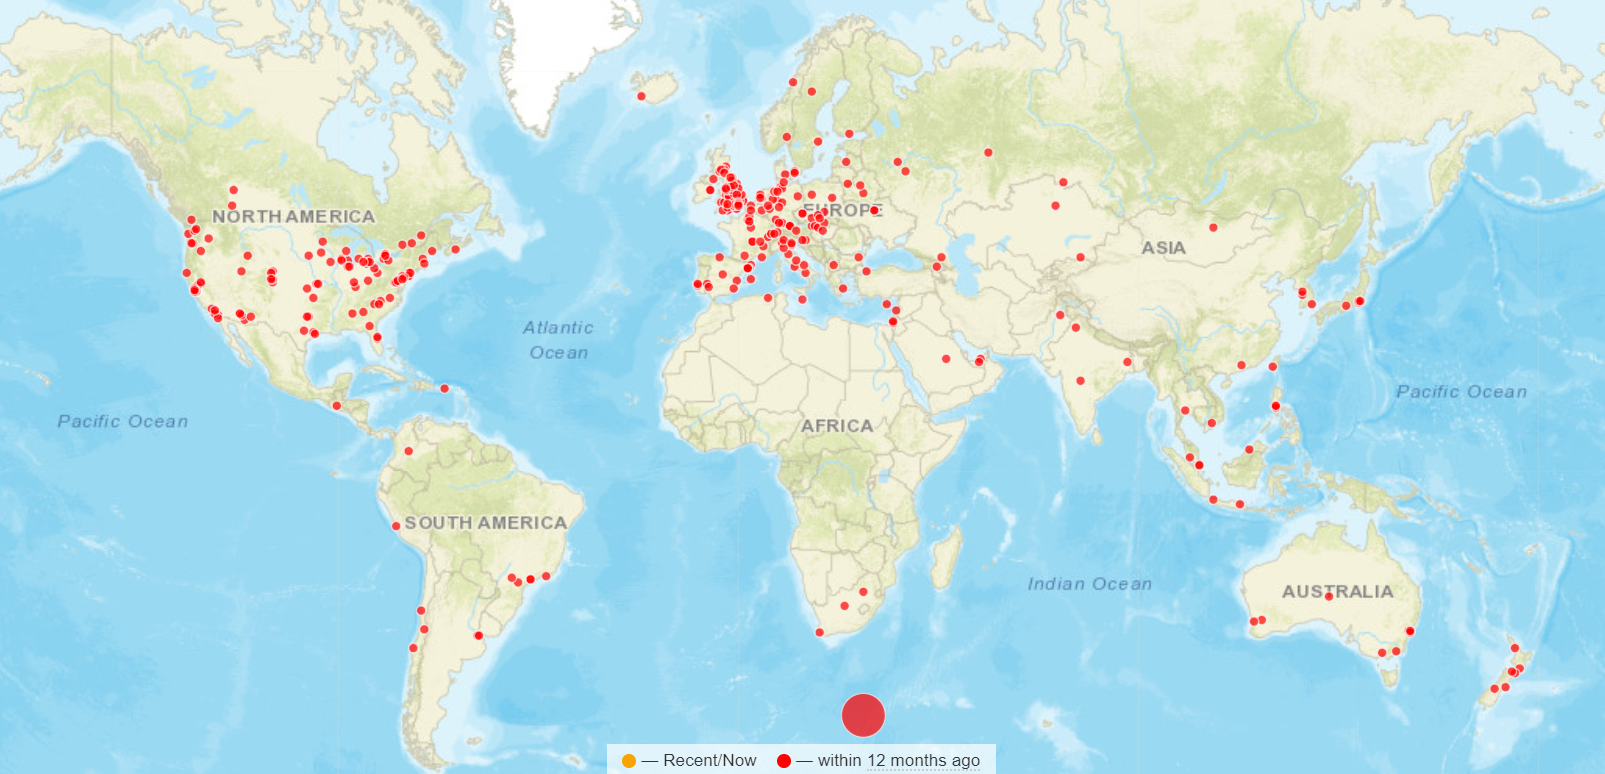
During the past year the site was visited from 64 different countries, literally from every corner of the world.  I always like to hear from anybody out there – comments, questions, help or just to say hello  – and can be contacted via details given in the ABOUT menu section or just leave a comment on any item if you prefer.

Reflections 2019 BannerX

Reflections is compiled at the end of each year as a review of my astronomy and astrophotography during the previous twelve months, together with some thoughts on possible future developments.

Overview, Images & Goals for 2020

The past year’s plan was simple: build-on and experiment with developments from the previous year, in particular using Plate Solving to achieve longer integration times and explore further the north sky, which I could now see from the new Shed Observatory and operates during the spring and summer months.

By routinely using Plate Solving integration times, now obtained over a number of nights or even months, have increased by up to four-fold compared to previous years.  As a result I concentrated on less objects but for longer time, achieving between 6 to 8 hours of subs on some occasions, the limiting factor as ever being British weather.  Although quite modest compared to those able to use fixed observatories, or in clear, dry climates with Bortle 1 or 2 skies, I was very pleased with the positive impact this had on my images.

Starting astronomy and astrophotography somewhat late in the day a few years ago, like many others after retirement, the learning curve was steep and often frustrating.  There were times I’ve almost considered giving up but with perseverance I’ve made progress and often get great pleasure from some of the results, as well as just enjoying and learning about this wonderful subject.  For me it is just a hobby but recognising some of my achievements and abilities acquired since starting out in 2014, I was especially proud this year to be elected a Fellow of the Royal Astronomical Society.  For all the help in reaching this point, I’d like to thank all those who have helped me from the astronomy community, wherever they are.

RAS logo

Favourite Images

My weakness in astrophotography remains processing but having at last obtained some good integration times, this year I made a greater effort to improve these techniques – with some success.  Adopting the theme less is more, I imaged just 17 different objects this year – of which nine were full narrow or broadfband images, with the rest being  experimental or DSLR – with a total integration time of 65 hours (2018: 25 objects & 43 hours).  The resulting images turned out well, achieving Picture of the Week on the British Astronomical Association website on six occasions.  It’s therefore difficult to choose favourites from this select group based on merit alone, so this year’s favourites (see below) represent those good images that also mark a significant milestone in my astrophotography.  Detailed reviews of these and all other images from 2019 are discussed in dedicated articles that can be found via the Blog Index under the ABOUT dropdown menu.

SHO2 CompF (Large)

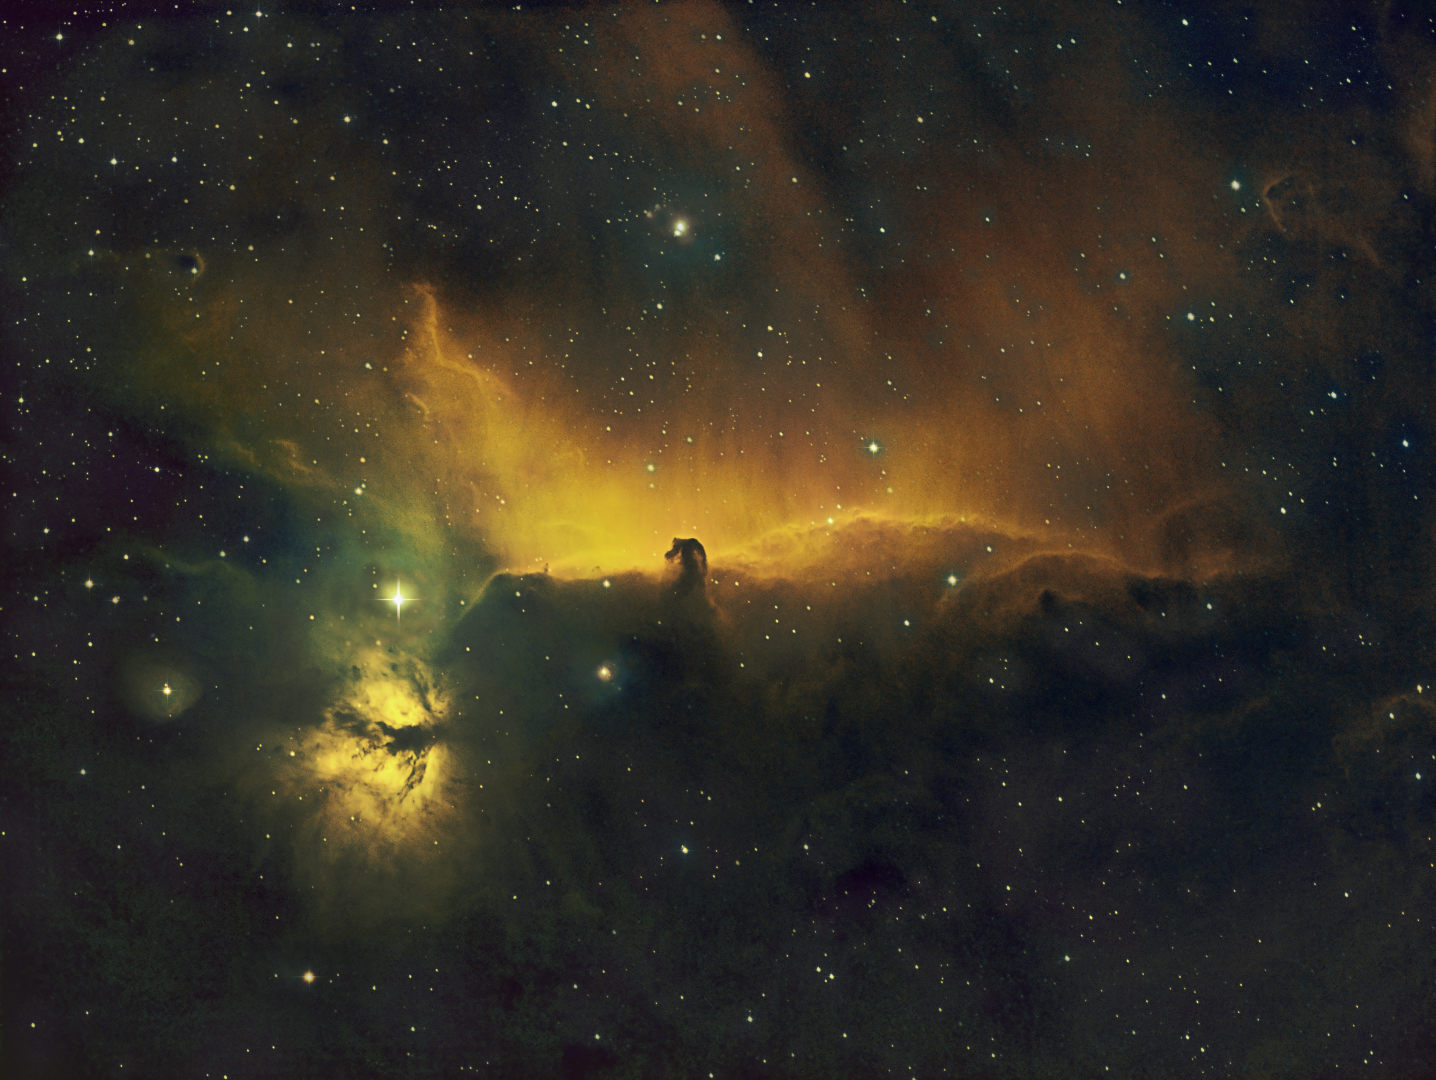
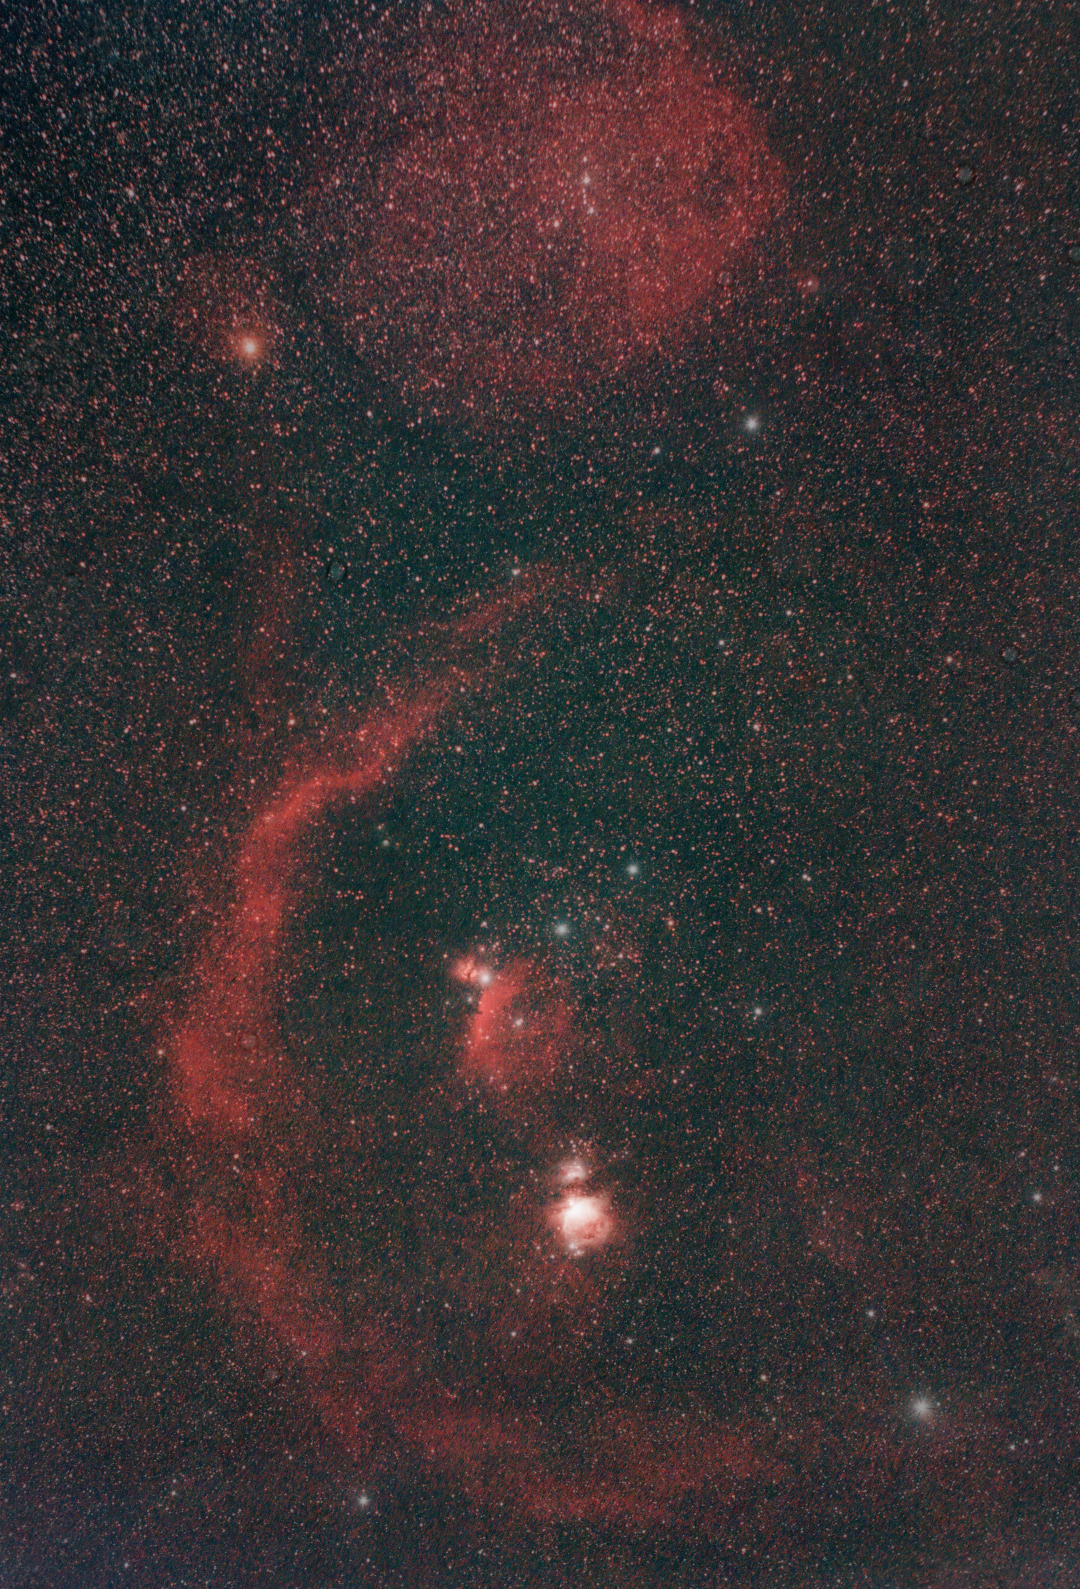
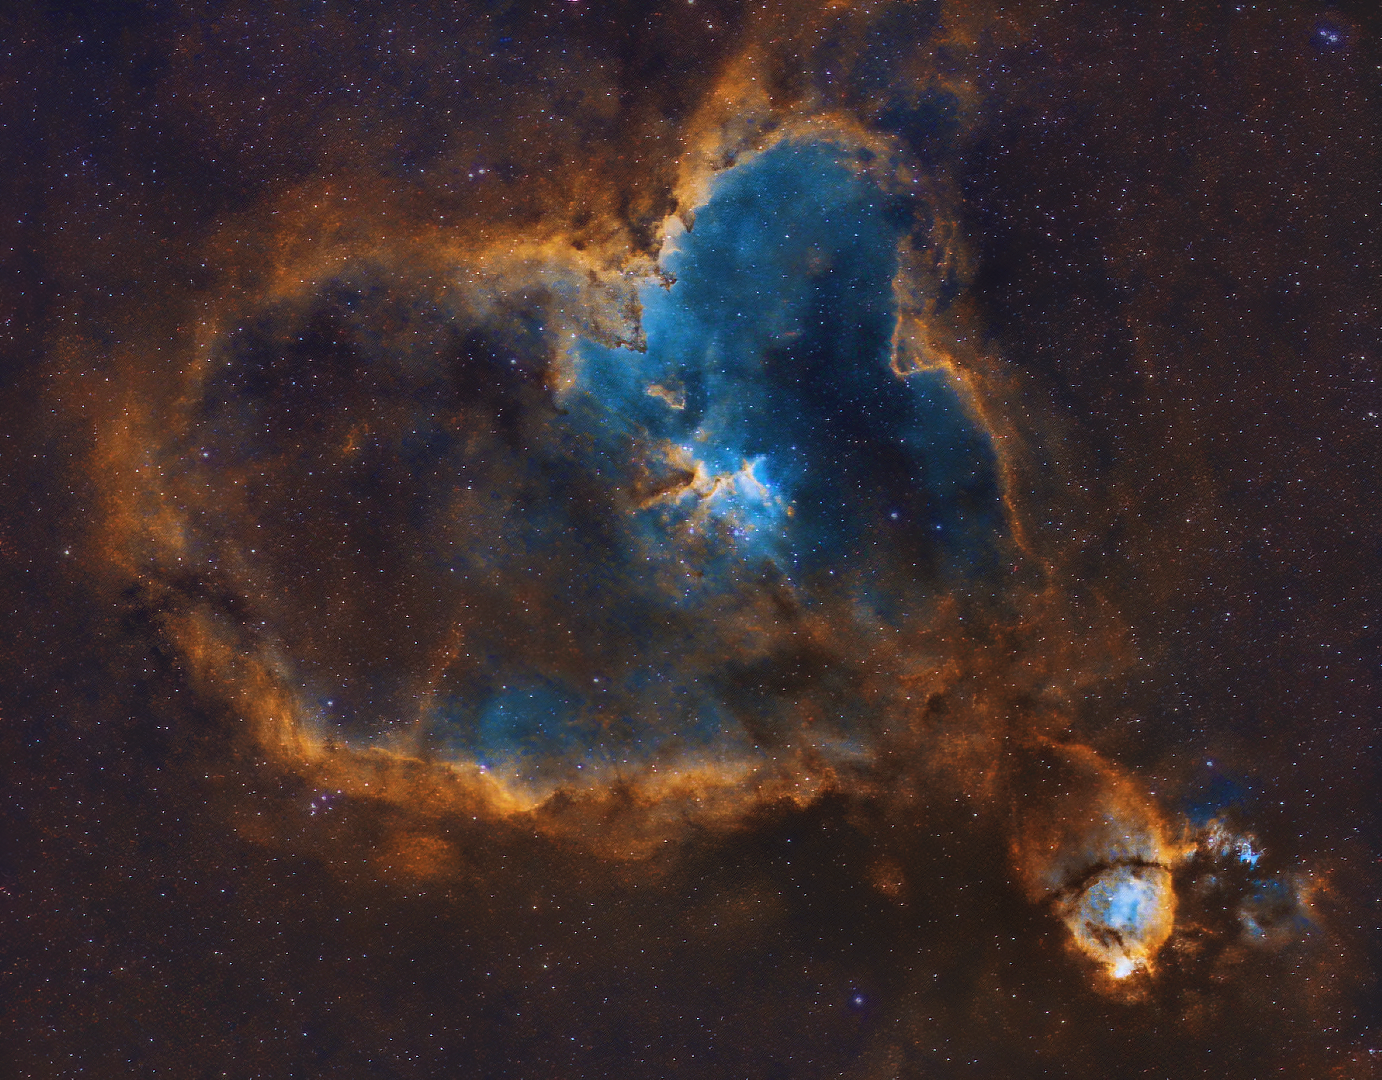
Horsehead & Flame Nebula: Usually imaged in LRGB broadband, this narrowband SHO version produced a very different affect and colours, whilst also showing the beauty of the accompanying clouds of interstellar gas and dust.  Taken over three nights, at nearly 7-hours, this image was also one of my longest integration times to date.     

M101 HaLRGB final Closeup

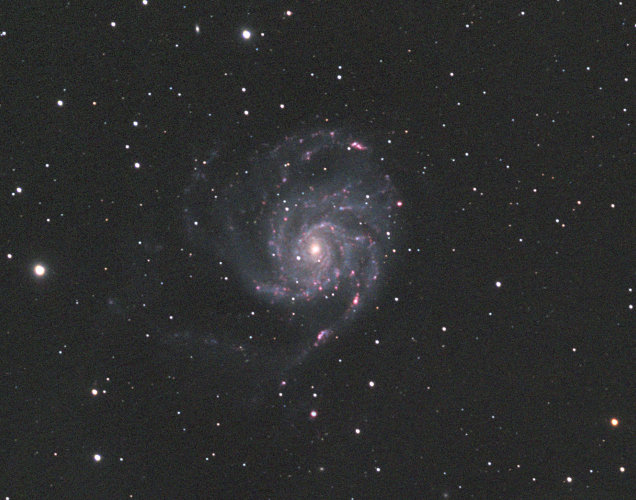
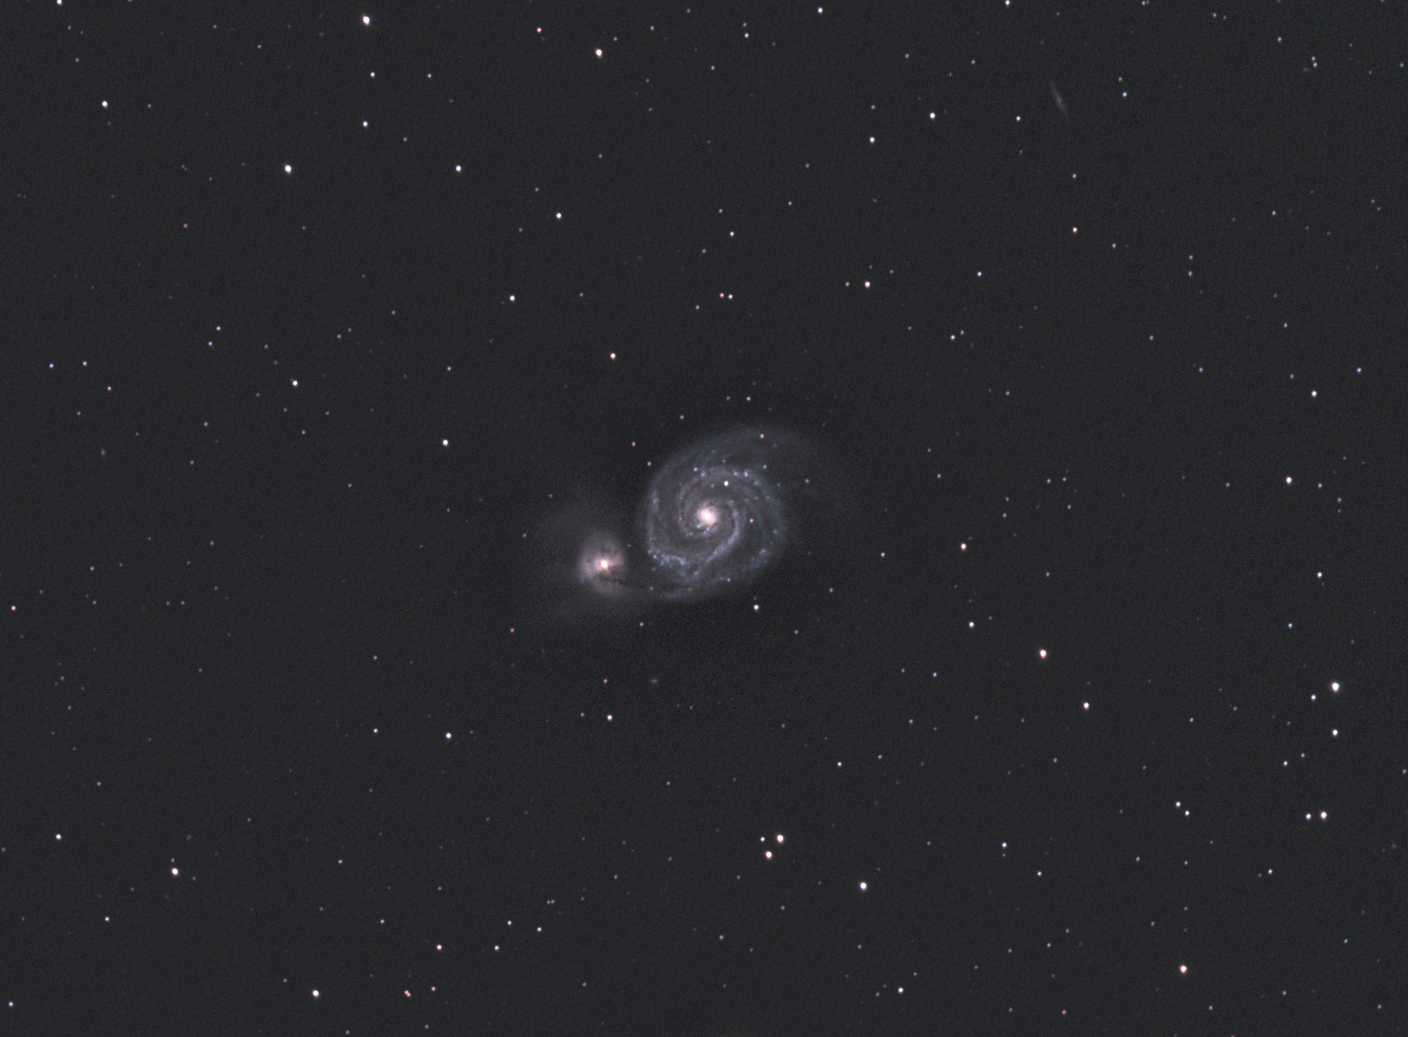
M101 Pinwheel Galaxy: Given Bortle 5-6 skies, being on the Gatwick Airport flightpath and a using a small refractor, I struggle to image galaxies and often LRGB images in general from Fairvale Observatory.  However, on this occasion the combination of 5-hours HaLRGB subs and new processing techniques to enhance the colours, M101 proved the exception and is perhaps my first decent classic spiral galaxy imaged from home.  Moreover, the HII regions light up along the spiral arms with the addition of Ha wavelength, producing a dazzling and dynamic image. 

Picture saved with settings embedded.

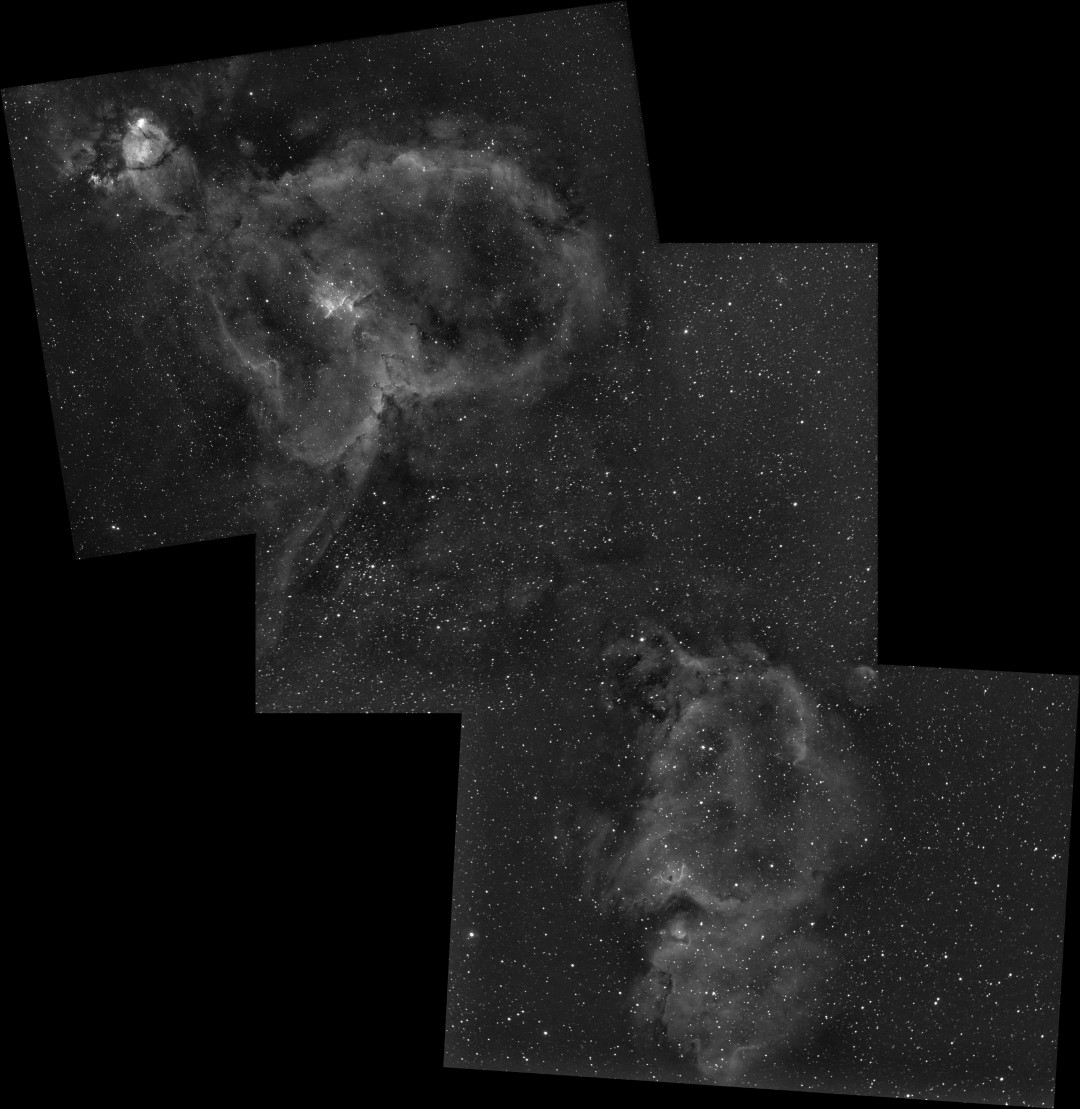
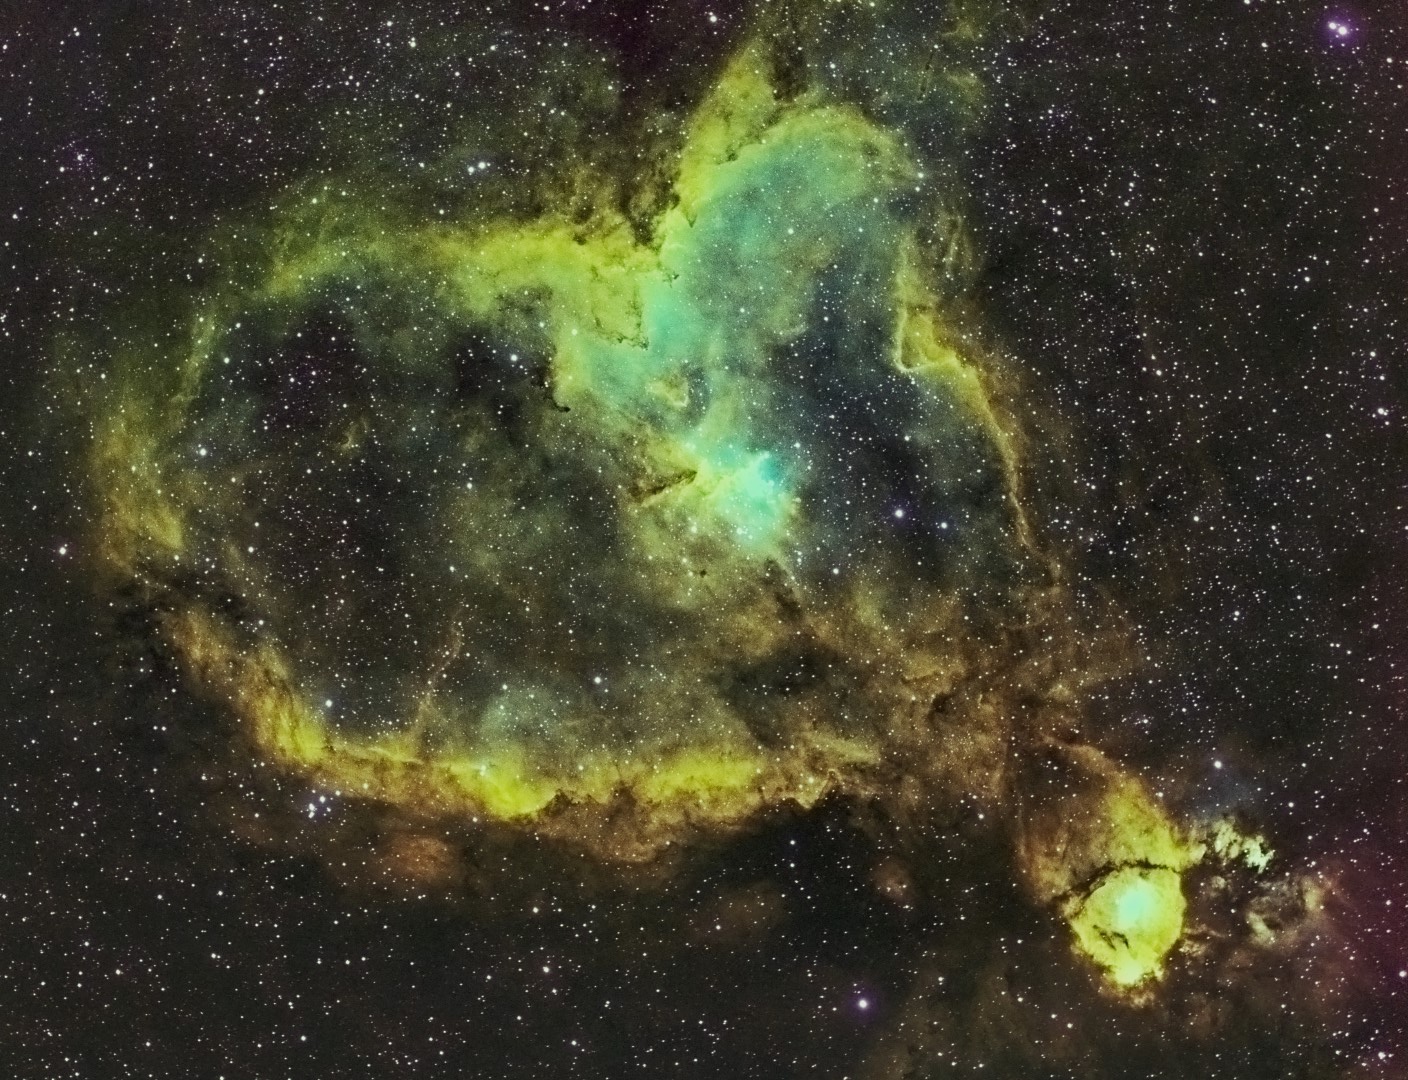
Heart & Soul Nebula:  Combining existing data from 2018 of the Heart Nebula and new 2019 data of the Soul Nebula + the intervening space, this is my first albeit modest mosaic, which promises to open up significant possibilities in the future. 

RECORD CARD – 2019
Goal Specifics / Results Outcome
Improve broadband and narrowband imaging


Achieved major increase of image integration times and overall quality. MUCH, MUCH BETTER


Improve processing Continuing to make slow improvements, with greater use of new Photoshop techniques. BETTER


Expand & Improve Widefield Imaging Despite some good images of the Milky Way in the USA, I never used the Vixen Polarie tracking mount and did not make it to any other dark sky sites  = disappointing. FAILED


My objectives in 2019 mostly went well in (see above), so here goes for 2020:

  • Imaging: There’s always scope to improve imaging techniques but probably most of all I still need to improve guiding quality and increase exposure and image integration times even further.
  • Mosaic: Expand the use of mosaic imaging using Plate Solving and new CdC planning software.
  • Improve processing: I expect this will continue to be something of a challenge for some time to come unless I go to the dark side and adopt software such as PixInsight & / or APP.
  • New Observatory: Unfortunately this will not be a fixed obsy whilst I continue to live here at Fairvale which is unsuitable.  However, I’m hopeful that another location between the Main (North) Observatory and the Shed Observatory might open up the north sky better and by getting away from the high hedges that surround the garden allow longer imaging sessions than can be currently obtained at the Shed.
  • Other: My mind is always thinking about larger telescopes or a dual rig and / or a new high-end encoded mount but probably not until I make further progress with the above goals and / or move to a better dark sky location – dreaming is part of astrophotography = watch this space!

Although you never know, I don’t see any major breakthroughs in the coming year but more of the same – revisiting familiar objects in order to obtain new image versions based on greater integration time and hopefully using mosaic techniques to build-out images in order to encompass wider areas of the sky.  This year I was surprised to discover objects that I had hitherto considered out of reach from my location (M101, M51 etc.), as well as exciting features that were completely new to me and still hold great promise e.g. DWB 111 AKA the Propeller Nebula.

Looking back I’m very happy to say 2019 was an excellent year for astronomy and astrophotography, almost certainly my best yet.  You can’t ask for more than that and I hope that WTSM’s Reflections 2020 will record further such success.

Watch this space!

wtsm logo


2019 CHRONICLE 

Below is a quarter by quarter summary of my astronomy and astrophotography for the year, followed by an imaging record.

JANUARY TO MARCH

Towards the end of 2018 I decided to undertake a project, with the prime objective to gather a much longer period of integration than hitherto achieved by using my newly developed skill of Plate Solving.  I’d previously imaged the Horsehead and Flame Nebula in the more traditional colour palette, either with a modded DSLR or by LRGB broadband.  However, I’d recently seen this iconic image undertaken using the Hubble Palette to great affect and was inspired to do the same myself. Thereafter, for more than 2-months the clouds rolled in and I thought my project would then be impossible, not least because by now Orion had crossed the Meridian in the early evening and imaging times were at best limited.  But as is often the case with astrophotography everything suddenly changed and it was game on!

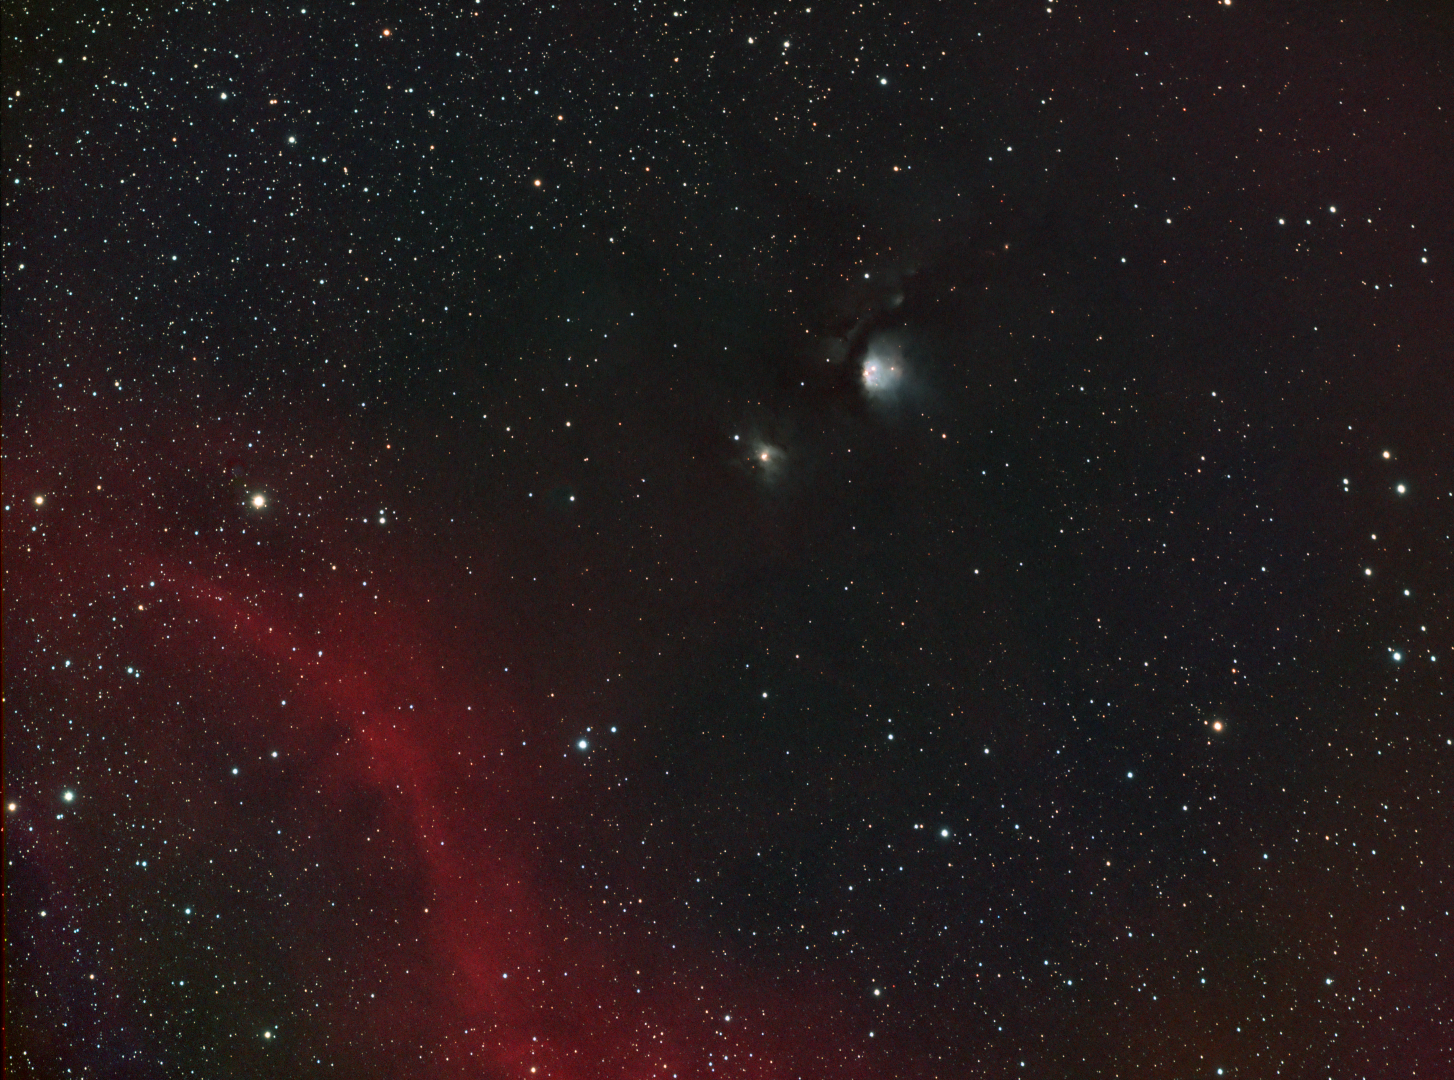
The first evening of clear skies since 11th November 2018 coincided with the full lunar eclipse on 21st January, which I was therefore able to image once again.  Then six days later a very untypical clear and quite warm period of weather arrived and I was able to complete my intended project after all, with further time to image both the Great Orion Nebula and the reflection nebula M78 + Barnard’s Loop (see images below).

HaLRGB2FINALcrop (Large)

Combined +180 degrees 3+5min HaLRGB (Large)

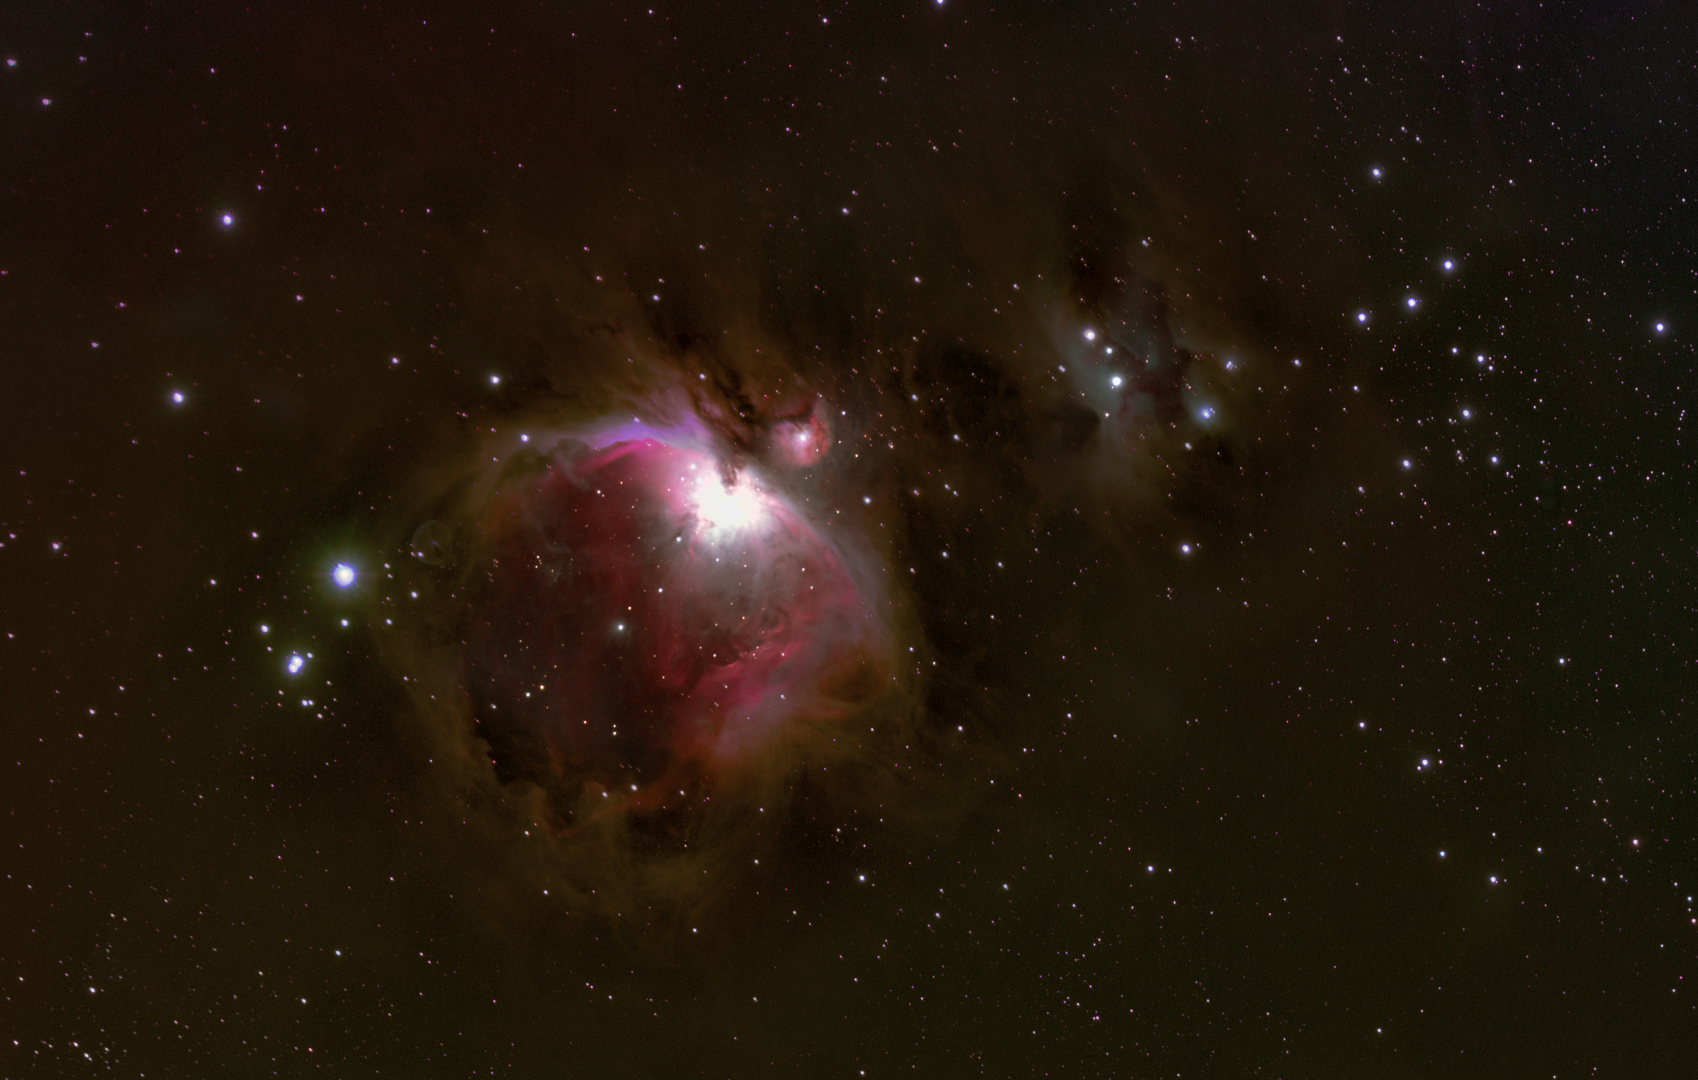
Achieving much longer integration times of between 5 and nearly 8-hours, the impact on the resulting images was transformative.  I was especially pleased with the outcome of the Horsehead project in SHO (see Favourites Images section) but found the Ha-only starless version of the same scene (see below) particularly mesmerising, as the large HII structures throughout this region bring the image to life.

NGC 2024 Ha Starless2

By the end of February the night sky at 51o latitude has moved inexorably on to the so-called Galaxy Season, which provides something of a dearth of imaging opportunities for my 81mm telescope.  However, with a good patch of weather at the end of March, whilst experimenting with the Leo Group I noticed that small areas of Ursa Major region could be seen directly above for a couple of hours, which to my surprise opened up a whole new world of possibilities hitherto considered unavailable.  Shortly after I managed to obtain almost 5-hours of data on M101 the Pinwheel Galaxy, which is one of my best galaxy images taken from Fairvale Observatory (see Favourite Images section).

APRIL TO JUNE

Having discovered the albeit limited possibilities of seeing Ursa Major, I moved to the Shed Observatory early in April, which by then afforded slightly better views of the same area of sky and thereby to my great joy provided the possibility of imaging the wonderful Whirlpool Galaxy, M51.  Unfortunately time was somewhat limited but it was better than nothing and I was thrilled to obtain an image of this wonderful object for the first time.  Weather permitting I’ll be back for more data in 2020 with which to build on the promising result obtained this year.

LRGB Image FINALX2 (Large)

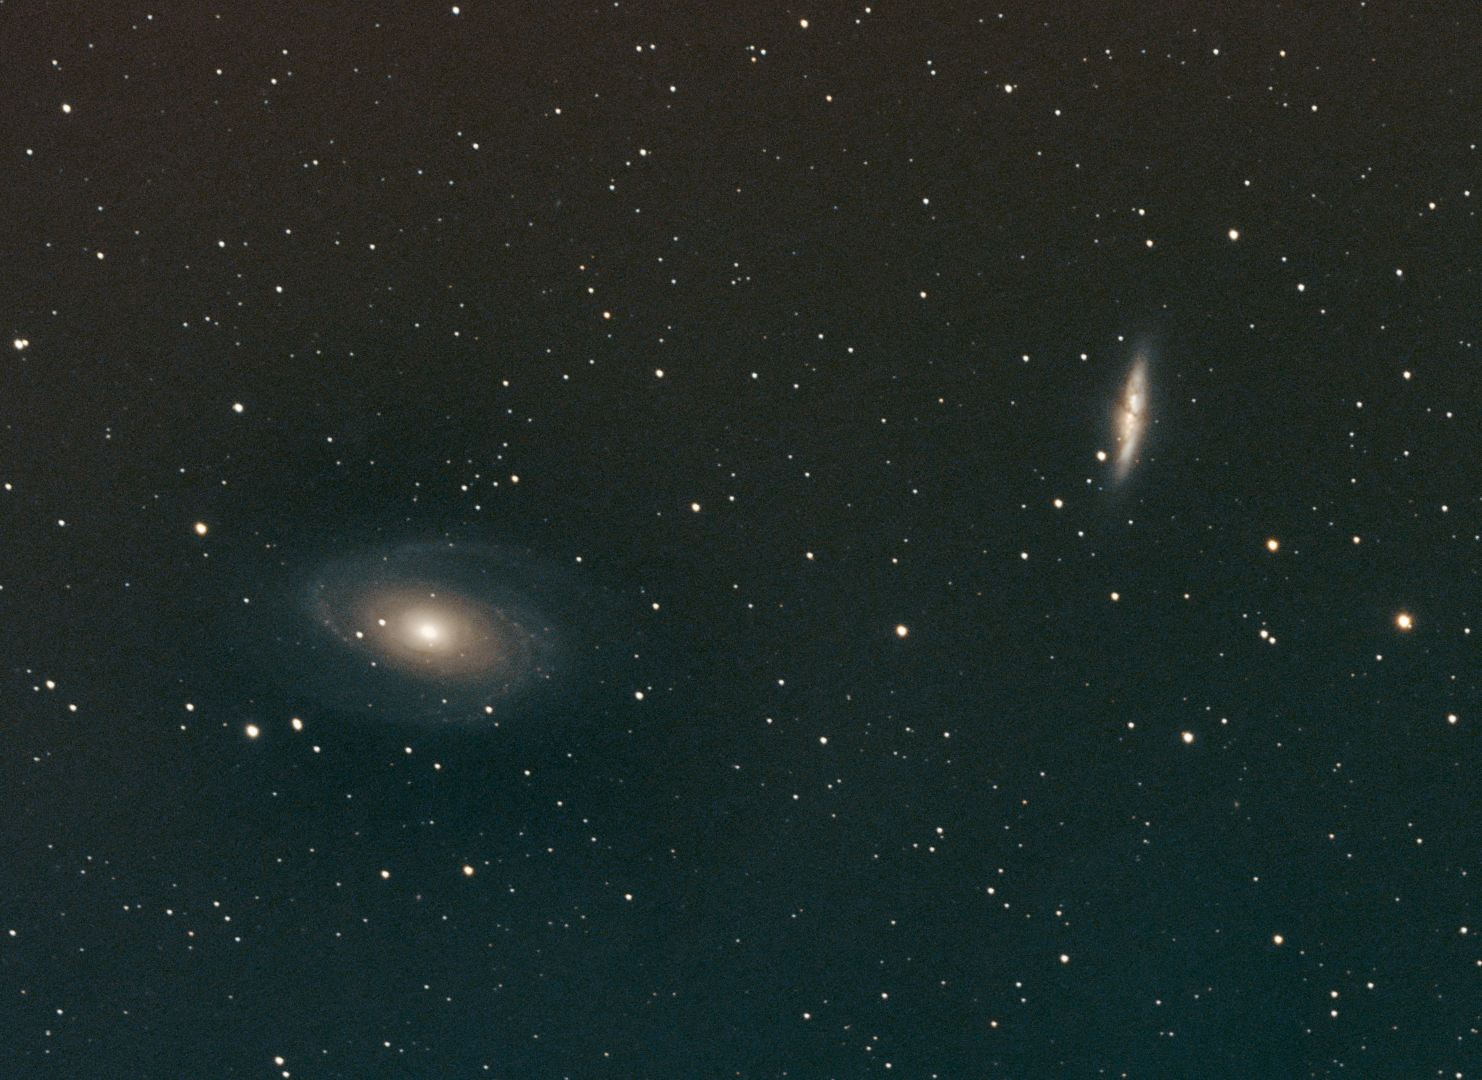
By the end of April just 8-weeks away from the summer solstice astronomical darkness is in short supply.  Fortunately having moved earlier to the Shed Observatory this year, I was in a good position to return to inaging the Bodes and Cigar Galaxies (see below), which had been my first ever image of north sky objects in 2018.

LRGBFinal (Large)

JULY TO SEPTEMBER

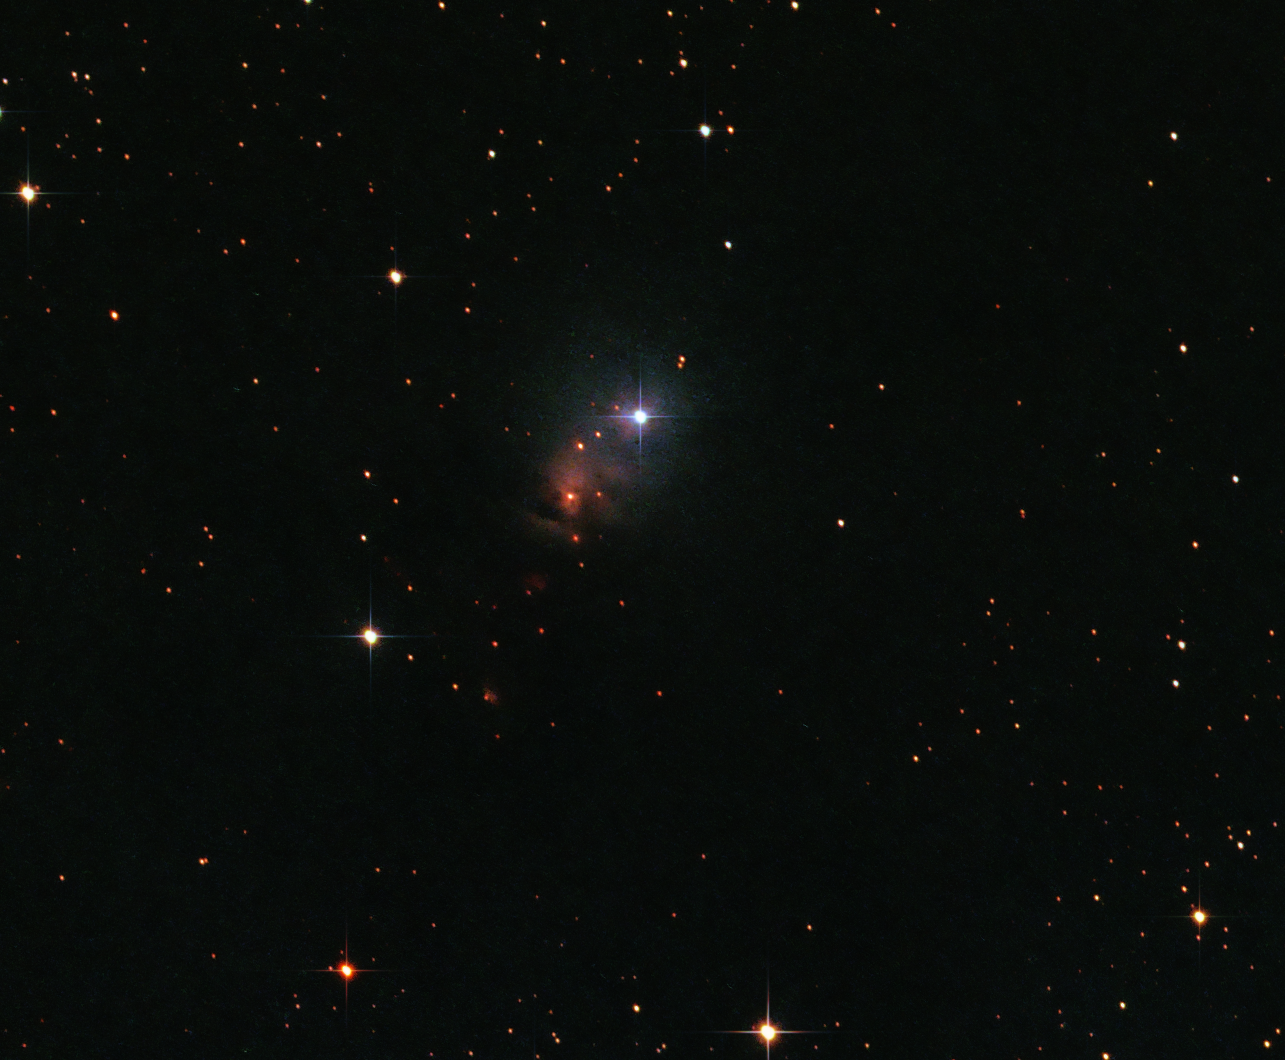
From May until late July the absence of Astronomical darkness makes astronomy difficult and frankly having progressed from the time of being a beginner, it is quite refreshing to take a break.  Therefore it was only after an evening viewing the partial eclipse on 16th July and a brief experiment with the Wizzard Nebula (something for the future) at the beginning of August, that much later I returned to astrophotography seriously.

SHO2SCcrop (Large)

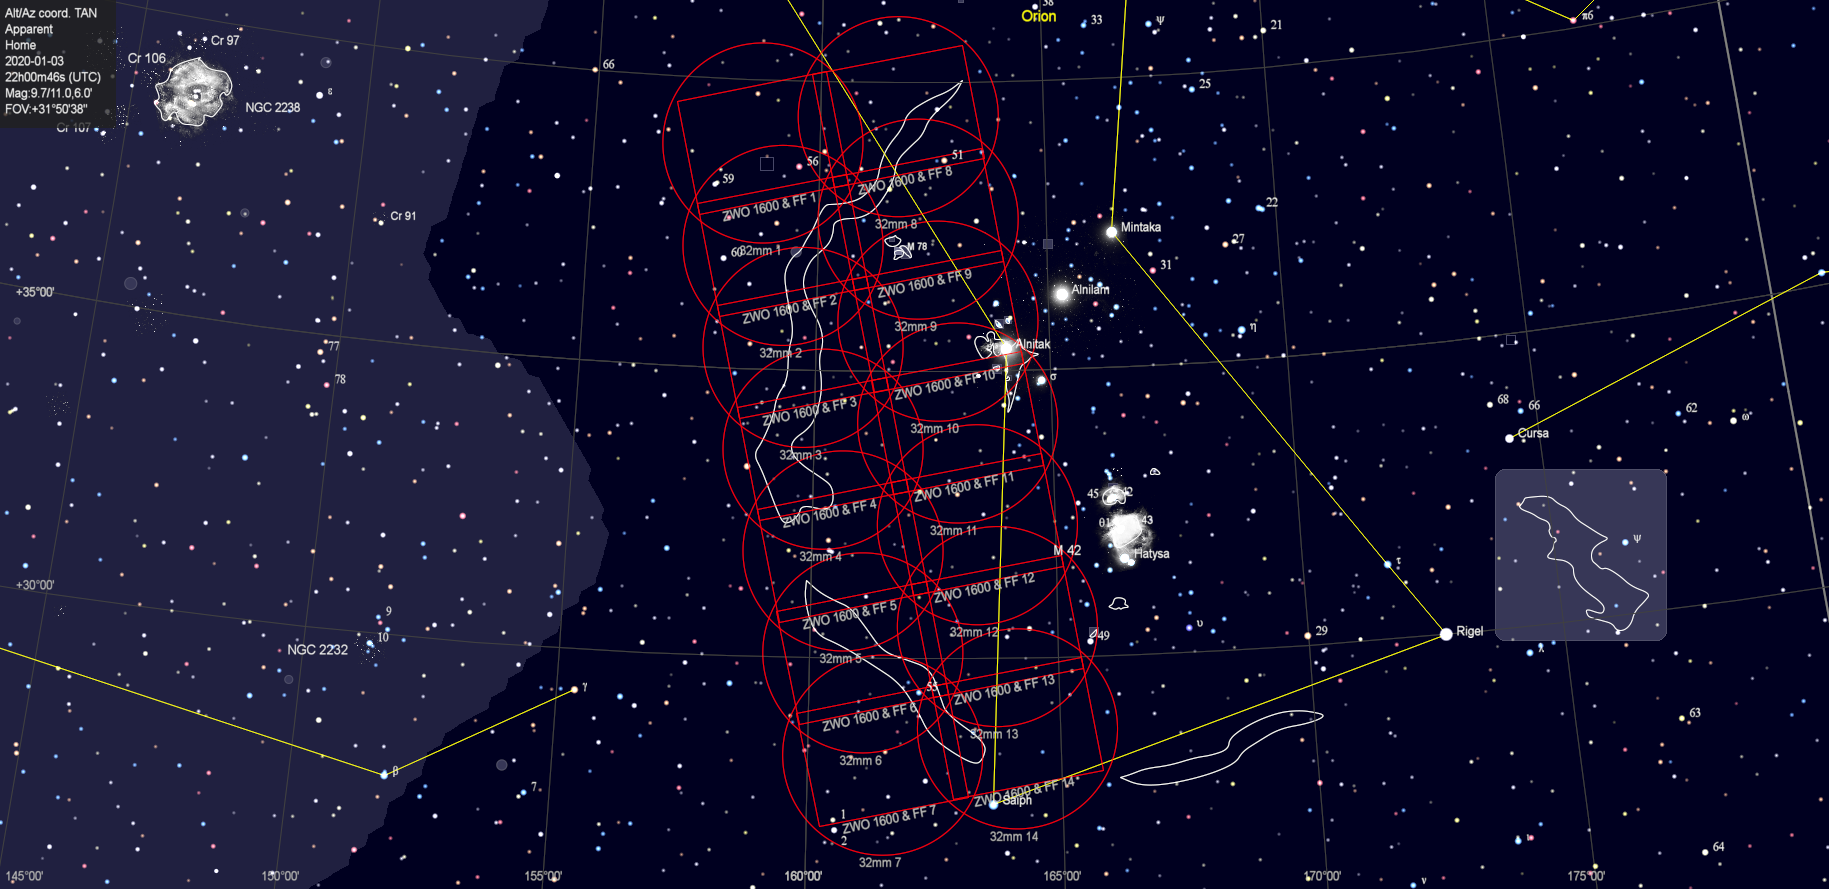
Having messed up imaging the Soul Nebula with poor framing in 2018 and being at the Shed Observatory, I decided to re-image the Soul properly, together with some of the adjacent sky in order to combine the new data with last year’s adjacent Heart Nebula to form a mosaic of both objects.  I don’t know why but this was my first attempt at a mosaic.  Only very recently has integrated software for mosaic planning combining  Cartes de Ciel and Astrophotography Tool for image capture has been released.  However, on this occasion I planned and implemented the said mosaic imaging manually, with a satisfying outcome (see Favourite Images section) but with the new software now available I hope to embark on more extensive mosaic projects in the near future.

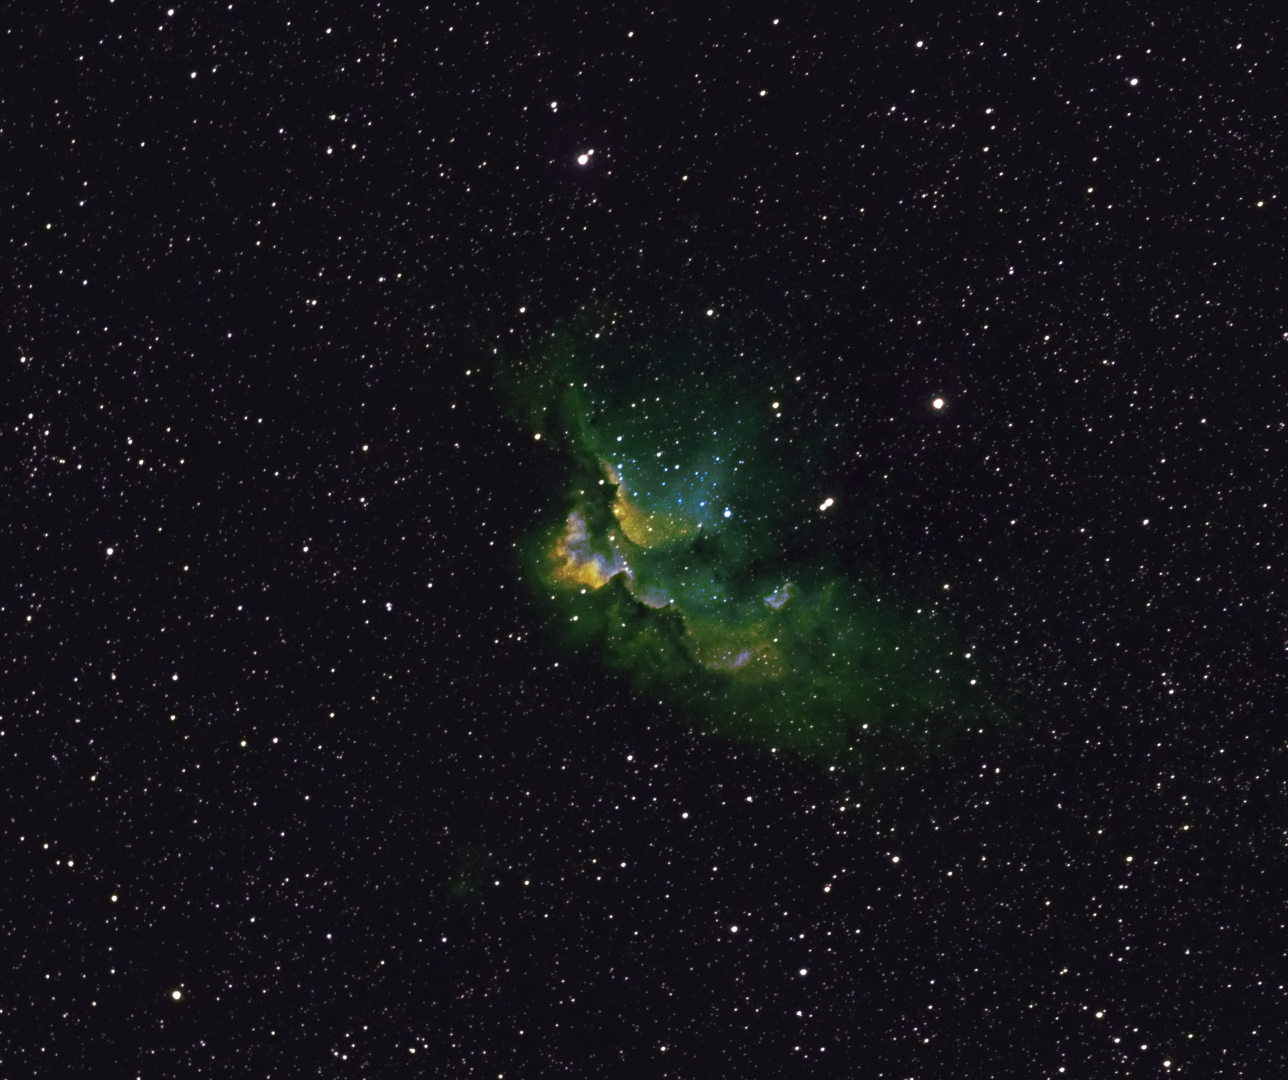
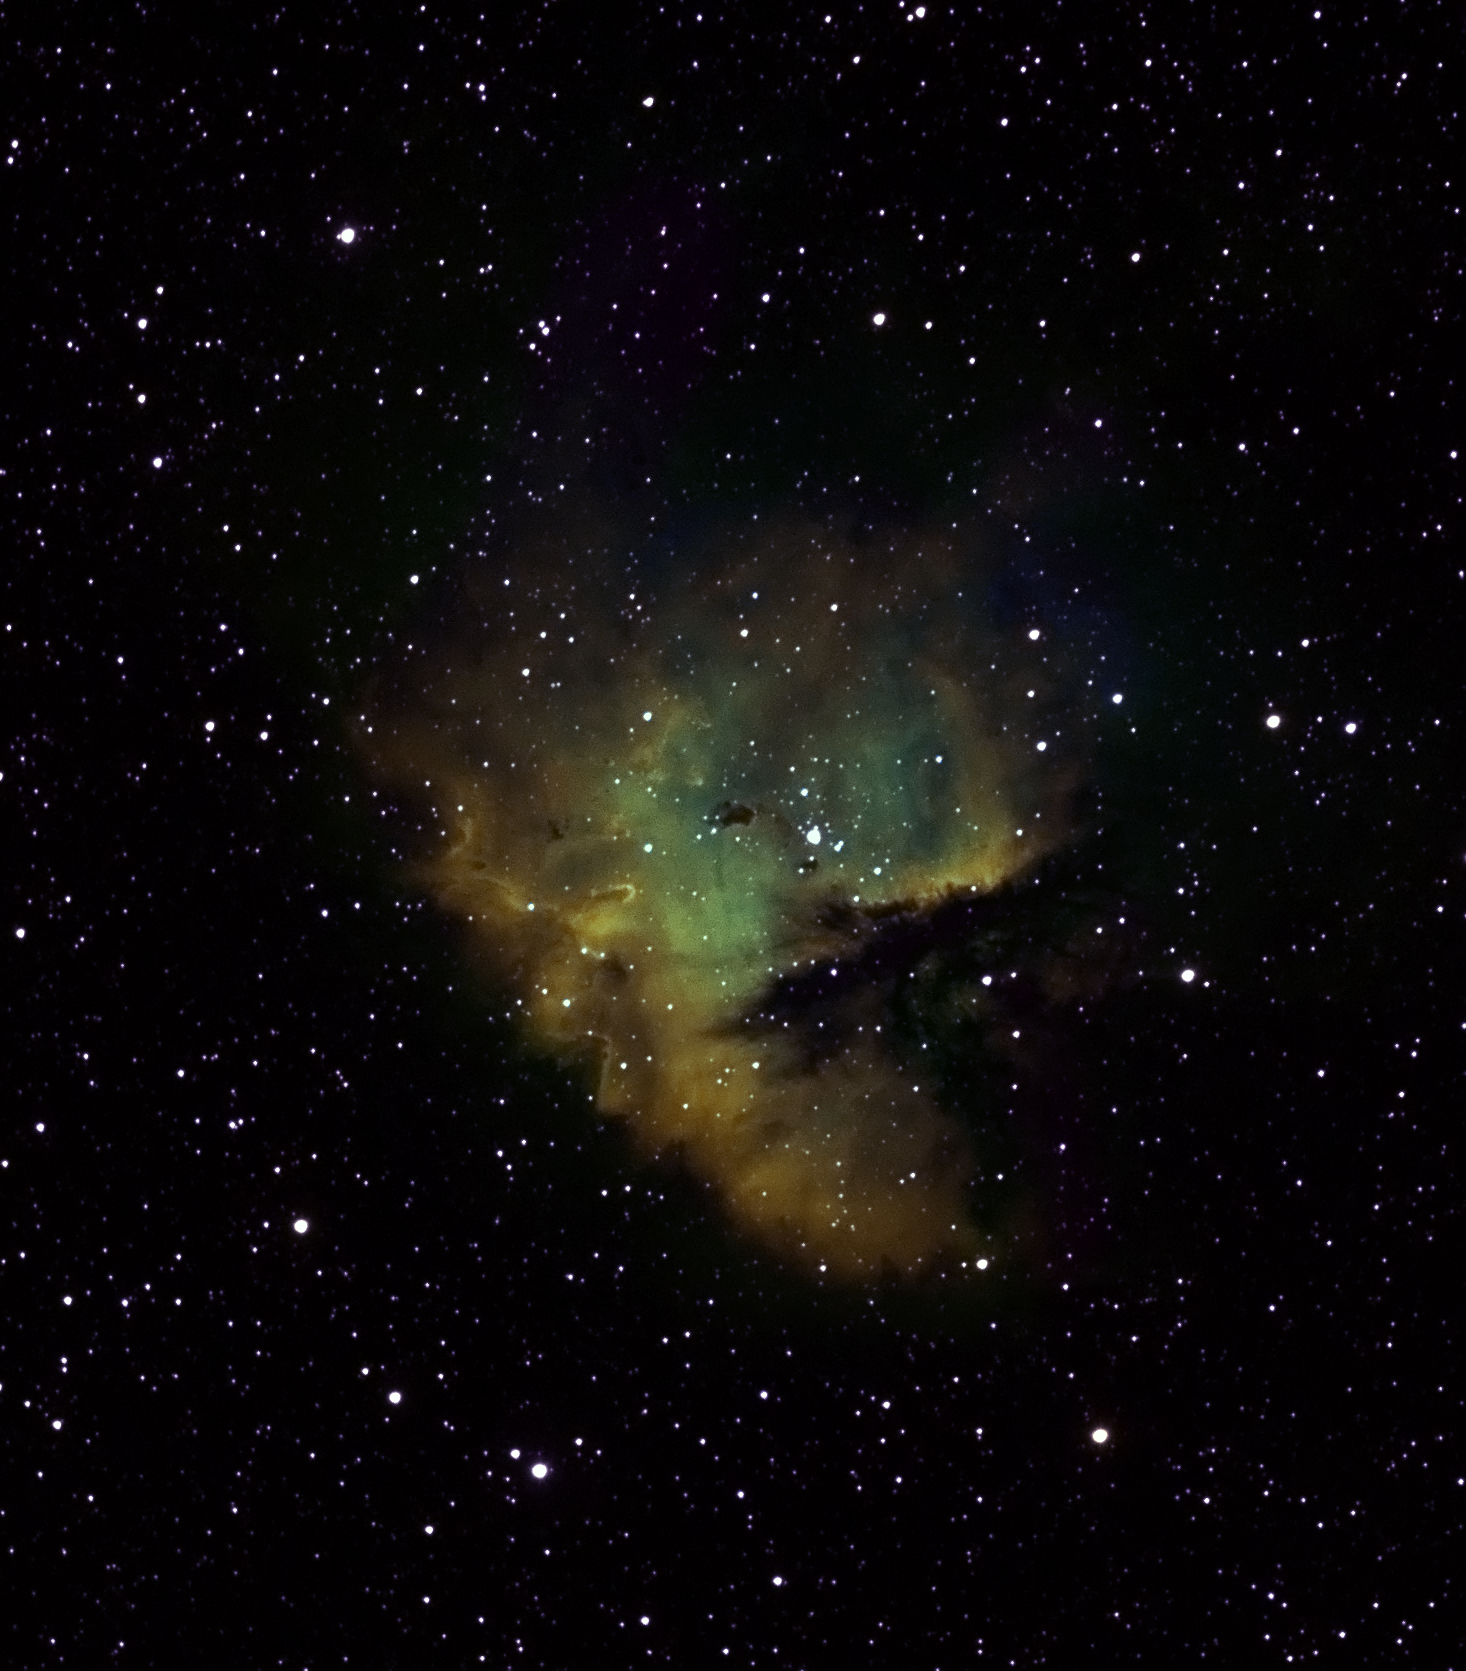
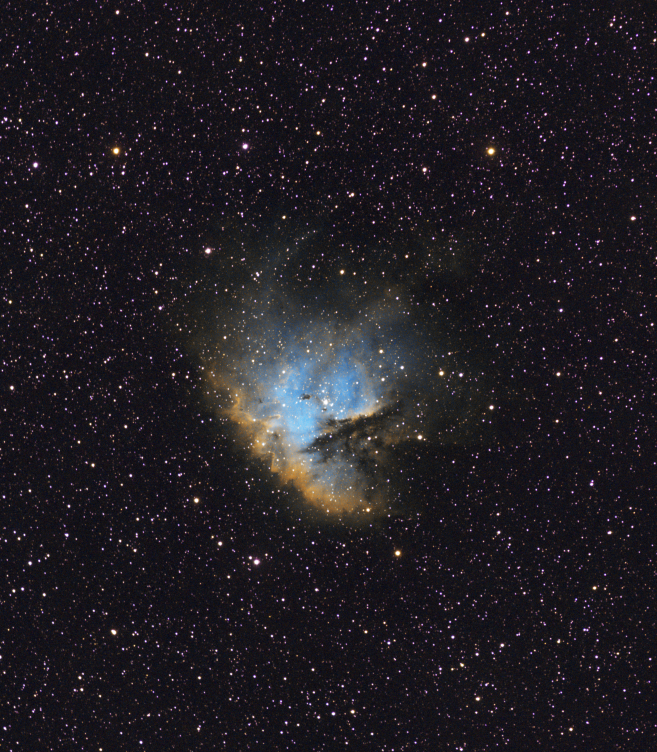
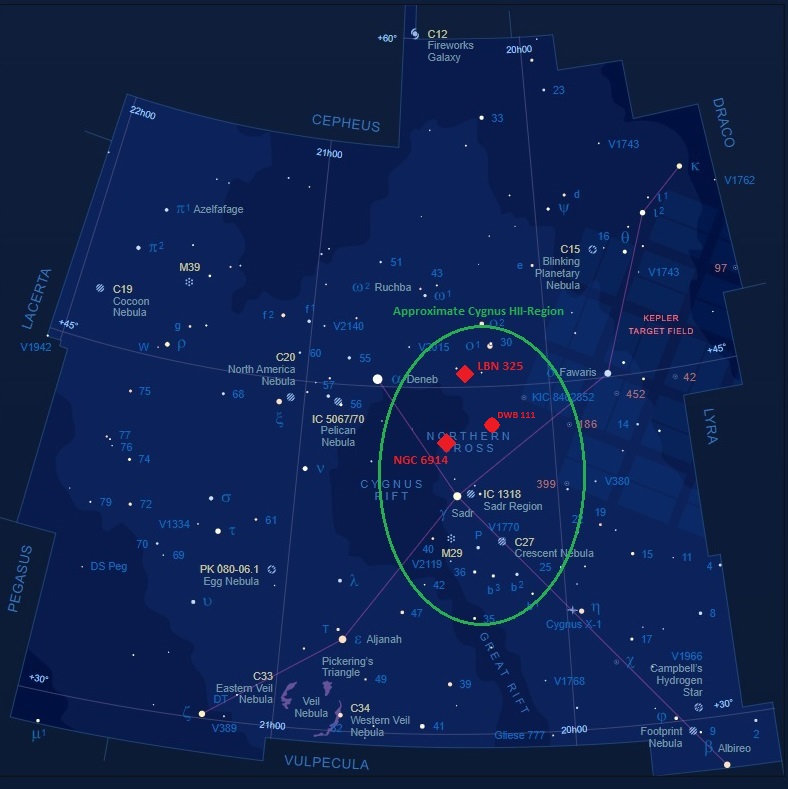
This year’s astrophotography has followed two themes, the aforementioned ‘less is more’ with the aim of producing better images using much greater integration times.  The second has been largely determined by chance, being the discovery of new objects that had hitherto either been unknown to me or considered to be out of view from Fairvale Observatory; the combination of my house, very high hedges + trees and adjacent houses obscures large swathes of the night sky.  Earlier in the year such chance had led me to the M101 and M51 galaxies and in the autumn it was first the iconic Pacman Nebula and then an exciting area of Cygnus constellation.

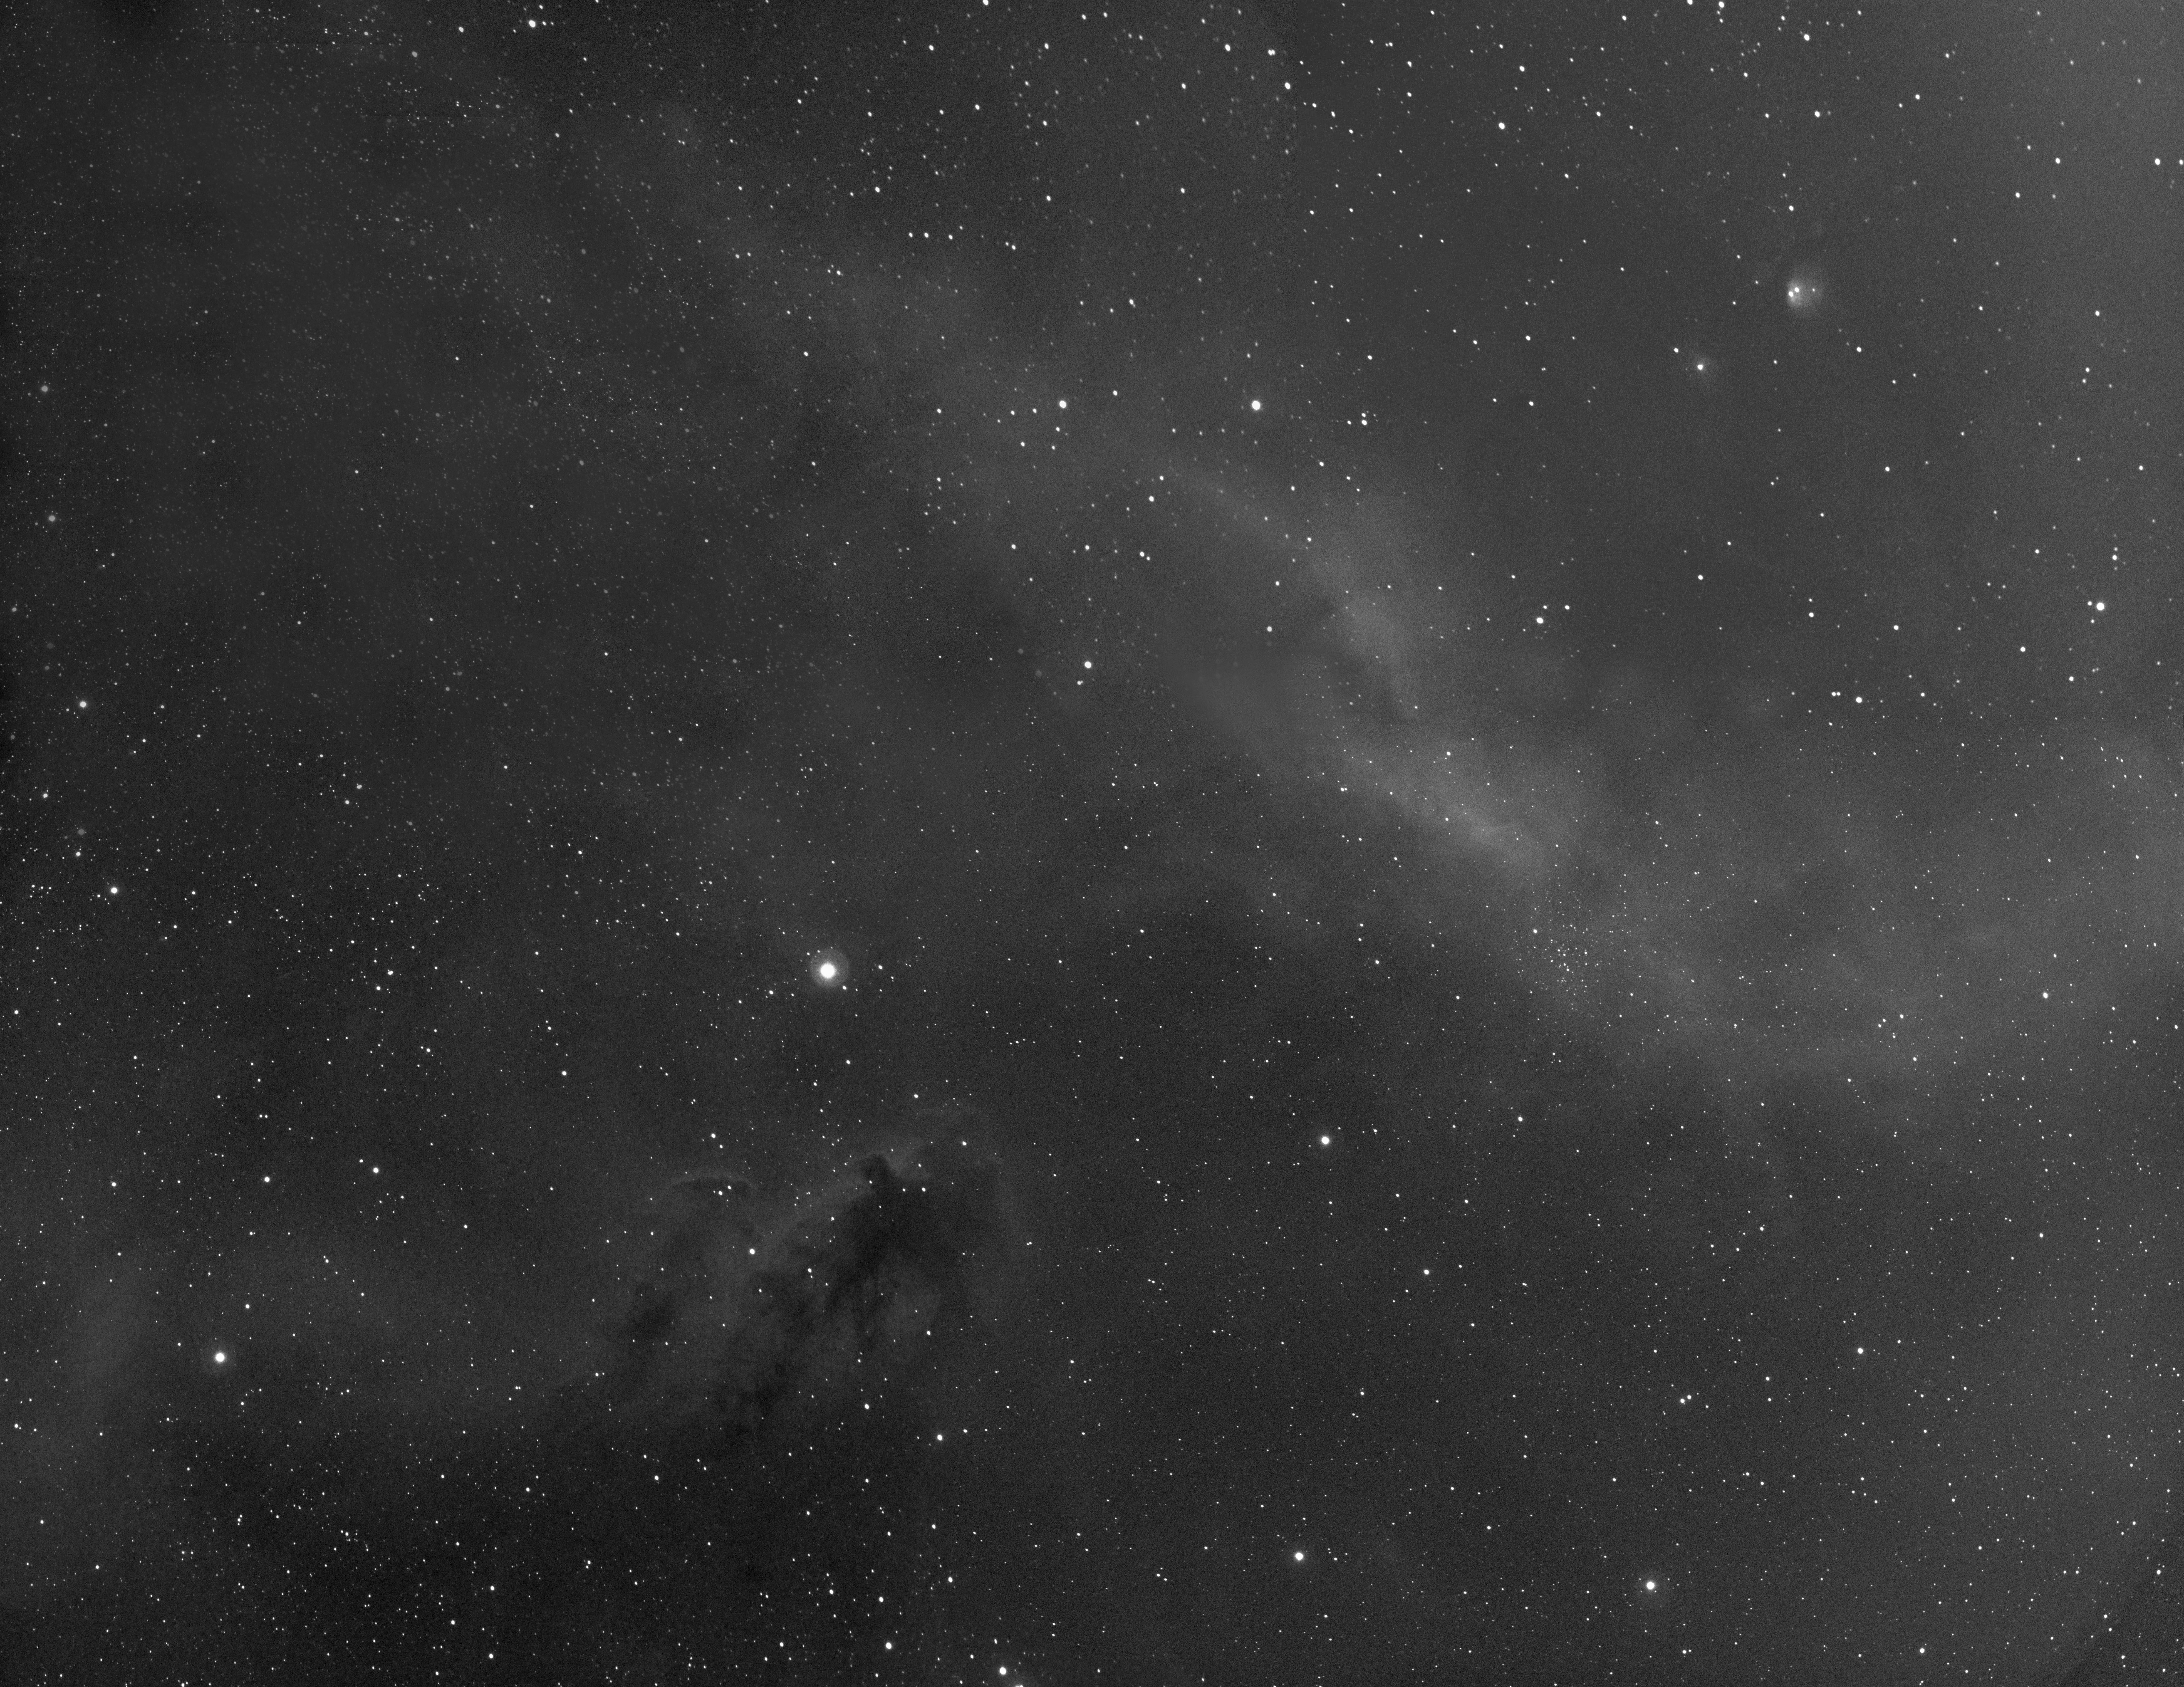
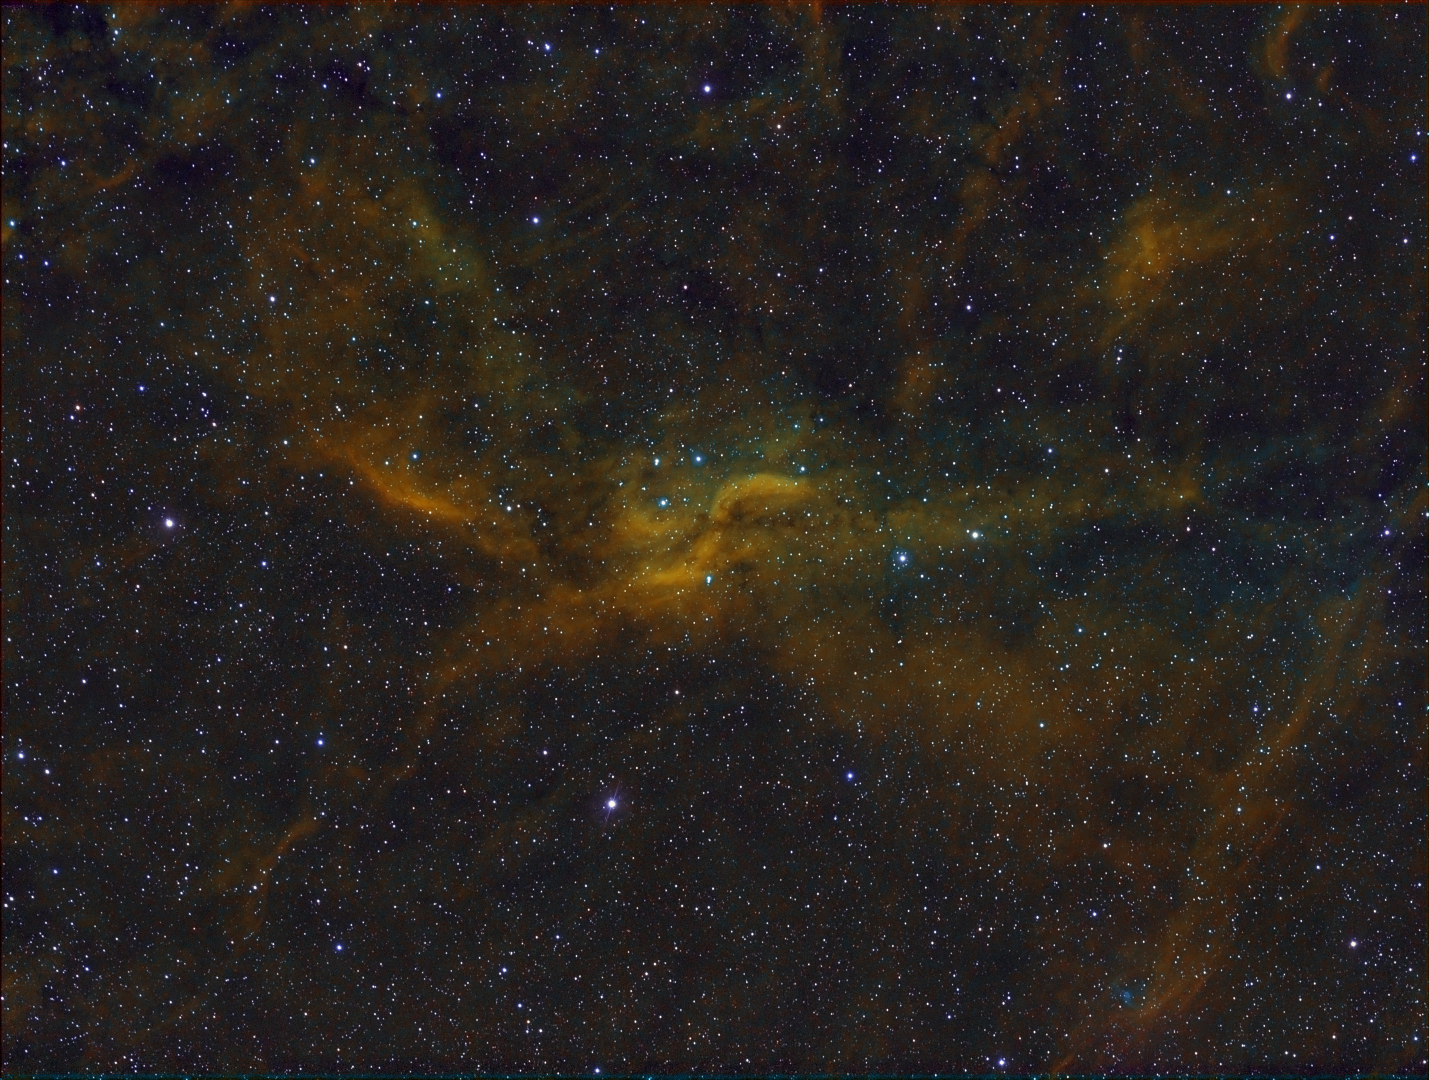
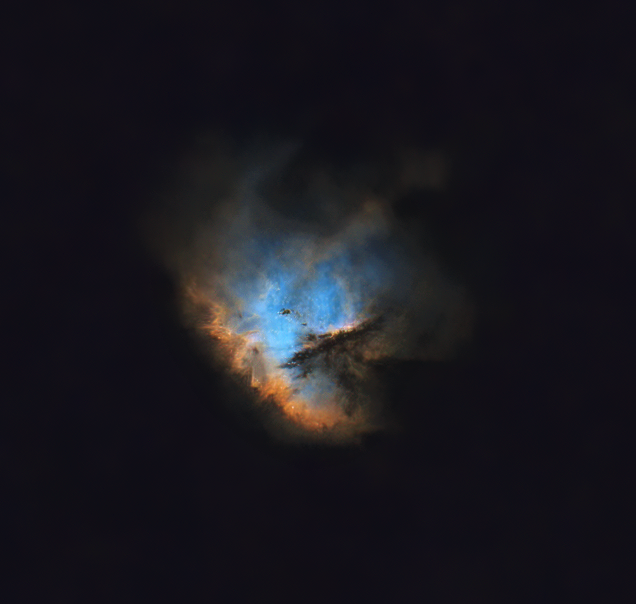
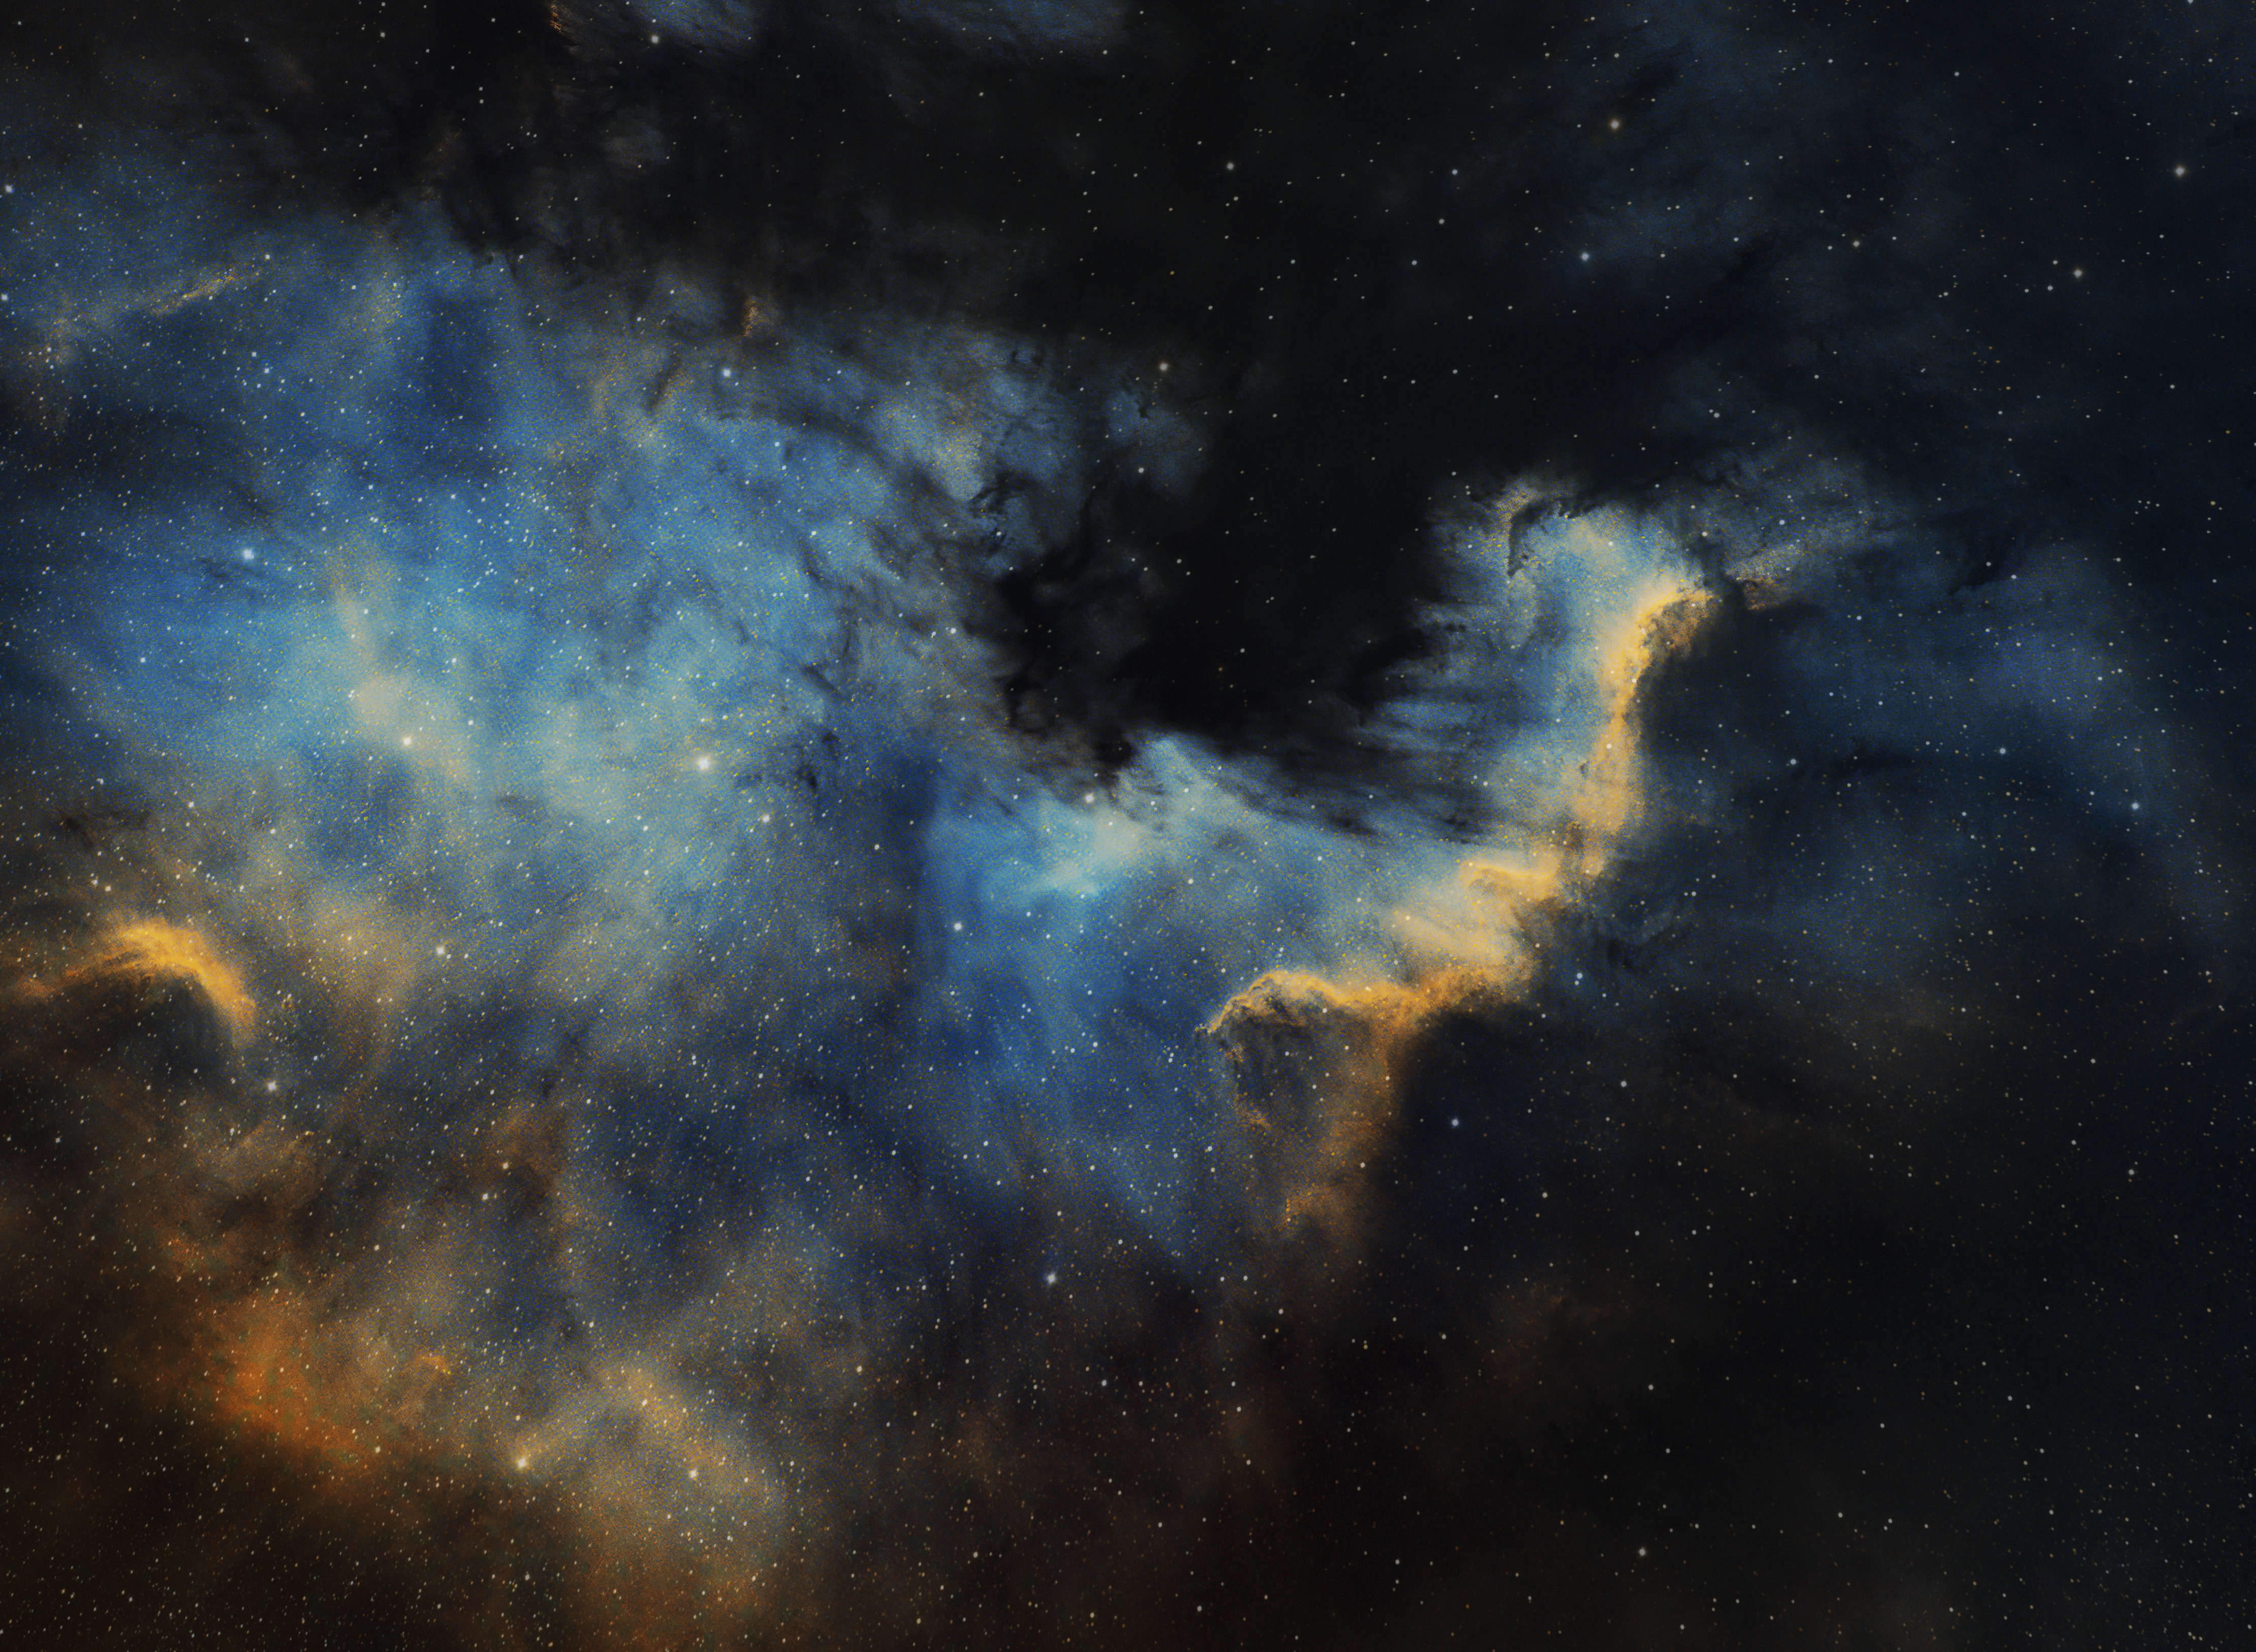
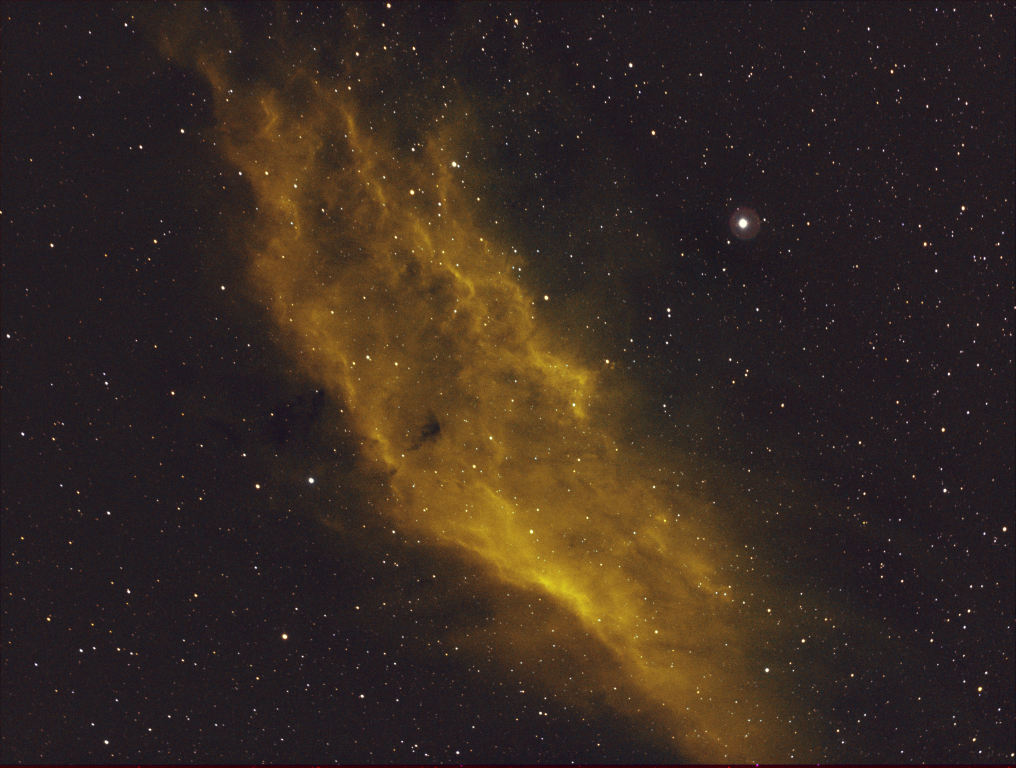
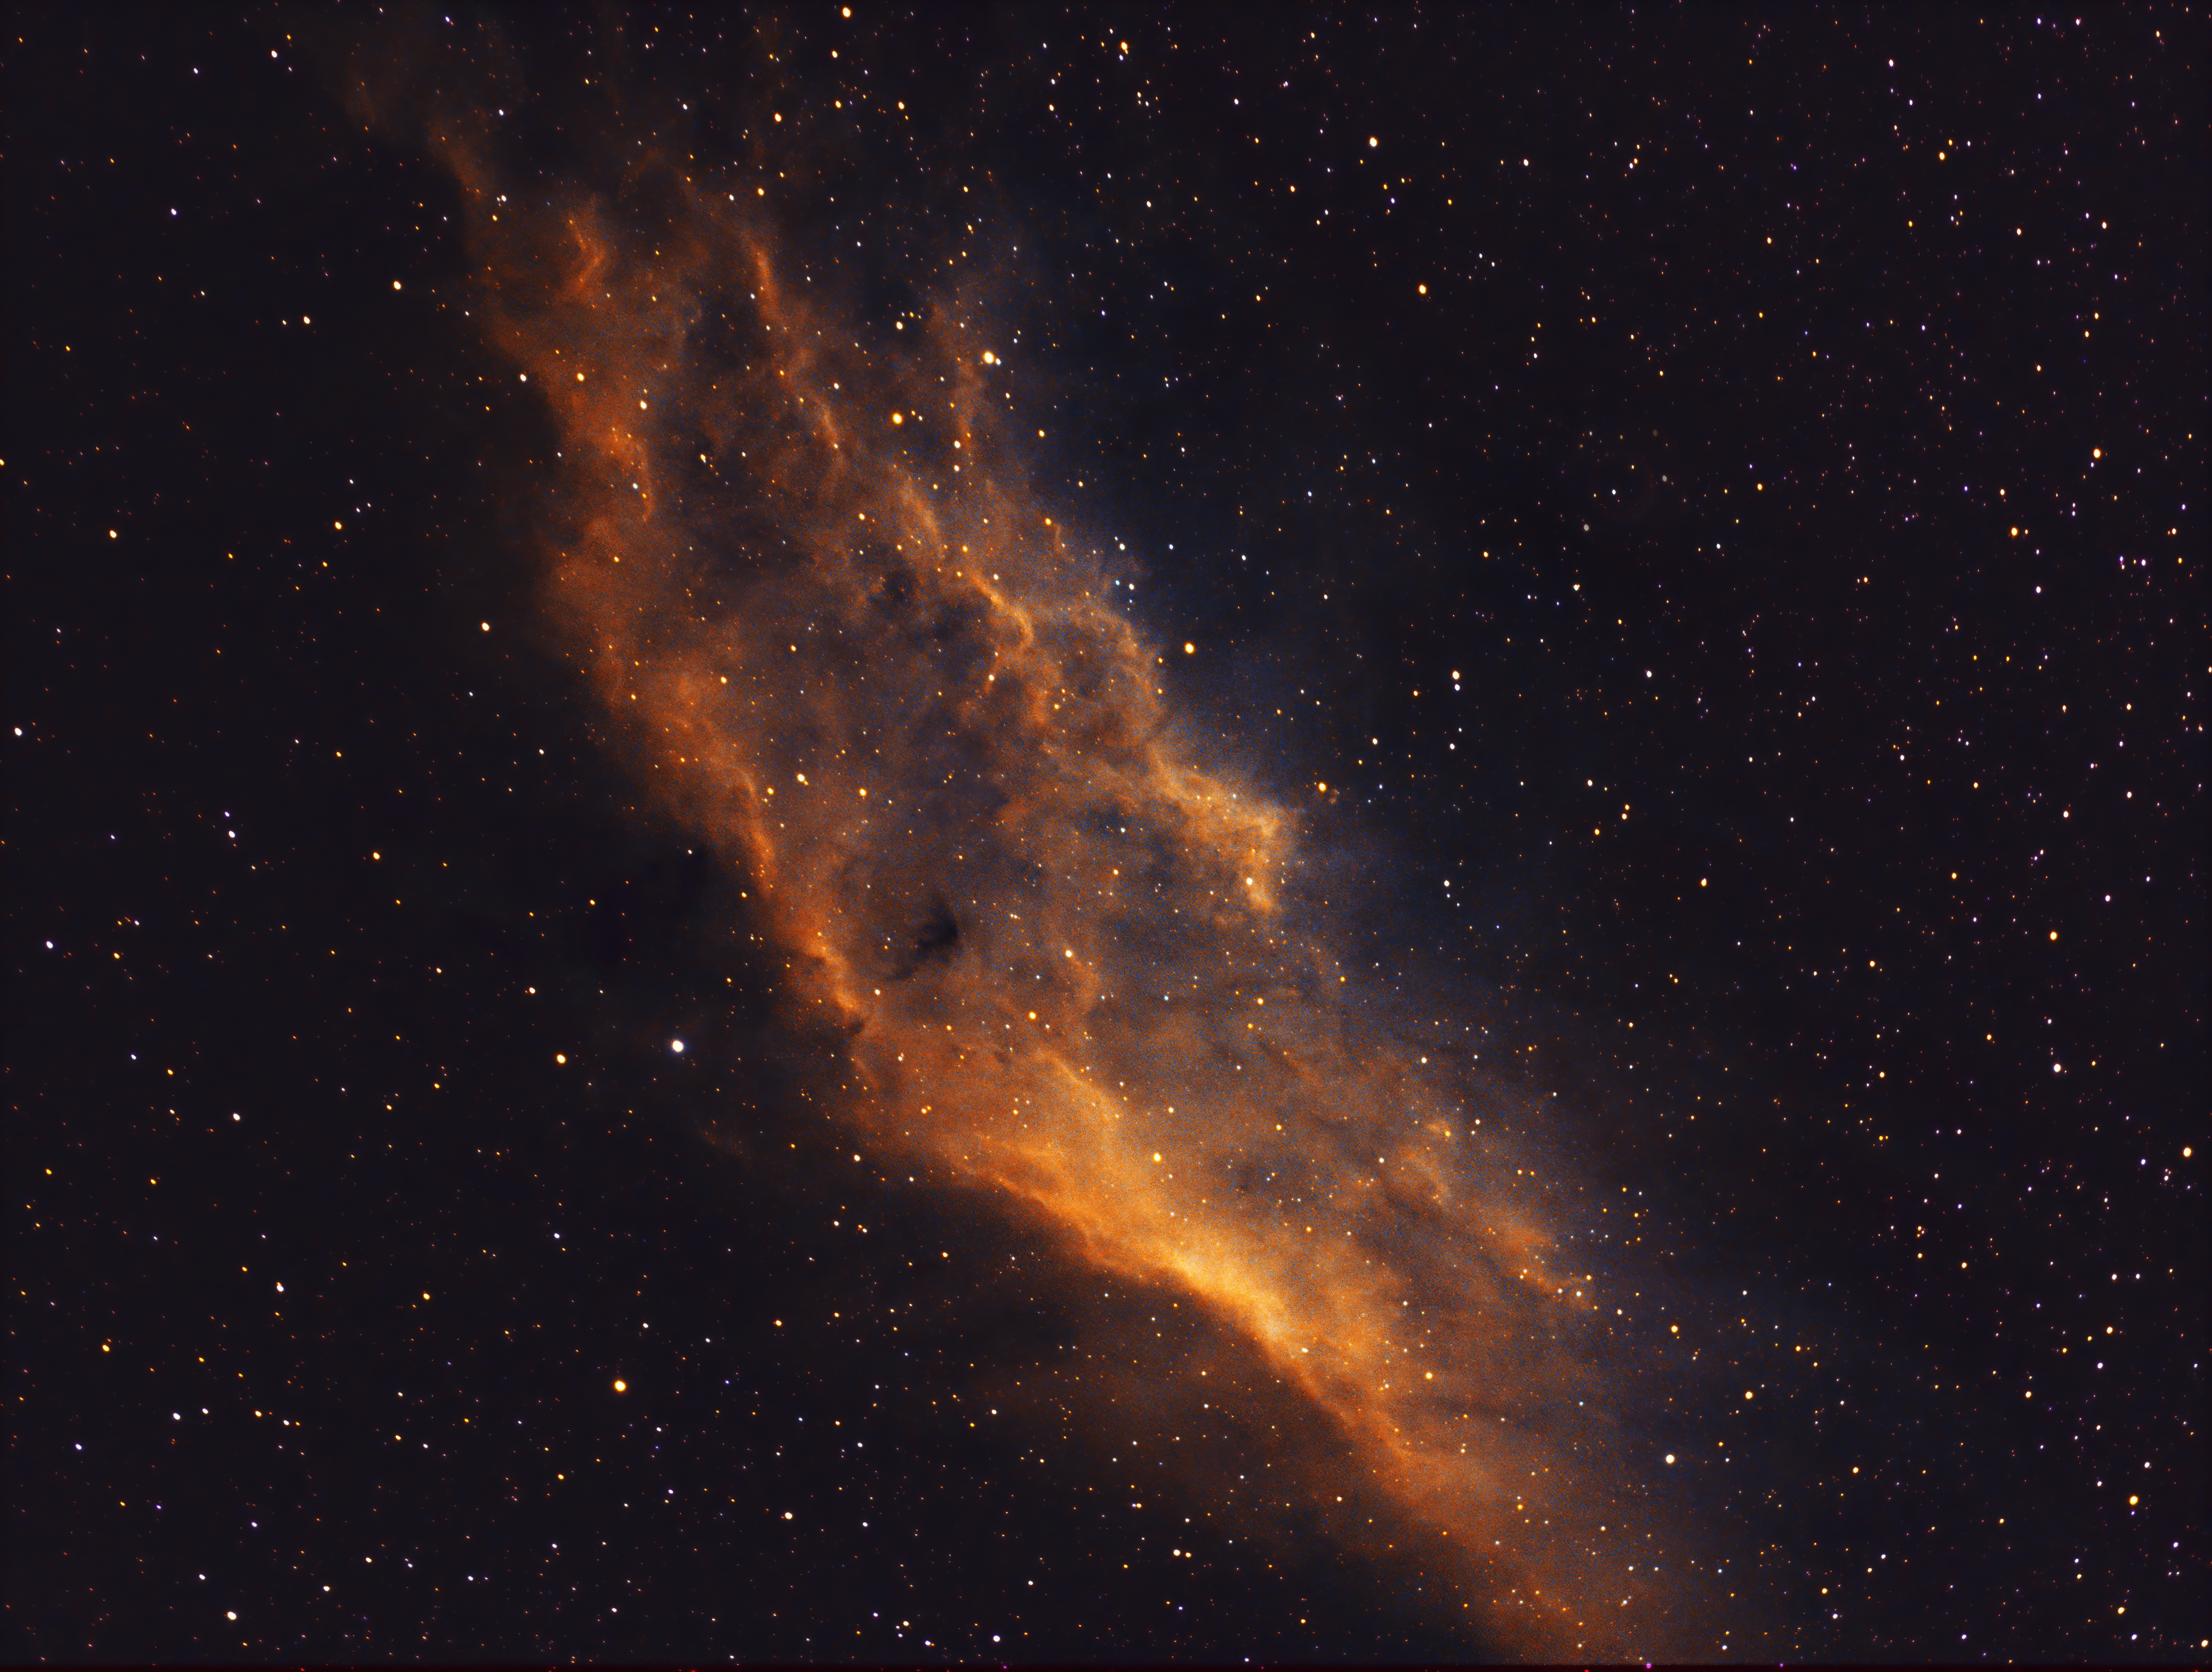
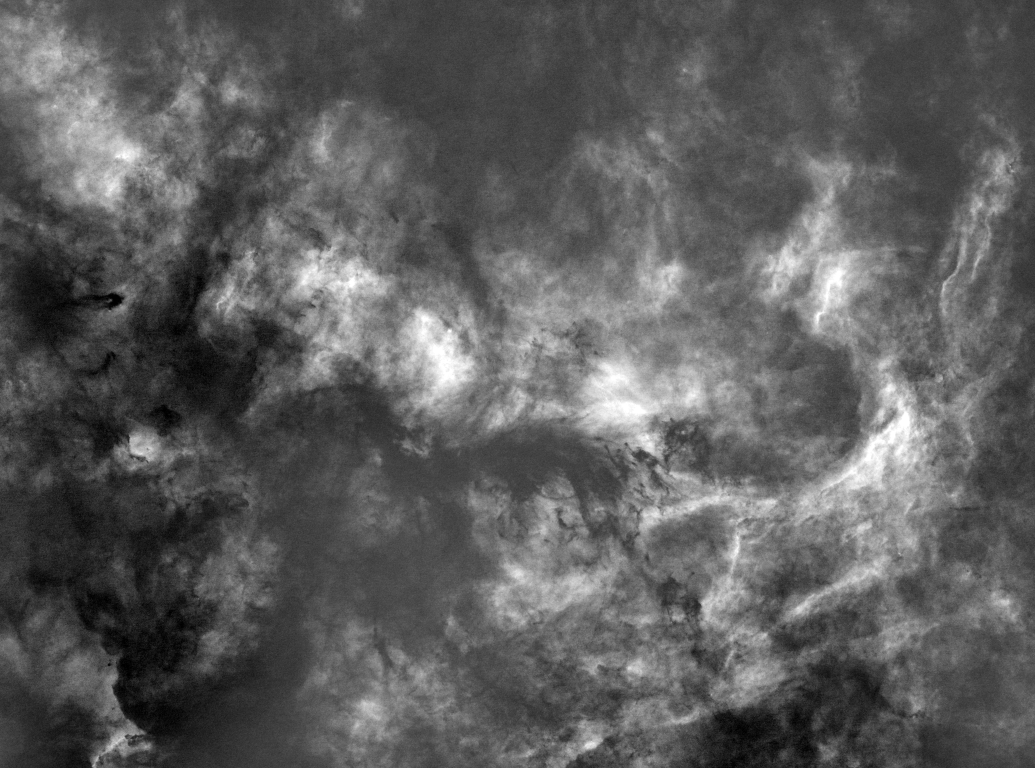
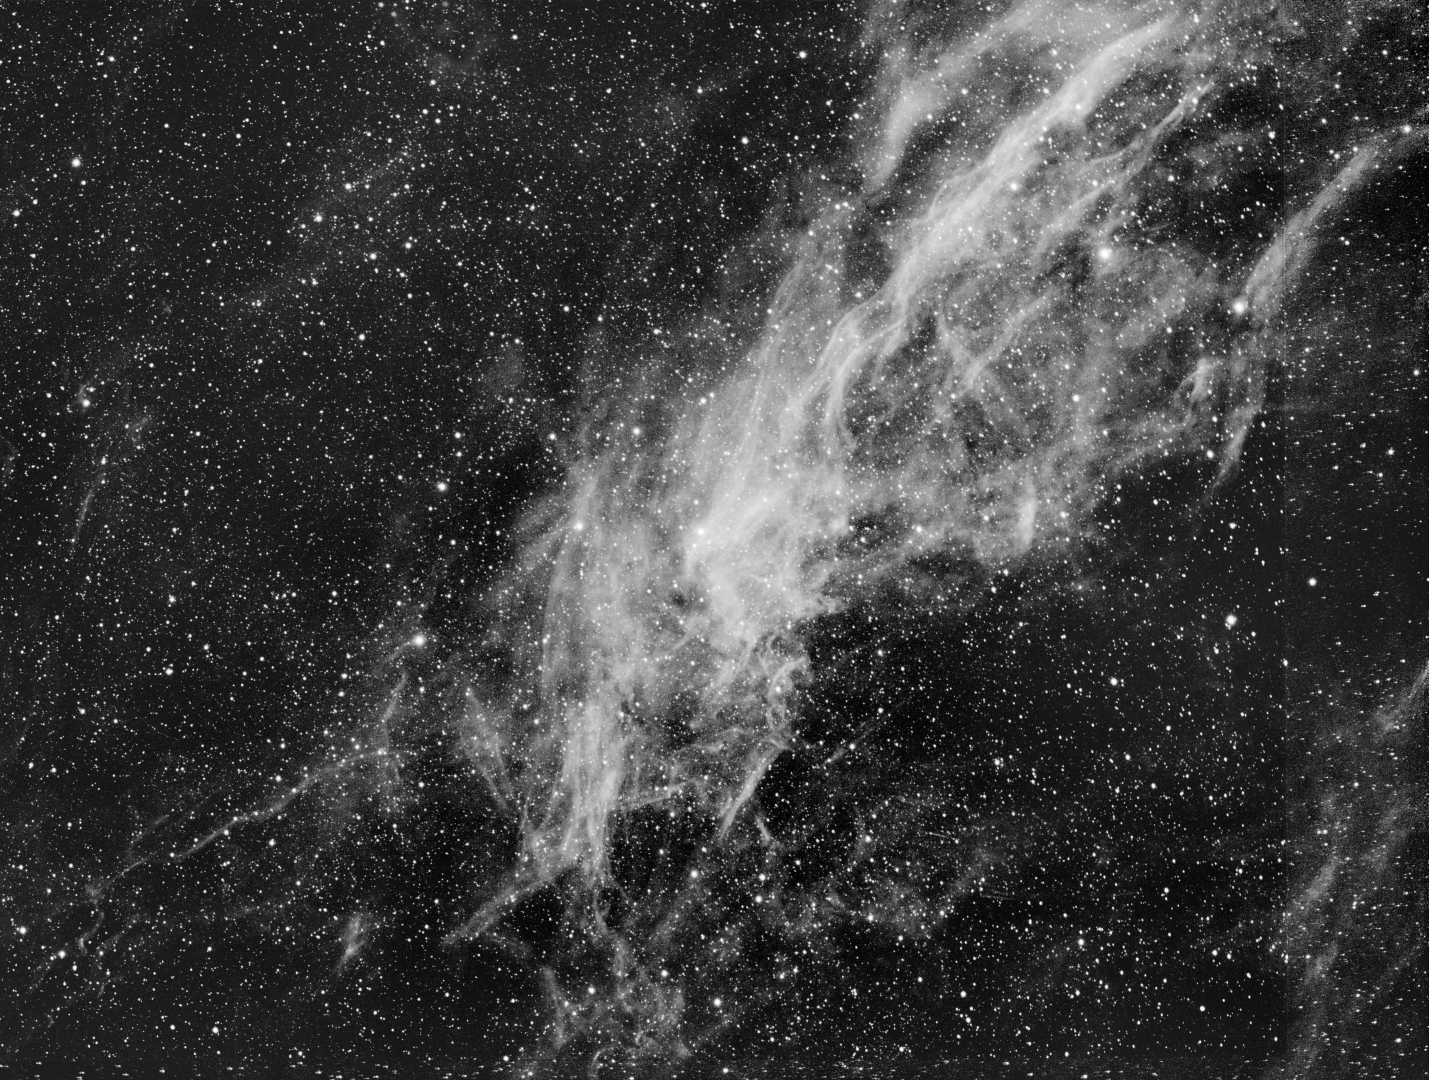
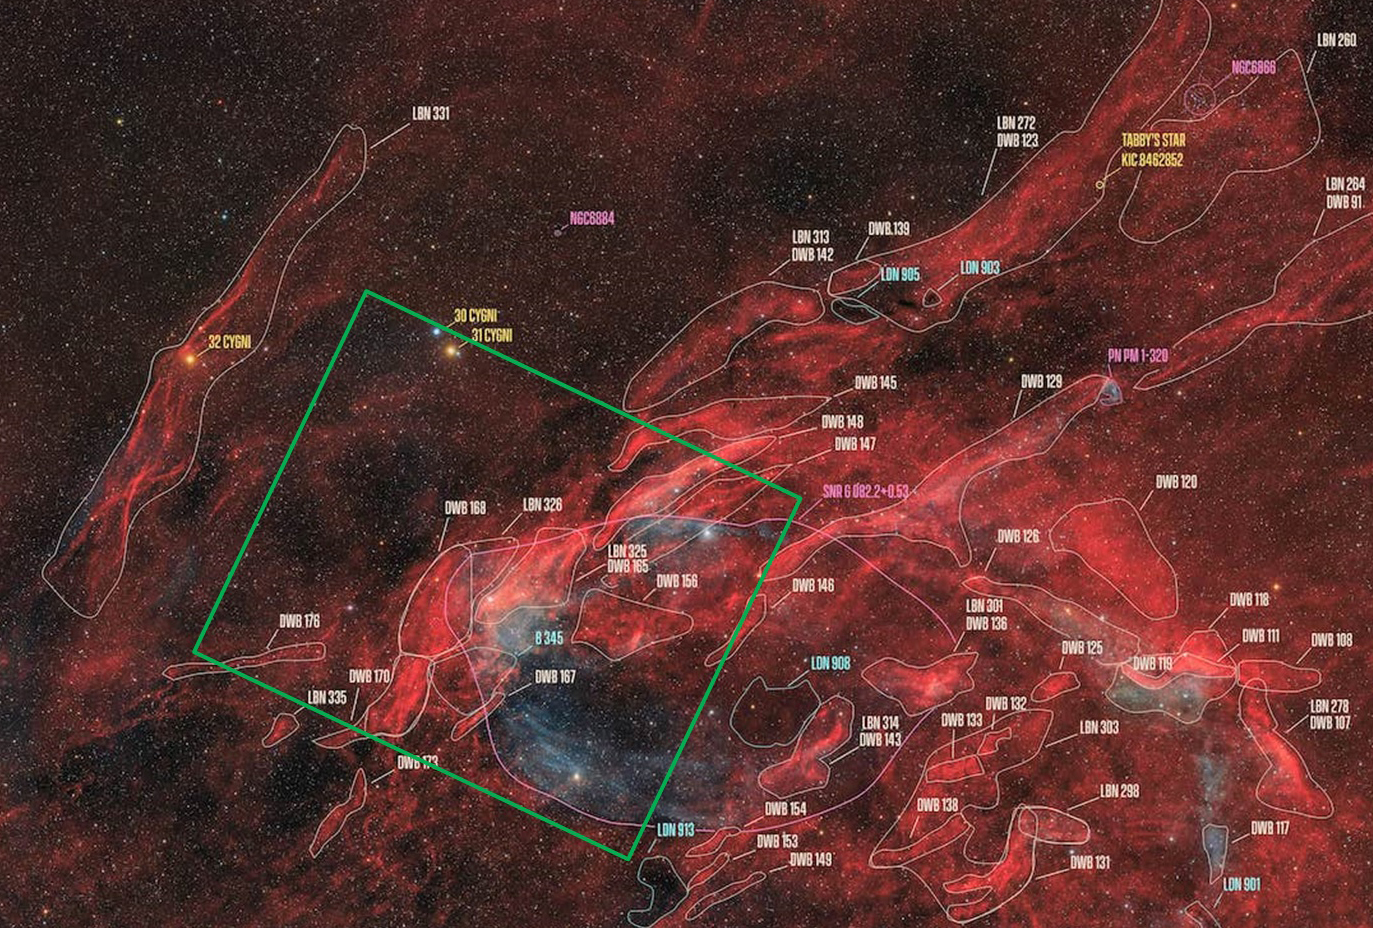
Pacman is not particularly large for my equipment but nevertheless produced a decent narrowband image, my last from the Shed Observatory for this year.  Not until late September did the clouds again relent for my next project that initially seemed something of a long shot but actually turned out very well.  The Propeller Nebula is located in a vast HII region of the Cygnus Constellation, which from my point-of-view was a complete surprise.  At some 25 arc seconds the nebula is again on the small side for my equipment but the complexity of the adjacent HII region transforms the wider image into something really spectacular (SHO version below), which I certainly intend to visit again next year to build on the current data and explore further afield the HII region which presents exciting possibilities.

SHO F HLVG (Large)

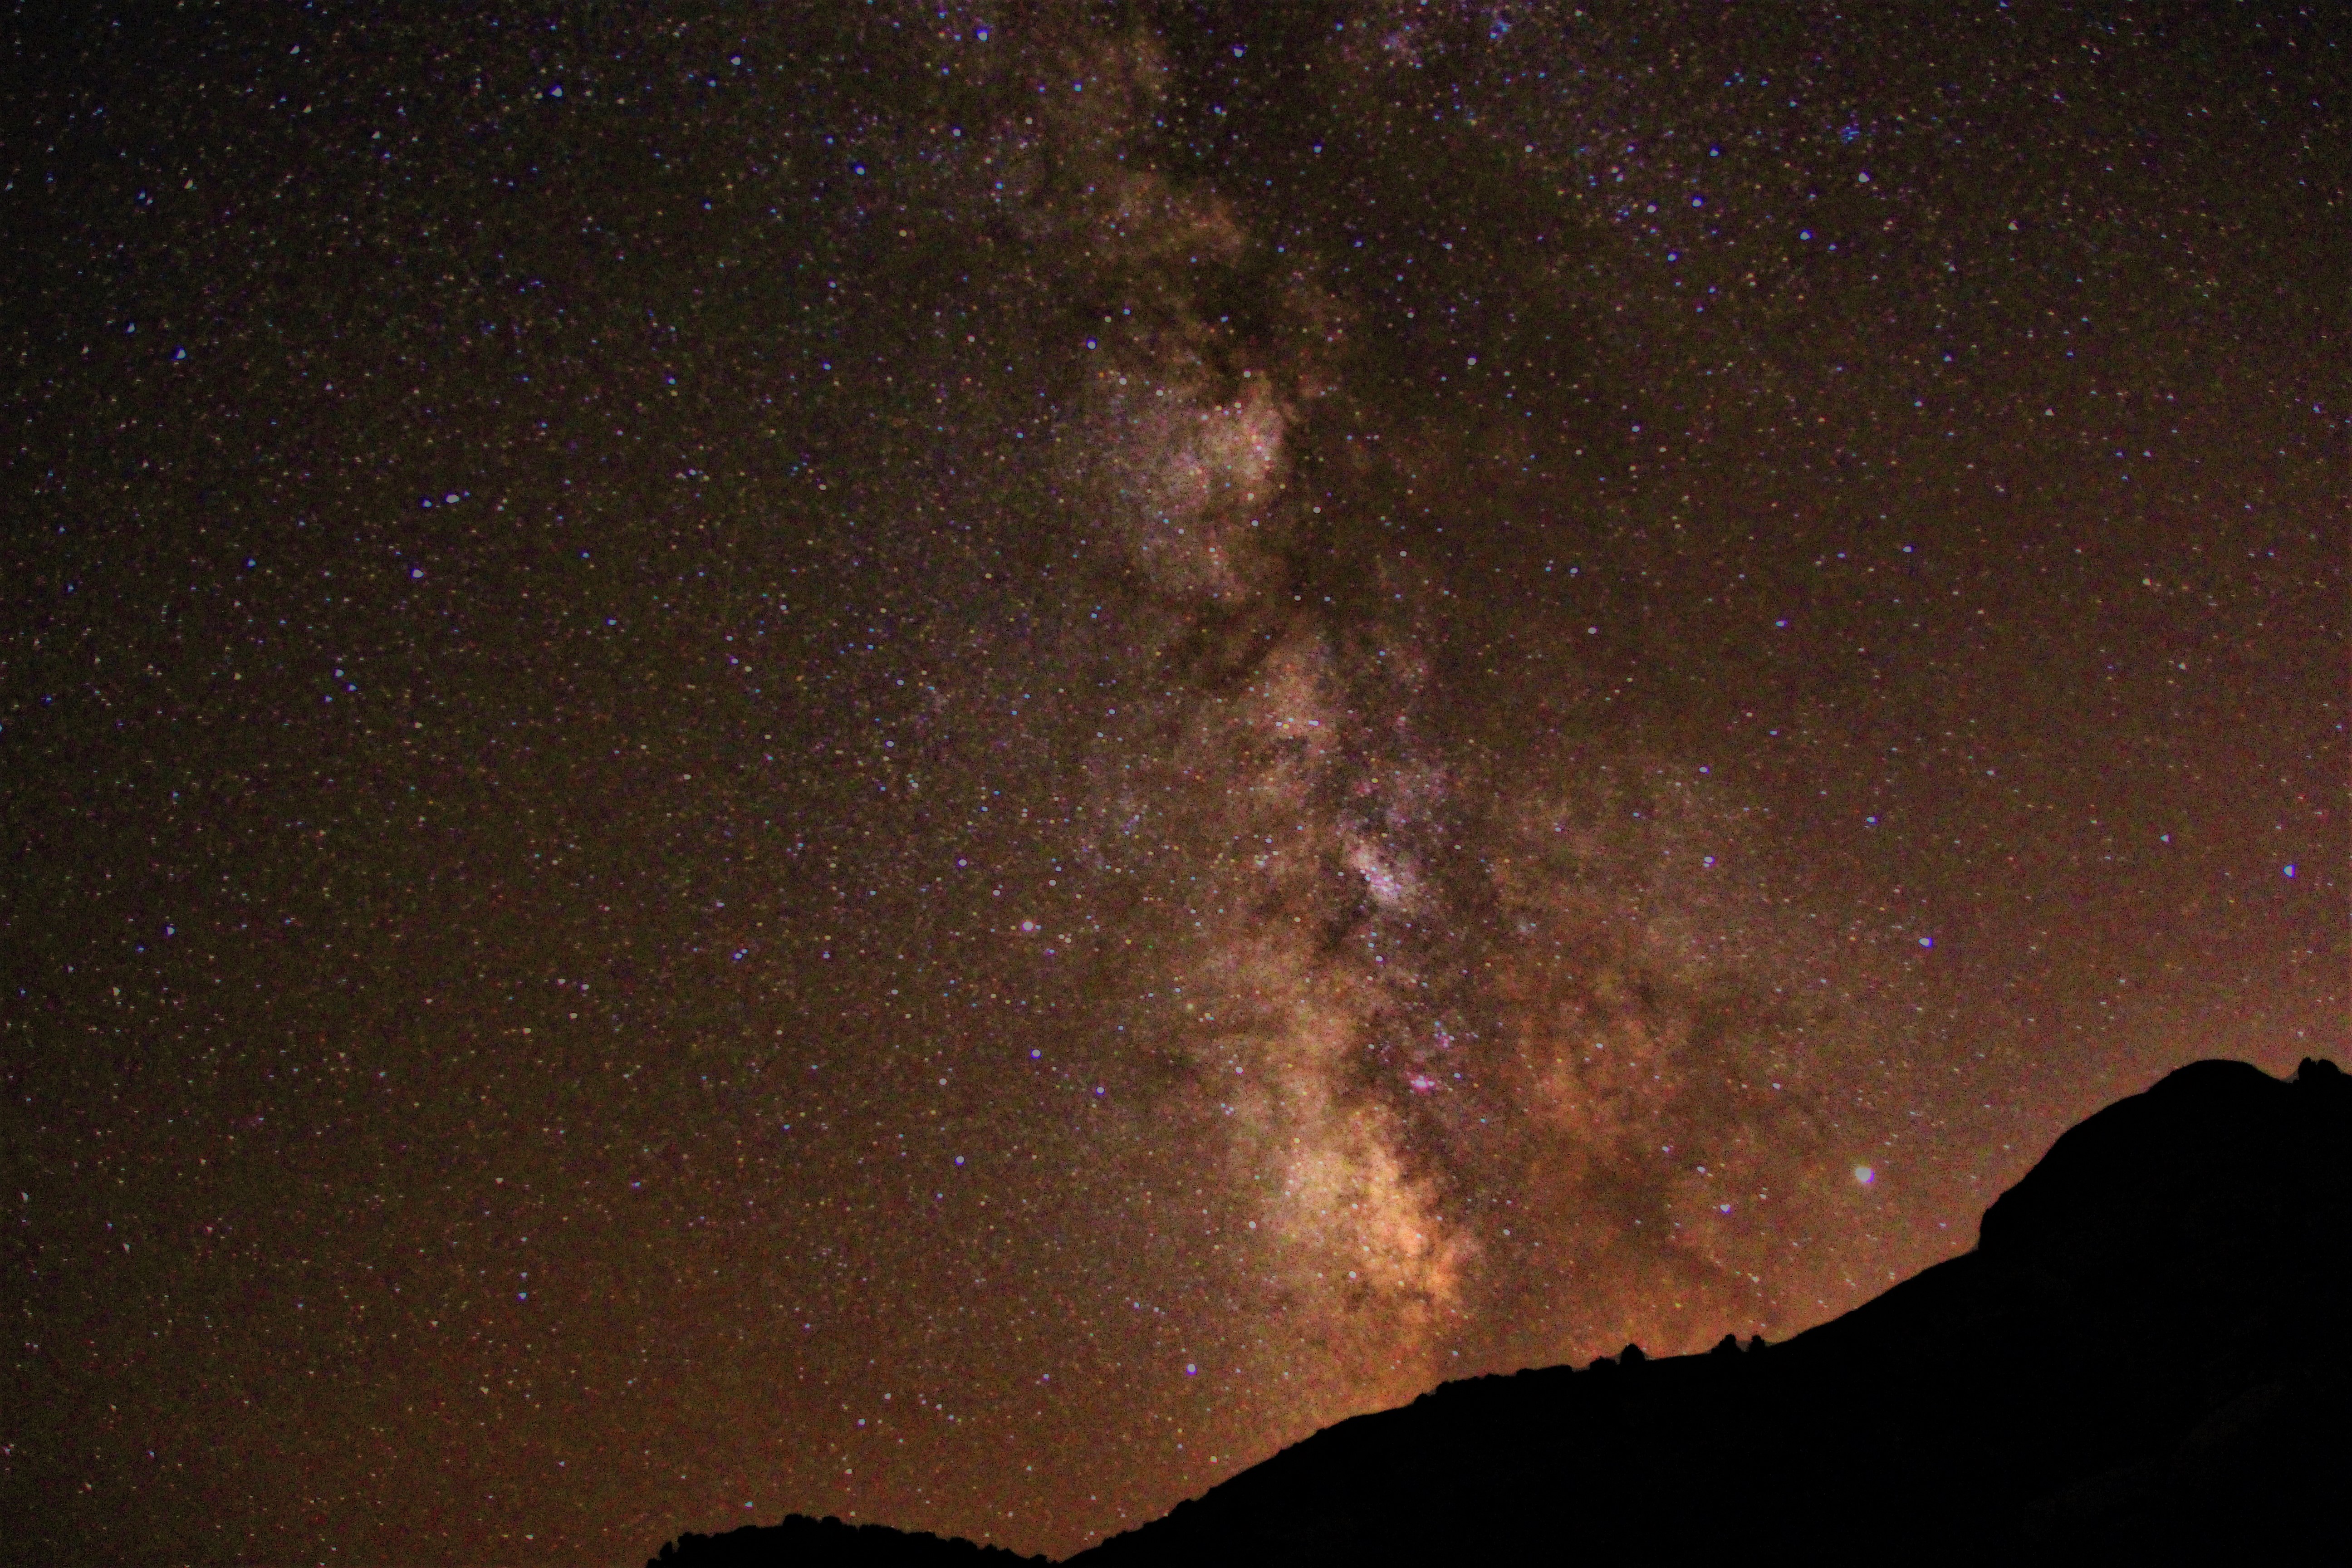
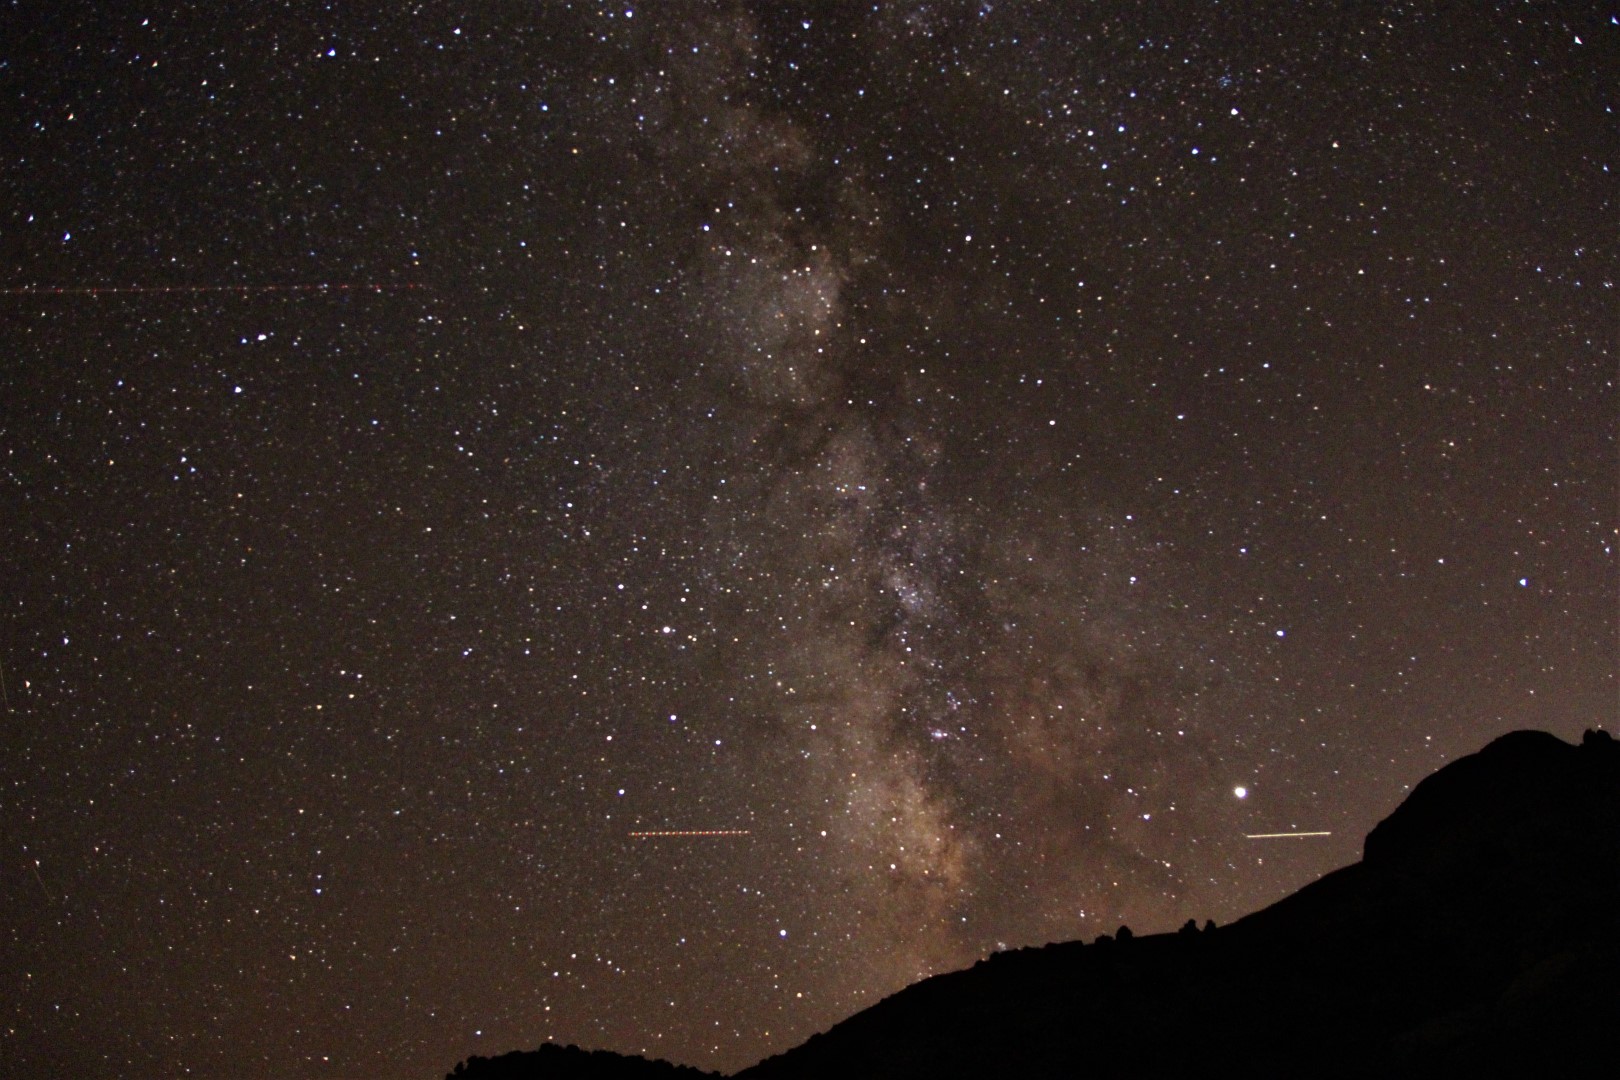
A subsequent long trip to the USA stopped all astronomy in Surrey but a couple of evenings out in Wyoming and Utah produced some incredible dark skies and DSLR Milky Way images (see below).  Despite the remoteness of Spilt Mountain in the UTAH section of the Dinosaur National Monument – designated a Dark Sky Area – whilst imaging at 20 second exposures only one-in-ten images were without a plane track, very sad.

IMG_2345 ComboX

OCTOBER TO DECEMBER

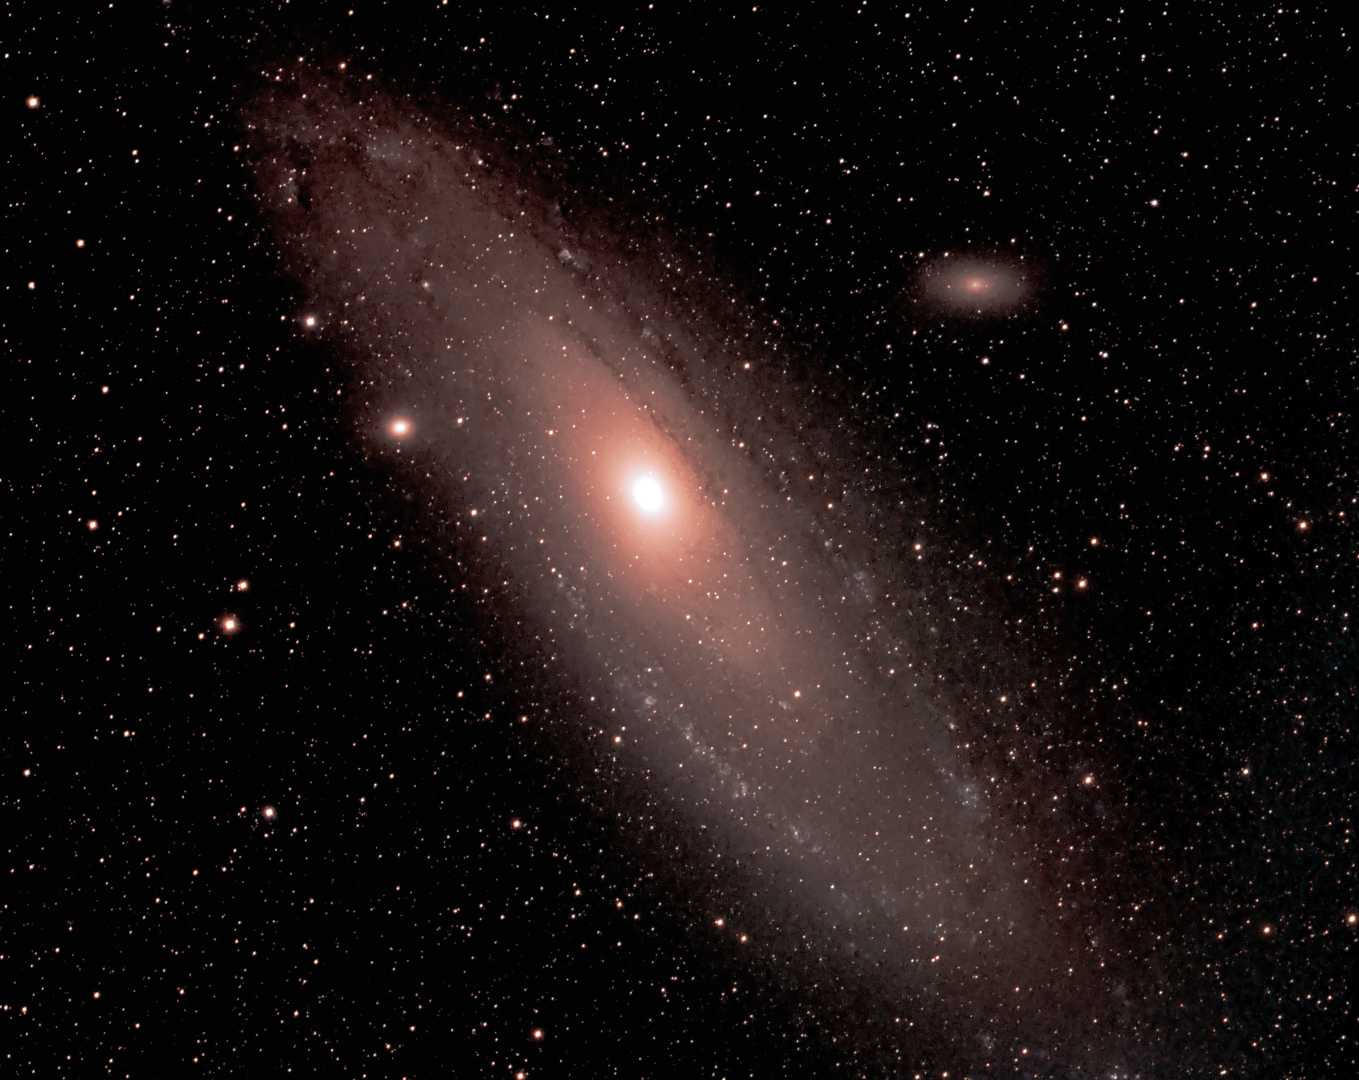
Prior to the arrival of Orion and other fun objects of the mid-winter night skies, imaging opportunities are sparse with my equipment but it’s been a couple of years since I last imaged M31 the Andromeda Galaxy and therefore for two evenings in late October it was time to give our neighbour the extended integration treatment.  At 7½ hours data acquisition went well but although the processed image is probably my best yet of this object, there’s room for improvement, which I suspect will require a move to more advanced processing software?

HaLRGBx5b (Large)

ASTROMINAGING RECORD 2019

No Date Type Object Name
       
1 21/01/19 DSLR Full Lunar Eclipse  
       
2 27/01/19* NB  Barnard-33 &

 NGC 2024

Horsehead & Flame Nebula
       
3 23/02/19* Combo M42 Great Orion Nebula
       
4 25/02/19* Combo M78 Reflection Nebula Orion
       
5 12/03/19 BB NGC443/444 Jellyfish Nebula
       
6 24/03/19 Combo M95/96/105 Leo-1 Group
       
7 29/03/19* Combo M101 Pinwheel Galaxy
       
8 10/04/19 Combo M51 Whirlpool Galaxy
       
9 13/04/19 BB M81 & m82 Bodes & Cigar Galaxies
       
10 16/07/19 DSLR Partial Lunar Eclipse  
       
11 02/08/19 NB NGC 7380 Wizzard Nebula
       
12 23/08/19* BB IC 1848 Soul Nebula +

Mosaic Link

       
13 26/08/19 NB NGC 281 PacMan Nebula
       
14 05/09/19* NB DWB 111 Propeller Nebula
       
15 Sept DSLR Milky Way Split Mountain Utah
       
16 22/10/19* Combo M31 Andromeda Galaxy
       
17 18/11/19 BB M74 Galaxy
       
18 18/11/18 NB SH2-240 Spaghetti Nebula
       

*multiple evenings        Combo = HaLRGB       Underlined = BAA published

POSTSCRIPT

The ones that got away – imaged but not seen in WTSM this year – warts and all

RHB_2ajelly (Medium)

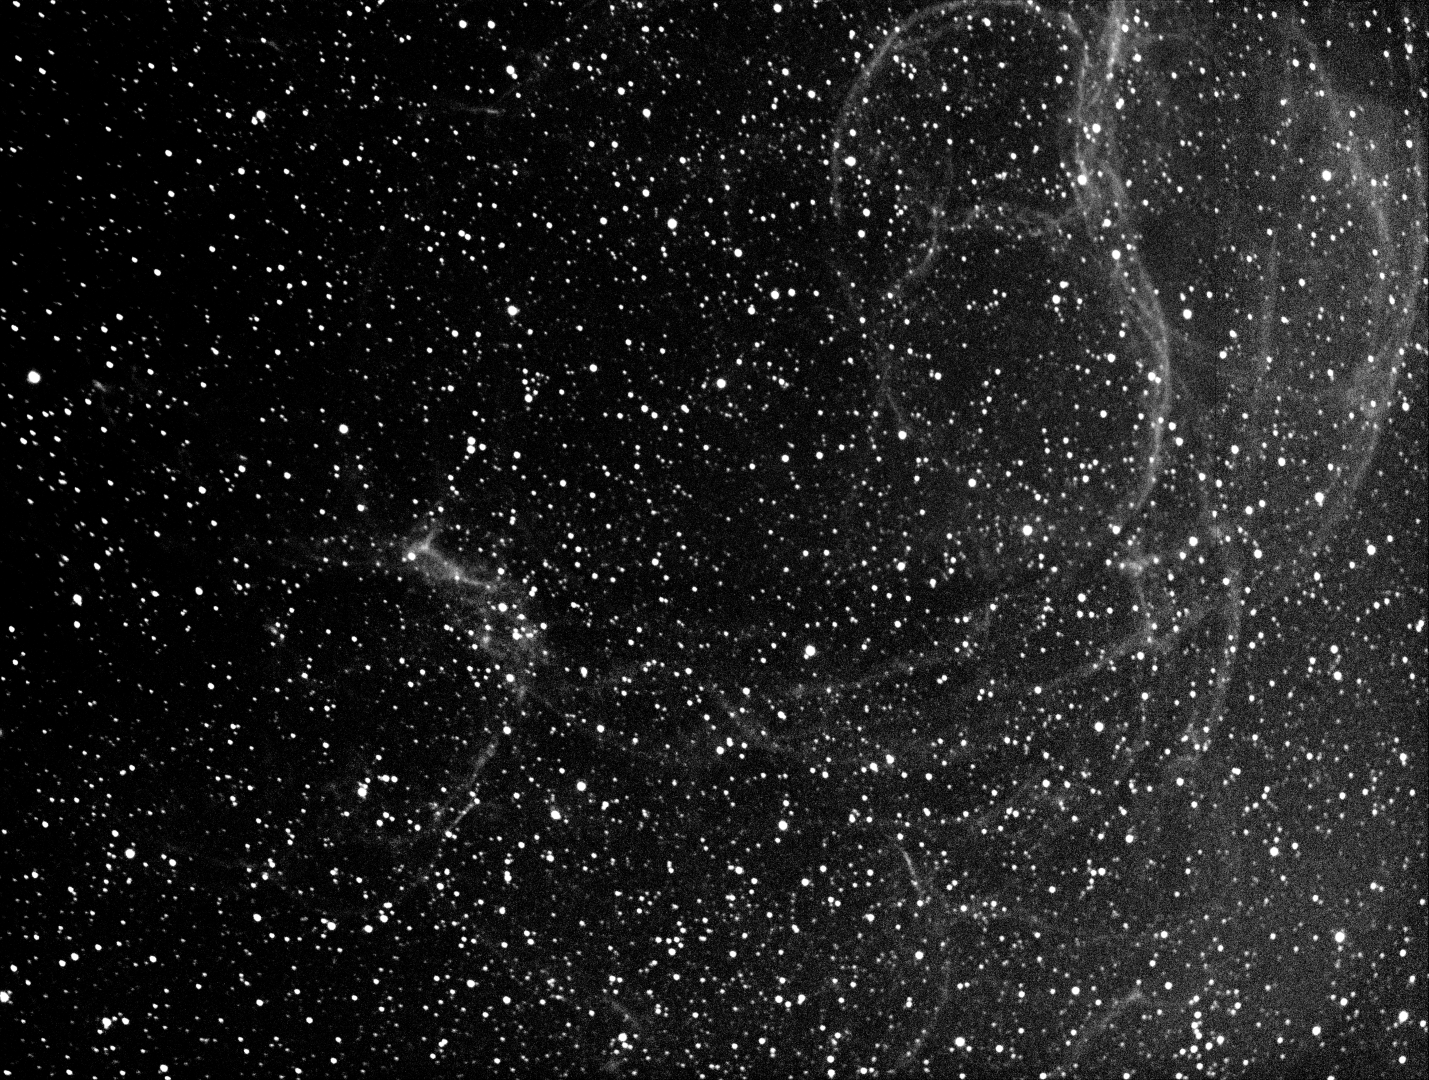
I saw some wonderful narrowband versions of the supernova remnant IC 443 Jellyfish Nebula this year, in particular adopting a wider view to incoporate its sentinel-like parner stars Tejat (Mu Geminorum) left and the tripple star Propus (Eta Geminorum) right, together with the reflection nebula IC 444 in the background.  As an experiment I think it may hold promise but will require a lot more integration time to improve the quality, colour and bring out more of IC 444.

M95_96_105 (Medium)

I’ve tried the Leo-1 group (M95/96/105) before but, as they say, if you don’t succeed try again.  Unfortunately the passage of time didn’t help – I need a larger telescope to do these critters justice! 

IMG_2336 (Large)

Dinosaur National Monument – Split Mountain, Utah.  Even at this wonderfully remote location, which is one of the darkest places in the USA, passing planes still get in the way of a good image – just like at Fairvale Observatory

M74 LRGBx (Medium)

At <=10 arc minutes the spiral galaxy M74 is too much for my equipment.

SH2-240 AB combined Ha Stretch (Large)

Located between the constellations Auriga and Gemini, SH2-240, Simeis 147 AKA the Spaghetti Nebula is a very large (+3 degrees) supernova remnant but it’s very low brightness makes imaging extremely difficult.  In fact prior to and during capture in Ha-wavelength, I had no idea if it was even within the image frame.  Aggressive stretching shows that it was there but only much darker skies and probably longer exposure time is likely to produce a more viable picture. 
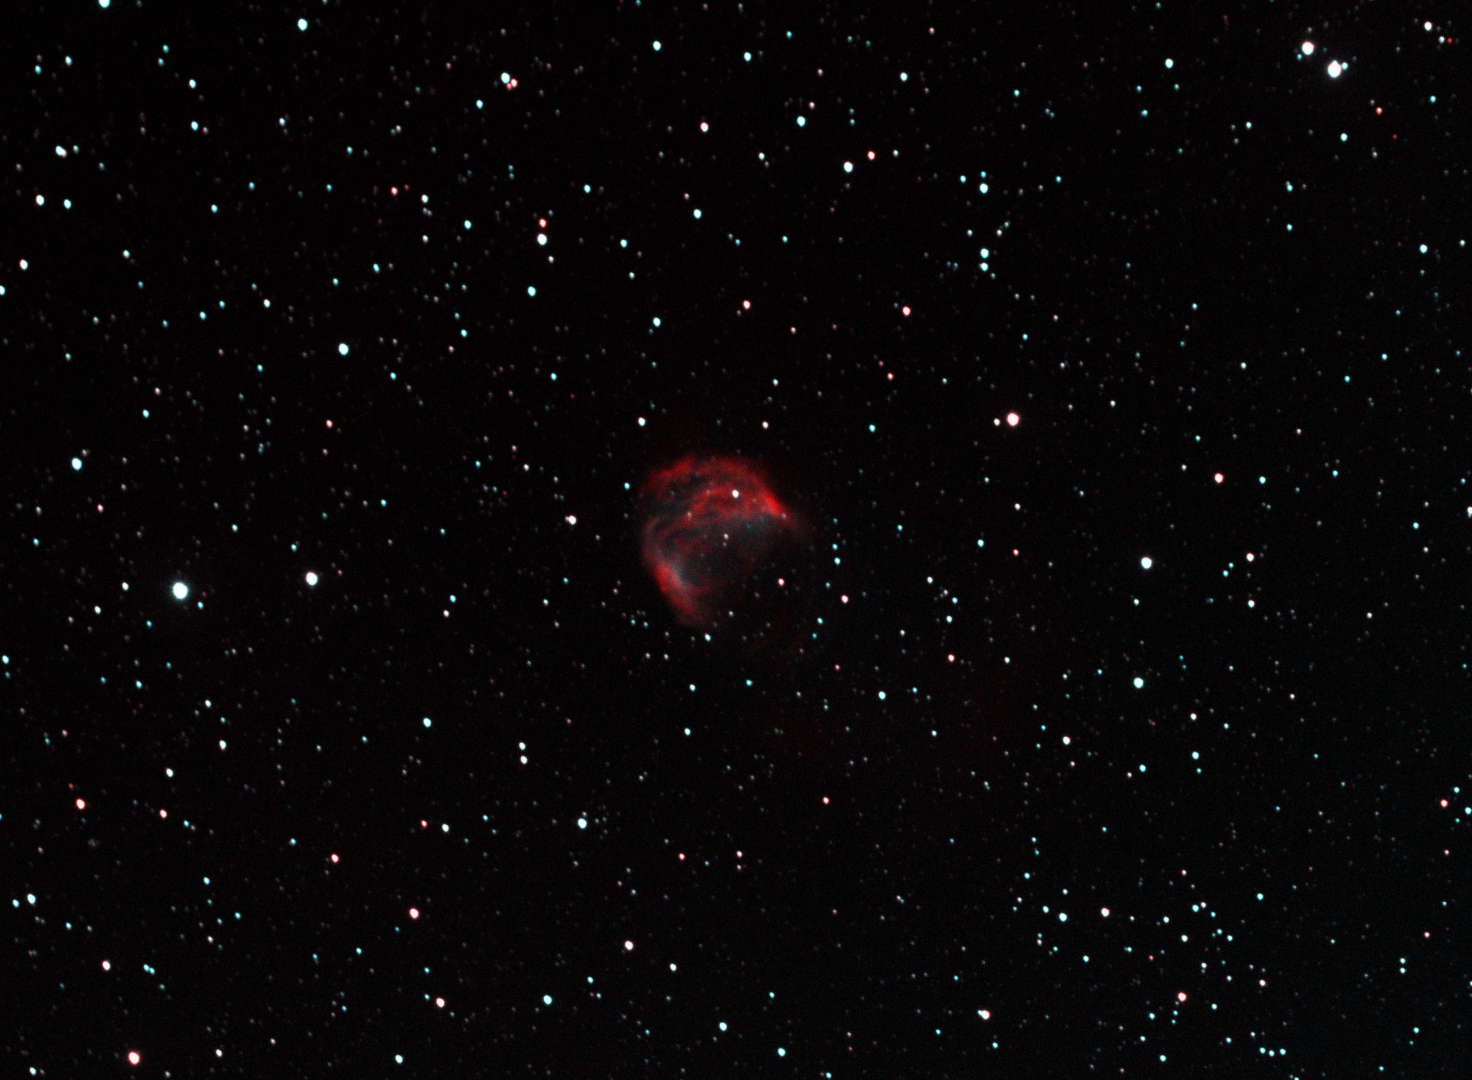
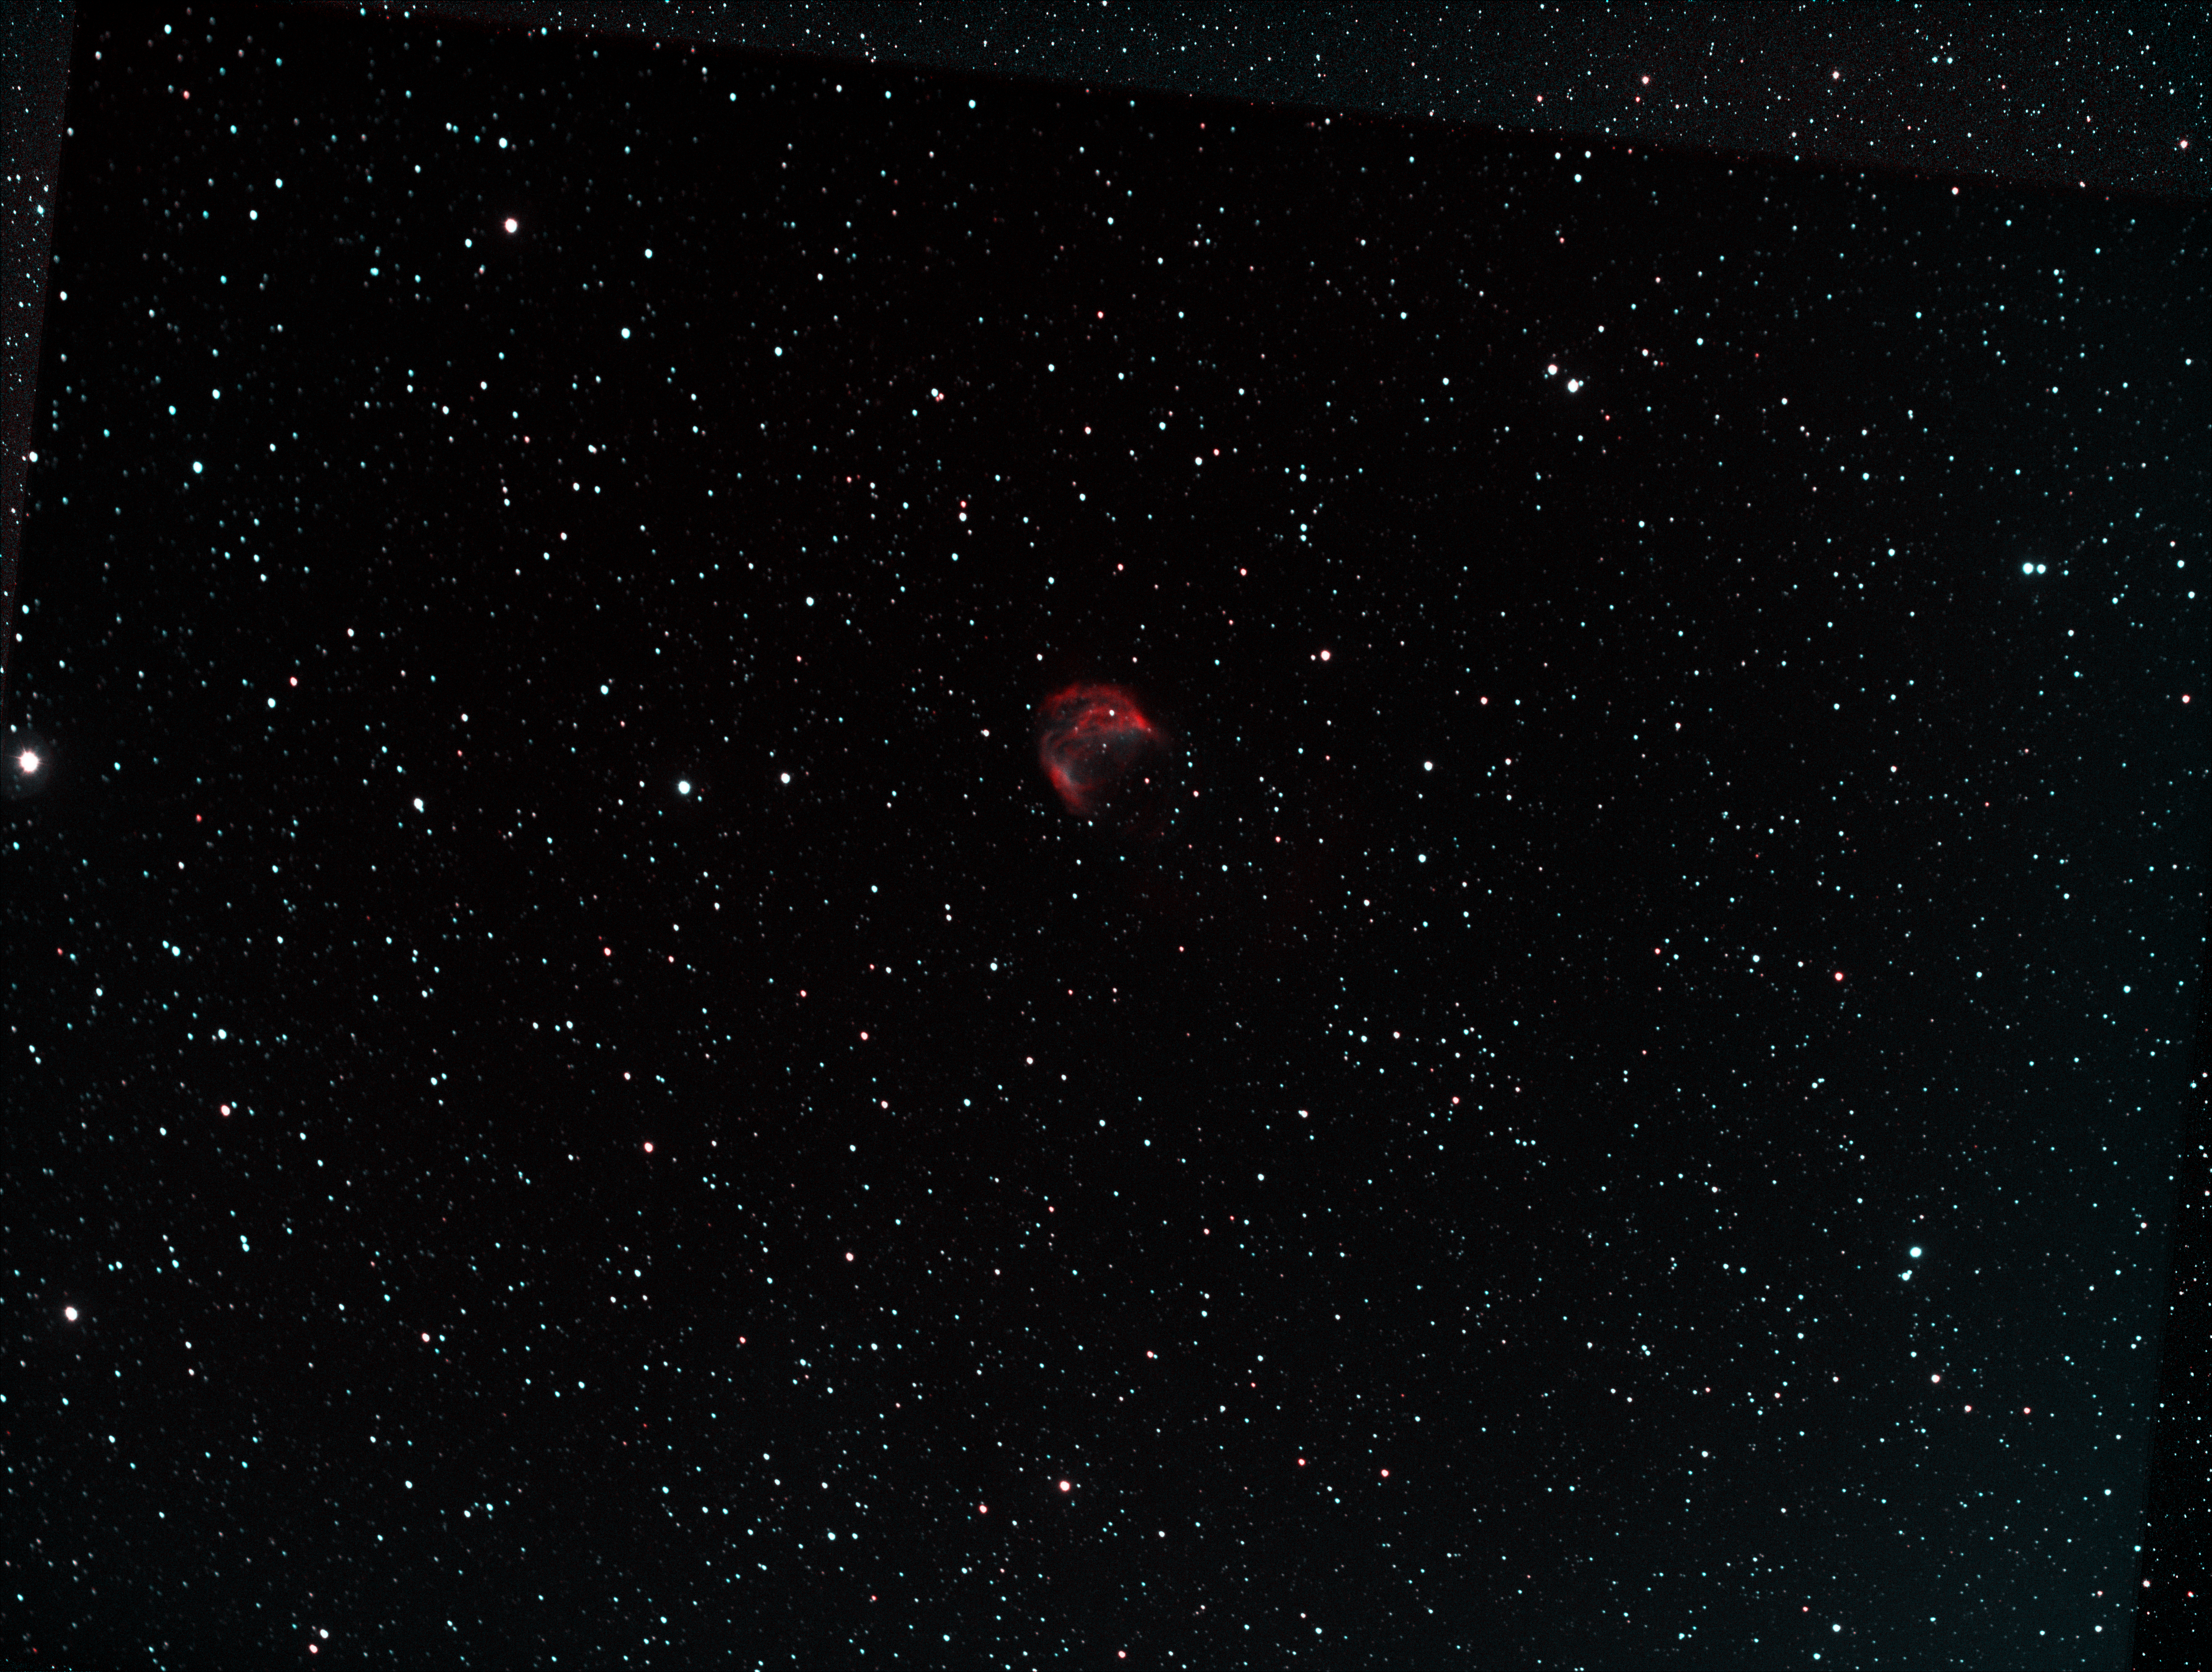
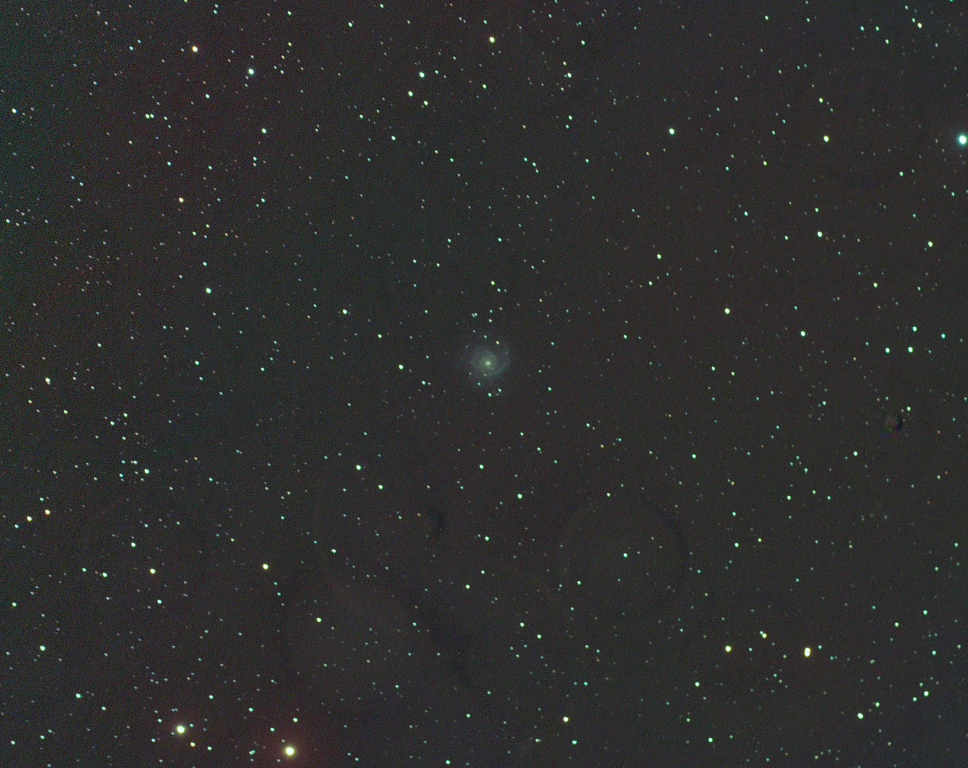
 

The Sum Of The Parts

Picture saved with settings embedded.

Having established an alternative imaging site at the southern end of my garden in the summer of 2018 AKA The Shed Observatory, I was thrilled to be able to image objects in the north sky for the first time, hitherto obscured by my house from the usual observing location.  Soon thereafter it was with great pleasure I achieved a good narrowband image of IC 1805 the Heart Nebula but was subsequently disappointed to find that part of the neighbouring object, IC 1848 the Soul Nebula, had been missed after encountering a framing problem.

One year on I was back in The Shed with new objectives for these targets: (i) to obtain a complete image of the Soul Nebula, and (ii) given the relative proximity of the Heart & Soul Nebula, to compile a mosaic which included the two objects; surprisingly I’d not attempted a mosaic before and this seemed like a good place to start.  Given the increased imaging time needed to complete even a small mosaic + the lack of darkness at the end of August + British Weather, I chose to restrict imaging to just the Ha-wavelength, which works well with both these targets and could build on the Ha subs already obtained of the Heart Nebula in 2018.

Traditionally mosaic images are based on a grid of say 1+1, 1+1+1, 2 x 2, 3 x 3  etc., which are then combined using the relevant aforesaid sequences, however, in this case starting with the original Heart Ha-subs such a system was not possible.  Since moving to mono imaging with the ZWO ASI1600-Cool camera I’ve used the excellent APT (Astro Photography) image capture software, which hitherto has catered very well with all my needs – including plate solving.  However, at this time APT did not yet have a comprehensive mosaic facility (see footnote) which would allow an imaging grid to be planned and pre-programmed.  Instead it was therefore necessary to first determine suitable image coordinates for each mosaic panel that would cover the Heart & Soul + 25% overlap and then manually establish each position prior to imaging.

Given the proximity of each component I estimated a suitable mosaic could be achieved with three panels, one for each of the main objects and an intermediate panel that would bridge the space between, thus linking the objects to form a continuous mosaic.  Given the spatial relationship, each ofthe three panes needed to be stepped relative to each other and also slightly rotated.  The final data for each nebula consisted of 1h 40m integration time + a further 1h 15m for the link panel, or 4h 35m in total for the complete mosaic.

To my relief the final mosaic was relatively easy to create.  First modestly stretching each panel, paying attention to the background levels and removing any gradients, in order to ensure uniformity between the images before compilation.  I then used Microsoft’s free ICE (Image Composite Editor) software to stich the three panels together into a final mosaic, after which further adjustments were made in Photoshop.

I’m very pleased with the outcome of my first, albeit modest mosaic.  With the ability to return to targets on any occasion using plate solving and, as always weather permitting, multi-image mosaics now open up whole new possibilities which can be captured and compiled over a period of time – even years.  However, until I am able to use a suitable mosaic programme for sequencing, I’m more likely to restrict such projects to small areas that only require limited imaging time, such as the Heart & Soul.

The Greeks and Romans knew a thing or two about mosaics and I’ve long enjoyed Escher’s use of the mosaic form as a basis for his graphic art (see above).  I’m quite sure they would marvel at the astrophotography of Deep Sky Objects and how mosaics can be used in their creation.  The mosaic is all about the sum of the parts, which not only produces a wider, more encompassing view but in doing, so the combined parts add a different quality to the final image.  For now my first mosaic has been quite successful, was good fun and moreover, I can see that the technique ultimately has the potential to open up new and exciting possibilities even with my existing equipment.

Footnote: Since imaging and processing the Heart & Soul mosaic, a recently updated Cartes du Ciel (CdC) verson 4.2 has been released, which incorporates a mosaic planning function.  Moreover, the aforesaid plan can then be imported into the APT software (subject to a minor adjustment being undertaken by APT to fix a panel numbering issue) and thereby provide integrated mosaic planning and programming.   

IMAGING DETAILS – 2018
Object Heart Nebula IC 1805     
Constellation Cassiopeia
Distance 7,500 light-years
Size 150’ x 150’  =  2.5o or 200 light-years
Apparent Magnitude +18.3
 
Scope  William Optics GT81 + Focal Reducer FL 382mm  f4.72
Mount SW AZ-EQ6 GT + EQASCOM computer control
Guiding William Optics 50mm guide scope
  + Starlight Xpress Lodestar X2 guide camera & PHD2 control
Camera ZWO1600MM-Cool (mono)   CMOS sensor
  FOV 2.65o x 2.0o Resolution 2.05”/pix  Max. image size 4,656 x 3,520 pix   
EFW ZWOx8 + ZWO LRGB & Ha OIII SII 7nm filters 
Capture & Processing Astro Photography Tool + PS2,  Deep Sky Stacker & Photoshop CS2, HLVG
Image Location              & Orientation Centre  RA 02:33:09    DEC 61:24:23                     


Exposures Heart Nebula 20 x 300 sec Ha  =  100 minutes   
  @ 139 Gain   21  Offset @ -20oC    
Calibration 5 x 300 sec Darks  20 x 1/4000 sec Bias  10 x Flats Ha  @ ADU 25,000  
Location & Darkness Fairvale Observatory – Redhill – Surrey – UK        Typically Bortle 5
Date & Time 16th & 17th  August 2018 @ +23.30h  
Weather Approx. 12oC   RH <=95%


IMAGING DETAILS – 2019
Object Soul Nebula IC 1848   & Link Pane
Constellation Cassiopeia
Distance 6,500 light-years
Size 150’ x 75’  or 100 light-years
Apparent Magnitude +18.3
 
Scope  William Optics GT81 + Focal Reducer FL 382mm  f4.72
Mount SW AZ-EQ6 GT + EQASCOM computer control
Guiding William Optics 50mm guide scope
  + Starlight Xpress Lodestar X2 guide camera & PHD2 control
Camera ZWO1600MM-Cool (mono)   CMOS sensor
  FOV 2.65o x 2.0o Resolution 2.05”/pix  Max. image size 4,656 x 3,520 pix   
EFW ZWOx8 + ZWO LRGB & Ha OIII SII 7nm filters 
Capture & Processing Astro Photography Tool + PS2,  Deep Sky Stacker & Photoshop CS2, HLVG
Image Location              & Orientation Centre – Soul Nebula   RA 02:56:16    DEC 60:20:07

Centre – Link Pane         RA 02:43:38    DEC 60:55:59    

Exposures Soul Nebula  20 x 300 sec Ha  = 100 mins   

Link Pane       15 x 300 sec Ha  =  75 mins

  @ 139 Gain   21  Offset @ -20oC    
Calibration 5 x 300 sec Darks  20 x 1/4000 sec Bias  10 x Flats HaI  @ ADU 25,000  
Location & Darkness Fairvale Observatory – Redhill – Surrey – UK        Typically Bortle 5
Date & Time 23rd & 25th August 2019 @ +23.30h 
Weather Approx. 18oC   RH <=60%


Hunting Orion

Combined +180 degrees 3+5min HaLRGB (Large)

In Greek mythology it is said that Zeus, the god of thunder, placed a giant huntsman amongst the stars as the constellation Orion.  Today it is one of the most recognizable of the 88 constellations in the night sky and certainly one of the most popular amongst astronomers.  Towards its extremities it is defined by the red supergiant star Betelgeuse at the top-left and the massive blue supergiant Rigel lower-right, divided in the centre by Orion’s so-called ‘belt’ formed by the line of bright stars from left-to-right: Alnitak, Alnilam and Mintaka.  These and the other stars that make up the constellation of Orion are of great interest to astronomers and also make an attractive widefield image with a standard camera.  But the more serious astrophotographer is mainly interested in the panoply of exciting DSOs that lie within and around Orion that I have therefore been pursuing myself since late January.

My quarry started with the Horsehead and Flame nebulae imaged in narrowband processed using the Hubble Palette technique in SHO to great effect.  Much to my surprise a spectacular period of warm weather and clear skies four weeks later then allowed me to capture the Great Orion Nebula over three nights in HaLRGB with an equally good result.  Such was the fine weather conditions that I was then able to continue over a further two nights – five consecutive nights of imaging in the UK in late February, unprecedented in my experience – with the objective now being the reflection nebula M78.

M78 is the brightest diffuse reflection nebula of a group that belongs to the Orion B molecular cloud complex but with an apparent size of 8 x 6 arc seconds it is a something of a challenging target with my equipment.  Notwithstanding, with the mono CMOS ZWO camera and the opportunity of obtaining increased integration times I considered it worth a try and was not disappointed with the outcome.

I generally like to present images in their natural orientation but this time I’ve chosen to rotate the it 90o anticlockwise, thus allowing the wider horizontal framing to better show M78 and the dramatic red Ha-light of nearby Barnard’s Loop together.   As with M42 previously, I first stacked and processed two exposure sets, short 60 second and long 300 second subs, before then combining them so as to tease out subtleties within the reflection nebula itself and provide greater control of the otherwise dominant Barnard’s Loop.  Despite my concerns about equipment and scale, I’m very pleased with the outcome of the main image (top-of-the-page), which beautifully shows off both the aforementioned objects to great effect and has even extracted some of the colour and detail of associated star clusters within and around the nebula.  Not surprisingly the cropped version of M78 itself starts to look a little noisy but is nonetheless interesting (below).

Combined crop 3+5min HaLRGB (Large)

After a very unpromising few months, the weather, Orion and my astroimaging took a surprising turn for the better from the end of January.  As a result of much longer integration times using plate solving over multiple sessions, combined with varied exposure times and more complex processing, I successfully managed to bag three classic deep sky objects of the Orion constellation – what’s not to like?

IMAGING DETAILS
Object M78 Orion reflection nebula
Constellation Orion
Distance 1,350 light-years
Size 8’ x 6’   
Apparent Magnitude +8.3
 
Scope  William Optics GT81 + Focal Reducer FL 382mm  f4.72
Mount SW AZ-EQ6 GT + EQASCOM computer control & Cartes du Ciel
Guiding William Optics 50mm guide scope
  + Starlight Xpress Lodestar X2 camera & PHD2 guiding
Camera ZWO1600MM-Cool mono  CMOS sensor
  FOV 2.65o x 2.0o Resolution 2.05”/pix  Max. image size 4,656 x 3,520 pix   
EFW ZWOx8 + ZWO LRGB & Ha OIII SII 7nm filters 
Capture & Processing Astro Photography Tool + PHD2 +  Deep Sky Stacker & Photoshop CS3
Image Location              & Orientation Centre  RA 05:47:37      DEC 00:20:59                     

Top Left = North  Bottom Left = East 

Exposures (A)    LRGB 8 x 180 sec  Ha 10 x 180sec       (Total time: 1hr 24 min.)

(B)    HaLRG 12 x 300 sec B 17 x300 sec      (Total time: 5hr 25 min.)   

  @ 139 Gain   21  Offset @ -20oC    
Calibration 10 x 180 sec & 5 x 300 sec Darks  20 x 1/4000 sec Bias  10 x  HaLRGB Flats               @ ADU 25,000
Location & Darkness Fairvale Observatory – Redhill – Surrey – UK        Typically Bortle 5-6
Date & Time 25th  26th 27th February  2019 @ +19.45h  
Weather Approx. 8oC   RH 60 to 80%                  🌙  ½ waning