2016 was the second full year of Watch This Space Man (WTSM) and once again it’s been something of a mixed period. Faced with a major, apparently insoluble problem, by mid-year I actually thought of giving up but by year-end it’s all come good again, in fact very good. Reflections is a look back at the ups-and-downs of the past year, astronomically speaking and a peek into the next twelve months, which one way or another could determine the future of my astrophotography.
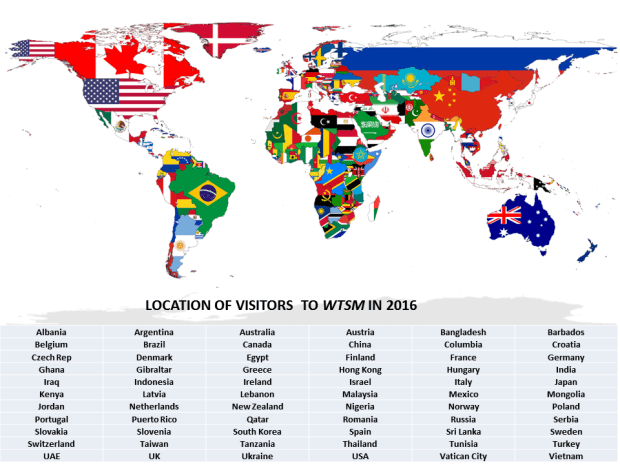
I have been astonished by the interest in this website, with some 7,000 visits and 14,000 page views from more than 65 different countries during the year, the list is quite amazing. Though I write this blog for myself, I am increasingly aware of this unsolicited readership – you are all most welcome and I would be very pleased to hear from anyone who would like to get in touch with queries, comments or just to say hello – contact details are in the Contact drop-down section of the About main menu.

JANUARY TO MARCH
The year started poorly, got much worse, then finally improved. Using my recently acquired Vixen Polarie I was pleased to start the year with an image of Barnard’s Loop, something notoriously difficult to photograph and had previously eluded me. Sadly I was not so successful with the Milky Way and have reluctantly come to the obvious conclusion that this can only be imaged in much darker skies than I’m ever likely to experience located just to the south of London and close to Gatwick airport!
As Orion starts to move on after Christmas and especially from February, I struggle to find suitable imaging targets; Coma Berenices and other constellations at this time contain numerous galaxies but they’re mostly too small for my William Optics GT81 and otherwise what might be doable I have already done before. Notwithstanding, after looking carefully I came across two HII nebulae still lurking in the early evening. The size and Ha-light of NGC 2174 Monkey Head Nebula and IC 2177 Seagull Nebula, provided just what I was looking for. Located close to Gemini and Monoceros constellations, both these DSOs are within the part of the Milky Way section of the sky, an area that thankfully produces many other similar opportunities at this time of the year for a modded DSLR camera.

Monkey Head Nebula
It’s often the small things that either alone or cumulatively can help transform the outcome with astrophotography. The quarterly period finished by acquiring two new pieces of equipment, one which could help improve the set-up and operation of the mount, the other which I hoped would help me move to the next level of imaging.
- When working in the dark and worse still in the cold, the ergonomics and general convenience of operating the equipment becomes paramount. Since starting to use EQMOD-ASCOM and Cartes du Ciel for mount control and tracking, I encountered the problem of having to be in two places at the same time; in this case co-ordinating adjustments at the mount and the computer, in particular when making and syncing star alignments. The answer to this conundrum was a gamepad, which I purchased for a nominal sum on eBay and after watching the inimitable Chris Shillito’s video on setting up and using a gamepad with EQMOD-ASCOM, have never looked back. By using the gamepad the telescope can now be manually slewed, centred and synced on any object whilst remaining at the scope, thereby making the process of alignment much quicker and convenient.


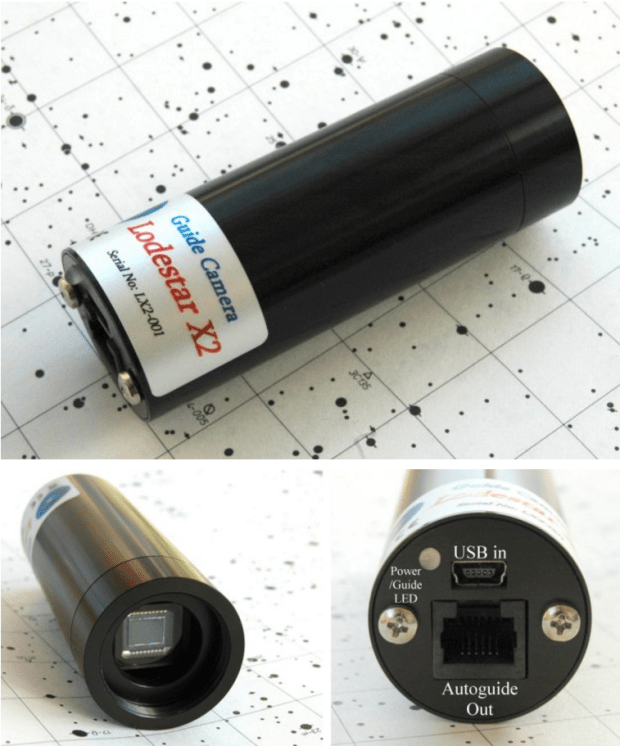
- At the end of 2015 it was my intention to start guiding in the coming year, a prerequisite for the long exposures necessary to increase data capture and thus hopefully improve image quality. I had originally intended to use my ZWO ASI120 MC camera together with a William Optics 50mm guidescope for this purpose but there always seemed to be other problems to overcome first and to be honest, I was somewhat intimidated about tackling the black art of guiding. I was finally prompted to do something about this when in March a second-hand Starlight Express Lodestar X2 autoguide camera came up on the UK Astronomy Buy & Sell. From previous research I knew this was considered to be a very good and popular guiding camera, so as it had only just been posted on the website, I immediately went for it and was successful – timing is everything. Inevitably I had problems setting-up and in particular getting the camera to focus – which was my own fault – but by the end of March I was guiding! Truth is my guiding at this stage was not very good and I needed to look further into using the PHD2 guiding software but nonetheless, the equipment was at least now working together!
|
No |
Date | Object* |
Name |
| 1 | 07/01/16 | Orion | Barnard’s Loop |
| 2 | 14/01/16 | Orion | Barnard’s Loop |
| 3 | 02/02/16 | Catalina | Comet |
| 4 | 02/02/16 | Milky Way | |
| 5 | 10/02/16 | IC 2087 | Dark nebula |
| 6 | NGC 2174 | Monkey Head Nebula | |
| 7 | IC 2177 | Seagull Nebula |
*Record of quarterly photographic images taken in 2016
APRIL TO JUNE
After finishing the previous quarter on something of a high note by getting PHD2 working for the first time, I was now hopeful that from herein my exposures and thus images would show improvement – unfortunately I was soon to be very disappointed.
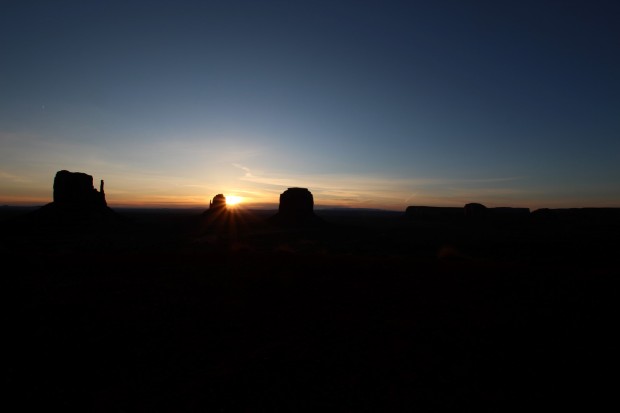
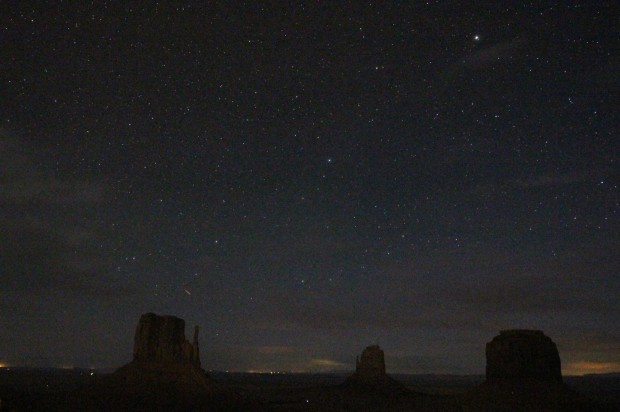
In April we went on a trip to the Southwestern USA – something of a geological pilgrimage for my wife and I (we are both geologists) – to see the Grand Canyon, Monument Valley, Bryce Canyon and Zion National Park as well as many other similar areas. Prior to going I had purchased a Sigma 10mm-20mm wide-angle lens in anticipation of all the big views that are characteristic of the region and was not disappointed by the lens or the scenery.
Being largely an uninhabited wilderness area, I also took the Vixen Polarie with a plan to at last capture images of the Milky Way. Unfortunately, whilst I had checked the sky beforehand on Cartes du Ciel, I think I must have made an error with the dates. We did get clear skies but unfortunately it turned out to be a full moon whilst there, which ruled out any hope of seeing, let alone imaging the Milky Way; oh well there’s always another day and it’s not going anywhere in the meantime. Notwithstanding I did manage some pleasing nightscapes at Monument Valley and Bryce Canyon.
Given my initial guiding success prior to visiting the USA, I had been looking forwards to getting to grips with improving guiding and imaging on my return. Furthermore, on 6th May there was a rare solar transit of Mercury and in preparation, the week before I set up and tested all the equipment and then successfully took some test images of the Sun using a Baader solar filter. All was well on the appointed day which was also fortunately clear and sunny, so that shortly before contact I was all set and ready to try and capture the movement of a small black dot (Mercury) across the face of the Sun. Unfortunately it was not to be and the weeks that followed almost marked the end of my still nascent hobby of astrophotography!
In short, EQMOD crashed when I turned on the DSLR camera to image the transit! I tried re-booting and checked every other piece of equipment numerous times but to no avail. I subsequently spent weeks trying to track down the problem, checking and re-checking every cable, piece of equipment and updating or reinstalling all the relevant software without success. The nature of the problem strongly suggested there was a conflict between EQMOD-ASCOM and the camera and I therefore turned to the EQMOD forum for help, without success. Somewhat late in the day and by now desperate, I posted the issue on SGL and quickly received a reply from someone who had had a very similar problem, which though also very difficult to identify, turned out to be a very small break in the outer cover of the DSLR AC/DC power adapter cable. It’s not clear to me why this matters but I bought a new adapter and as they say, Bob’s your uncle, it worked! I have looked very carefully at my adapter and cable and can see nothing wrong but am very thankful for the advice.

AC/DC Adapter: How can something as basic as this cause so much disruption?
It seems ridiculous that this very minor problem was nearly terminal but just in case it happens again I have since bought another spare power adapter. Together with my daughter’s wedding in early June and the adapter meltdown, imaging for two of the three months during this period was almost non-existent. Still by July I was ready to start again but by then there was no astronomical darkness!
|
No |
Date | Object |
Name |
| 8 | April | USA | Monument Valley etc |
| 9 | 06/06/16 | M5 | Globular cluster |
| 10 | M13 | Globular cluster | |
| 11 | M57 | Ring Nebula |
JULY TO SEPTEMBER
After the carnage of the last quarter, I was then unable to resume imaging in July due to travel commitments. So I used what time was available to improve my knowledge of PHD2 and once again, check everything was now working ready for the return of astronomical darkness and better night skies from 20th July; I am of course now paranoid of another similar breakdown. At the start of August I manged to obtain a just passable image of the Eagle Nebula for the first time. Then shortly afterwards on the evening of 11th / 12th August, clear skies produced a decent night for viewing and imaging a few of this year’s Perseids meteor shower. But it was at month-end and continuing into September that my imaging in 2016 finally took off.
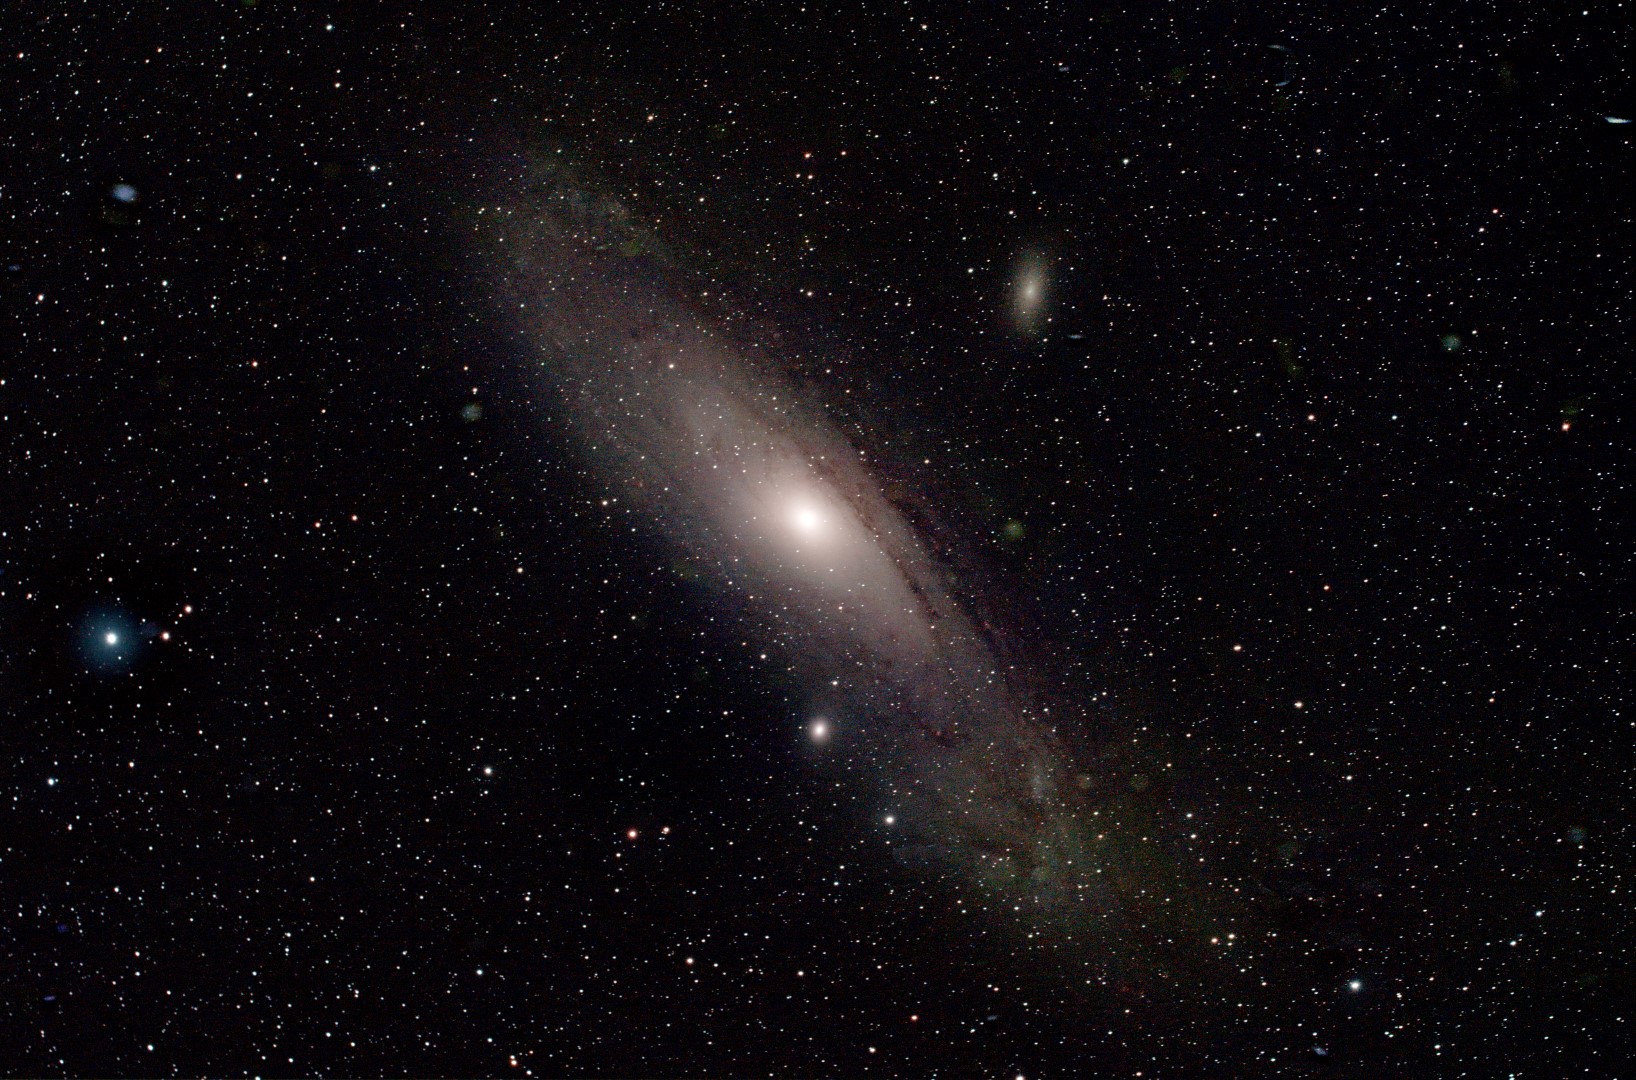
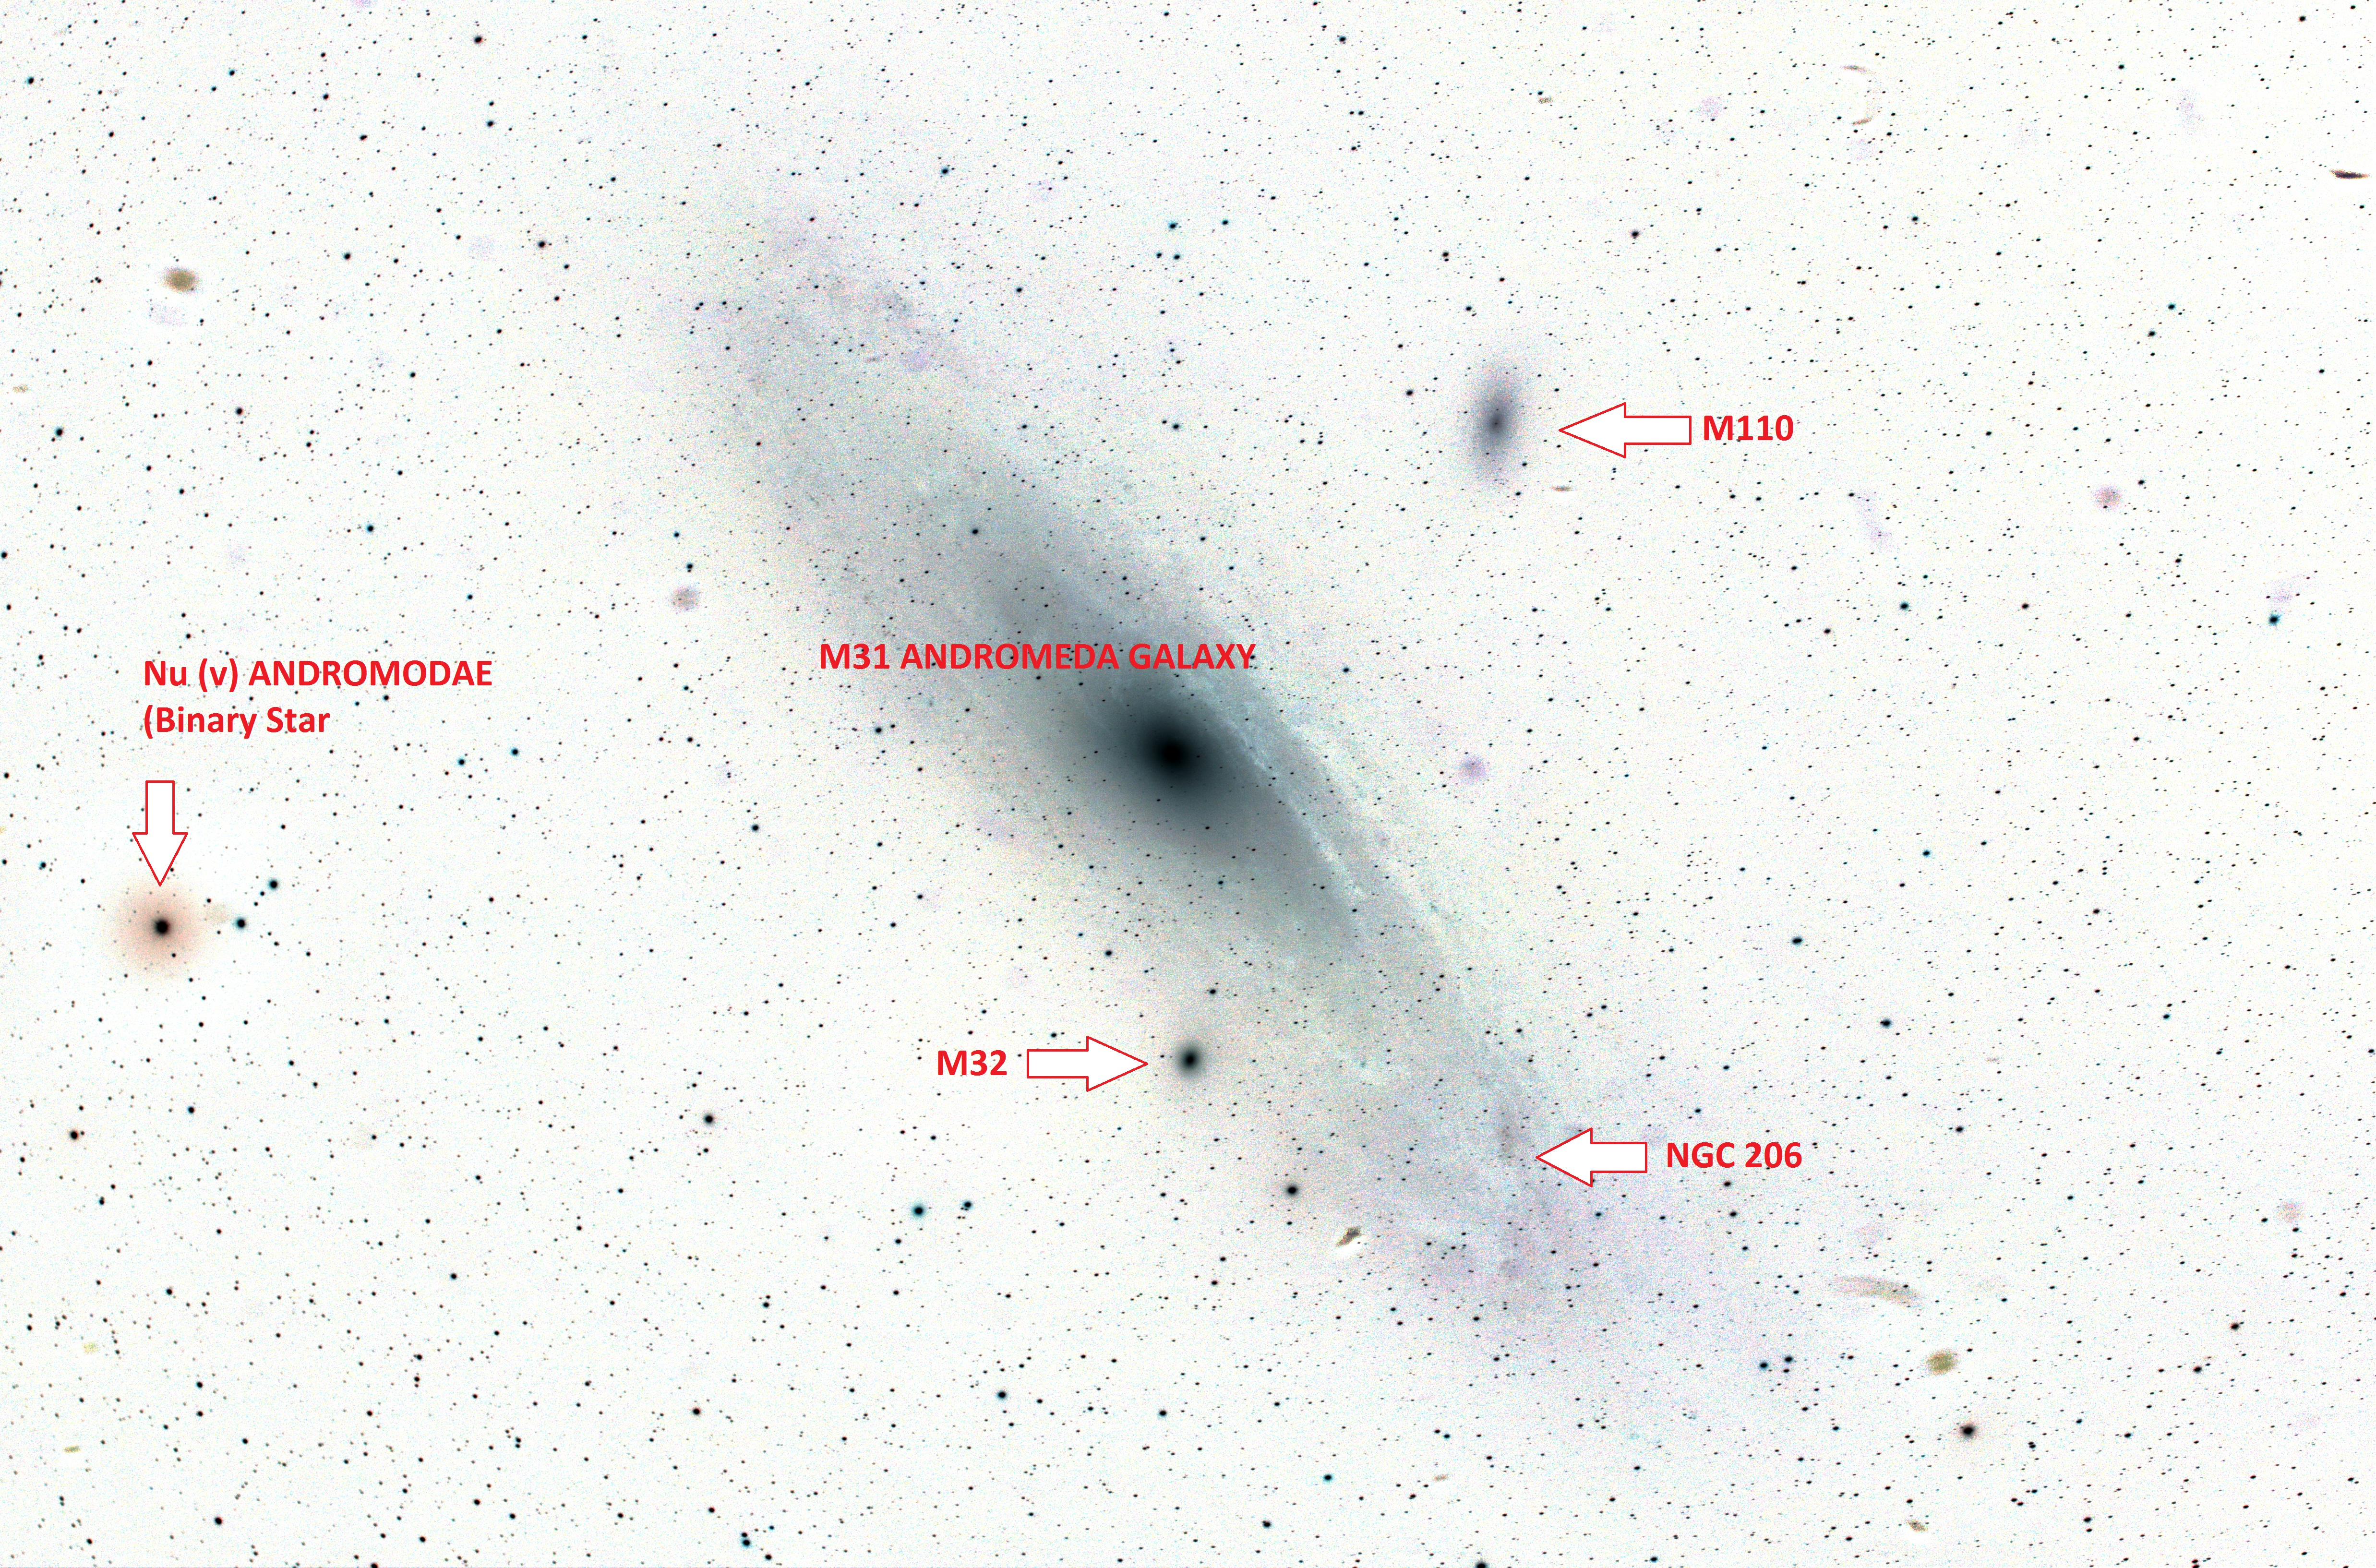
At that time the weather was consistently dry and warm, providing more than a week of clear skies and almost nightly imaging. Dark nebulae are interesting features I’d hitherto not recognised as imaging opportunities and was therefore intrigued to successfully image the E-Nebula at this time. Thereafter I used the opportunity of the weather window to experiment with PHD2 by using M27 the Dumbbell or Apple Core Nebula as a control imaging object. Of course, each year is different but I’ll try to use any similar conditions in the future to sort out and develop old and new techniques, such unusual moments are precious for UK astronomers. At the end of nearly two tiring weeks I had PHD2 working quite well and have not looked back since. As a result of this work soon thereafter obtained good images of the Andromeda Galaxy, as well as the Veil, Crescent and Ring Nebulae.
|
No |
Date | Object |
Name |
| 12 | 07/08/16 | M16 | Eagle Nebula |
| 13 | M11 | Globular | |
| 14 | B142-3 | Dark E-Nebula | |
| 15 | 11/08/16 | Perseids | |
| 16 | 23/08/16 | LDN 673 | Dark Nebula |
| 17 | NGC 6781 | Planetary Nebula | |
| 18 | M27 | Dumbbell Nebula | |
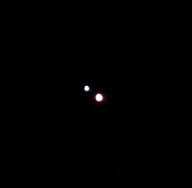
| 19 | Albireo | Double star | |
| 20 | Moon | ||
| 21 | 28/08/16 | M11 | Globular cluster |
| 22 | NGC 6905 | Blue Flash Neb | |
| 23 | Albireo | Double star | |
| 24 | 15 Aquilea | Double star | |
| 25 | NGC 6960 | W Veil / Witch’s Broom | |
| 26 | M32 | Andromeda Galaxy | |
| 27 | 29/08/16 | M27 | Dumbbell Neb |
| 28 | NGC 6960 | W Veil / Witch’s Broom | |
| 29 | NGC 7814 | Pegasus galaxy | |
| 30 | M15 | Globular | |
| 31 | M27 | Dumbbell Nebula | |
| 32 | M27 | Dumbbell Nebula | |
| 33 | 08/0916 | M27 | Dumbbell Nebula |
| 34 | M27 | Dumbbell Nebula | |
| 35 | NGC 6960 | W Veil / Witch’s Broom | |
| 36 | NGC 6960 | W Veil / Witch’s Broom | |
| 37 | M31 | Andromeda Galaxy | |
| 38 | 11/09/16 | NGC 6888 | Crescent Nebula |
| 39 | NGC 6992 | Eastern Veil (NGC 6995) | |
| 40 | 13/09/16 | M57 | Ring Nebula |
OCTOBER TO DECEMBER
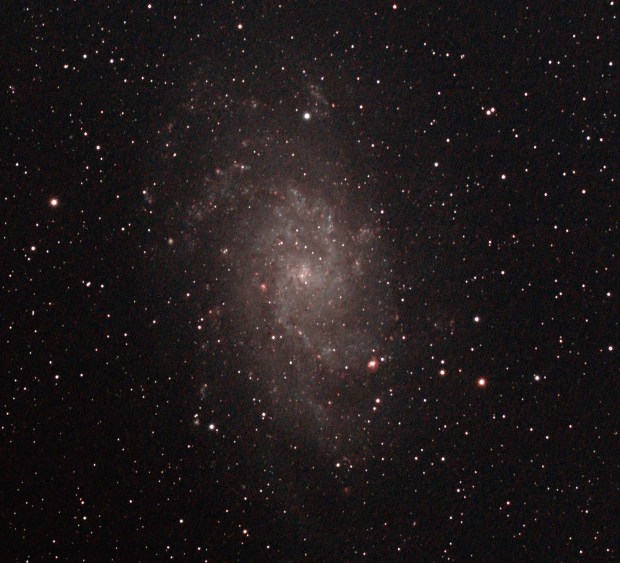
Normal conditions resumed later in September and into the final quarter in the form of overcast skies. A minor break in the weather allowed a crack at the M33 Triangulum Galaxy towards the end of October but only in late November did another clear period occur, by which time the winter sky had arrived and temperatures had fallen to nearly 0oC.

M33 Triangulum Galaxy – consisting of some 40-billion stars, the photons in this image have travelled 3-million light years in order to reach my camera sensor! | WO GT81 + modded Canon EOS 550D & FF guided | 18 x 300 secs @ ISO 800 & full calibration | 22nd October 2016
Unfortunately I am unable to establish a permanent observatory here at Fairvale and have to take-out the bring-in all the astronomy equipment each time. Apart from being inconvenient this has two practical disadvantages: (i) it can be uncomfortable even unpleasant working outside in such temperatures, and (ii) it is necessary to polar and star align every time; on occasion when using SynScan and EQMOD-ASCOM it can take up to 2-hours before starting imaging. Fortunately, I think I have now sorted out both these problems which should greatly help in the future.
By re-configuring the computer, mount and camera wiring, combined with establishing a wireless link between my tablet and the computer, once set-up I can now control most of the functions from indoors. The comfort of being indoors benefits operating in general and especially thinking, which can be quite difficult when astroimaging and made even harder when it is cold.
With prolonged periods of clear weather in the second-half of the year, I was sometimes able to set-up and leave the equipment for a few days under a waterproof cover, which meant that from day-to-day I could be up-and-running each time in less than 30 minutes! However, I expect this will only rarely be possible and nightly set-ups are likely to continue to be the norm. Fortunately, I have also recently discovered two techniques that should help both streamline and improve star and polar alignment in the future.
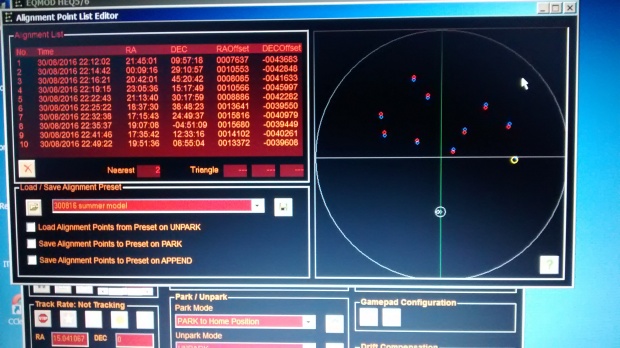
In addition to guiding, PHD2 has a very good polar alignment facility that eliminates the use of the SynScan handset and enables the procedure to be carried out from the computer; it can also be undertaken without sight of the Polaris star, which is a major problem at Fairvale Observatory where it is totally obscured by my house. At times when the mount can be left outside, I can also save and subsequently re-use the star-alignment model in EQMOD-ASCOM. All-in-all these and other procedures have made a very positive impact on my astronomy and astroimaging. The outcome of these changes led to a decent sequence of imaging with which to finish the year and, furthermore, hopefully provides a strong foundation for continuing improvements in 2017.
|
No |
Date | Object |
Name |
| 41 | 22/10/16 | M15 | Globula cluster |
| 42 | M33 | Triangulum Spiral Galaxy | |
| 43 | 28/11/16 | M45 | Pleiades |
| 44 | NGC 2024 | Horsehead Nebula | |
| 45 | M42 | Orion Nebula | |
| 46 | 29/11/16 | Hyades | Open star cluster |
| 47 | NGC 2244 | Rosette Nebula | |
| 48 | 30/11/16 | NGC 1499 | California Nebula |
| 49 | IC 405 | Flaming Star Nebula | |
| 50 | 03/12/16 | M74 | Spiral Galaxy |
| 51 | M77 | Spiral Galaxy | |
| 52 | M1 | Crab Nebula | |
| 53 | IC 2118 | Witch’s Head | |
| 54 | M78 | Reflection Nebula | |
| 55 | 04/12/16 | SH2-264 | Lamda Orionis |
| 56 | SH2-261 | Lower’s Nebula |
ETCETERA
A few other astronomy and imaging related matters helped shape the past year for me. After coming across WTSM, I was surprised to be contacted by the Purley Photography Camera Club to give a lecture on astrophotography in March. I’m pleased to say the event went very well and, furthermore, the process of compiling the presentation beforehand helped expand my own knowledge of the subject too.
In May I received a sun dial installed on a carved Purbeck Stone plinth as a retirement present. As a time piece it’s accuracy is limited but it is a beautiful addition to my garden and solar astronomy for which I am very grateful. By coincidence, later in the year I also came across a simple but charming sun dial set into the ground by the upper lake at Earlswood Common, a short walk from my home and Fairvale Observatory. Intriguingly it works by standing on a central stone, located depending on the season, and then uses your own shadow to read off the time – clever.


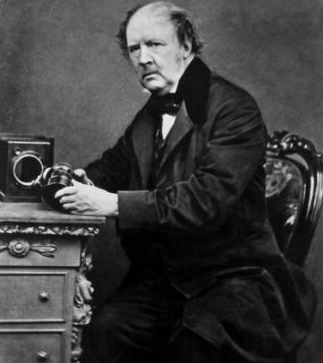
In September we visited Lacock Abbey in Wiltshire, home of William Fox Talbot in the 19th Century – photography pioneer and notable for developing photographic fixing and printing. The photography museum there is very good and it was fascinating to see his place of work in the house, where the very first photographic print is also displayed. His contribution to photography is unique and today he is generally recognised as the father of modern photography.
As a Londoner born and bread, I like to think I know the city well and over my lifetime have visited most of its unique sites, old and new. However, for some inexplicable reason I had never been to Westminster Abbey, so decided to put that right in November. It is, of course, a building of unparalleled history, with numerous graves and memorials of centuries of kings & queens, as well as scientists, explorers, poets, actors etc. Noteworthy amongst these for the astronomer is the physicist and mathematician Sir Isaac Newton and Second Astronomer Royal, Edmond Halley.


I must next give mention to the man who throughout the year dominated my reading, learning and thinking – Albert Einstein. His work during the early part 20th Century still dominates today’s physics and astronomy. We continue to make ground breaking discoveries that substantiate and build on his ideas that were originally postulated over 100-years ago. Pictures only recently obtained using the the Hubble telescope have spectacularly demonstrated the effect of gravitation lensing and in 2016 for the first time ever the existence of gravitational waves was confirmed. This year I therefore decided to understand the man and his work better. During the first half of the 2016 I read Walter Isaacson’s excellent biography of Einstein and have recently completed and 8-week Stanford University course on the Special Theory of Relativity. They were both very enjoyable, immensely interesting and time well spent.


Finally, this Christmas I was surprised and very pleased to receive a printed, bound copy of the WTSM blog for the period since its inception on 5th August 2014 until 10th November 2016. A lot of work has gone into producing this blog and I’ve always been concerned that somehow something might go wrong with the website or internet and it would all be lost. This book now safely preserves in print all the blogs and images posted during the aforementioned period. The production is generally very good and I have already enjoyed re-reading some of my blogs once again.

WTSM: The Book!
Favourite Images
As a result of the aforementioned issues, 2016 has certainly been a year of two halves. Having resolved the equipment problem and started to employ some very useful new techniques and software, I was eventually able to obtain some good images. My personal favourites in no particular order are shown here below:

Barnard’s Loop & Lamda Orionis Nebula : Vixen Polarie & modded Canon 550D + Sigma UWA @ 20mm | 11 x 240 secs @ ISO 1,600 + darks | 7th January 2016
Monument Valley by Night: order of buttes same as daytime photo above. Canon 700D + 10mm Sigma wide-angle lens | 20 x 15 secs @ ISO 6,400 | 10th April 2016
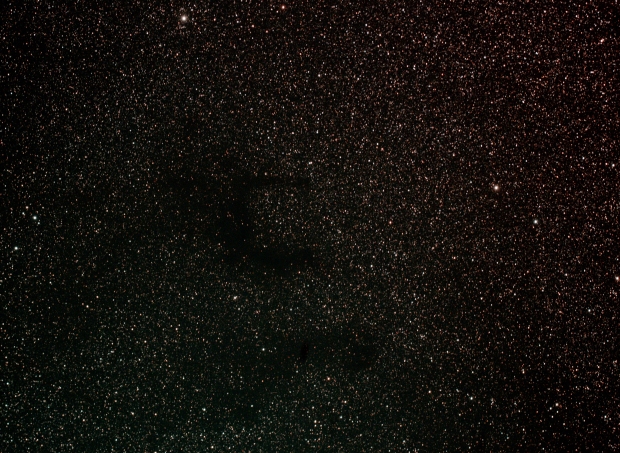
B142/3 Barnard Dark E-Nebula
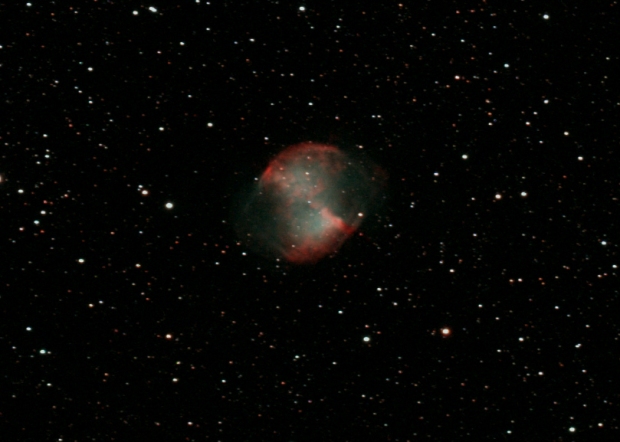
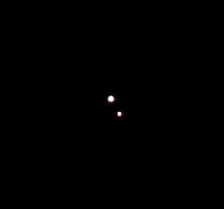
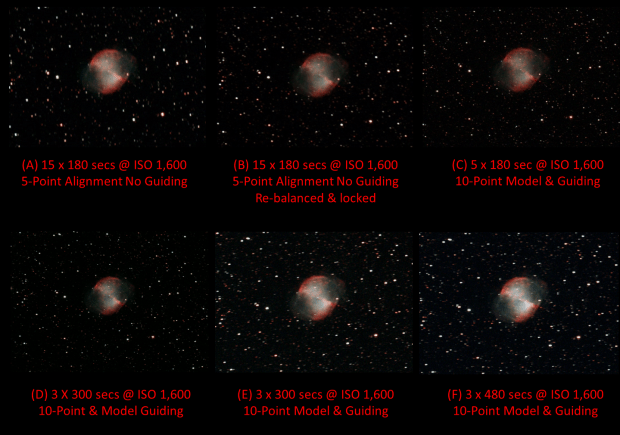
M27 Apple Core Nebula | William Optics GT81 + 50mm Guide Scope & 10-point EQMOD-ASCOM alignment model | modded Canon 550D + Field Flattener | 3 x 300 secs @ ISO 1,600 & full calibration, 90% cropped | 30th August 2016
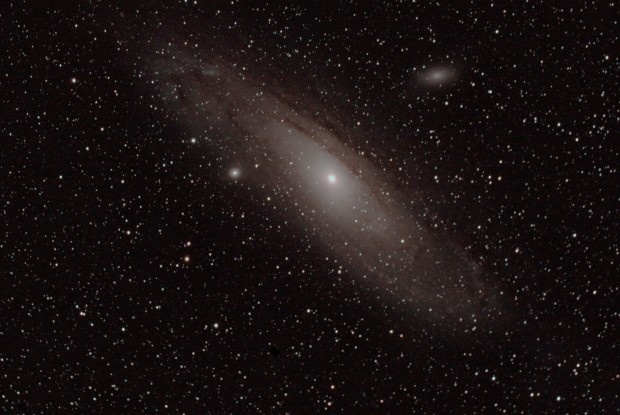
M31 | WO GT81 + modded Canon 550D & FF | 10 x 300 secs @ ISAO 1,600, darks + flats | 8th September 2016


Round-up & goals for 2017
Despite the frankly awful start to the year, astronomically speaking 2016 finished on something of a high. Furthermore, contrary to initial indications I was in the end partially successful in achieving some of my objectives set out at the beginning of last year:
| RECORD CARD – 2016 | ||
| Goal | Specifics / Results | Outcome |
| Increase imaging exposure times | Improved equipment set-up and alignment and successfully started autoguiding with exposure times of up to 8-minutes. | DONE
|
| Improve processing | Started using newer version of Photoshop CS2 + other related software. Improvement with post-processing using online tutorials and Nik Syzmanek’s booklet Shooting Stars. | GETTING THERE
|
| Start widefield imaging | Purchased Vixen Polarie, with portability put to use in the USA but did not make UK dark sky sites as planned. | GETTING THERE
|
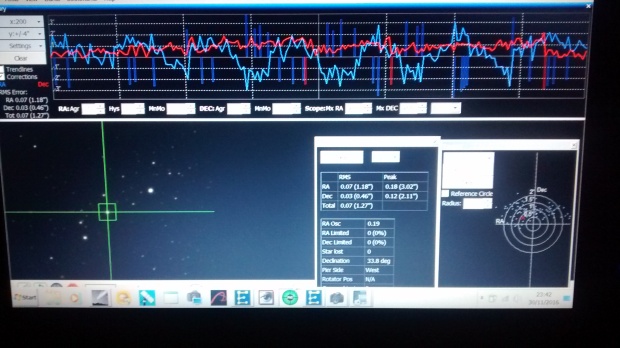
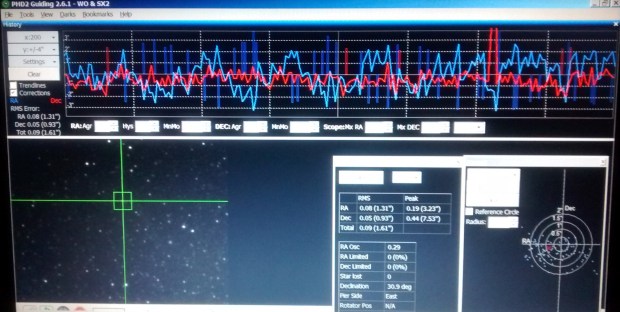
Getting better: PHD2 working screen 30th November 2016, DEC is good but room for improvement with the RA settings. Notwithstanding, the impact of tracking and image quality is noticeable.

I’m concerned about setting more goals or the forthcoming year but I think it helps, so here goes:
- Improve processing: As the headmaster’s report would say “room for improvement” and I will try. I have purchased Warren Keller’s book Inside PixInsight, considered by many to be the gold standard of post-processing software but is a nightmare to learn – this may be a step too far for now, we’ll have to see – maybe 2018?
- Expand and improve widefield imaging: First – use the Vixen Polarie as had been intended last year to obtain nightscape images at UK dark-site locations. Second – look at ways of using a widefield set-up with the mount more successfully.
- Start LRGB imaging: I spent a lot of time in 2016 considering the question – what next? I am keen to image smaller DSO objects, in particular galaxies and was on the verge of purchasing a larger telescope – probably another refractor. However, after attending a talk by Nik Syzmanek, one of Britain’s foremost astrophotographers, I have come to the conclusion that the next step should probably be a move to LRGB imaging, which if successful probably has the greatest potential to improve my pictures – let’s hope so.


Looking back 2016 was a funny old year, which for me was defined by three experiences:
Despite two wonderful periods at the end of August and November the weather for astronomy was mostly awful, with cloud cover for weeks on-end and when it was clear, it was a full moon – frustrating or what?
I had already learned that patience and perseverance are required in large quantities for astroimaging but the equipment break-down in May and June was so severe and apparently insoluble that, together with the aforementioned cloudy skies, I really thought of giving up.
However, this time there is a happy ending: after I finally solved the equipment problem and started autoguiding, I feel I have eventually made some great strides with my imaging in 2016 which, furthermore, holds much promise for the coming year and I hope can record in WTSM’s Reflections at the end of 2017.
Watch this space!