Originally thought to be a planetary nebula, Abell included this object in his catalogue as Abell-85 but later in 1971 it was revised as a supernova remnant (SNR) and renamed CTB-1, thus also denoting it as a radio source. The overall structure is a circular shell with a conspicuous rupture towards the north (bottom right of image). The main red Ha-shell is composed of multiple interlocking filament limbs, with a blue / green OIII arc along one side (see main image above).
I experimented extensively processing the data because of its overall complexity and is an interesting object, which is therfore also presented below as greyscale Ha-wavelength only and starless versions. The main Ha and OIII data is shot at long 1,800 second exposures, which together with RGB adds up to a whopping 29 hours of integration time. However, CTB-1 is an extremely faint object, which probably still requires considerably more time – I’ve seen somebody else’s 61-hour integration which they described as “not enough” and despite the quality of their image I’d probably have to agree.
CTB-1 is a very exciting object, which might have been what Douglas Adams had in mind when creating Milliways or The Restaurant At The End Of The Universe in the Hitchhiker’s Guide, from which such spectacular events could be ordered to view with your meal!
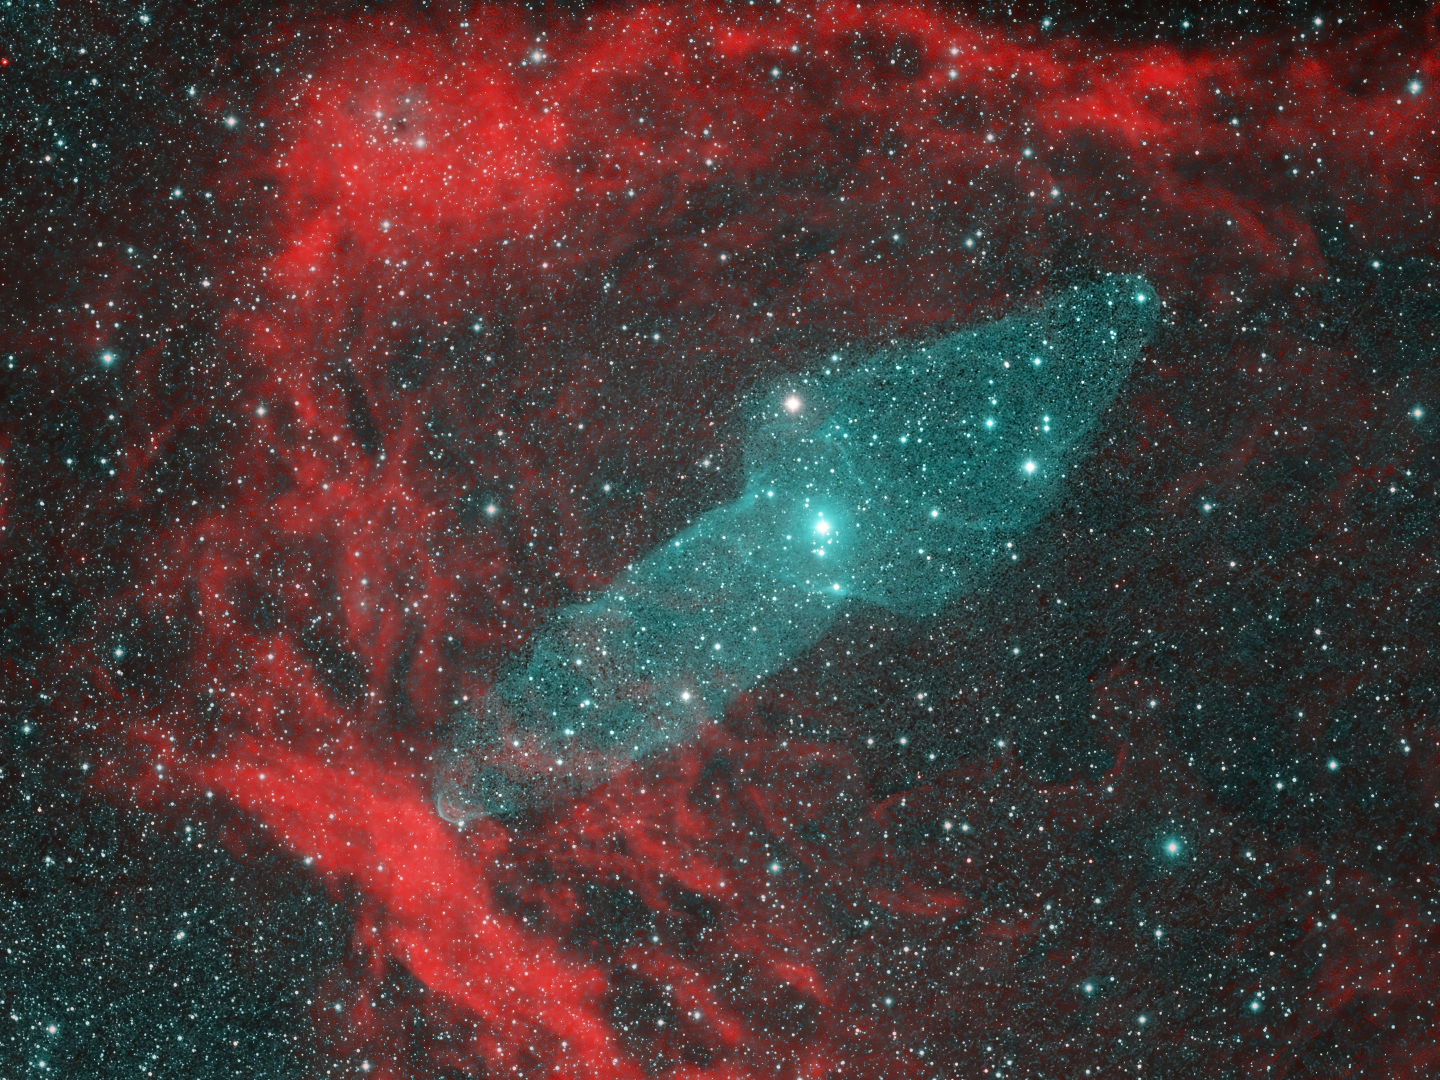
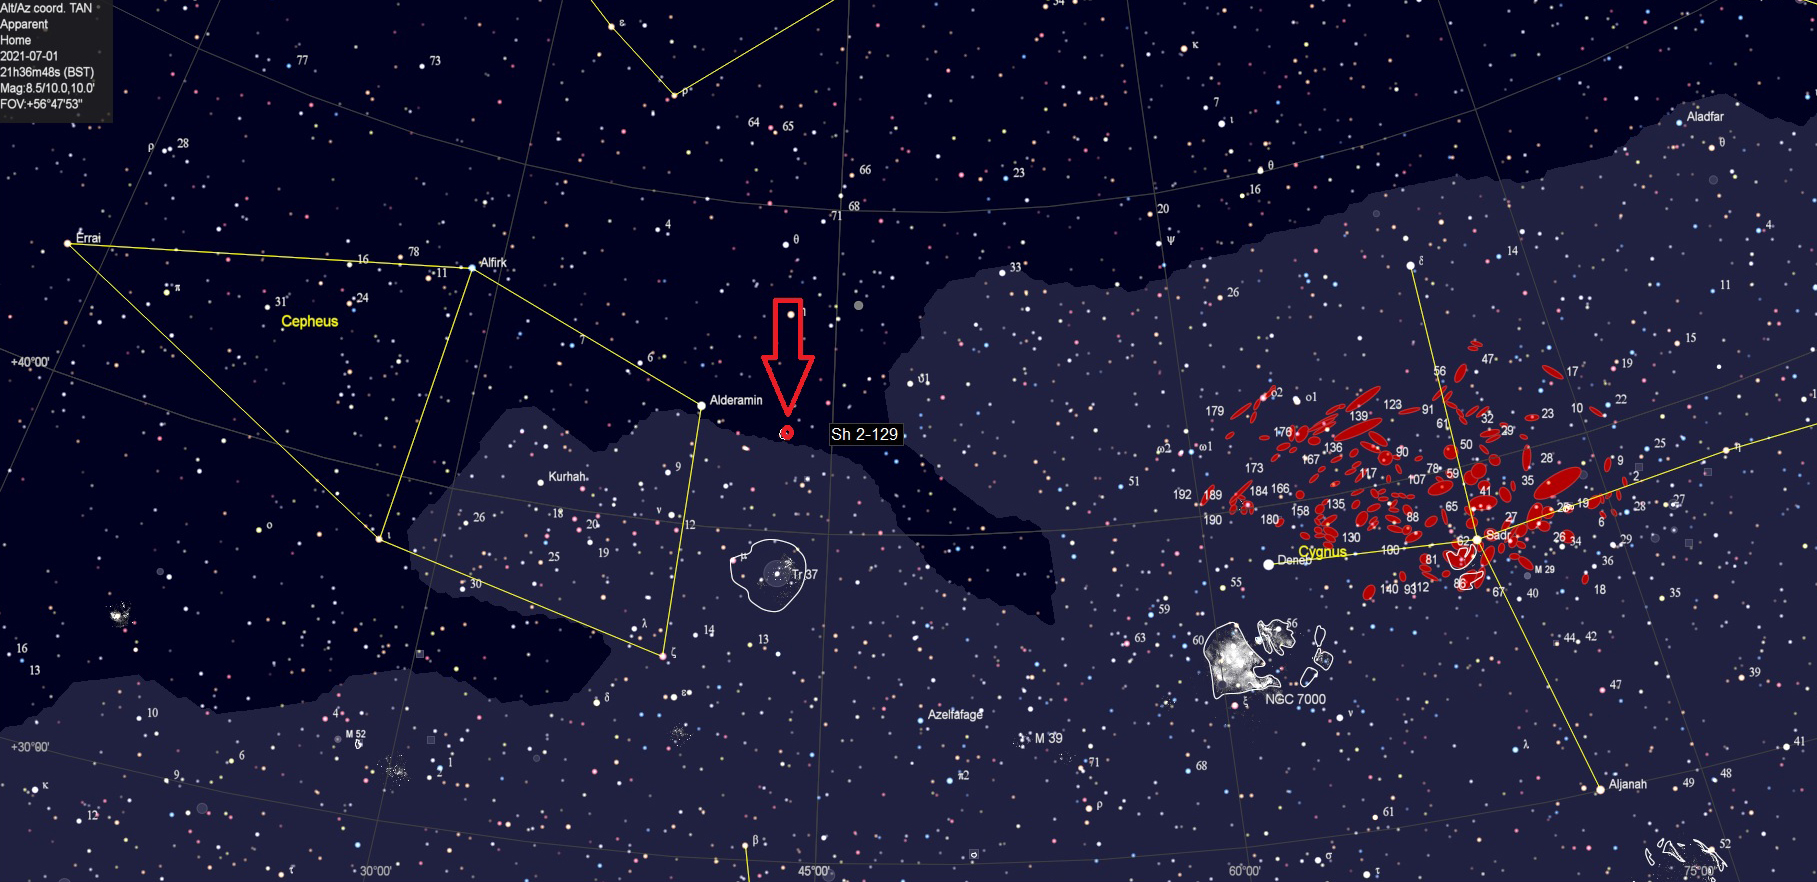
Discovered as recently as 2011 by French astronomer Nicolas Outters, is the very faint OIII emission nebula Ou4. Located in the constellation of Cepheus , this somewhat elusive object requires very long exposures and integration time to successfully image. For obvious reasons Ou4 has become known more commonly as the Giant Squid Nebula and belongs to the difficult but must-do objects list of astrophotographers. Moreover, the Squid lies within the much larger SH2-129 HII emission region or the Flying Bat Nebula, only part of which is shown here. In this case some 40-hours of exposure, of which the Squid is 15-hours, combined with careful processing has produced a wonderful image of both these exciting objects.
Initially considered to be a Planetary Nebula, Ou4 is now thought to be a bipolar outflow that was discharged 90,000 years ago from the hot massive triple star system HR 8119 situated within the Sh 2-129 HII-region, which is also responsible for ionizing the red emission nebula itself. The Squid consists of two collimated lobes with arc-shaped tips of enhanced OIII emission that resemble bow-shocks seen in stellar outflows and a few bubbles and filamentary arcs. The bipolar Ou4 lobes measure some 50×8 light-years, which though faint forms one of astrophotography’s great spectacles.
About this time of the year as astronomical darkness is lost for a few months I tend to take it easy, astronomically speaking. However, this year’s an exception as I have a large backlog of image processing to complete courtesy of the Photon Factory. With continuously bad weather prevailing across Europe back in February, it was more than four months since I’d been able to undertake any astrophotography here at Fairvale Observatory – of course such problems go with the hobby but this was ridiculous and somewhat disheartening. There were three solutions to the situation: continue waiting, give up all together or look further afield where the skies are reliably clear and dark, which like many others nowadays is what I did and thus joined the ever increasing band of remote imagers.
About 2-years ago I considered establishing equipment at one of the growing number of astrophotography host sites in southern Europe. However, after some research I concluded that whilst such a facility would be great to have it was probably too expensive for now and moreover, I first needed to spend more time improving my processing techniques before embarking on such a plan. Thus having since taken steps towards this goal, which included learning PixInsight, I felt the time was right to sign-up with Deep Sky West (DSW) situated in the state of New Mexico, USA. DSW were one of the early remote hosting observatories established and have a good reputation, reasonable prices and a wide choice of quality equipment. I therefore signed up for one year’s imaging with the following set-up:
QSI1683-WSGA camera 5.4 nm pixels & Astrodon 5nm filters
Paramount MyT mount
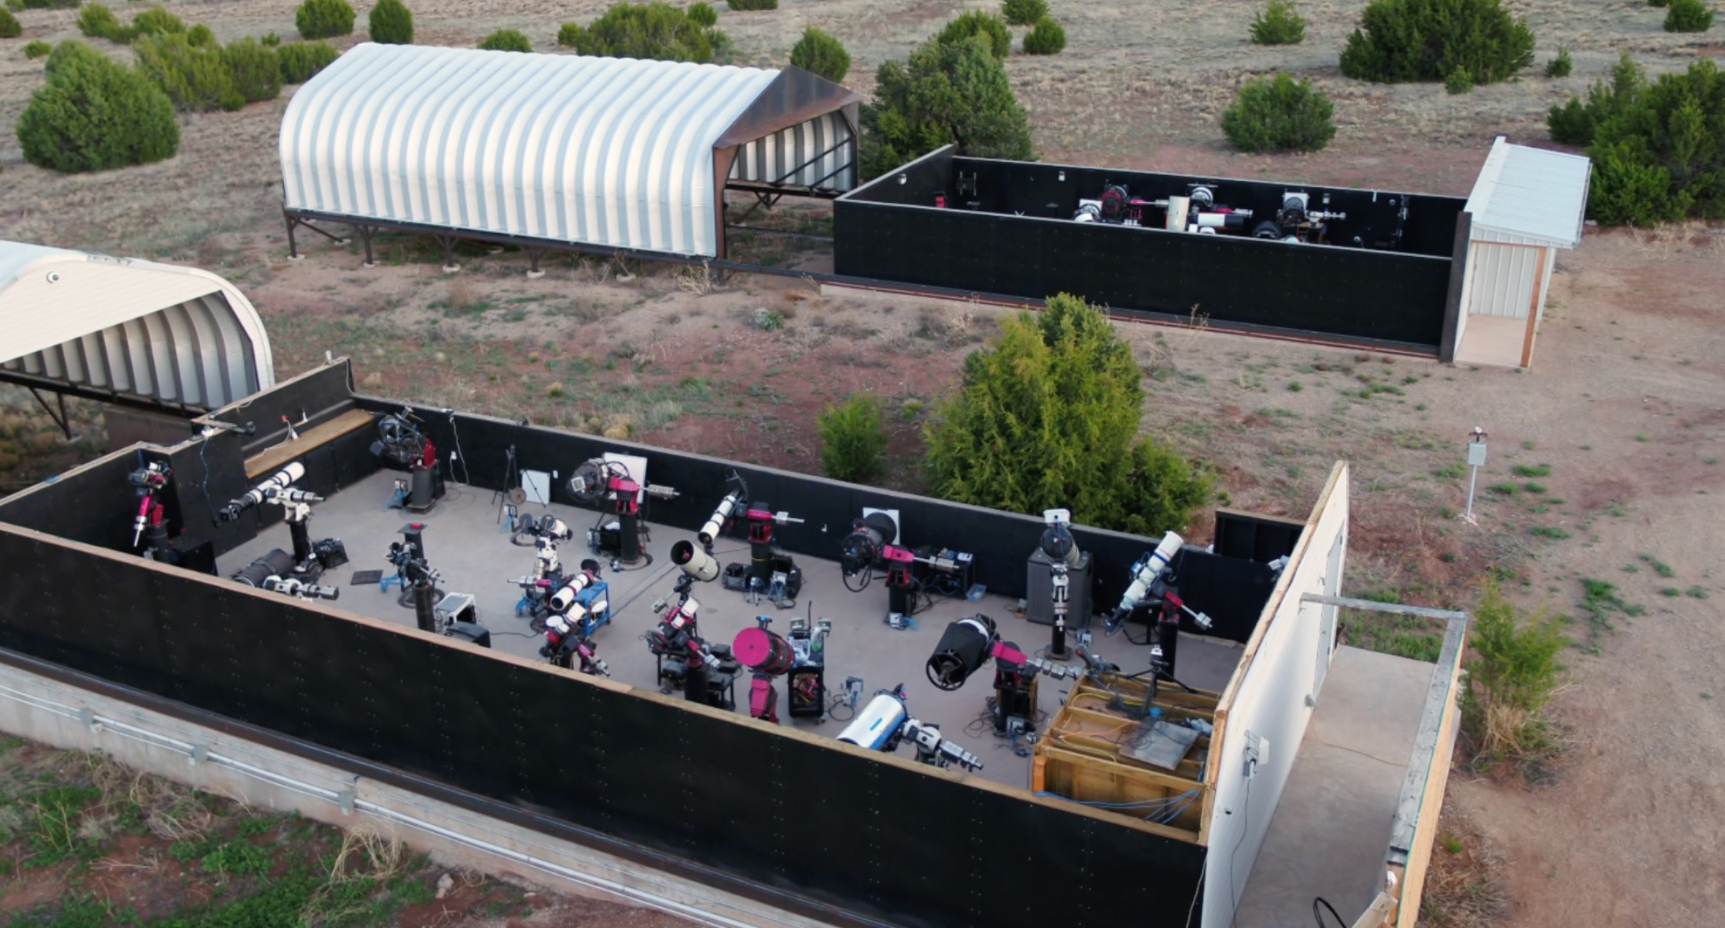
Deep Sky West is located about 35-miles south east of Santa Fe, at an elevation of 7,400ft on the Glorietta Mesa (see above map). Established by Lloyd Smith and Bruce Wright in 2015, there are now two large bespoke roll-off sheds (Alpha & Beta – see picture below) housing up to nearly forty rigs which are used by astrophotographers from across the world – you could call it a photon factory. DSW has since established a premier reputation as an observatory producing high quality data. Building on this success and the burgeoning demand for remote imaging, DSW are now expanding their service into Chile.
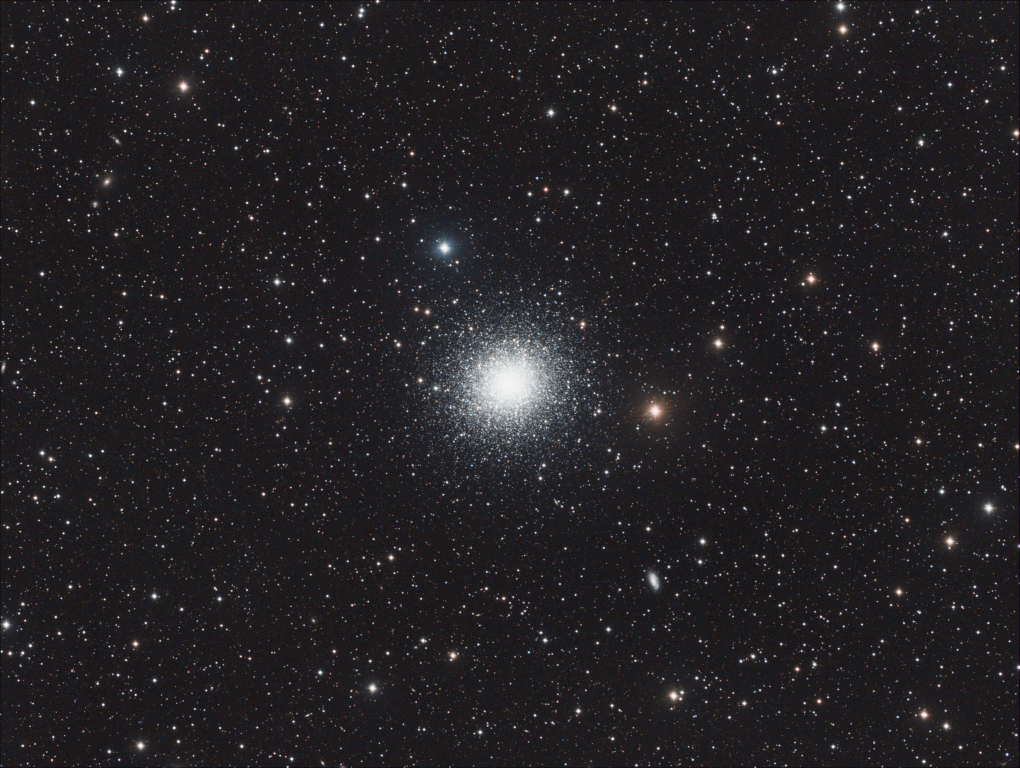
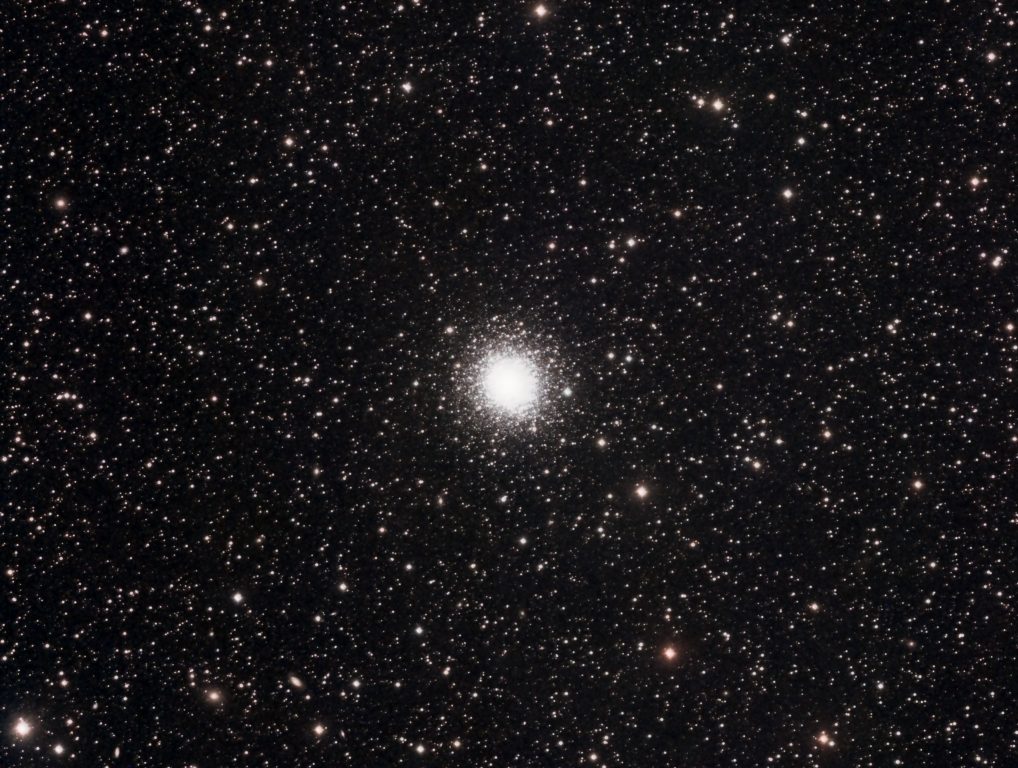
After imaging the globular cluster M53 from Fairvale Observatory in early April, it was opportune to be able to continue the same theme with my first two DSW images taken during Q1 and Q2 – the globular clusters M13 and M92, both located in the constellation of Hercules. With an angular separation of just 9o 33’, spatially the two clusters appear as neighbours but in reality M13 is some 4,560 thousand light-years closer. Spanning some 145 light years in diameter, M13 consists of several hundred thousand stars and as the brightest globular cluster in our galaxy it is generally considered to be the finest in the Northern Hemisphere. Whilst somewhat overshadowed by its more famous neighbour, M92 is still one of the brightest globular clusters orbiting the Milky Way and at +11 billion years is one of the oldest.
Since moving to mono imaging in 2017 I’ve only used a CMOS camera and therefore this is my first experience of working with CCD data, hitherto considered as the best, though more recent development of CMOS sensors suggests this is now likely to be the way forwards for amateur astrophotography. Whilst most of the techniques are the same there are minor differences such as using bias frames instead of dark flats with my CMOS camera for calibration.
The DSW equipment combination produces a field-of-view nearly 50% less than my equipment at home but with a similar resolution, thus improving the magnification and image details of smaller and/or complex features such as globular clusters. Notwithstanding, I was pleased with my previous image of M13 (above) taken from Fairvale Observatory in 2018, which after cropping compares well with the new DSW version (see main image at the top of the page). This is my first image of M92 (below), which though OK probably needs more attention, as I’m not convinced the combination of the 600 secs + 300 secs + 60 secs data has worked to its full potential.
The Takahashi 106 is one of my dream scopes and with up to 250 clear nights a year historically, the DSW location in New Mexico provides an opportunity to work with top level equipment in outstanding night sky conditions – what’s not to like with remote imaging? However, with a growing cadre of remote imagers this has become a something of a contentious issue amongst astrophotographers – there’s no doubt it produces excellent data which leads to outstanding images but as a hobby it’s still good to be hands-on. So far I’m really enjoying working with the remote data produced under optimum conditions but strangely there’s much to be said for imaging in the backyard even with or perhaps because of the problems it involves. Funny old world!
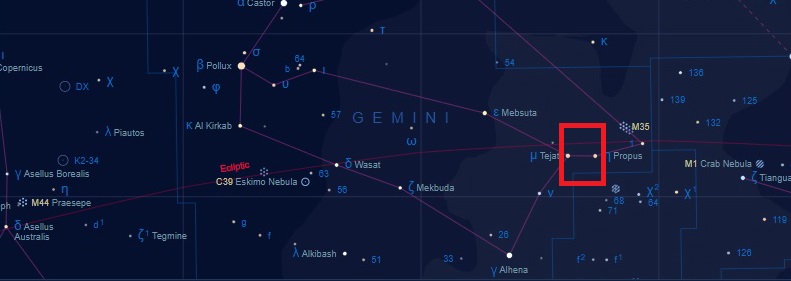
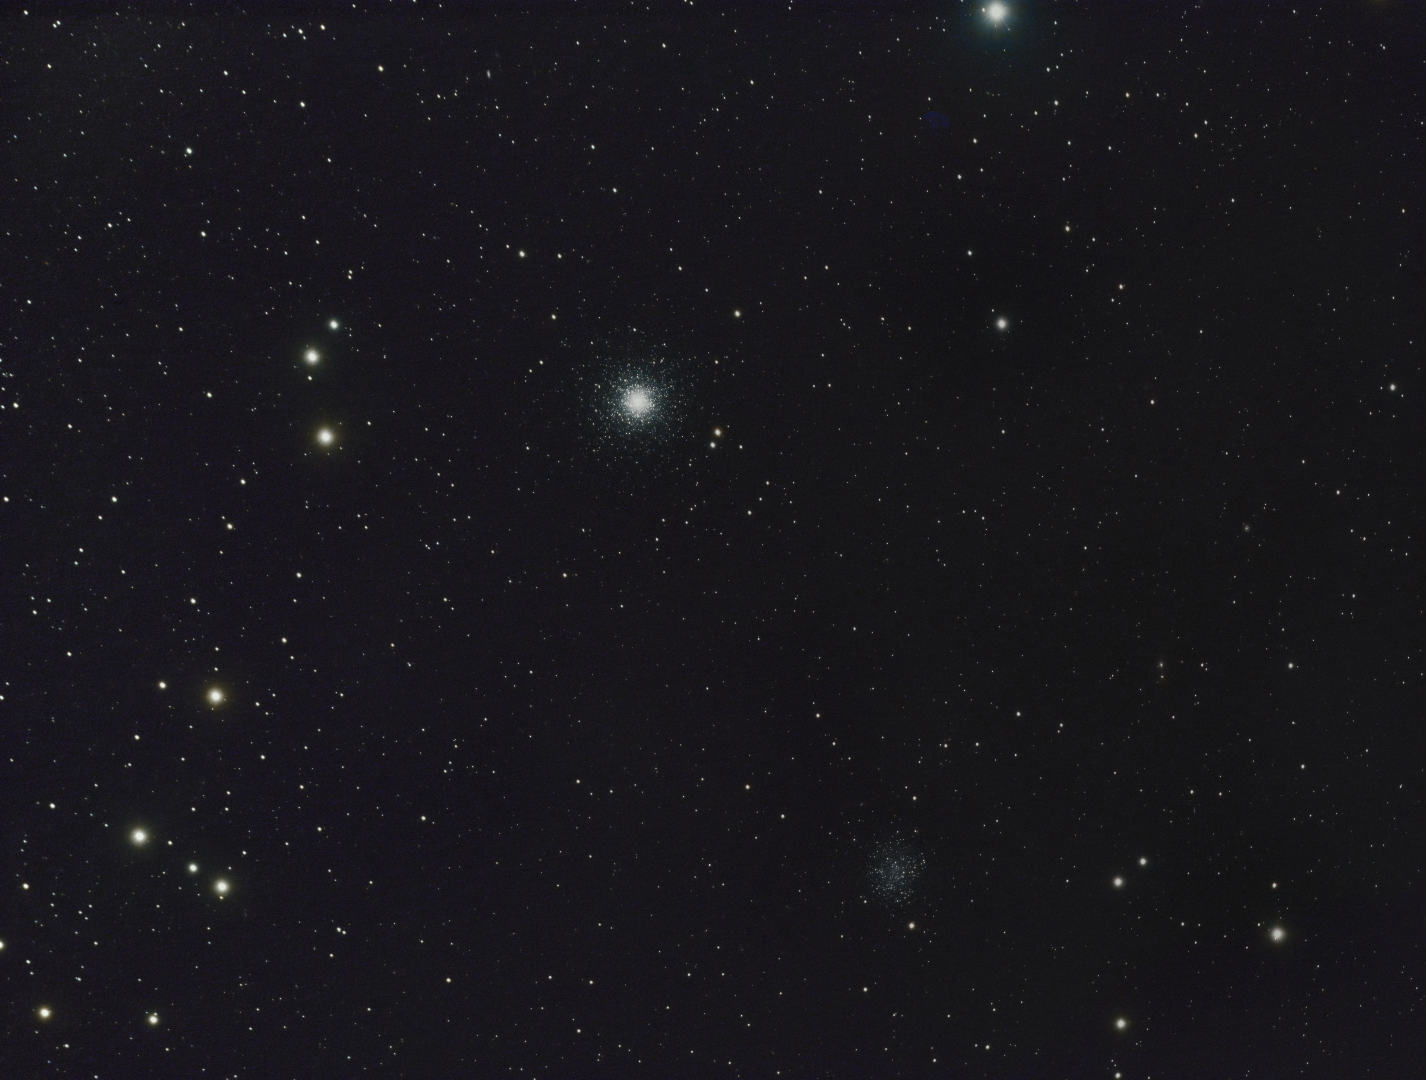
Here at Fairvale Observatory, most of the exciting deep sky objects associated with the transit of the Milky Way during winter have disappeared over the western horizon by early spring. Notwithstanding, a brief period of decent conditions at the very end of March provided a late window of opportunity to image a core area of our galaxy, which being viewed above Oirion at a higher declination in the constellation of Gemini, helped to extend the limited imaging time available. Frankly after such a terrible period of weather since last November, I was desperate to get one last image from this rich part of the night sky and try out my new Chroma narrowband filters again, which thankfully worked out well after imaging IC443 the Jellyfish Nebula over four nights, despite there being less than two hours of suitable viewing and darkness each night.
The remnant of a supernova that occurred between 3,000 and 33,000 years ago, located in the Gemini constellation the Jellyfish Nebula is some 5,000 light years from Earth. With a diameter of 70 light-years, the angular view of the nebula is some 50 arcminutes or nearly twice the size of a full moon. Overall the nebula consists of at least three distinct shells reflecting the complex nature of this Type-II supernova, which is interacting with the surrounding area of molecular clouds.
Red box indicates location and orientation of image
Acknowledging the limited time available – compounded by lingering cloud each night – I chose to image The Jellyfish in narrowband bicolour, hoping to collect some SII photons on another day to add to the Ha & OIII. At the end I also added some short LRGB subs to improve the final star colours and during processing used Ha as a false luminance layer to help bring out the complex structure of the nebula further. The image has been deliberately framed by the adjacent large stars Propus (bottom) and Tejat (top), which caused plenty of problems during processing but in my opinion form an essential component when imaging this object. Whilst IC443 is undoubtedly the main act, it is set off well by the large adjacent area of detailed nebulosity and the smaller reflection nebula IC444 to the right which is easy to overlook. Despite many issues I am very pleased with the final image that beautifully shows off this spectacular DSO and the surrounding region in all its glory, which seems all the better being something of a last chance opportunity that I thought I’d missed for this season.
IMAGING DETAILS
Object
IC443 Jellyfish Nebula & IC444
Constellation
Gemini
Distance
5,000 light-years
Size
50 arc minutes ~70 light years
Apparent Magnitude
+12
Scope
William Optics GT81 + Focal Reducer FL 382mm f4.72
Mount
SW AZ-EQ6 GT + EQASCOM computer control & Cartes du Ciel
Guiding
William Optics 50mm guide scope
+ Starlight Xpress Lodestar X2 camera & PHD2 guiding
Camera
ZWO1600MM-Cool mono CMOS sensor
FOV 2.65o x 2.0o Resolution 2.05”/pix Max. image size 4,656 x 3,520 pix
For good reason spring is known as “galaxy season” by astronomers but during this period, shortly before astronomical darkness inevitably disappears for summer, there’s also another show in town. Closer to home in the denser extremities of our galaxy, over 150 globular clusters have so far been identified orbiting above and below the plane of the Milky Way within the galactic halo. Globular clusters consist of hundreds of thousands of tightly packed stars that are surely one of the more enigmatic features of astronomy, as we now know that similar clusters also are associated with other galaxies throughout the Universe. Whilst the formation of globular clusters is poorly understood, we do know that at 10.0 to 13.5 billion years they are very old. Given their age, location and density, it seems that globular clusters formed under very different circumstances to the more recent dispersed star clusters.
Image Setting / Location
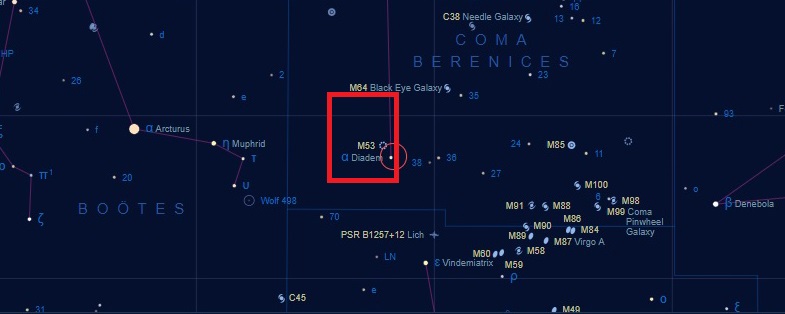
Sagittarius and Ophiuchus brim with globular clusters but at the higher latitude here at Fairvale Observatory it is necessary to view those around the regions of Canes Venatici, Virgo or Coma Berenices; the Great Cluster of M13 and others such as M92 and NGC 6229 located in the aforesaid Hercules constellation move into a better view later during early summer. Having previously imaged a number of these clusters in the past, this spring I looked around for something new and different, which I found in the name of M53 (Above + left of centre – main image top of the page) . In this case it turned out to be two for the price of one, as with careful framing it was possible to include a second globular cluster, NGC 5053 (Below + right of centre – main image top of the page).
Located in the southern area of the Coma Berenices constellation, M53 (Above left of centre – main image, top of the page) is some 58,000 light years from Earth. Containing some 500,000 metal-poor stars, the cluster equates to 13 arc minutes of sky or about 220 light years in diameter, with an estimated age of 12.67 billion years. Just over 1o east of M53, NGC 5053 is 53,500 light-years away, with an apparent size of 10.5 arc minutes or 160 light-years. Although classified as a globular cluster, NGC 5053 is more irregular and dispersed in nature without a distinct bright core and is therefore dimmer than its neighbour, making it more difficult to image.
M35 Full Crop
All-in-all I believe these two globular clusters, combined with the star studded background that just includes the binary Diadem star (Upper edge + right of middle – main image, top of the page) southwest of M53, altogether makes for a rich and interesting final image.
IMAGINGDETAILS
Object
M53 & NGC 5053
Constellation
Coma Berenices
Distance
Approx.. 58,000 & 53,000 light-years
Size
13.0 & 10.5 arc minutes
Apparent Magnitude
+8.33 & +10.00
Scope
William Optics GT81 + Focal Reducer FL 382mm f4.72
Mount
SW AZ-EQ6 GT + EQASCOM computer control & Cartes du Ciel
Guiding
William Optics 50mm guide scope
+ Starlight Xpress Lodestar X2 camera & PHD2 guiding
Camera
ZWO1600MM-Cool mono CMOS sensor
FOV 2.65o x 2.0o Resolution 2.05”/pix Max. image size 4,656 x 3,520 pix
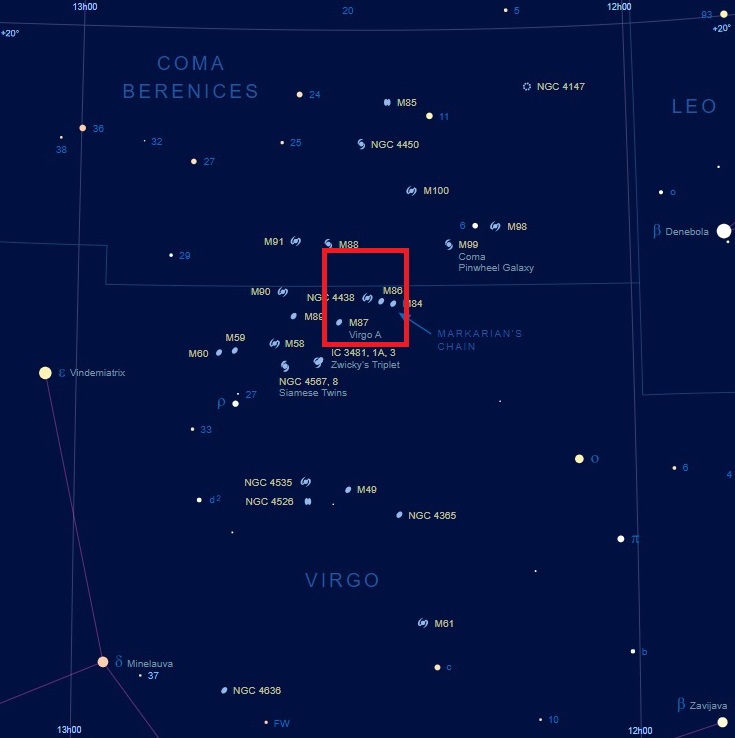
The Virgo Cluster consists of more than 2,000 galaxies, which unfortunately are optically too much for my small William Optics GT81 telescope individually. However, one of several sub-groups within the Virgo Cluster forms a striking J-curve shape that does make for a pleasing LRGB image. Discovered and named after the Armenian astrophysicist Benjamin Markarian, Markarian’s Chain is a string of bright galaxies that share a common motion through space. I first imaged the Chain in April 2015 using a modded DSLR and then again in April 2017, as my first LRGB image with the then new ZWO ASI1600MM-Cool camera but with integration times of less than 1-hour on both occasions, the resulting images were far from ideal. On this occasion using my new Chroma LRGB filters for the first time I was determined to do better.
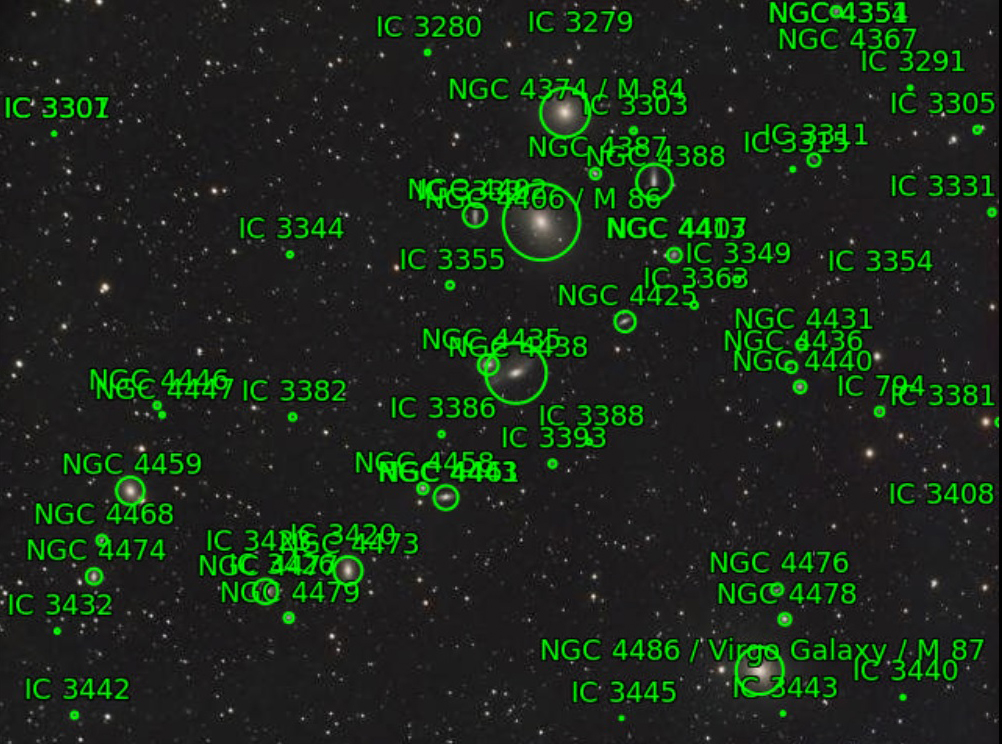
The new filters and nearly 7-hours integration time has resulted in a much more dynamic and detailed image, which I believe now does justice to this spectacular group of galaxies. Analysis of the image using Astrometry.netshows just how crowded this area of Virgo is with galaxies (see annotated image above) but it is Markarian’s Chain that inevitably stands out together with a few other adjacent galaxies.
Large 10th magnitude M84 & M86 galaxies at the western end of the Chain dominate the image. M84 is the object with the highest blue shift in the Messier catalogue, which is a result of its rapid movement (244km/sec) towards the centre of the Virgo Cluster and us. At the centre of M84 is a 1.5 billion solar mass black hole.
NGC 4420 & NGC 4388 – by comparison these edge-on galaxies together with even smaller NGC 4413 & NGC 4425 seem to frame the larger M84 and M86.
Next along the Chain is a pair of interacting galaxies, the smaller round shaped NGC 4435 and NGC 4438 with its distorted disk, known as “The Eyes”.
As the Chain starts to turn, some 20’ along is NGC 4458 and its partner, the 11th magnitude elliptical NGC 4461.
The final section of the Chain consists first of NGC 4473, its brightness generated by a supermassive black hole – at 100 million solar masses its diameter of 4.46au which would stretch from the Sun to the asteroid belt! Thereafter the 11.4 magnitude barred lenticular galaxy NGC 4477 defines the north eastern extremity of Markarian’s Chain.
As previously noted, there are many other galaxies in this part of the Virgo Cluster. Perhaps most notable though is M87, from which the first ever image of a black hole was the obtained in 2019 – consisting of some 6.5 billion solar masses.
All-in-all Markarian’s Chain makes for a rewarding image using my small telescope combined with the new Chroma filters. Such is the nature of the image the galaxies might also suggest a string of pearls or perhaps galactic stepping stones – metaphorically leading to the next phase of my astroimaging journey.
IMAGING DETAILS
Object
Markarian’s Chain
Constellation
Virgo & Coma Berenices
Distance
50 – 55 million light-years
Size
~2.5o total
Apparent Magnitude
Varies +10 to +12 approx.
Scope
William Optics GT81 + Focal Reducer FL 382mm f4.72
Mount
SW AZ-EQ6 GT + EQASCOM computer control & Cartes du Ciel
Guiding
William Optics 50mm guide scope
+ Starlight Xpress Lodestar X2 camera & PHD2 guiding
Camera
ZWO1600MM-Cool mono CMOS sensor
FOV 2.65o x 2.0o Resolution 2.05”/pix Max. image size 4,656 x 3,520 pix
The history of astrophotography will record a period of rapid innovation during the past decade, amongst which one of the stand-out developments has been that of the CMOS sensor based camera, notably the ZWO ASI1600MM-Cool (see below). Just look at any astrophotography website such as Astrobin and it won’t take long to find an image taken with this camera such is its popularity. It is this very camera that I was fortunate to purchase in December 2016 shortly after its release and has been the core of my astrophotography set-up ever since.
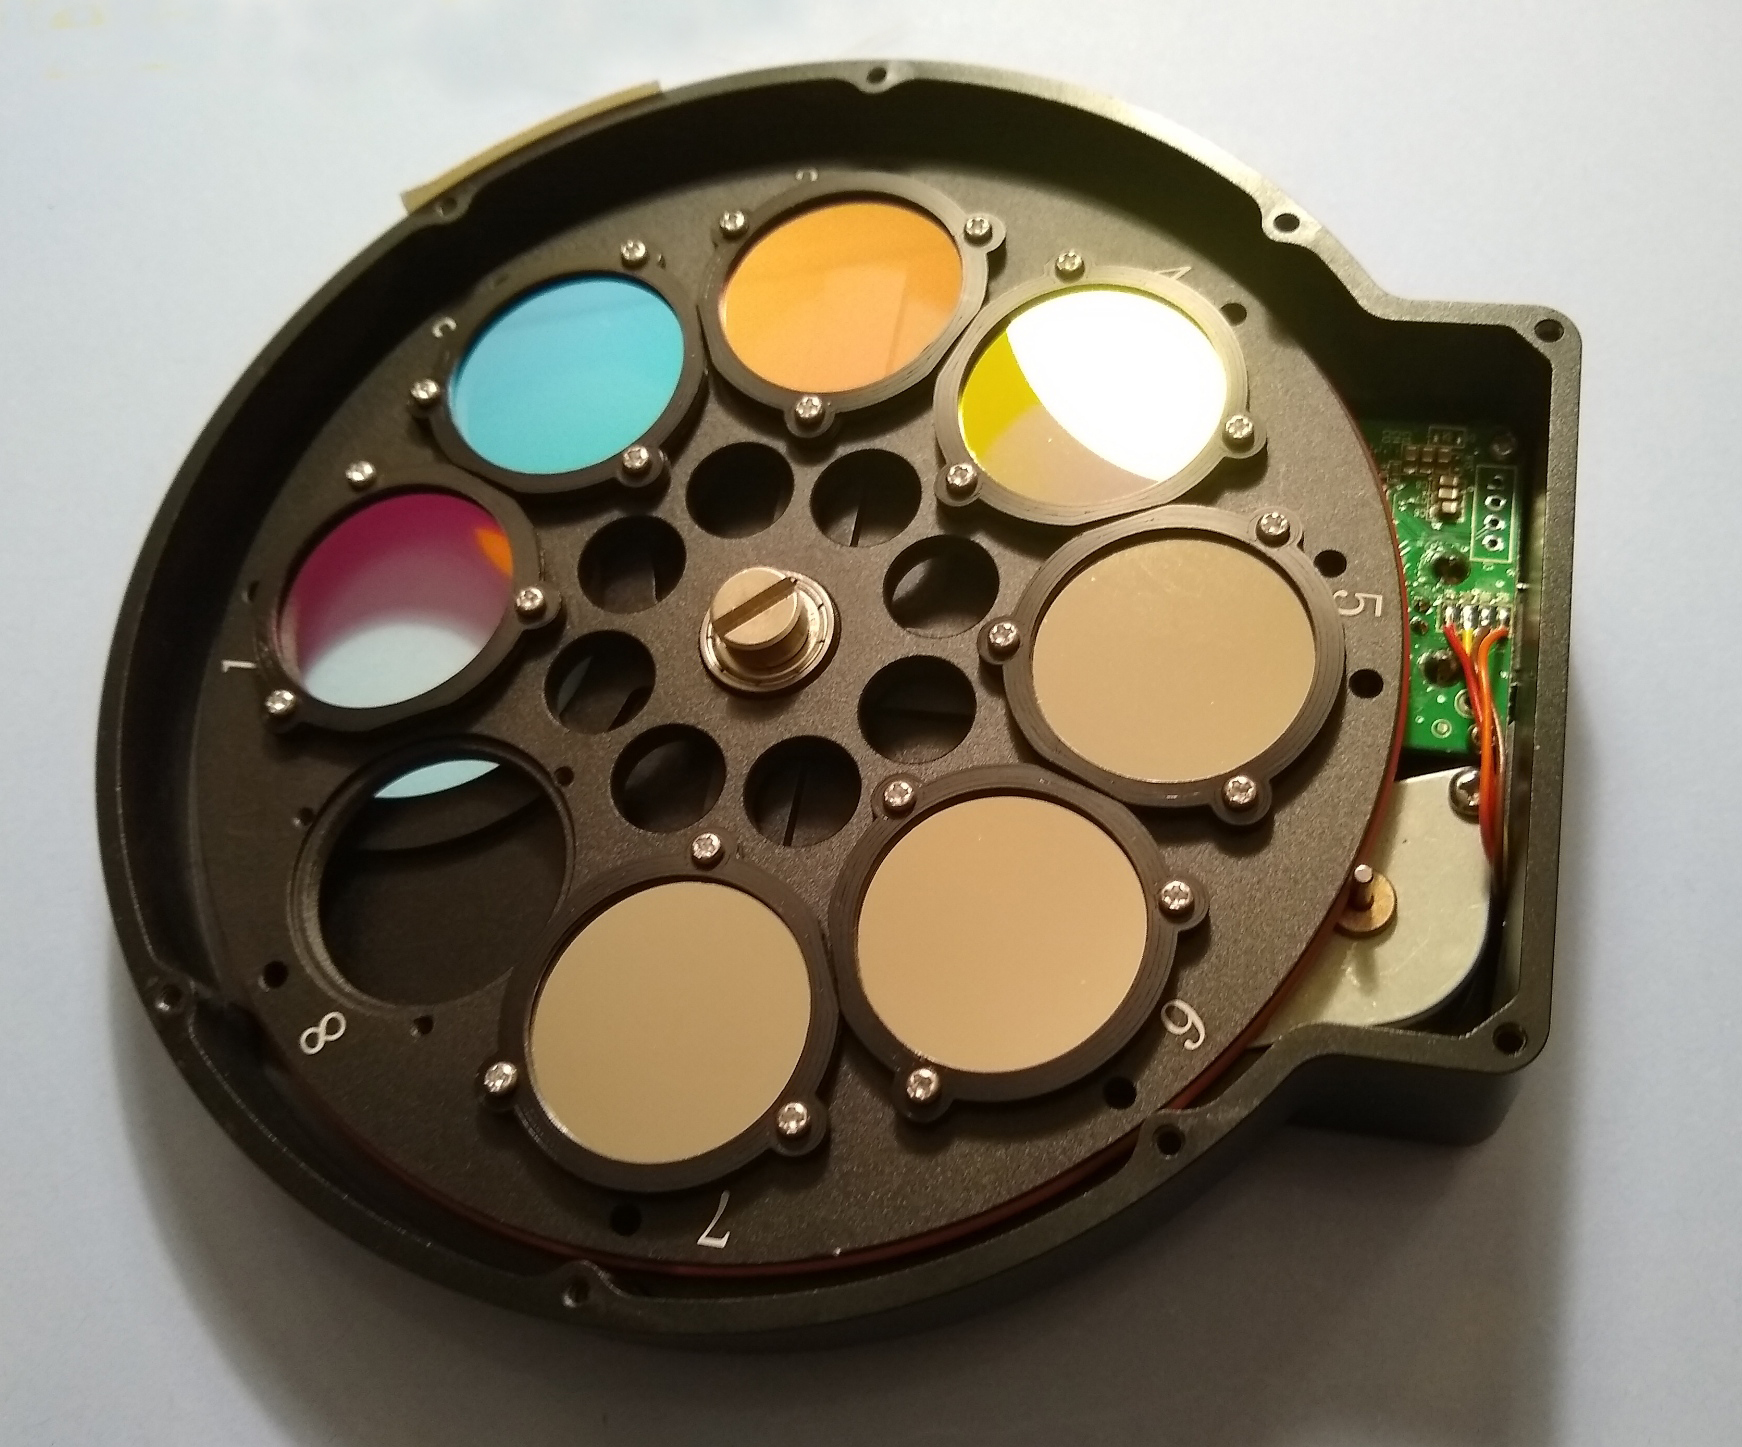
I have generally been very happy with the results achieved with the ZWO camera, although an issue sometimes occurs when imaging large stars, so called ‘star bloating’. There are a number of theories discussed ad nauseam online why this might occur, of which microlensing and / or diffraction seems most likely and probably relates to either – the sensor, sensor cover or filters. Since beginning with the ZWO camera I’ve used their excellent matching EFW with LRGB and 7nm narrowband filters. Notwithstanding, the filters are considered to be somewhat ‘low end’ by the aficionados of such things and after living with the ZWO filters for some time, at considerable cost I recently decided to upgrade to a set of Chroma 31mm filters – LRGB + 3nm narrowband. Together with Astrodon, Chroma filters are generally considered to be the best and my expectations were therefore high.
Being unmounted I’d previously found the ZWO filters tricky to install using the small screws and fibre washers supplied. At 3mm Chroma are physically 1mm thicker than ZWO filters and also need to be fitted in a specific direction, which is ‘letters up’ or with top of the ID letters on the side of the filter facing towards the sensor; this is disputed by the manufacturer but there’s substantial first-hand experience online that suggests otherwise. With these issues in mind I sought out bespoke filter masks and longer M2 6mm screws to hold the thicker filters firmly in place. The 3D printed masks from Buckeyestargazer in the USA did a great job securing the filters and are better than those from ZWO – the internal edge of the mask forms an L-shaped ledge into which the filter fits snuggly. Ready to go, I then had to wait nearly 4-months before the clouds parted to try out these expensive pieces of glass and then it was a full moon – I often wonder if astrophotography is a good hobby to choose in the United Kingdom but it’s too late now?
Chroma filters secured with Buckeyestargazer masks and ready to go
Given the presence of the moon it therefore had to be suitable narrowband target and after three years since I’d last imaged this object it was an opportunity to have another go at NGC 2244 AKA the Rosette Nebula, though being late February there was limited time each night before the object sunk low behind trees on the western horizon; coincidentally the ZWO ASI1600MM-Cool First Light in early 2017 was also the Rosette. Before starting serious imaging I first tried some test shots to make sure everything worked OK and immediately discovered that the change from 7nm to 3nm had a significant impact on light gathering, thus requiring greater exposure times of an unprecedented 10 minutes. Not surprisingly this was also apparent when taking flats which increased exposure time of up to x10 longer in duration compared to the ZWO filters; conversely preliminary but limited tests on the broadband filters seem to indicate greater transparency and thus shorter exposures, time will tell if this is correct.
So was it all worth it? I’m very pleased with the final image which was processed using the SHO Hubble Palette with PixInsight and Photoshop (see top of the page). There are a number of significant bright stars in and around the Rosette which the Chroma filters have handled well but overall it is the more delicate tone that has been achieved which is most pleasing. Fundamentally the 3nm filters have produced a more subtle quality to the overall image and in particular the nebulosity. In addition, applying Hartmut Bornemann’s excellent colour calibration script AutoColor for the first time (see Visible Dark’s video tutorial here) has resulted in a soft but exciting colour palette.
Subsequently I have focussed on the inner region of the nebula which contains the so-called ‘Carnival of Animals’ (see above), which has been cropped and reprocessed individually to show-off the ‘animals’ or Bok globules – named after the Dutch-American astronomer Bart Bok, who in 1947 proposed that these dark nebula indicated clouds of dust undergoing gravitational collapse as part of the process of new star formation, which has since been confirmed. In conclusion I’d therefore say that despite the obstacles, issues and long wait, on the evidence so far the addition of the Chroma filters to my set-up has been very successful – transformative in fact. Now I wonder if they make something that removes the clouds?
IMAGING DETAILS
Object
NGC 2244 + 2337 + 2238 + 2239 + 2246 AKA the Rosette Nebula
Constellation
Monoceros
Distance
5,200 light-years
Size
65 light-years
Apparent Magnitude
9
Scope
William Optics GT81 + Focal Reducer FL 382mm f4.72
Mount
SW AZ-EQ6 GT + EQASCOM computer control & Cartes du Ciel
Guiding
William Optics 50mm guide scope
+ Starlight Xpress Lodestar X2 camera & PHD2 guiding
Camera
ZWO1600MM-Cool mono CMOS sensor
FOV 2.65o x 2.0o Resolution 2.05”/pix Max. image size 4,656 x 3,520 pix
In ancient history Orion’s stars were considered to form a pattern that resembled a hunter holding a club above with his right arm and a shield in front with his left. The appearance of Orion each year marks the highlight of the astronomy for many including me but for the second year running months of continuous cloud have precluded any astronomy since October; I note from comments online far-and-wide that this phenomenon has prevailed across much of the northern hemisphere, no doubt resulting in a lot of unhappy astronomers.
The Anantomy of Orion
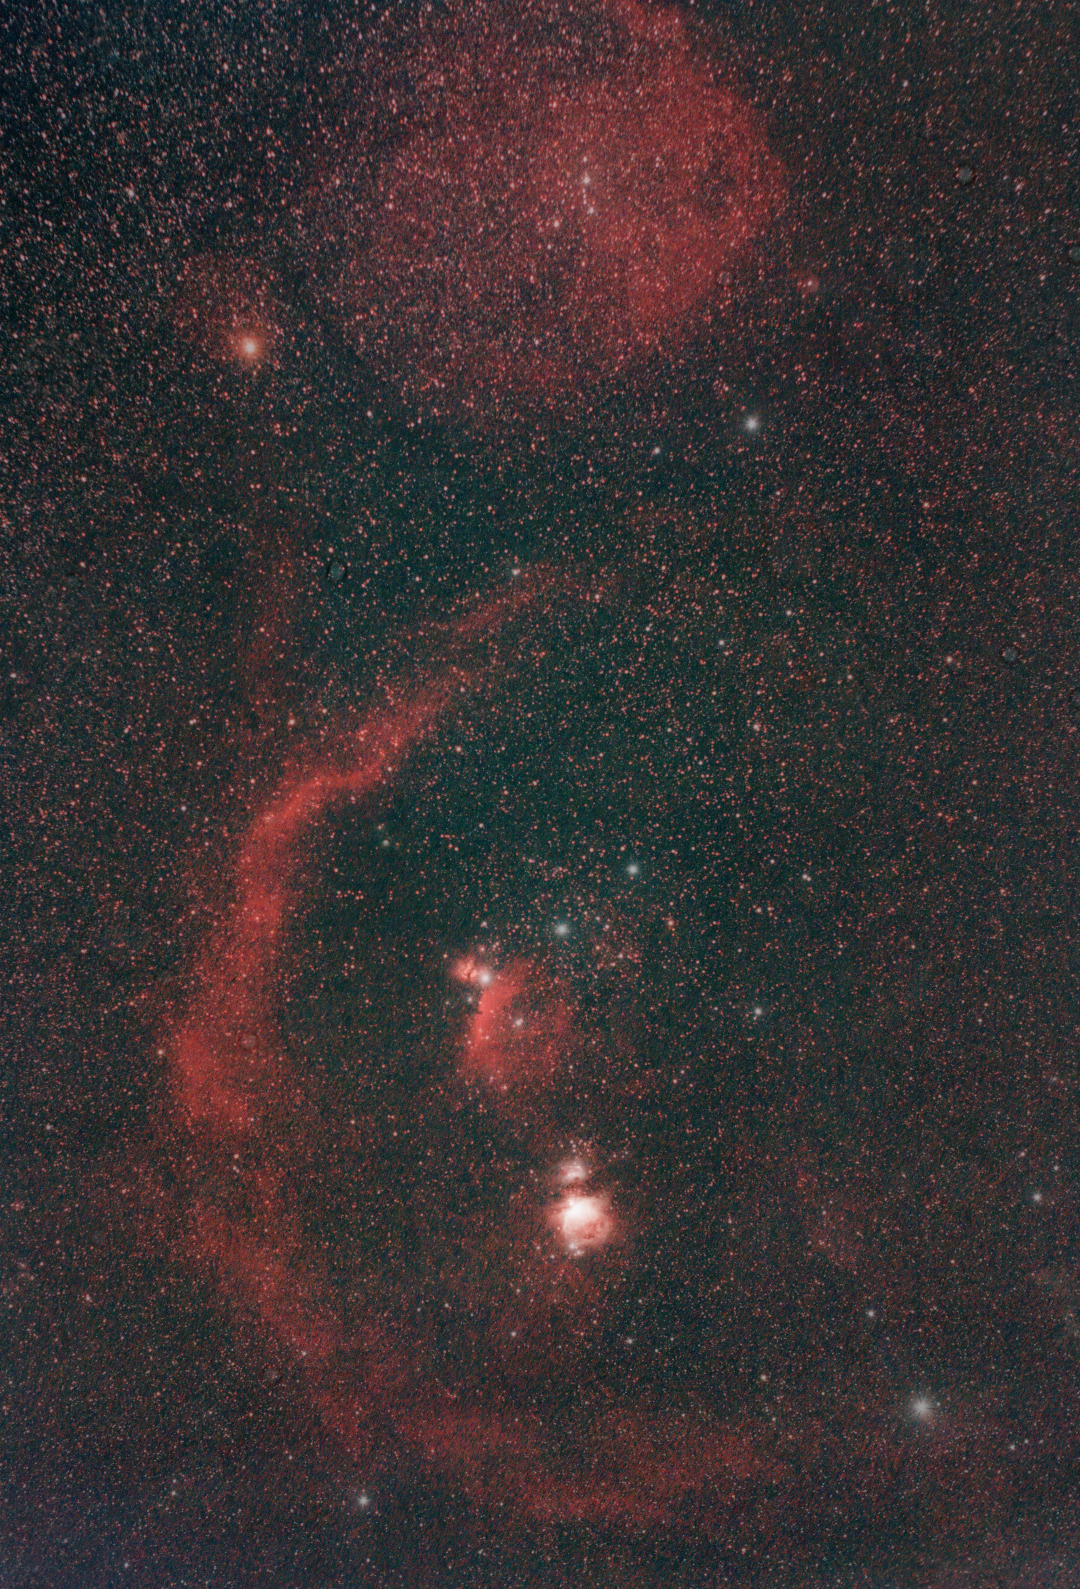
Finally the clouds briefly relented over Fairvale Observatory in February but only for a few hours each time, thus eliminating the possibility of imaging with a CMOS mono camera. Faced with these problems I therefore returned to my somewhat neglected modded Canon 550D camera and suitable lenses for appropriate widefield compositions, in order to image some classic targets around the Orion constellation in a broader context. Having first whetted my appetite with the Samyang 135 f2 and its large 9.45o x 6.30o FOV to successfully image the iconic area that encompasses Orion’s belt, the Horsehead Nebula and M42 (see Going Big), it was time to go really big in order to capture the entire constellation literally and figuratively in a new light.
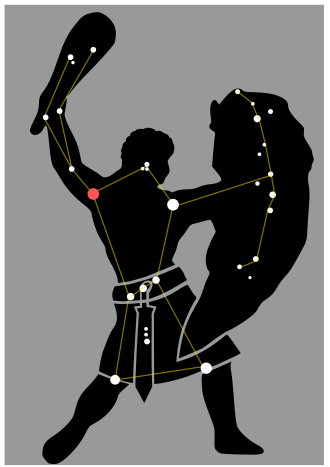
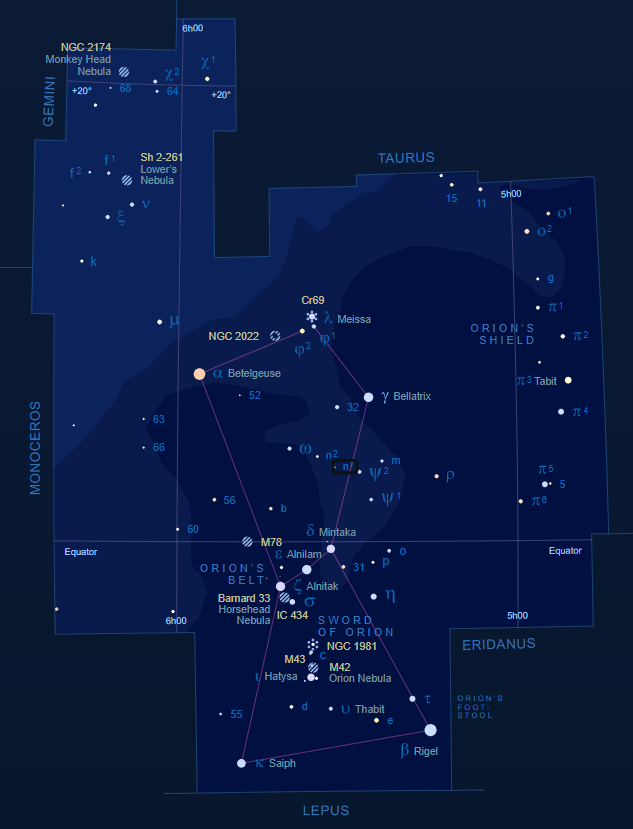
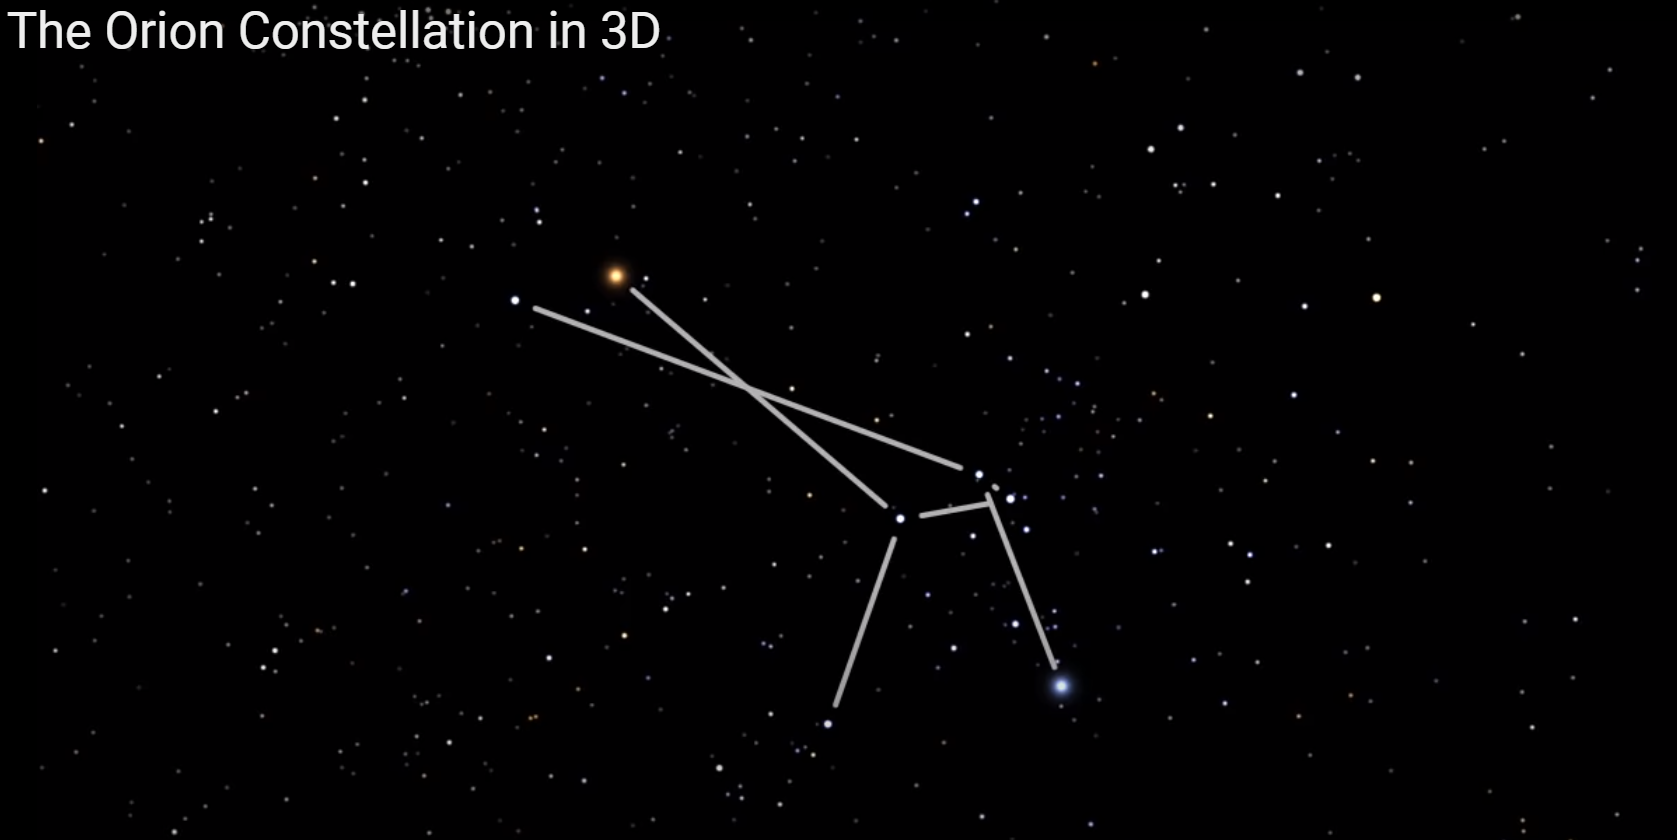
Seven bright stars define the area which outlines the torso and upper legs of Orion the Hunter: Betelgeuse, Bellatrix, Rigel and Saiph at the top and bottom, connected across the centre by his ‘belt’ formed from Alnitak, Alnilam and Mintaka. The H-shape thus created by these stars is a familiar sight over the winter months but like so many asterisms of the night sky all is not what it seems. Plotting the distance from Earth of each star it is immediately obvious that their spatial relationship significantly changes the shape of the constellation compared to what as we perceive by eye. It is a sobering thought that with the passage of time those asterisms familiar to astronomers today will look very different in the future as the stars move though space and therefore continue to change their relative positions, look and shape.
Star
Betelgeuse
Bellatrix
Rigel
Saiph
Alnitak
Alnilam
Mintaka
Distance from Earth*(light years)
643
243
772
724
800
1,359
900
*Source: Royal Greenwich Observatory
Click HERE for annotated version of the Orion Constellation in 3D ref. Space Science Telescope Instititue
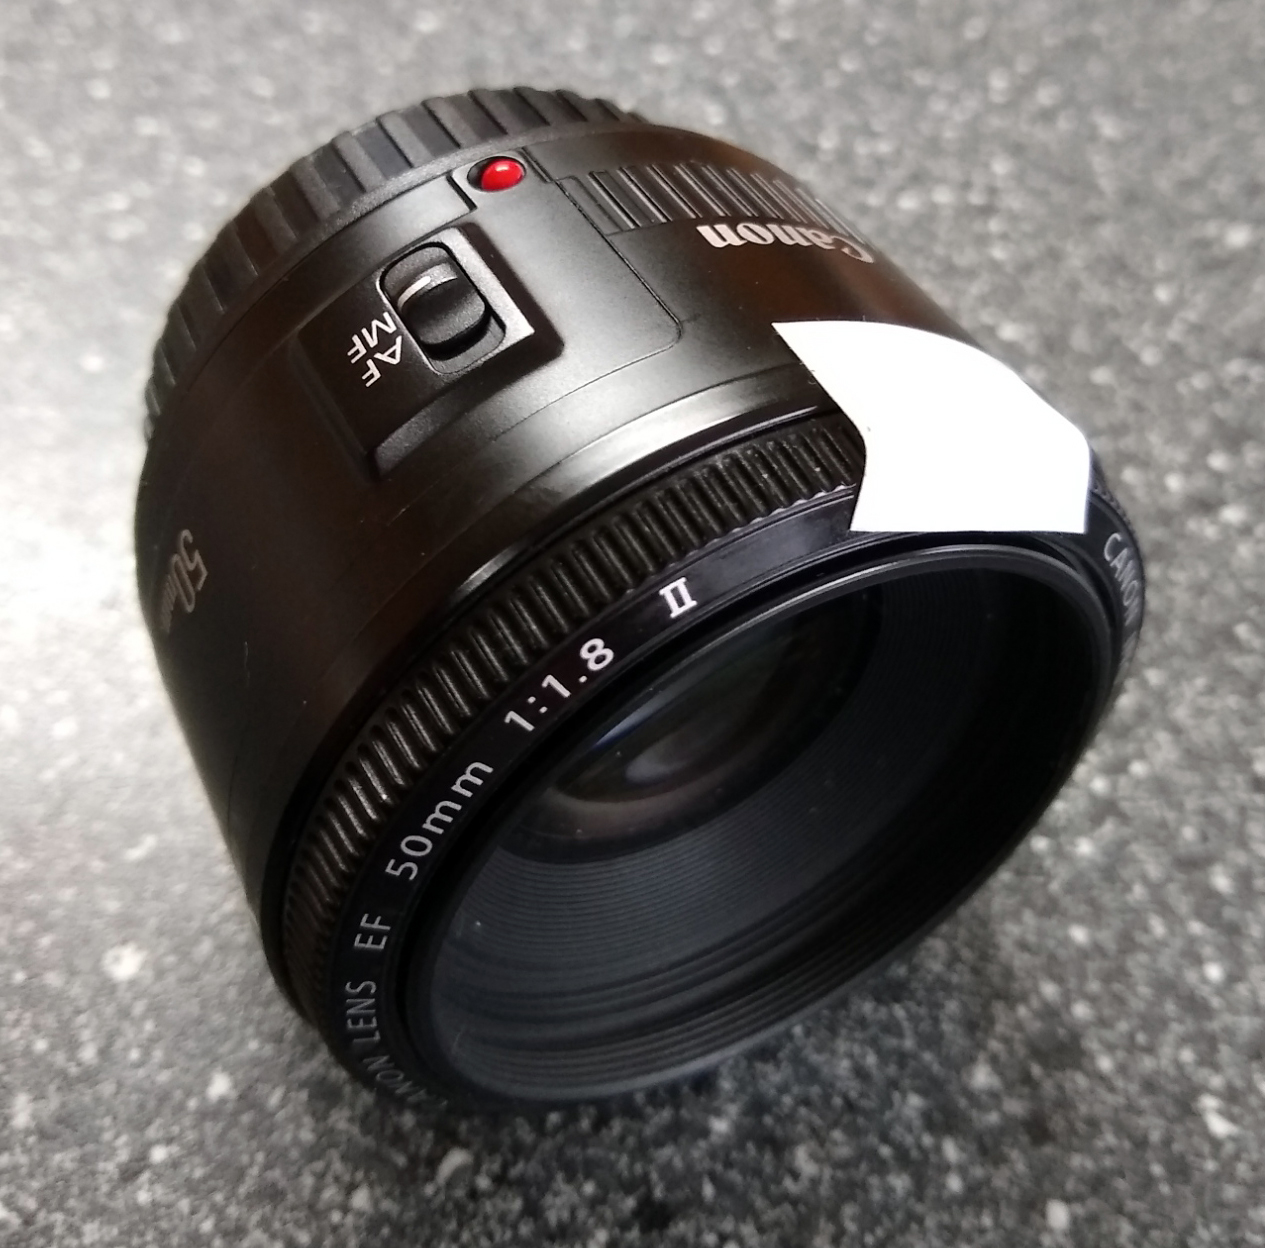
The Canon ‘Nifty Fifty’ 50mm f1.8 fixed aperture lens is perfect for an ultra widefield image of Orion. Whilst the glass is excellent, focus leaves a lot to be desired and once achieved needs to be secured with tape
Aside from the said visual perspective of Orion, like so much of space we only see a fraction of what is really present in the Universe but can nevertheless often be disclosed by astrophotography. And so I next decided to image the entirety of Orion, this time with a basic Canon 1.8 50mm lens – the so called “nifty fifty”- with the purpose of capturing in one shot the constellation with which we are all familiar, together with vast spectacular HII-regions that encompass much of the constellation but usually remain unseen. This camera-lens combination provides an enormous 25.5o x 17.0o field-of-view (x7 > Samyang lens, x83 William Optics GT81!) albeit with lower resolution, which perfectly encompasses most of Orion and therefore the entire arc of Barnard’s Loop on the left and the Angelfish Nebula (Orion’s “head”) located above and between Betelgeuse and Bellatrix.
Above:Orion constellation from Fairvale Observatory 24th December 2014 (Left) compared with long exposure image + modded camera 10th February 2020 (right)
Barnard’s Loop is an emission nebula, forming part of the Orion Molecular Cloud Complex which also contains the dark Horsehead and bright Great Orion Nebulae M42. The Loop is believed to have originated from a supernova explosion about 2 million years ago, which is now ionized by stars from within and around the Orion Nebula and takes the form of a large arc centred approximately on the Orion Nebula. Discovered and photographed by E. E. Barnard in 1894, this vast feature extends over some about 600 arcminutes when viewed from Earth or physically up to 300 light years across, depending on the distance from Earth.
The Angelfish Nebula SH2-264 is centred on the young star cluster of Lamda Orionis, of which Meissa is the brightest. An HII-region with an apparent size of 5 degrees and actual size of 150 light years, it is also an emission nebula that is energised by the aforesaid star cluster and is considered to form the so-called head of Orion.
Having previously imaged notable parts throughout Orion, I’ve long wanted to capture the full extent of this wonderful constellation in all its glory and am very pleased with the outcome on this occasion.
DSLR IMAGING DETAILS*
Object
Orion Constellation
Constellation
Orion
Distance
243 to 1,360 light-years
Size
594o2
Apparent Magnitude
Varies
Lens / Scope
Canon 50mm f1.8
Mount
SW AZ-EQ6 GT + EQASCOM computer control & Cartes du Ciel
Guiding
No Guiding
Camera
Canon 550D modified
FOV 25.5o x 17.7o Resolution 17.72”/ pixel
Capture & Processing
Astro Photography Tool + PHD2 Deep Sky Stacker, PixInsight, Photoshop CS3 & Topaz Denoise AI
Image Location & Orientation
Centre RA 05:37:37.3 DEC +00:48:50.26 Top = North Right = West
Exposures & Aperture
42 x 120 sec @ ISO800 Total: 1hr 24 min F1.8
Calibration
5 x 120’ Darks, 20 x 1/4000 sec Bias 20 x Flats
Location & Darkness
Fairvale Observatory – Redhill – Surrey – UK Typically Bortle 5-6
Date & Time
10th February 2021 @ +21.00h
Weather
Approx. <=0oC RH <=65% 🌙 NEW MOON
*For higher resolution and plate-solving data go to AstrobinHEREand click on image
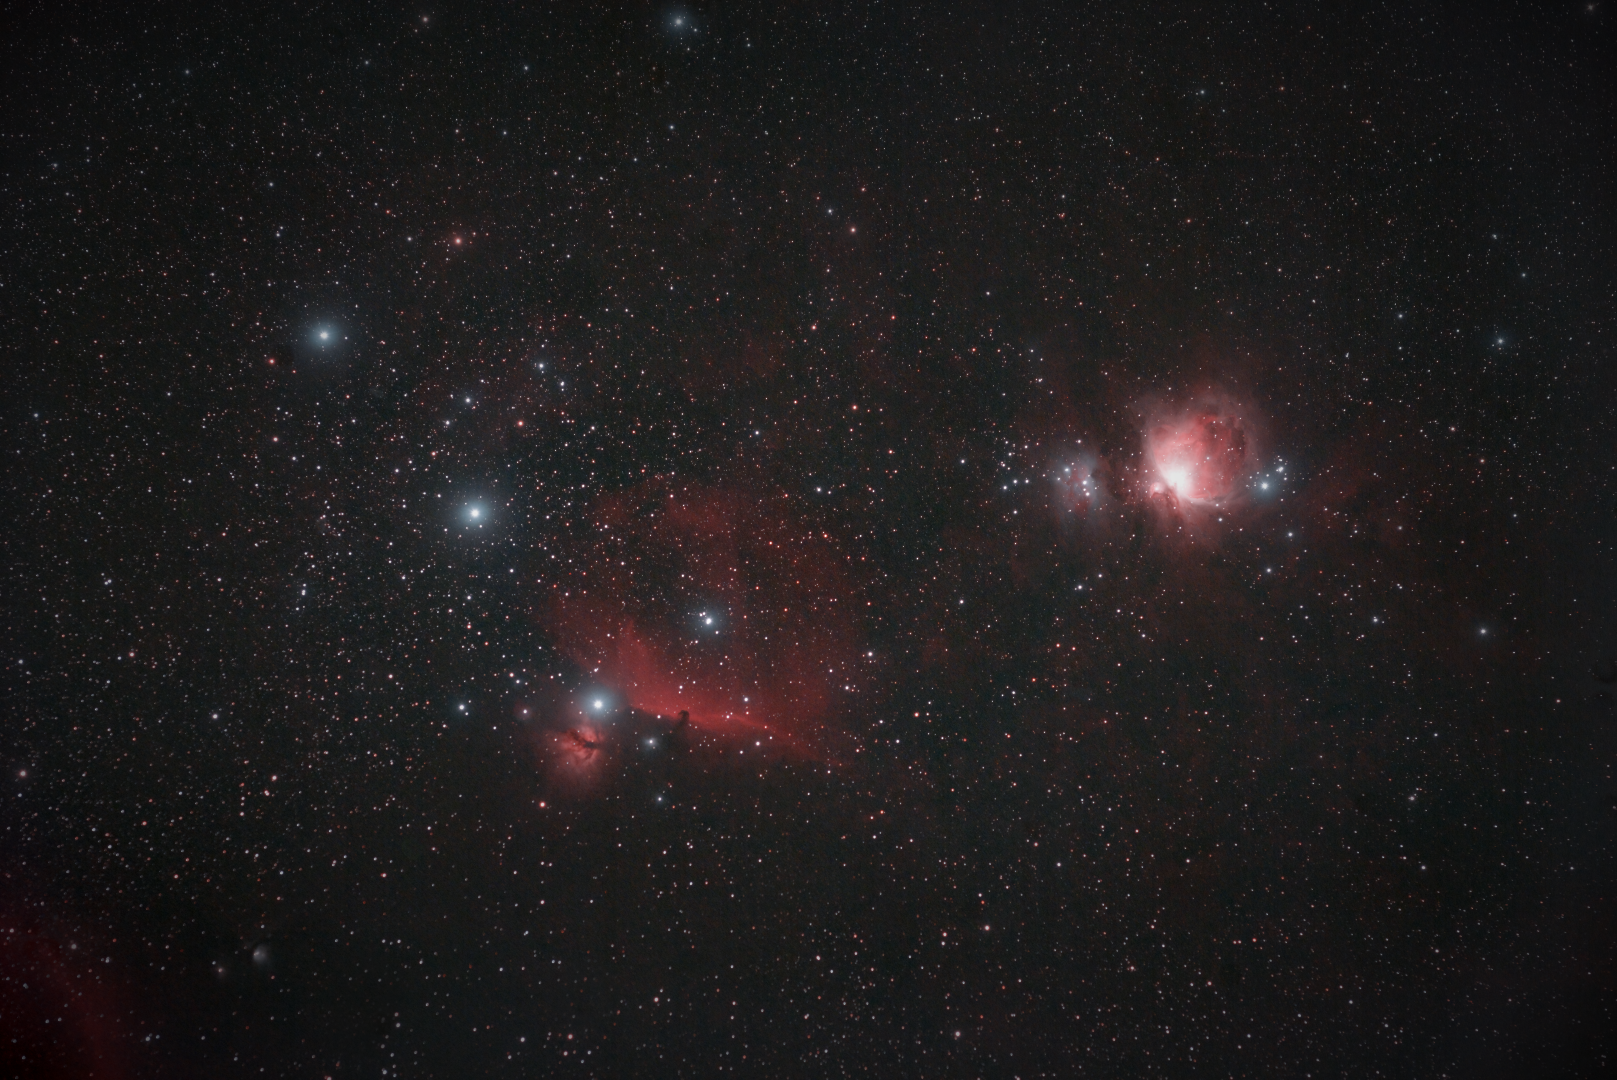
After considering the limitations created by UK weather, I chose to purchase a Samyang 135 f/2 lens last year, rather than typically moving to a larger aperture / focal length scope. Unfortunately because of the aforesaid poor weather conditions that have since prevailed its use has so far been restricted. However, after literally months at last the clouds briefly relented over Surrey recently and I was able to get a couple of hours imaging the Orion constellation.
I really enjoy the widefield aspect of astrophotography, particularly without resorting to a mosaic which is too often impractical given the lack of favourable imaging conditions in the UK. Such images can produce another perspective of favourite targets previously imaged with a telescope or are just fascinating in their own right. For the moment I’m using the Samyang lens at f2.8 with a modded Canon 550D, manual focus and no guiding but eventually intend to pair it with a mono CMOS camera. This combination results in a whopping 9.45o x 6.30o field-of-view, no-less than 11x that of my standard William Optics GT81 and ZWO1600 set-up. Whilst using the lens at its maximum f/2.0 aperture would be even better, stopping down to f2.8 improves focus quality and removes any possibility of vignetting.
In this instance I chose to frame the image around the area of Orion’s Belt and the Great Orion Nebula M42 but such is the lens’ extensive field-of-view that M78 and part of Barnard’s Loop have also sneaked into the lower left corner. Even though this was something of a ‘quick & dirty’ session resulting in just 112 minutes integration time, looking closer at M42 (see cropped version) the detail and colours achieved with this lens has far exceeded my expectations. As well as the detail of M42 and the Horsehead Nebula, I’m also impressed at how well the lens has dealt with the usually difficult large bright stars of Orion’s Belt & others in the image.
The quality produced with this small lens is quite extraordinary and it is definitely one of my star astronomy purchases. Going forwards the challenge will be to find suitable targets that can fill its very large field-of-view, as well the inevitable wait for clear skies!
DSLR IMAGING DETAILS*
Object
Orion: M42, Horsehead, M78 & Barnard’s Loop
Constellation
Orion
Distance
243 to 1,360 light-years
Size
594o2
Apparent Magnitude
Varies
Lens / Scope
Samyang 135 f/2
Mount
SW AZ-EQ6 GT + EQASCOM computer control & Cartes du Ciel
Guiding
No Guiding
Camera
Canon 550D modified
FOV 9.45o x 6.30o Resolution 6.45”/pix
Capture & Processing
Astro Photography Tool + PHD2 Deep Sky Stacker, PixInsight, Photoshop CS3 & Topaz Denoise AI
Image Location & Orientation
Centre RA 05:36:48 DEC -03:11:30.4 Right = North Top = West
Exposures & Aperture
56 x 120 sec @ ISO800 Total: 1hr 52 min F2.8
Calibration
5 x 120’ Darks, 20 x 1/4000 sec Bias 20 x Flats
Location & Darkness
Fairvale Observatory – Redhill – Surrey – UK Typically Bortle 5-6
Date & Time
3rd February 2021 @ +22.00h
Weather
Approx. 6oC RH +85% 🌙 67% waning
*For high resoluton image go to AstrobinHERE and click on image
After starting astronomy in 2014, Watch This Space (Man) was launched shortly thereafter as a personal record of my then nascent astronomy journey. Apart from the main blog about my progress or otherwise, links to other astrophotographers, astronomy tools, astronomy weather, scientific papers etc. can also be found on this website; I was suprised to see that to-date 152 items have been published on this site.
I always like to hear from others – comments, questions, help or just to say hello – and can be contacted via: graham.s.roberts@gmail.com or just leave a comment at the end of any item if you prefer.
Vistor map 2020: In this most difficult of years for everyone, it’s especially heartening to see so much interest from all corner’s of the world and hope to see you and others again in 2021 – Clear Skies!
REFLECTIONS is a review of my astronomy and astrophotography during the past year, together with some thoughts on possible future developments.
2020 Overview, Images & Goals for 2021
For the world 2020 was a year like no other. Notwithstanding the obvious problems and dire consequences of Covid-19 for everyone, there have been surprising benefits for astronomy. Although I am retired, under lockdown there was even more time available for hobbies. Furthermore, as I live close to Gatwick and Heathrow airports + underneath numerous high altitude long-haul overflight paths, a massive reduction in air travel resulted in a very obvious improvement in seeing conditions, which was confirmed by guiding results. Located in a Bortle 5 to 6 area I ordinarily achieve at best average RMS error guiding of 0.90” to 1.50”/pixel, guiding improved markedly during lockdown to between 0.50” to 0.75”/ pixel. Of course such seeing conditions also resulted in better quality imaging itself and on a number of occasions I was able to achieve integration times of 10-hours or much more over a number of nights. The result was better images but less of them and inevitably, a lot more cloud throughout the rest of the year!
Having previously got to grips with plate solving, using the new CdC planning function I intended to develop the use of mosaics this year. However, such is the weather in the UK (see above) that it’s obvious to me that creating mosaics is probably not the best use of what imaging time we get. Undeterred, during January I planned and shot a 15x panel mosaic of Barnard’s Loop in Ha-wavelength. Unfortunately the unpredictable occurrence of patchy cloud invalidated some of the panels, though I was finally able to compile a 7x panel mosaic of the upper easterly section of Barnard’s Loop – see below. Notwithstanding, there were lessons learned: (i) restrict mosaics to one or two panels and / or (ii) where wider view images are required use a wide FOV set-up rather than a large mosaic.
Most of my other objectives for 2020 turned out to be pipedreams e.g. a new observatory or perhaps a larger telescope or dual rig. Despite this there were important developments on other fronts.
After eventually coming to the conclusion that mosaics were probably an unwise way to go considering UK conditions, it became clear that a suitable high-quality camera lens might produce similar coverage with less imaging time and hassle. Thus also inspired by the images of others on the SGL Forum using such equipment, I set out to build a new rig based around the excellent Samyang 135 f2 lens. This project remains work-in-progress but so far using the lens with a bespoke 3D printed rig and micro focuser made by Astrokraken and a modded DSLR, it’s apparent that this lens produces excellent widefield images in a relatively short time.
Initial Samyang 135 f2 set-up with modded DSLR
With the time and ‘opportunity’ afforded by lockdown throughout most of the year, I finally decided to do something about improving my processing, namely learning PixInsight. Unfortunately the rumours were correct – it is a steep learning curve and altogether a less than user friendly software. However, after many weeks of toil and expletives I’m pleased to say I can now process an entire image with PixInsight, the impact of which has been nothing less than profound. However, whilst PixInsight is an excellent processing facility, I’ve come to the conclusion that it is often best used together with other process software where appropriate for specific tasks:
Deep Sky Stacker for calibration, alignment and stacking; the equivalent PixInsight process is just too complicated and time consuming;
Photoshop can be very helpful finessing colours and stretching (Levels & Curves);
Starnet++ is useful for creating starless images, which then help to get the best from processing nebula separately before re-combining with the stars;
Topaz AI Denoise has been very effective and easy to use for noise reduction and sharpening at any point during the workflow.
This combination for processing has turned out to be something of a game changer and almost certainly was the most important astrophotography development of the year for me, which augurs well for 2021 and beyond.
Favourite Images
Continuing with the theme of less is more, I imaged just 13 objects this year – of which three were experimental & three with a DSLR – but still with a total integration time of 80 hours (2019 17 objects & 65 hours, 2018: 25 objects & 43 hours). Having worked through many of the astronomer’s favourites by now, images in 2020 consisted of: a new approach to old favourites, difficult / small objects for my equipment e.g. galaxies or less popular and widefield targets.
I’m pleased to say that most of these images turned out well and it’s difficult to choose a favourite. The so-called ‘favourites’ below therefore represent those images from this year that portray an important development in my astrophotography journey. More detailed reviews of these and all other images from 2020 can be found in specific articles that can be accessed using the links found below or via the Blog Index, located under the dropdown menu ABOUT.
Heart Nebula: Although imaged in 2018, this version has been re-processed using mainly PixInsight, thus transforming the original SHO Hubble Palette image from something rather dull to one with warm, vibrant colours, as well as much great detail – demonstrating the significant impact of my new PixInsight based processing abilities.
LBN 325: Numerous emission nebulae populate this small part of a very extensiveHII-Region, which forms an exciting LRGB image. Processing was complex and difficult, in order to bring out exciting features that abound in this spectacular but less popular area of the Cygnus constellation. Integration time of 10-hours was obtained over three nights and is my first LRGB image processed using PixInsight.
M63 Sunflower Galaxy: At 12.6’ x 7.2’and apparent magnitude of +9.3,this small flocculent galaxy in the Canes Venatici constellation is a challenge for my equipment. However, with 8 hours 20 minutes exposure over three nights in April and careful processing, the all-important detail within the galactic disc is clear. Topaz Denoise AI and Gigapixel software played an important role in maintaining the colour and delicate detail in this +50% cropped image.
Taken from last year’s REFLECTIONS 2019:
“Although you never know, I don’t see any major breakthroughs in the coming year”. Just goes to show what I know, fewer but better images were obtained in 2020:
RECORD CARD 2020
Goal
Specifics / Results
Outcome
Improve image capture
Further Improvements in overall quality + much longer integration times + better guiding accuracy = less but better images.
MUCH BETTER
Better processing
Using PixInsight software combined with Photoshop, Starnet++ and Topaz Denoise AI has led to major processing improvements and much better final images.
MUCH MUCH BETTER
Widefield Imaging
Initial results from new imaging rig based around Samyang 135 f2 lens were very promising but there’s more to do.
BETTER
My main objectives for 2020 were largely fulfilled (see above), so what about 2021?
Imaging: Other than maintaining the aforesaid improvements achieved over the past two years – guiding & longer integration times – two items that still need to be addressed are: (i) upgrade filters to remove star bloating and all round better images, (ii) improved focussing.
Widefield: Complete Samyang-rig build and switch from DSLR to CMOS mono camera.
Consolidate processing improvements: Whilst the move to PixInsight and other software was very successful in 2020, I’m still only scratching the surface of what’s possible.
Upgrade mono camera – there’s a new generation of colour CMOS cameras starting to appear, hopefully soon to be followed by their mono equivalents !
Hardly a year I and the rest of the world will want to remember, though more than ever astrophotography played a big role in providing relief from the trauma going on around us all.
The major increase of integration times achieved and the use of PixInsight has proved transformative for my astrophotography and will justify returning to reimage some old favourites in future years. I had often thought about upgrading my OTA to something bigger but given the lack of a permanent observatory here at Fairvale Observatory, combined with long periods of bad / cloudy weather, the penny finally dropped and I now have high hopes for the little wonder that is the Samyang 135 f2 lens when I complete its set-up in 2021.
Looking back I have to be happy with my astrophotography in 2020 but more importantly, look forwards to an even better year which holds great promise building on the positive developments of the past 24-months. Moreover, I hope for the sake of everyone that we will be able to deal with Covid-19 soon and return to something of a normal life once again. These are big ambitions and I hope that WTSM’s Reflections 2021 will record such success.
Watch this space!
ASTROPHOTOGRAPHY INDEX OF 2020
To access each blog, click on the title required below highlighted in RED: