Star Struck


M13 LRGB F2 CROP (Large)

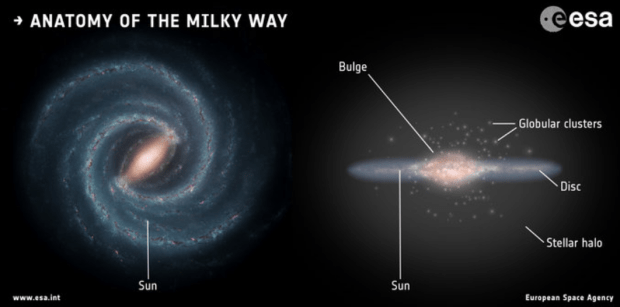
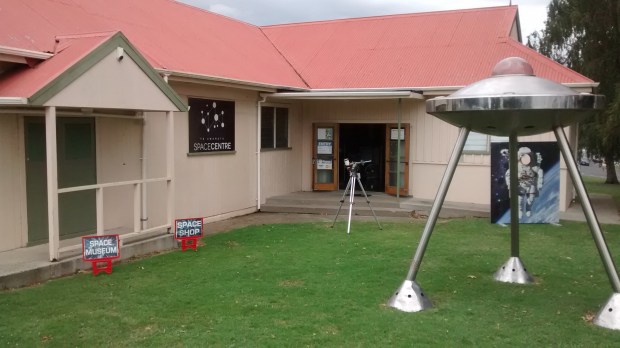
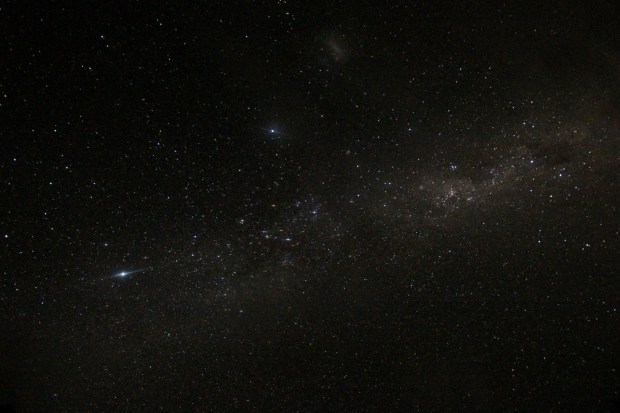
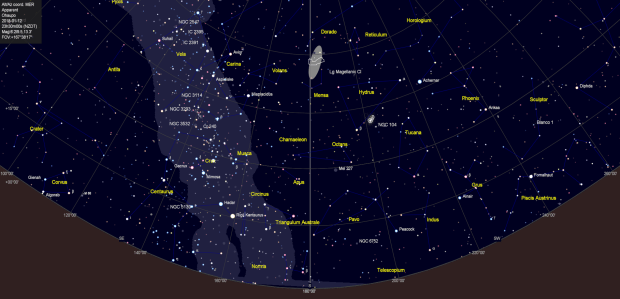
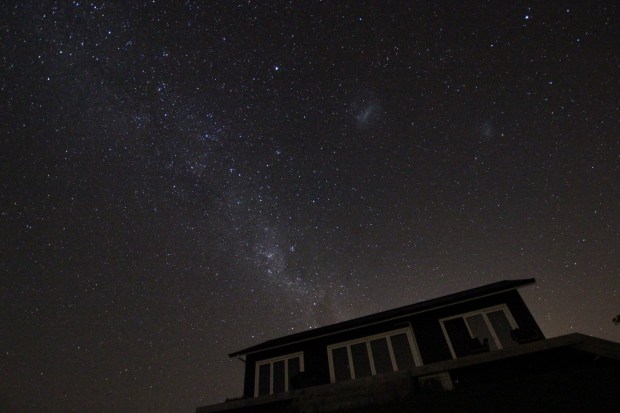
Of all the things I’ve discovered since taking up astronomy, perhaps it is the presence and nature of globular clusters that has most surprised me. Bound closely together by gravity, these massive spherical collections of stars orbit the galactic core perpendicular to its plane.  In the case of the Milky Way there are 150 globular clusters but they can be much larger in other galaxies, such as M87 which has some 13,000; clusters of clusters have also now been discovered in the Universe!  Typically each cluster might contain a few thousand or tens of thousands of stars, although in some cases they can be much larger.  Omega Centauri is the largest globular cluster in the Milky Way, being 150 light-years in diameter it contains 10 million stars; though clearly visible from Earth it can only be viewed from the Southern Hemisphere, which we unfortunately did not see when in New Zealand earlier this year.

MW & globs

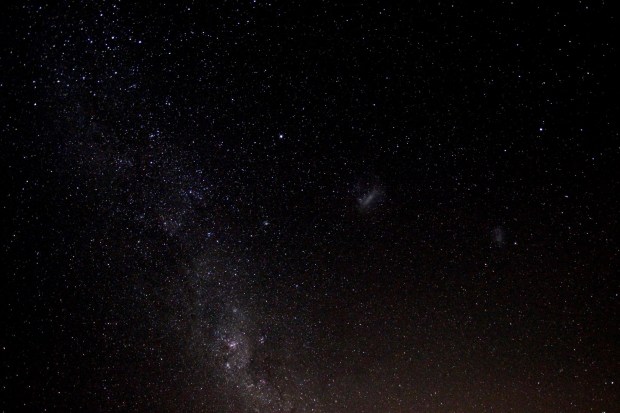
Despite all the advances being made in cosmology, the origin of globular clusters still seems to remain quite uncertain.  Characteristically the stars are all very old, typically in the region of 8 to 12-billion years and are of low metallicity i.e. they contain a low proportion of elements other than hydrogen and helium.  At least some, such as Alpha Centauri, are thought to have condensed from dwarf galaxies and such a process may currently be taking place within the large Magellanic Cloud – which we did see in New Zealand!  In other cases it is thought that the clusters have probably originated independently and were subsequently captured by the relevant galaxies.  However, their very old age – sometimes nearly as old as the universe itself – origin and relationship to galaxies remains intriguing.  For these and many other reasons I personally find globular clusters fascinating, probably more than any other astronomical feature, amazing as they too may be.

GlobsX

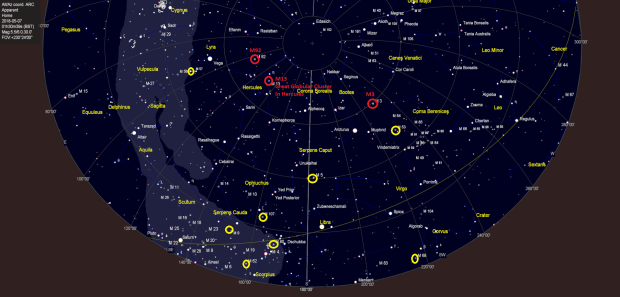
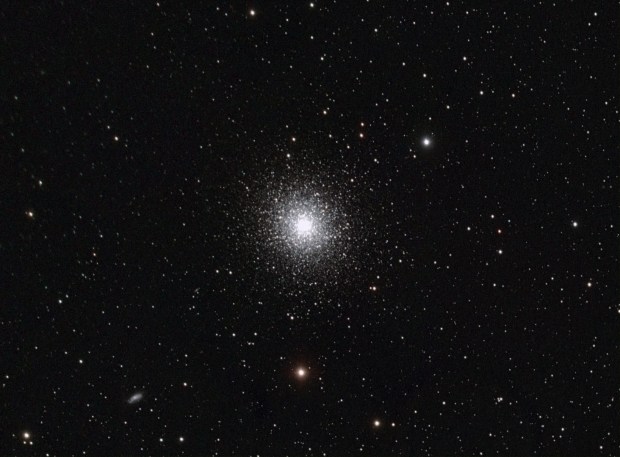
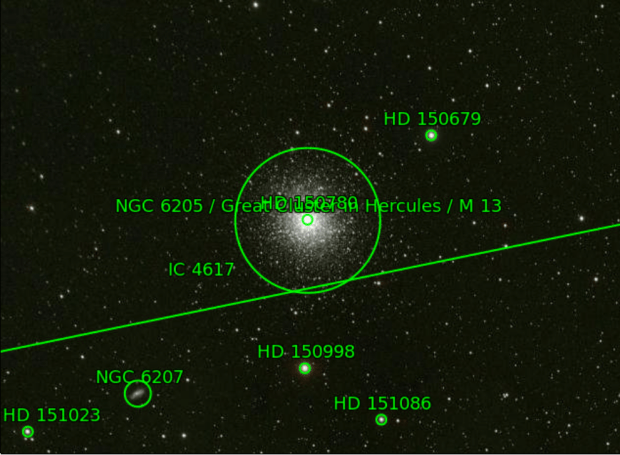
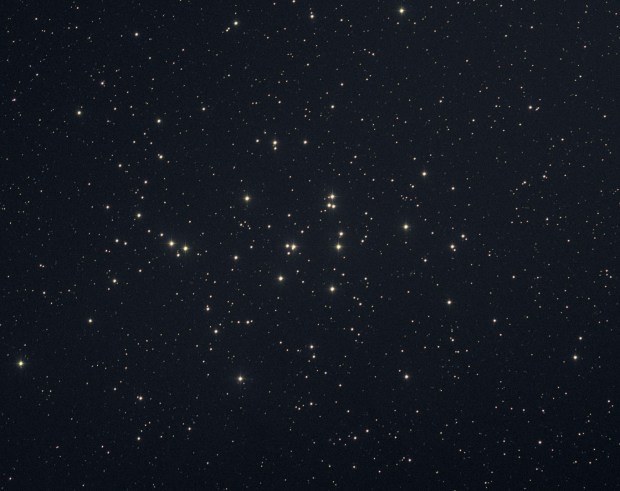
Globular Clusters May 2018: M3, M13 & M92 (red circles) + Others (yellow circles)

From time-to-time I’ve tried imaging various globular clusters but have not been satisfied with the outcome.  Now using guiding, plate solving and the high-resolution ZWO1600MM-Cool camera, it was time to give it another try this spring, when some of the best clusters are present in the northern night sky.

M3 LRGB Final (Large)

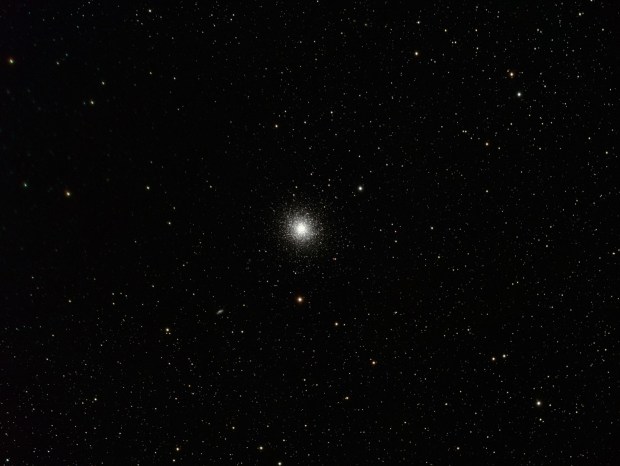
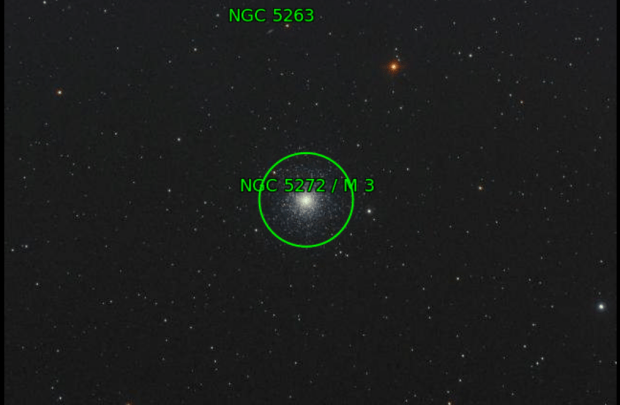
First up was M3 (Final image above), the very first Messier Object to be discovered by Charles Messier himself in 1764.  Consisting of 500,000 stars, between 8 and 11-billion years old and spanning some 220 light-years, M3 is one of the largest and brightest (absolute) globular clusters associated with the Milky Way – about 300,000 times brighter than our Sun.  It is noteworthy that the cluster contains some 274 variable stars, the highest number of any clusters, as well as a relatively high number of ‘blue stragglers’ – young main-sequence stars that appear to bluer and more luminous than the other stars in the cluster and are thought to be formed through stellar interaction of the older stars.

M3 LRGB Crop (Large)

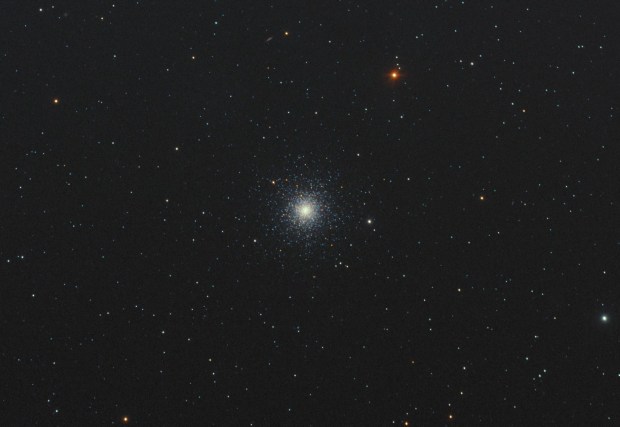
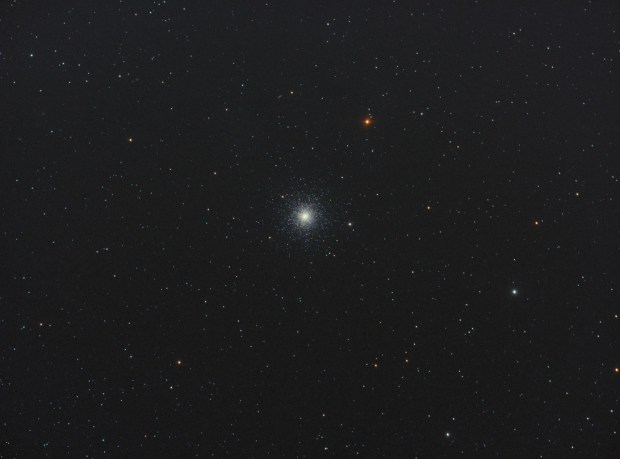
With these attributes it is not surprising that M3 is considered a popular target in astrophotography (cropped image above), likely surpassed however by M13 AKA the Great Globular Cluster in Hercules (cropped image top-of-the-page), which conveniently follows M3 in the same area of the sky about 3-hours later (together with nearby the globular cluster M92).  And so having bagged M3 it was time to turn the telescope and camera towards M13 (Main image below).  Discovered by the eponymous Edmond Hailey in 1716 (he of Hailey’s Comet), seen from Earth M13 is slightly brighter than M3 with a wide range of star colours that certainly makes for an exciting image.  At 11.65 billion years old, M13 has been around almost three times as long as the planet Earth.

M13 LRGB Final (Large)

Since starting astrophotography I like to try my hand at imaging a globular cluster at least once each year but hitherto with disappointing results.  This time I’m pleased with the outcome, especially M13 which is surely one of the most magnificent objects in our night sky; as a bonus there are also a few galaxies in the background of both the M3 and M13 images too.  It is therefore fortunate that for those of us in the higher latitudes of the northern hemisphere the Great Globular Cluster in Hercules can be seen all-year round, though is at its highest and therefore best position between May and September – thereby inaccessible for the Kiwis who are instead compensated by Alpha Centauri!  I expect to be back again next year to marvel at these amazing and enigmatic objects, if not before.

M3 Location Crop

IMAGING DETAILS
Object M3    (NGC 5272)     
Constellation Canes Venatici
Distance 33.9 million light-years
Size 18.0’ or 220 light-years     
Apparent Magnitude +6.2
 
Scope  William Optics GT81 + Focal Reducer FL 382mm  f4.72
Mount SW AZ-EQ6 GT + EQASCOM computer control
Guiding William Optics 50mm guide scope
  + Starlight Xpress Lodestar X2 guide camera & PHD2 control
Camera ZWO1600MM-Cool (mono)   CMOS sensor
  FOV 2.65o x 2.0o Resolution 2.05”/pix  Max. image size 4,656 x 3,520 pix   
EFW ZWO x 8 + ZWO LRGB & Ha- OIII-SII 7nm filters 
Capture & Processing Astro Photography Tool + PS2,  Deep Sky Stacker & Photoshop CS2
Image Location Centre  RA 13:42:23     DEC 28:22:50  
Exposures 24 x 180 sec L + 10×180 sec RGB  (Total time: 162 minutes)   
  Unity @ 139 Gain   21  Offset @ -20oC    
Calibration 10 x 180sec Darks  20 x 1/4000 sec Bias  10 x Flats LRGB  @ ADU 25,000  
Location & Darkness Fairvale Observatory – Redhill – Surrey – UK        Typically Bortle 5
Date & Time 5th + 6th  May 2018 @ +23.00h

M13 Location Crop

IMAGING DETAILS
Object M13     (NGC 6205)
Constellation Hercules
Distance >=20,000 light-years
Size 20’  or 150 light-years
Apparent Magnitude +5.8
 
Scope  William Optics GT81 + Focal Reducer FL 382mm  f4.72
Mount SW AZ-EQ6 GT + EQASCOM computer control
Guiding William Optics 50mm guide scope
  + Starlight Xpress Lodestar X2 guide camera & PHD2 control
Camera ZWO1600MM-Cool (mono)   CMOS sensor
  FOV 2.65o x 2.0o Resolution 2.05”/pix  Max. image size 4,656 x 3,520 pix   
EFW ZWOx8 + ZWO LRGB & Ha OIII SII 7nm filters 
Capture & Processing Astro Photography Tool + PS2,  Deep Sky Stacker & Photoshop CS2
Image Location Centre  RA 12:39:59    DEC -11:37:20  
Exposures 20 x 180 sec L + 15×180 sec RGB  (Total time: 195 minutes)   
  @ Unity 139 Gain   21  Offset @ -20oC  USB 40 
Calibration 10 x 180sec Darks  20 x 1/4000 sec Bias  10 x Flats LRGB  @ ADU 25,000  
Location & Darkness Fairvale Observatory – Redhill – Surrey – UK        Typically Bortle 5
Date & Time 6th + 7th + 9th May 2018 @ +00.30h  


Chapeau!

LRGB GxC Crop-2 (Large)


I always had a general interest in astronomy but was eventually sparked into action after viewing Saturn through the Thompson 26 inch refractor at Herstmonceaux observatory in 2014.  The beauty of the planet and its unique rings is captivating and like many others it remains my favourite planet to this day.  One year on and looking further afield at Joan Genebriera’s Tacande Observatory on the island of La Palma, I discovered what is now  one of my very favourite Deep Sky Objects – M104 or the Sombrero Galaxy; until recently I used the resulting picture obtained whilst at La Palma as the main banner image for this website.  Though perhaps not as spectacular as the Orion Nebula or certain spiral galaxies, the sombrero-like galaxy (with a passing resemblance of a flying saucer too), is beguiling in its own unique way and ever since then I’ve been eager to return to The Hat and image it myself from home.

Chart_1.cdc3

However, imaging the Sombrero from the UK and especially at my location just south of London is quite another matter to La Palma.  Aside from light pollution, being at 51o north compared to 28o in La Palma, M104 is considerably lower in the sky when viewed from Fairvale Observatory in Redhill; at the time of imaging in early May it was about 26o above the southern horizon.  Furthermore, my sight lines are obscured on three sides by 15-foot hedges and directly south by two 45-foot conifers – see below SE to SW view of M104 imaging track at Fairvale Observatory.

M104 Track crop

As a result, only after it emerges from behind the western edge of the aforesaid conifers can M104 (just) be imaged, as it moves along the top of the hedge for just over an hour before disappearing from view once again.  Of course this is far from ideal but with my enthusiasm for the Sombrero, a high-resolution ZWO1600M-Cool camera and newly acquired ability to plate solve, I gave it a try over three consecutive nights.


RGB GxC crop (Large)


An unbarred spiral galaxy, the hallmark of M104 is its bright bulbous centre encircled by dark dust lanes, which when viewed from Earth tilted at just 6-degrees above the equatorial plane creates the appearance of a sombrero hat (see cropped image above).  With the much higher resolution of the Hubble telescope some 2,000 globular clusters have been identified with M104, ten-times that of the Milky Way.  In 1912 the galaxy was found to be moving away from Earth at 700 miles per second, providing an early indication that the Universe was in fact expanding in all directions.

All-in-all the Sombrero galaxy is a fascinating and unusual object, though small and all-in-all a challenging imaging target, especially seen from Fairvale Observatory.  Notwithstanding, at last I am very pleased to obtain my own exciting image of the Sombrero – chapeau!

M104 Location

IMAGING DETAILS
Object Sombrero Galaxy  M104     
Constellation Virgo
Distance 29 million light-years
Size 9’ x 4’  or  50,000 light-years
Apparent Magnitude +8.0
 
Scope  William Optics GT81 + Focal Reducer FL 382mm  f4.72
Mount SW AZ-EQ6 GT + EQASCOM computer control
Guiding William Optics 50mm guide scope
  + Starlight Xpress Lodestar X2 guide camera & PHD2 control
Camera ZWO1600MM-Cool (mono)   CMOS sensor
  FOV 2.65o x 2.0o Resolution 2.05”/pix  Max. image size 4,656 x 3,520 pix   
EFW ZWOx8 + ZWO LRGB & Ha OIII SII 7nm filters 
Capture & Processing Astro Photography Tool + PS2,  Deep Sky Stacker & Photoshop CS2
Image Position Centre  RA 12:39:59    DEC -11:37:20  
Exposures 25 x 180 sec L + 3x5x180 sec RGB  (Total time: 120 minutes)   
  @ 139 Gain   21  Offset @ -20oC    
Calibration 10 x 180sec Darks  20 x 1/4000 sec Bias  10 x Flats LRGB  @ ADU 25,000  
Location & Darkness Fairvale Observatory – Redhill – Surrey – UK        Typically Bortle 5
Date & Time 5h + 6th + 7th  May 2018 @ 23.30h  approx.


Spinning Plates

65 Comp Lgx Crop

Much of life is about meeting and dealing with challenges. Who hasn’t put off a task in the hope either that it will go away, somebody else will deal with it or an easier solution might be found?  Whatever anybody says to the contrary, astrophotography is not easy and throws up many such challenges from the very beginning, which will usually have to be dealt with if progress is to be made.  Amongst such challenges a few have the potential to transform the process and / or outcome of imaging but can also irrationally at first appear as a stumbling block rather than an opportunity and, as a result, get put aside until another day.

My list of such obstacles so far confronted consists of:

I have experienced many other challenges but excluding processing itself – which is another story – overcoming these four tasks has each time had a material positive impact on my astrophotography.

It’s fair to say that with technology, problems and life in general, wherever possible I like to adopt the KISS principle (Keep It Simple Stupid).  Unfortunately such a philosophy is often difficult, if not impossible to follow with astrophotography and most of the time there is just no alternative but to work through the unavoidable difficulties step-by-step in every excruciating detail, which usually requires lots of patience, perseverance and time.  In understanding and finding a solution the almost endless and invaluable online help from others should not be overlooked, without which I would probably still be back at the proverbial square one.  The availability of such friendly help and the extensive free but still excellent software is surely one of the defining characteristics of astronomy and astrophotography, which not only makes it easier but more enjoyable.

Notwithstanding, when I look back at the aforementioned list of tasks which took me months or even years to address and solve, I wonder now why I had been so daunted beforehand.  Once I found the courage to work through the problems, I discovered that I too was able to set-up and carry out such techniques that hitherto I’d thought beyond my abilities.  It was very satisfying but, more to the point, each such breakthrough took me to another level of imaging.

Ever since moving on from DSLR to using the ZWO1600mm-Cool mono camera and EFW, I realised that if I was ever going to truly master astrophotography I would need to achieve much longer integration times, which could only mean one thing – the apparently black art of plate solving.  I had read about plate solving and understood the principle but at first was too busy learning the new camera and then either just kept putting it off or, with so much bad weather, used the rare clear night just to enjoy imaging.  Notwithstanding, an all too brief warm and clear spell recently occurred and I decided to give it a try.

Aside from the innate underlying complexity of such techniques I am first put off by the instructions. I do read them but as always with technical items they appear to have been written by an alien – poorly written, idiosyncratic and altogether difficult to understand.  In this case I chose to use PlaneWave’s PlateSolve2 software incorporated within the excellent image capture software Astro Photography Tool (APT) as Point Craft and to be fair, the author’s (Ivo from Hungary) instructions are comprehensive but still difficult to understand; thankfully the related APT Forum helps enormously to resolve resulting difficulties and misunderstandings. However, like riding a bike you will not learn by reading a book but need to get on and do it!

Having installed the necessary software and star catalogues for plate solving my first night was for various reasons a disaster, thankfully the good weather continued for the subsequent two evenings and I was therefore able to continue.  To learn the technique I needed a suitable target and at this time of the year the Leo Triplet formed an easily recognisable composition that met the bill, though the detail of each galaxy remains difficult to resolve with my set-up.  My approach was first to verify I could Solve an image i.e. identify the exact RA and DEC position of the image (location and orientation) using the plate solving software and then using this image and solved data:

  1. Re-position the camera exactly over the target in the same part of the sky
  2. Do the same but after a Meridian flip, and finally…
  3. Do the same using the original image but over two nights
PoinCraft

APT PointCraft input screen: After connecting the scope, solving the image (upper box) and framing the image (lower box), the GoTo++ function can be used to return the scope and imaging location to the originally solved and framed position in order to resume imaging.

I’m not going to say I’ve cracked it but I did achieve all the above tasks and am now confident that I’m on my way to obtaining longer integration times with the help of plate solving.  After some failures I was finally able to realign the camera to within 2 pixels, which is quite amazing accuracy achieved by the software.   I was even pleased with the resulting test images, which however emphasised the aforementioned need for much greater integration times; top-of-the page image from separate image sets on 19th April, image below from image sets on 20th April.  Of course increased times will also require clear skies and a return to more suitable targets.

Picture saved with settings embedded.Despite my aversion towards much of the so-called modern world I am not a technophobe, I embrace and often enjoy many of today’s technical developments.  However, I am of the opinion that many of the problems with such technology arise at the interface between the technology and mankind – technology is now (mostly) digital and we are analogue i.e. incompatible. Furthermore, such difficulties are often compounded by the lack of intuitive operation and inability of those creating such devices or software to explain to normal human beings how to use them – surely altogether a limiting factor for the ultimate development of the modern world itself? Notwithstanding and somewhat ironically, my experience indicates astrophotography may also be a metaphor for life.  Often working in the unknown, difficult, complex and frustrating but at times very rewarding – a bit like spinning plates really? And so on to my next plate – watch this space!

Leo

IMAGING DETAILS
Object The Leo Triplet   M65 + M66 + NGC 3628     
Constellation Leo
Distance 35 million light-years
Size M65 8.7’ x 2.45’      M66 9.1’ x4.2’      NGC 3628  15.1’ x 3.6’
Apparent Magnitude M65 +10.25              M66 + 8.9             NGC 3628  + 10.2
 
Scope  William Optics GT81 + Focal Reducer FL 382mm  f4.72
Mount SW AZ-EQ6 GT + EQASCOM computer control
Guiding William Optics 50mm guide scope
  + Starlight Xpress Lodestar X2 guide camera & PHD2 control
Camera ZWO1600MM-Cool (mono)   CMOS sensor
  FOV 2.65o x 2.0o Resolution 2.05”/pix  Max. image size 4,656 x 3,520 pix   
EFW ZWOx8 + ZWO LRGB & Ha OIII SII 7nm filters 
Capture & Processing Astro Photography Tool + PS2,  Deep Sky Stacker & Photoshop CS2
Image Location Centre  RA 11:19:59    DEC 13:31:01  
Exposures 1.Main image  60 sec x35* LRGB  (Total time: 100 minutes)  *15 East & 10 West

2. Second image  180 sec x 5 LRGB (Total time: 60 minutes)

  @ 300 Gain  50  Offset @ -20oC    
Calibration 1.   15 x 60 sec Darks  20 x 1/4000 sec Bias  10 x Flats LRGB  @ ADU 25,000  

2.   10 x 60 sec Darks  20 x 1/4000 sec Bias  10 x Flats LRGB  @ ADU25,000

Location & Darkness Fairvale Observatory – Redhill – Surrey – UK        Typically Bortle 5
Date & Time 19th & 20th February 2018 @ 22.00h approx.

Playing With Fire

RGB (Large)

When possible my current repertoire has continued with DSO targets previously imaged with a modded DSLR and now revisited using the ZWO1600MM-Cool camera.  In general I’ve found the outcome with the new camera has been noticeably better in detail and colour but I’m still learning and know I can do better in time.  Last imaged in December 2015 with a DSRL camera, the larger FOV comfortably encompassed both the Tadpole (IC410) and adjacent Flaming Star (IC405) nebulae, resulting in an exciting composition. However, this time the ZWO CMOS sensor could only accommodate the latter in the image but with improved resolution.

fn3

Picture saved with settings embedded.

IC 405 (right) The Flaming Star Nebula & IC 410 The Tadpole Nebula: WO GT81 & modded Canon 550D + FF | 15 x 180 sec @ ISO 1,600 & full calibration | 8th December 2015

The Flaming Star is an emission / reflection nebula, which surrounds the bright blue variable star AE Aurigae.  Imaging in narrowband produced decent Ha data but was very weak in OIII and SII wavelengths and even with 2-hours integration time is somewhat lacking in colour both in SHO (top-of-the-page) & HOO (below).  Notwithstanding, it’s an exciting object that at some point in the future will obviously require much longer imaging time and perhaps even a mosaic  in order to include its neighbour the Tadpole once again.

HOO (Large)

FN

IMAGING DETAILS
Object The Flaming Star Nebula   IC405     
Constellation Auriga
Distance 1,500 light-years
Size 37’ x 19’  
Apparent Magnitude +6.0
 
Scope  William Optics GT81 + Focal Reducer FL 382mm  f4.72
Mount SW AZ-EQ6 GT + EQASCOM computer control
Guiding William Optics 50mm guide scope
  + Starlight Xpress Lodestar X2 guide camera & PHD2 control
Camera ZWO1600MM-Cool (mono)   CMOS sensor
  FOV 2.65o x 2.0o Resolution 2.05”/pix  Max. image size 4,656 x 3,520 pix   
EFW ZWOx8 + ZWO LRGB & Ha OIII SII 7nm filters 
Capture & Processing Astro Photography Tool,  Deep Sky Stacker & Photoshop CS2
Exposures 300 sec x12 Ha, x6 SII & x6 OIII (Total time: 120 minutes)
  @ 139 Gain  21 Offset @ -20oC  
Calibration 5 x 300 sec Darks  20 x 1/4000 sec Bias  10 x Flats Ha, OIII & SII @ ADU 25,000  
Location & Darkness Fairvale Observatory – Redhill – Surrey – UK        Typically Bortle 5
Date & Time 24th February 2018 @ 20.30h approx.


Lost In Space

IMG_9267 (Large)

Night produces a very different feeling to day.  Familiar locations take on a distinct atmosphere created by the absence of light, as the darkness imbues a sense of being in another world.  With restricted sight other senses of sound, temperature and smell become more vivid.  Furthermore, as my familiarity with the night sky has improved through astronomy, I’ve felt an increasing impression of physical separation.  Just being outside at 3.0 a.m. in the morning when most others are in bed, one becomes not only more aware of the night’s unique senses but a magical feeling of Earth’s movement through space itself.

IMG_9999x (Large)

  The Milky Way & Magellanic Clouds from Slab Hut Creek, South Island, New Zealand 

When travelling I like to read and learn about the new places I visit, in order to gain insight into the people, their culture, what’s happening and what makes them tick.  For this purpose during my recent trip to New Zealand I enjoyed reading two very different but equally fascinating books:

  • Long Cloud Ride by Josie Dew, which describes Josie Dew’s epic 6,000 mile cycle journey around New Zealand, and…
  • Squashed Possums by Jonathan Tindale. ‘Written’ by a caravan (that’s right!) assisted by its occupant. Possums describes life off the beaten track in New Zealand, specifically Jon’s life in a semi-derelict caravan in the wilderness.  The experience provides an amusing but insightful description of New Zealand, New Zealanders and the impact of living in such a remote location on humankind.  Apart from the practical and physical issues, the impact is sometimes profound – for the caravan and Jon – I was particularly struck by the description of their experience of the night sky in the back country, which powerfully captures something of my own feelings of being outside on a clear night, alone in the darkness.

SQP

I put my book down, pulled not one but two jumpers on and ventured outside to look at the cloudless night sky.  Brrr! True, it was cold, freezing probably but the view was breathtaking.  The Moon was out, or at least some of it was, and the Milky Way stretched across the sky like a colossal halo embracing the planet.  The Southern Cross stood proud, forever pointing north (?).  I turned around to look at my caravan, its windows filled with light, surrounded by the stars and darkness, reminding me of a satellite.  Lost and far away, suspended in space, I imagined an astronomer observe me from afar.

I stood there a while, quietly watching and taking in the view.  I tasted the chilled air, with a sense of time winding down a gear.  The there was a palpable jolt, like a quite earthquake that left no physical impression.  There was no crack in the earth, but there had been a change nonetheless – a profound and intoxicating sensation.

For a moment, I was disconnected.  I felt strangely without form, somehow insubstantial and insignificant.  Lost, like a speck on a rock in the darkness.  At least it might have been a moment, it may well have been much longer.  Moments may have been minutes, minutes might have been hours.  Time ceased to have any meaning.

I’d stumbled across something that is not easy to express.  It was the feeling of utter isolation, of removal not just from society, but from the world and then finally being removed from my own sense of self.  And yet, something intangible was filling this void and it pushed a tickle up my spine.

The sense of isolation quickly dissipated and instead of feeling lost, I had the profound experience of being part of everything – the earth, air and stars – all of it.  I was utterly overwhelmed by this new awareness. My subconscious struggled desperately to find a cultural reference point to cling to.  David Bowman swam past, cast adrift in the final moments of 2001: Space Odyssey, calling out to Bowie’s Major Tom.

And then, as quickly as it happened, the moment passed.  I was returned to reality, with something like an elastic twang. I’d not so much been thrown but catapulted back to this small patch of damp grass on a cold night, having been in an unexplained place.  What on earth was that?  One thing I was sure of, I was desperate for a steaming hot mug of tea.

IMG_9269 (Large)

Hive Of Activity


M44 Crop (Large)

Identified by Ptolemy in the second century AD, the open star cluster was known in Greek and Roman mythology as Praesepe (The Manger). Soon after developing the so-called ‘Dutch Gadget’ for use in astronomy as a refractor in 1609, Galileo became the first person to properly observe through the telescope what is now known as The Beehive Cluster and thus detect some 40 stars.  In 1769 Messier added the cluster to his growing catalogue as the 44th object and thus became M44.  More than 400 years since Galileo’s first view, the Beehive Cluster AKA M44, Praesepe or more prosaically NGC 2632, is now known to consist of approximately 1,000 stars and forms one of the imaging targets at or about the time of the Spring Equinox each year.

M44 Locate

Located in our galaxy relatively nearby within the constellation Cancer, between 520 and 610 light-years away and 3-times the Moon’s diameter or 1.5o, The Beehive can be seen with the naked eye as a blur in dark skies and with a telescope becomes an excellent imaging target.  Last imaged with the modded Canon 550D DSLR in 2015, the LRGB image obtained this time shows improvement but with only 20-minutes integration time lacks the colour seen in other examples, which however consist of more than 17 hours! Truth is that this was a brief experiment carried out between imaging two other objects on the same night and I’m encouraged that by increasing my time significantly I can eventually tease out better quality and the spectacular colours that make The Beehive such an attractive open cluster.

IMAGING DETAILS
Object The Beehive Nebula   (Praesepe, M44, NGC 2632)     
Constellation Cancer
Distance 520 – 610 light-years
Size 1.5o  
Apparent Magnitude +3.7
 
Scope  William Optics GT81 + Focal Reducer FL 382mm  f4.72
Mount SW AZ-EQ6 GT + EQASCOM computer control
Guiding William Optics 50mm guide scope
  + Starlight Xpress Lodestar X2 guide camera & PHD2 control
Camera ZWO1600MM-Cool (mono)   CMOS sensor
  FOV 2.65o x 2.0o Resolution 2.05”/pix Max. image size 4,656 x 3,520 pix   
EFW ZWOx8 + ZWO LRGB & Ha OIII SII 7nm filters 
Capture & Processing Astro Photography Tool,  Deep Sky Stacker & Photoshop CS2
Exposures 4×5 x 60 sec LRGB (Total time: 20 minutes)
  @ 139 Gain  21 Offset @ -20oC  
Calibration 5 x 300 sec Darks  20 x 1/4000 sec Bias  10 x Flats Ha, OIII & SII @ ADU 25,000  
Location & Darkness Fairvale Observatory – Redhill – Surrey – UK        Typically Bortle 5
Date & Time 11th February 2018 @ 21.30h approx.


Death Throes of a Star

Abell 21 RGB 1Final (Large)

As the winter arm of the Milky Way proceeds inexorably towards the west, I’ve been seeking new objects and was pleasantly surprised to recently discover a small but nonetheless interesting planetary nebula located just to the east of the galactic plane between Canis Minor and Gemini.  Consisting of large filaments of glowing ionized gas, the feature goes by the popular name of the Medusa Nebula, after the Greek mythological gorgon figure which has hair of writhing snakes!

145615-004-A364787F

Statue of Medusa

Also known as Abell 21 (discovered by George Abell in 1955), Medusa is an ancient planetary nebula some 1,500 light-years away, officially situated within the constellation Gemini.  Like its dramatic mythological namesake, the planetary nebula represents the final stages of a low mass star such as our sun in the process of transforming from a red giant to hot a white dwarf star, in the process shedding its outer layers which are illuminated by ultraviolet radiation from the hot star within which powers its glow.

Medusa

At 4-light years across the Medusa Nebula is a small though reasonable size but with an apparent magnitude of some +15.99 is very faint and is therefore difficult to image.  Nonetheless, Ha and OIII gases are prevalent and as something of an experiment I chose to try and image this object at narrowband wavelenghts.

Abell 21 RGB 1FinalCrop (Large)

Considering the aforesaid problems I am quite pleased with the outcome (top of page), indeed I was surprised to see I had captured anything.  However, given its challenging low brightness and a total integration time of only 75-minutes, the final image was always going to be lacking in detail and noisy (cropped image immediately above).  Notwithstanding, now I know of its presence I will surely be returning to The Medusa Nebula on another occasion to improve the integration time and perhaps use a larger telescope to grab those photons which prove elusive to my current equipment set-up.


IMAGING DETAILS
Object The Medusa Nebula    (Abell 21 / Sharpless 2-274)     
Constellation Gemini
Distance 1,500 light-years
Size Approx. 12’ x 9’
Apparent Magnitude +15.99
 
Scope  William Optics GT81 + Focal Reducer FL 382mm  f4.72
Mount SW AZ-EQ6 GT + EQASCOM computer control
Guiding William Optics 50mm guide scope
  + Starlight Xpress Lodestar X2 guide camera & PHD2 control
Camera ZWO1600MM-Cool (mono)   CMOS sensor
  FOV 2.65o x 2.0o    Resolution 2.05”/pix  Max. image size 4,656 x 3,520 pix   
EFW ZWOx8 + ZWO LRGB & Ha OIII SII 7nm filters 
Capture & Processing Astro Photography Tool,  Deep Sky Stacker & Photoshop CS2
Exposures 10 x 300 sec Ha, 5 x 300 sec  OIII   (Total time: 75 minutes)
  @ 139 Gain  21 Offset @ -20oC  
Calibration 5 x 300 sec Darks  20 x 1/4000 sec Bias  10 x Flats Ha, OIII & SII @ ADU 25,000  
Location & Darkness Fairvale Observatory – Redhill – Surrey – UK        Typically Bortle 5
Date & Time 11th February 2018 @ 23.00h approx.


The Fox & Cone

Cone Ha100 20 15 OIII B CROP

After the fun of December and January provided by the wide choice of exciting DSO objects, February affords a worthy finale to the winter season, in particular within the constellation Monoceros.  After successfully imaging the Rosette Nebula on 9th February, a few days later I was able to move on to another nearby HII-region in the Milky Way, with equally good results.  Surprisingly it’s been just over 3-years since I last imaged the same part of the sky just before Christmas 2014, on that occasion with an unmodded Cannon 700D DSLR.  Now armed with the more capable ZWO1600MM-Cool camera and narrowband filters, the potential for raising the bar was good and the results did not disappoint.

Untitled

Of foremost interest this time was NGC 2264, which officially describes the Cone Nebula and Christmas Tree Cluster but also includes the Snowflake Cluster and Fox Fur Nebula, all set within a large HII-region.  Individually each object is towards the limit of my equipment’s resolution but taken all together makes for an interesting combination when encompassed inside the 2.65o x 2.00o field-of-view.  Like the Rosette I chose to image in narrowband, with a total integration time of 90 minutes; again using 300 second subs at Unity gain proved to be very effective – I suspect that only more subs rather than longer exposures would lead to a better outcome but that will have to wait until I’ve sorted how to plate solve, watch this space!

Picture saved with settings embedded.

I’ve recently been experimenting in Photoshop using star masks and related sharpening and contrast enhancement methods, which for the first time I applied when processing these images to great effect.   Being an HII-region the overall image area is dominated by Ha-light and the processed Ha-subs resulted in a very exciting image at this wavelength, with many subtleties revealed throughout (see below).  On the other hand OIII and especially SII wavelengths are much less prevalent, from which it would seem  that a higher ratio of those subs would be required to better tease out detail at those wavelengths.  Notwithstanding, the resulting Ha-OIII-OIII Bi-Colour image has turned out well (top of the page), with all the aforementioned objects showing clearly.

Picture saved with settings embedded.

The signature object of this image is probably the Cone Nebula.  New stars are forming within a cone shaped dark molecular cloud, itself sculpted by strong stellar winds. However, I consider the Fox Fur Nebula (Sharpless-273) to be the bigger imaging challenge, which I’m therefore pleased to say is starting to show well in these images.  The name derives from the rich, fur-like texture of the nebula which is also shaped by stellar winds; reckon The Fox & Cone would make a good pub name! Below:  Cone Nebula & Christmas Tree Cluster Ha-OIII-OIII before colour mapping.

Cone Ha100 20 15 OIII A crop

But there’s more. A series of stars form an inverted outline shape of the so-called Christmas Tree Cluster above the Cone Nebula (see image above), with the conspicuously bright 15 Monocerotis at its base made of a massive variable star system.  And finally, somewhat off piste, lurking in the top right corner of the main image is NGC 2261 or Hubble’s Variable Nebula.  Discovered by Edwin Hubble in 1949, the nebula is illuminated by the unseen R Monocerotis star and forms a small but distinct bright triangular area.

All-in-all this is a great part of the February sky for imaging.  There’s still more to discover and I won’t leave it as long as 3-years before going back again, with the objectives of increasing integration time and possible addition of RGB subs to enhance the colour potential.

IMAGING DETAILS
Object Fox  & Cone Nebulae  NGC 2264 + Hubble’s Variable Nebula NGC  2261     
Constellation Monoceros
Distance 2,700 light-years
Size Approx. 54’ x 37’
Apparent Magnitude +3.9
 
Scope  William Optics GT81 + Focal Reducer FL 382mm  f4.72
Mount SW AZ-EQ6 GT + EQASCOM computer control
Guiding William Optics 50mm guide scope
  + Starlight Xpress Lodestar X2 guide camera & PHD2 control
Camera ZWO1600MM-Cool (mono)   CMOS sensor
  FOV 2.65o x 2.0o    Resolution 2.05”/pix   Max. image size 4,656 x 3,520 pix   
EFW ZWOx8 + ZWO LRGB & Ha OIII SII 7nm filters 
Capture & Processing Astro Photography Tool,  Deep Sky Stacker & Photoshop CS2
Exposures 12 x 300 sec Ha, 6 x 300 sec  OIII   (Total time: 90 minutes)
  @ 139 Gain  21 Offset @ -20oC  
Calibration 5 x 300 sec Darks  20 x 1/4000 sec Bias  10 x Flats Ha, OIII & SII @ ADU 25,000  
Location & Darkness Fairvale Observatory – Redhill – Surrey – UK        Typically Bortle 5
Date & Time 11th February 2018 @ 21.00h

What Comes Around Goes Around

RGB HaOO XXX2

It’s nearly 4-years since I started astronomy, like so many inspired after observing Saturn through a telescope.  Not just any telescope but the 13” Astrographic Refractor at the Observatory Science Centre in Herstmonceaux.  Built in 1890 specifically to make use of the then new technique of astrophotography, the telescope was first employed as part of the worldwide Carte Du Ciel project to map the entire night sky by photography and subsequently for a crucial test of Einstein’s then new theory of General Relativity.  Soon thereafter I was to view the aforesaid planet once again with my first, newly purchased Skywatcher 150PL Newtonian telescope.  Inevitably something of a lesser view than that at Herstmonceaux it was nonetheless just as exciting, if not more so.  I was hooked!

I then attempted afocal imaging using a compact camera held up to the telescope eyepiece but with poor results, except in one respect.  By clamping the camera onto the front of the eyepiece and achieving longer exposures, nebulosity otherwise unseen with the naked eye was revealed in the resulting image, in this case Orion’s Nebula.  As crude as the image was, for me the penny had dropped and I’ve been pursuing images of the hidden beauty of the night sky ever since.

rosette map

ngc2237map

Like mariners, through astronomy I have by now become accustomed to the seasonal procession of the night sky wonders throughout the year, none more so than the Rosette Nebula.  About 100 light-years across and 5,000 light-years from Earth, the Rosette Nebula is surely one of the annual highlights for most astrophotographers?  Located just east of Orion, the Rosette is at its best between December and February, so that I was first able to image this beautiful object myself at the end of 2014.

As a very large HII region the Rosette Nebula emits light mainly at narrowband wavelengths, which produces wonderful but mainly red colours when imaged with a modded DSLR camera.  As my astrophotography and equipment have since developed, it has become a pleasure and challenge to image objects as they return each year such as the Rosette, thereby also charting my own improvements or otherwise from year-to-year.  Its size makes the Rosette an especially attractive target for smaller telescopes such my own with an 81mm aperture, which nicely fills much of the sensor of an APS-C camera.

Despite having purchased a new ZWO1600MM-Cool mono camera at the end of 2016, by the time I was ready to use it at the end of the following March, the Rosette Nebula had almost disappeared over the western horizon for another year.  Notwithstanding, in the limited time remaining I managed to capture a few Ha-OIII-SII subs, thus marking first light for the camera, which ironically resulted in one of my favourite images for 2017.  Using narrowband for the first time it was immediately possible to see the potential of the new camera when imaging this type of object.

Returning from an extended overseas trip at the end of January this year, 10-months had passed since my last encounter with the Rosette Nebula last March and I found myself with the first real opportunity to image the nebula properly with the ZWO1600MM-Cool camera.  Since last year I’d acquired more knowledge and experience with the camera, plus this time the Rosette was now in the south eastern quadrant and provided significantly more imaging time than before.

After a break of nearly two months I needed to sort out the equipment, refocus the camera and start a new alignment model in EQASCOM.  For the first time I also decided to use longer exposure times of 300 seconds, which altogether produced a good Ha+OIII Bi-Colour image (top of page – awarded BAA Picture of the Week 4th March 2018); whilst much longer exposures are used with conventional CCD sensors, such is the sensitivity of the CMOS mono sensor in the ZWO camera that 5-minute exposures provide exceptionally good quality data.  Overall the impact of longer exposure, good focus, tracking and much longer total integration time had a noticeably positive impact on noise and overall image quality, though there’s still room for improvement – there always is!

To some extent, even after a year I’m still in the experimental phase with this camera.  For most of 2017 I used a high gain setting of 300 but this time I chose the Unity gain setting of 139 and for interest also imaged at a shorter exposure of 180 seconds.  Comparison between the two settings for Ha images – Unity gain at 300 and 180 seconds – shows that for such a nebulous type of feature as the Rosette, Unity gain works very well at the longer 300 second exposure (first image below) but not 180 seconds (second image below), which is too short to collect sufficient data.

Picture saved with settings embedded.

Picture saved with settings embedded.

Notwithstanding, in the past I have found shorter exposures at Unity or less have generally been more suitable for brighter objects such as star clusters or galaxies like Andromeda.  An alternative SHO Hubble Palette image below of the Rosette Nebula at Unity gain and 300 second exposure also compares more favourably with the same image taken last year using less subs, higher gain and shorter exposure time.

Untitled-2 Crop2 (Large)
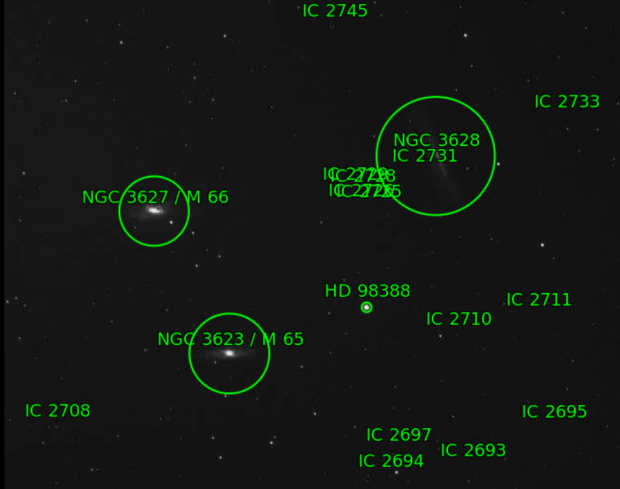
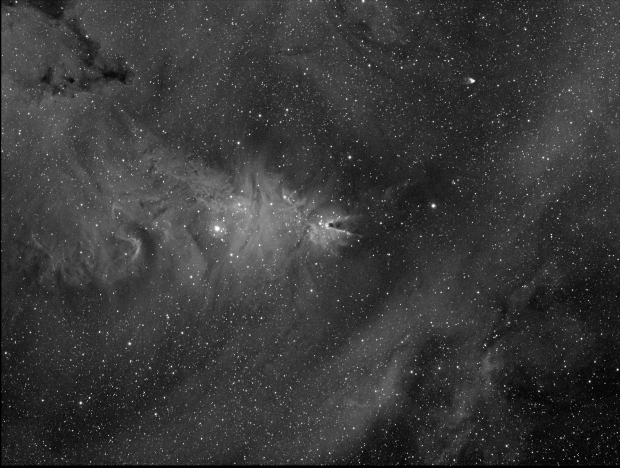
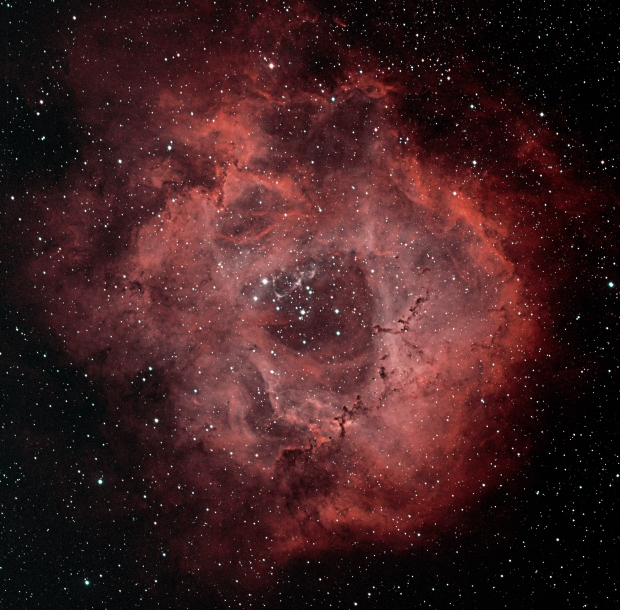
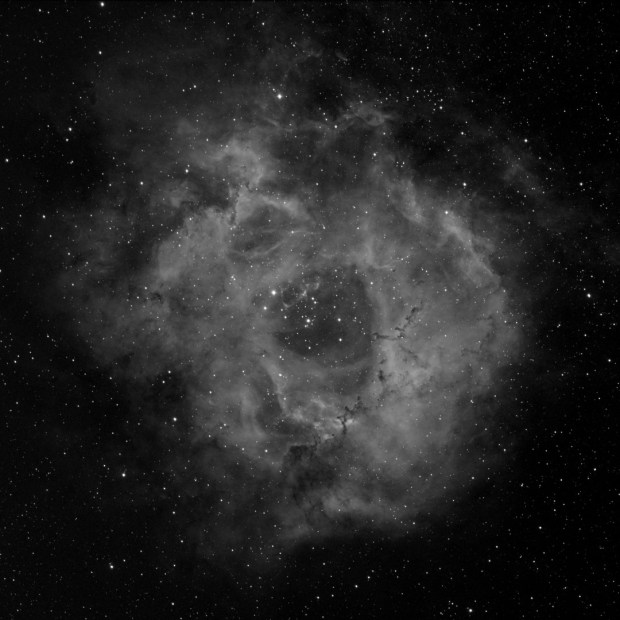
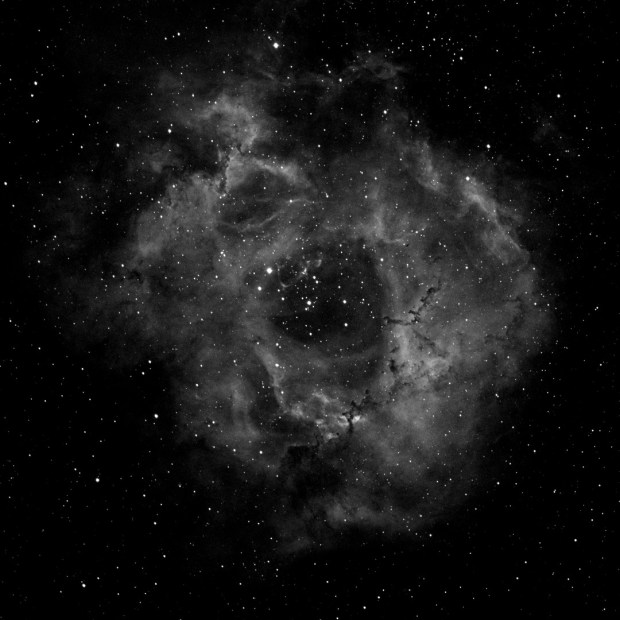
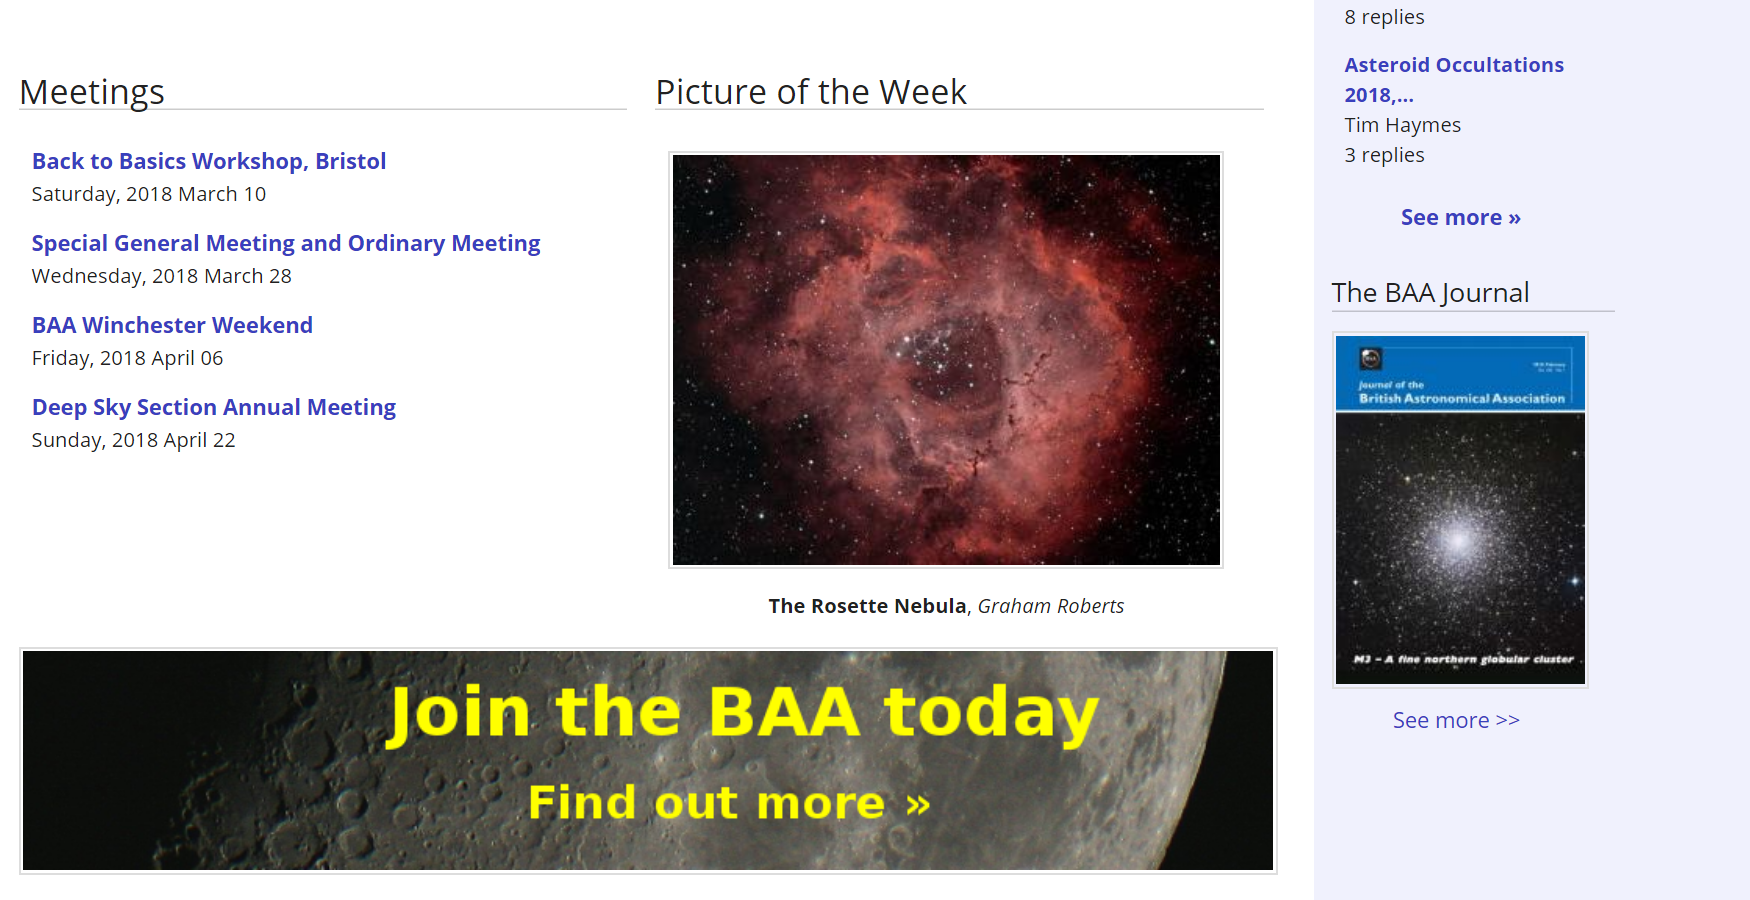
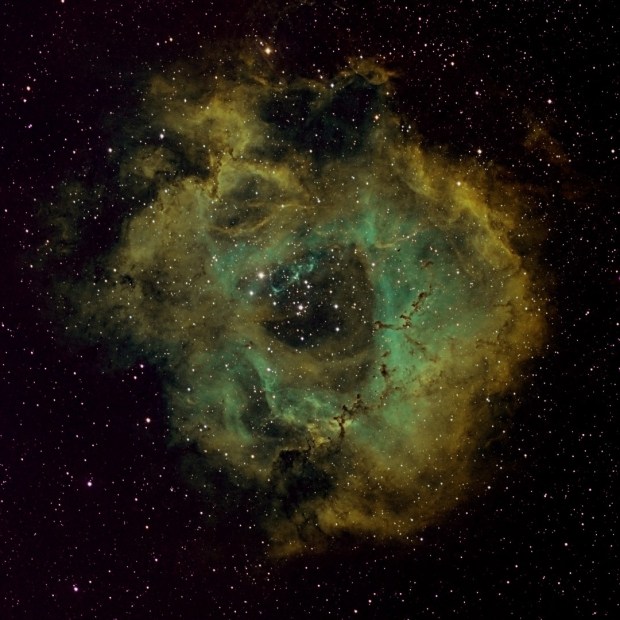
When the object is right, such as the Rosette Nebula, narrowband imaging using the ZWO camera produces exceptional results.  This is evident in these recent images where it’s now possible to clearly see structural elements of the nebula, as well as the star fields located within.  Frankly I am very excited by these new images and can’t wait for next year to come around again!

Postscript: Research at Leeds University just published suggests that the Rosette Nebula is a disc but I believe my eyes and this image and many others which says otherwise!

IMAGING DETAILS
Object Rosette Nebula     NGC 2244 + 2237, 2238, 2239 & 2246   
Constellation Monoceros
Distance 5,000 light-years
Size Approx. 100 light-years or 1.3o
Apparent Magnitude +9.0
 
Scope  William Optics GT81 + Focal Reducer FL 382mm  f4.72
Mount SW AZ-EQ6 GT + EQASCOM computer control
Guiding William Optics 50mm guide scope
  + Starlight Xpress Lodestar X2 guide camera & PHD2 control
Camera ZWO1600MM-Cool (mono)   CMOS sensor
  FOV 2.65o x 2.0o    Resolution 2.05”/pix   Max. image size 4,656 x 3,520 pix   
EFW ZWOx8 + ZWO LRGB & Ha OIII SII 7nm filters 
Capture & Processing Astro Photography Tool,  Deep Sky Stacker & Photoshop CS2
Exposures 12 x 300 sec Ha, 6 x 300 sec  OIII & SII  (Total time: 120 minutes)
  @ 139 Gain  21 Offset @ -20oC  
Calibration 5 x 300 sec Darks  20 x 1/4000 sec Bias  10 x Flats Ha, OIII & SII @ ADU 25,000  
Location & Darkness Fairvale Observatory – Redhill – Surrey – UK        Typically Bortle 5
Date & Time 9th February 2018 @ 22.00h


Antipodean Astronomy Adventures

IMG_9050 (Large)

I’ve recently returned from visiting family on an extended trip to Aotearoa – Maori for New Zealand – and whilst travelling around used the opportunity to learn something about astronomy in that part of the world (NZ Astro Directory).  Of course, the main difference Down Under is that it’s currently summer, plus everything in the night sky is upside down.

IMG_0003crop anotate

Topsy Turvy – everything’s in the wrong place ! Red arrow = Betelgeuse, Yellow arrow = Orion Nebula

It’s obvious really but relatively speaking the sky has not changed, you’re just  personally inverted compared to the Northern Hemisphere – which from the point of view of astronomy takes some getting used to when looking at otherwise familiar objects such as the Moon or Orion Constellation.  Although being their summer, at our principal location of latitude of 38o on North Island there was more than four hours of astronomical darkness even on the December solstice; viewed from the perspective of the Northern hemisphere, it is interesting to note that this is about the same latitude as Athens or the Korean DMZ!

Moon Man

It’s all about perspective – obvious really!

Although the weather was mostly very good, I was struck by how frequently the sky at night was cloudy – just like good old Blighty – it is after all also known as The Land of the Long White Cloud by the Maori.  Notwithstanding, as a country with only 4.85 million people most of the country is rural or even desolate, so that when the skies are clear the darkness and seeing conditions can be quite spectacular.  Viewing conditions are particularly good on South Island around the Lake Tekapo and Mt Cook district where a number of astronomy ventures are based, including the University of Canterbury’s Mt John Observatory – shown at the beginning of this blog.  For practical reasons I was restricted to taking only limited equipment – DSLR & lenses + Gorilla Pod & ball head + Vixen Polarie tracker + 10×50 binoculars – but was still able to obtain some pleasing images during the trip.

IMG_9081 (Large)

Mt Cook from near our campsite – the night sky here was fantastic

Early on it became evident that New Zealand seems to have all the right conditions required for the formation of lenticular clouds (altocumulus lenticularis).  I’m presuming this is related to its somewhat exposed position between the South Pacific Ocean and Tasman Sea, thus providing favourable wind and moisture conditions which are then influenced by the mountainous tectonic terrain that runs along the spine of South Island and the volcanic topography of North Island.  Whatever it is it works, providing really beautiful and often spectacular sights of these elusive and somewhat rare high altitude cloud phenomena.

IMG_9097 (Large)

Lenticular clouds south of Mt Cook – South Island 

IMG_9457 (Large)

Lenticular clouds near Te Awamutu – North Island 

Prior to arriving in New Zealand I tried unsuccessfully to link up with some local astronomy clubs.  However, close to our base near Te Awamutu on North Island I was able to visit the Te Awamutu Space Centre at nearby Kihikihi.

IMG_20180115_130500614

The Te Awamutu Space Centre – Kihikihi

Conceived and run by the enthusiastic Brit Dave Owen (well he wasn’t going to be a Kiwi was he?), the Centre is an eclectic and interesting collection of space, space programme, astronomy and related educational items (see below).

Essentially the Centre is an outreach programme, which would be of interest to anyone in general, young and old, as well as the seasoned astronomer.  I particularly found the area on New Zealand astronomy & astronomers, astronauts and the historical role of Maoris in astronomy very  interesting.

Pliades

Maori star names of Mataraki (Pleiades)

As we travelled the length and breadth of the country with the tantalising promise of some very dark skies, I was keen to view and image the Milky Way and particularly the Large and Small Magellanic Clouds, which are only visible from the Southern Hemisphere. Thwarted for a while by cloud cover I eventually got my first look at all these features whilst camping near the base of the 3,724 metre Mt Cook on South Island.  The sight did not disappoint but I was unfortunately unable to obtain any images on this occasion.

No worries (as they say in New Zealand – frequently!), a few nights later whilst camping at the improbably named Slab Hut Creek (site of old alluvial gold workings) west of the historic mining town of Reefton, I was at last able to image all these features.  Remotely situated in the middle of woods adjacent to the aforesaid gold creek, the night sky was inky black, albeit with some passing cloud from time-to-time.  Furthermore, located in the centre of the opening were two very large quartz boulders, which provided an ideal platform on which to set up the camera and Gorilla Pod.

IMG_9280 (Large)

A few tons of conveniently placed quartz helped imaging later in the night!

I didn’t get much sleep that night but it was a magical experience and I was thrilled to image both the Milky Way and Magellanic Clouds not individually but together.  As an added bonus we were also able to successfully undertake some gold panning during the day in the creek!

IMG_9244 (Large)

The Milky Way at Slab Hut Creek with the Large & Small Magellanic Clouds

IMG_9265 (Large)

Thereafter I was hindered for the next few weeks by Christmas events and the inevitable full moon at the start of January, though the ISS did pass directly overhead on one evening (New Zealand from the ISS).  However, 10-days later back on North Island at our cottage in the Waipa district, I was eventually able to view and image once again the wonderful sight of the Milky Way + Magellanic Clouds + Southern Cross at the same time – sky chart and image below.

Ohaupo Sky

IMG_9984 (Large)

From our base on North Island: The Milky Way & Magellanic Clouds (right) + Southern Cross just above the left-hand side of the roof line 

When the conditions are right the night sky in New Zealand is truly outstanding. I would have liked to spend time there with the full astronomy set-up and camera that I use in the UK but for now I was very pleased to experience and enjoy Antipodean astronomy, it really is worth the long journey.