Reflections is a summary of my astronomy and astrophotography during the past year, plus some thoughts about what might happen in going forwards. In some ways it’s a bit of a chore to compile but as it provides me with some perspective on what I’ve achieved year-to-year, I do find it to be a worthwhile exercise.
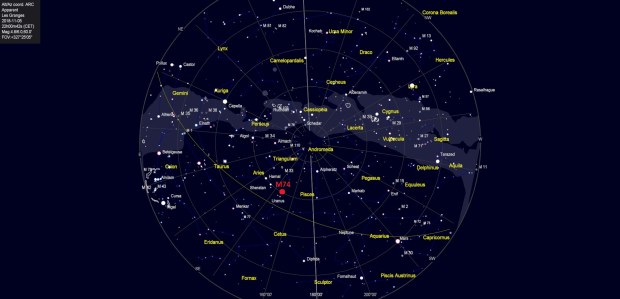
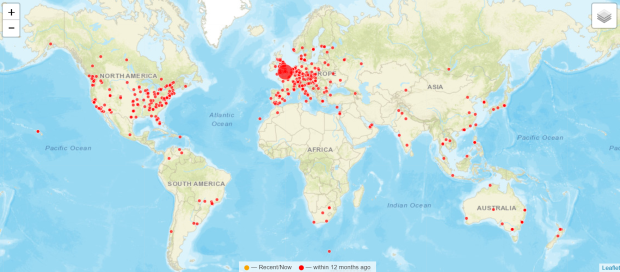
Watch This Space (Man) started in 2015 as a personal record of my astronomy journey. Notwithstanding, the blog has so far attracted 15,000 views from all over the world, including various locations in 64 countries over the past year (see map below for visitors in 2018). I do like to hear from anybody out there – comments, questions, help or just to say hello – and can be contacted via details in the ABOUT menu section or alternatively just leave a comment on any item if you prefer.
I’m always tinkering with the website where apart from the main blog, there are also links to other astrophotographers, astronomy tools, astronomy weather, scientific papers etc., so even if you’re a regular visitor please take a look around from time-to-time. Looking back I see I did not file any reports this year under the new Astrobites section, on the other hand look out for more notable occasional image that now appears in the right-hand column under the heading Screenshot, which this year included: the Eskimo Nebula, Jupiter, the Moon & Jupiter in conjunction and Venus etc.
Whilst there is a photo gallery of my work, for a more summary view of some of my better images there’s a FLICKR album link which is accessible from the GALLERY menu. Following the change to mono imaging techniques in 2017, for reference each image is now accompanied by a detailed tabulation of the technical information; personally I find this information invaluable when looking at other astrophotographer’s images as a guide to settings and issues when imaging the same object myself for the first time.

Overview, Images & Goals for 2019
Since getting to grips with autoguiding in 2017, I’m pleased to say all the basic processes worked well throughout 2018, resulting in a marked improvement of individual image subs. Long imaging times are difficult to achieve in the UK with poor skies being the norm but the successful adoption of Plate Solving this year marked a very significant breakthrough and holds great promise for ever longer integration times in the future. Re-configuring the equipment and operating set-up in 2017 now enables operating from indoors most of the time, which apart from improving working conditions, has also made operating itself much more efficient.
I’m especially pleased that after more than 4-years astrophotography I finally manged to establish a new imaging location at the bottom of the garden this year, thereby for the first time enabling imaging of the north sky, literally opening up a new world! For another perspective I was also fortunate to experience some excellent night skies in New Zealand, France and Cornwall during the year, which was great fun and led to some excellent images too (see 2018 CHRONICLE later in this blog).
Favourite Images
Apart from the odd DSLR shot of the night sky, my astrophotography at Fairvale Observatory in 2018 was entirely carried out with the ZWO1600MM-Cool mono CMOS sensor camera & EFW, combined with the William Optics GT81 scope, in both narrowband and broadband wavelengths. The new camera has in every sense been a game changer and a lot more work but, in my opinion, the images this year show substantial improvement. I also made progress using more complex processing techniques in Photoshop and improved colour and detail by combining Ha with LRGB or adding RGB and narrowband wavelengths. With these advances I submitted a number of images to the British Astronomical Association which, I’m pleased to say, were chosen for publication on their website at various times throughout the year (see Astroimaging Record 2018 at end of blog for details).
A few of my personal favourites are shown below, in no particular order:
M74 Phantom Galaxy (HaLRGB)
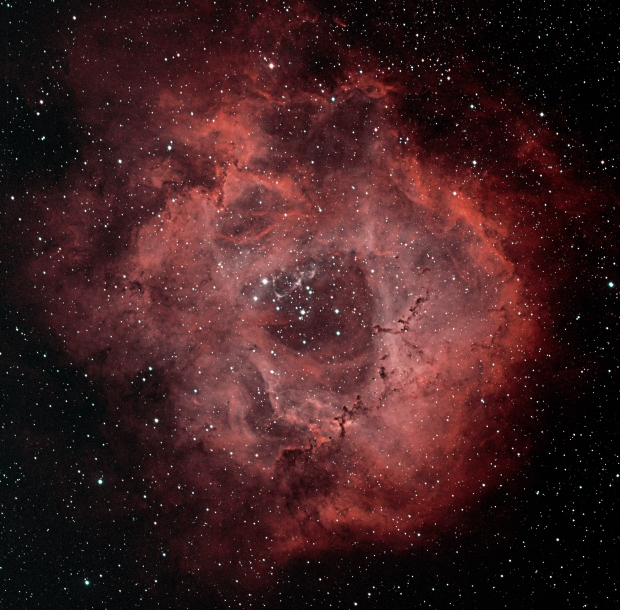
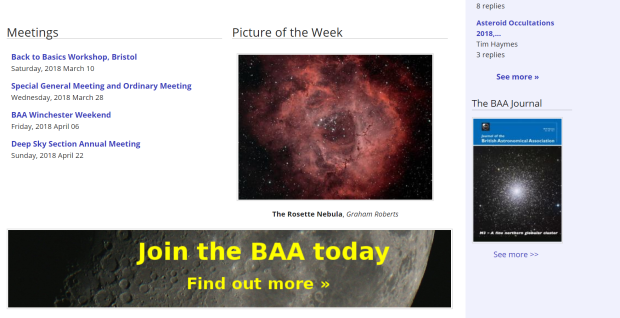
Rosette Nebula (HaOO)
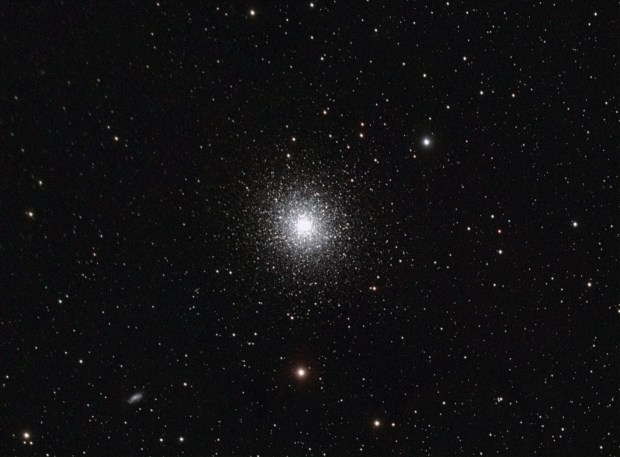
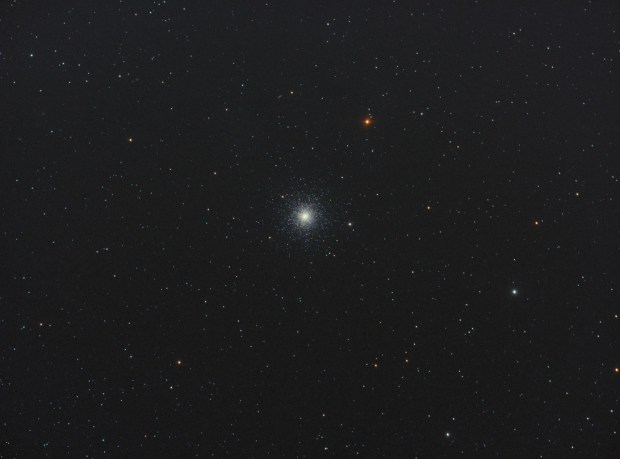
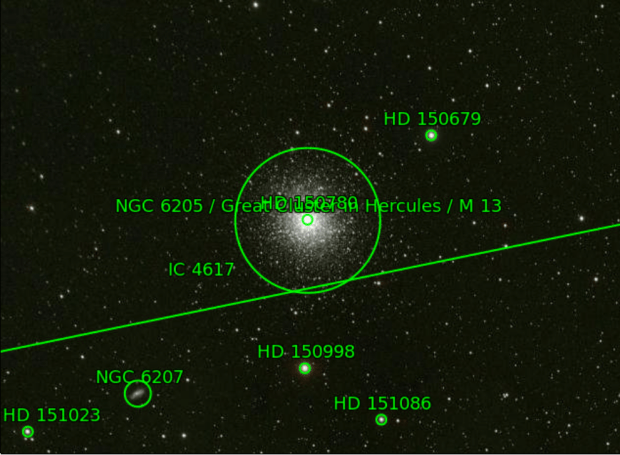
M13 Great Globular Cluster of Hercules (LRGB)

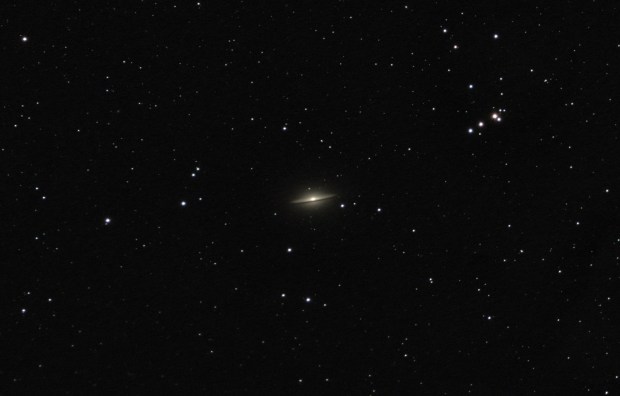
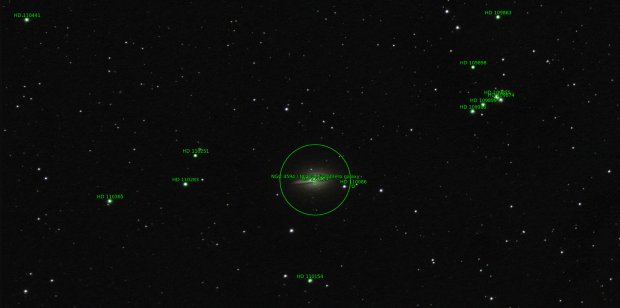
M104 Sombrero Galaxy (LRGB)
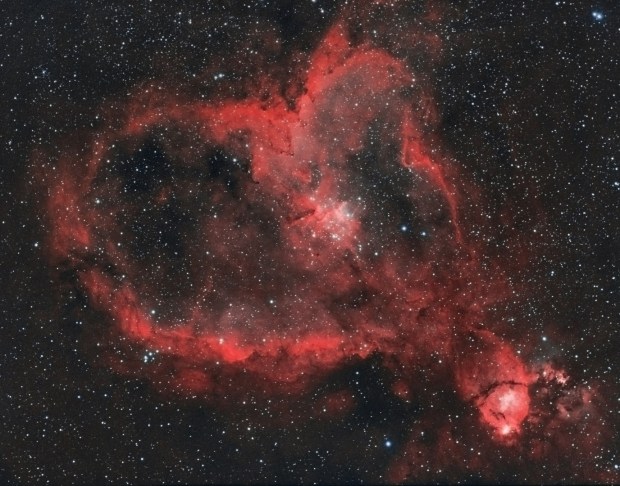
Heart Nebula (HaOO)
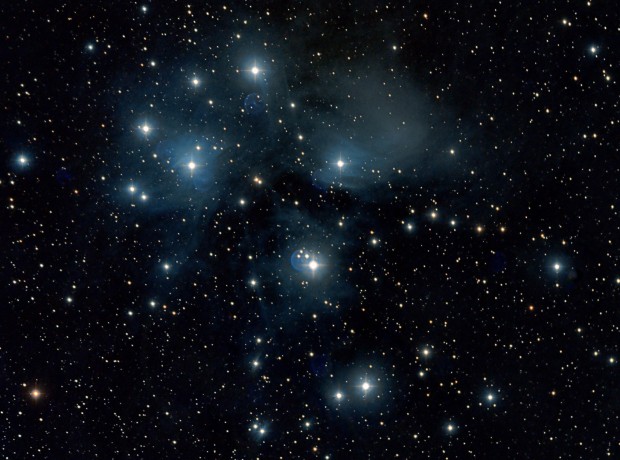
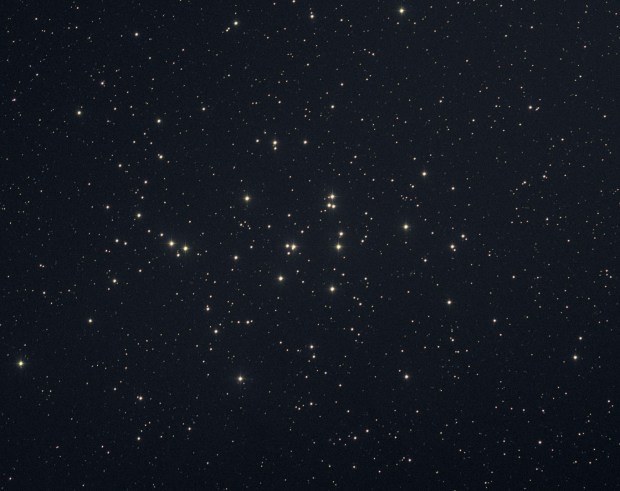
M45 Pleiades (LRGB)
| RECORD CARD – 2018 |
| Goal |
Specifics / Results |
Outcome |
| Improve broadband and narrowband imaging
|
Improved understanding and use of the ZWO1600MM-Cool mono camera leading to better subs. Major breakthrough with Plate Solving enabling a significant increase in image integration times and overall quality. |
MUCH BETTER
|
| Improve processing |
Continuing to make improvements and achieving noticeably better narrowband images but with more work to do in broadband. Much greater use of various Photoshop techniques is improving detail, colours and final quality. |
BETTER
|
| Expand & Improve Widefield Imaging |
Despite some good images of the Milky Way in the UK and NZ I barely used the Vixen Polarie tracking mount and did not make it to any dark sky sites in the UK. |
FAILED
|
I think it helps to set new goals each year, so here goes for 2019:
- Imaging: (i) There’s lots of scope to improve imaging techniques but probably most of all I now need to improve guiding quality and then increase exposure and image integration times further. (ii) Start mosaic imaging using Plate Solving.
- Improve processing: Despite progress, I expect this will continue to be a major challenge for some time to come. Working with Olly Penrice in France and using Steve Richards’ new book Dark Art or Magic Bullet provided lots of opportunities to learn more but I’m still considering a move to new software for pre- and post-processing – we shall see.
- Other: (i) Widefield imaging – Since acquiring the Vixen Polarie two years ago I’ve done little more than dabble in the occasional night sky shot. Maybe just set my sights lower this year and just see what happens! (ii) Do more observing – I had been thinking of getting something bigger like a Dob for observing whilst imaging is underway but frankly now thinking just do a bit more when I can with what I’ve got. (iii) Notwithstanding weather issues at Les Granges observatory in France, get back to at least one good dark sky site next year.
I’m very pleased to say 2018 was again very good year for astrophotography, almost certainly my best yet, which was especially defined by two positive developments that are already transforming my astrophotography and hold further promise in 2019 (I said the same last year but it’s true):
- Starting to Plate Solve has opened up whole new possibilities, in particular: Meridian flips and multiple imaging over different nights; Mosaic imaging.
- Fairvale Observatory South – The ability to see and image the north sky from the new location expands imaging possibilities very significantly – should have done it sooner.
You can’t ask for more than that and hope that WTSM’s Reflections 2019 will record further such success.
Watch this space!

2018 CHRONICLE
Below is a quarter by quarter summary of my astronomy and astrophotography for the year 2018, followed by an imaging record. It’s interesting but not surprising that I recorded about 50% less objects than in the previous year but, as explained, integration times have increased markedly – “never mind the width, feel the quality”!
JANUARY TO MARCH
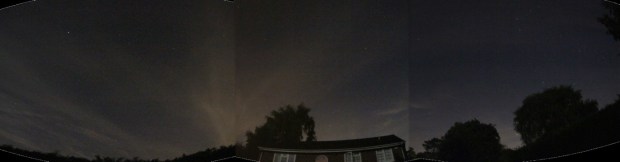
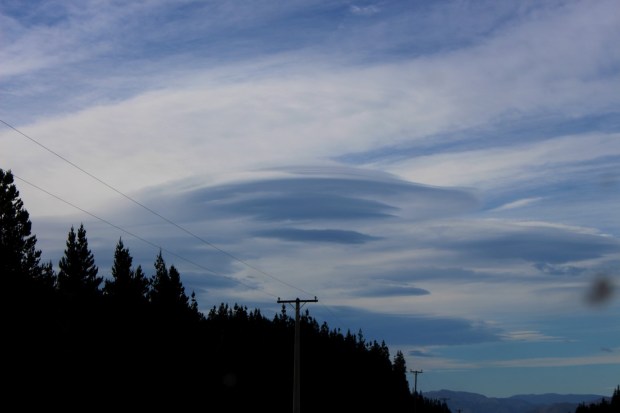
The year started with a new perspective on astronomy – upside down! A six week trip to New Zealand over the Christmas period produced some wonderful views of the night sky in the Southern Hemisphere. Using my basic DSLR and a GorillaPod, I was able to obtain some good images of the Milky Way, accompanied by the Large and Small Magellanic Clouds, which are unseen in the Northern Hemisphere. New Zealand’s weather conditions and terrain also produced opportunities to see various noctilucent cloud formations, particularly on South Island (below).
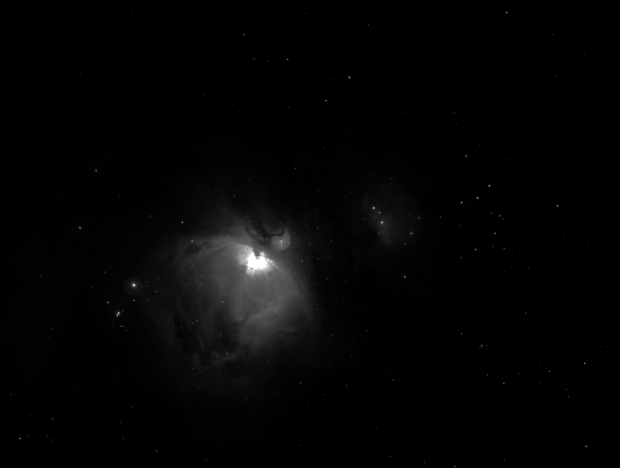
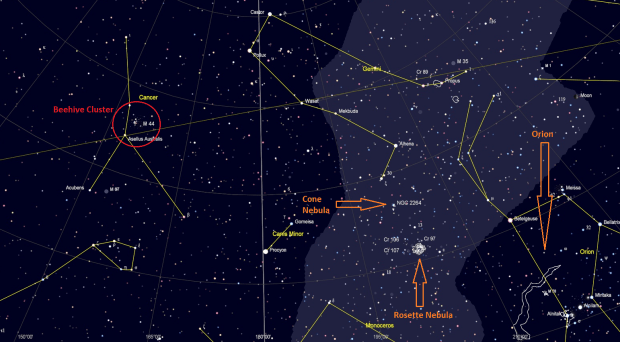
Being Down Under for much of January I was unable to start astroimaging until February but it was worth the wait, which resulted in an excellent narrowband image of the Rosette Nebula with which to start the year . From the experience and advice gained in 2017, in narrowband I now tend to stretch each Ha-OII-SII wavelength more aggressively prior to post-processing and, as a result, obtain better detail and contrast. In this case the resulting HaOO version of the Rosette (see Favourite Images section above) was particularly good and for the first time was included on the British Astronomy Association’s website 🙂
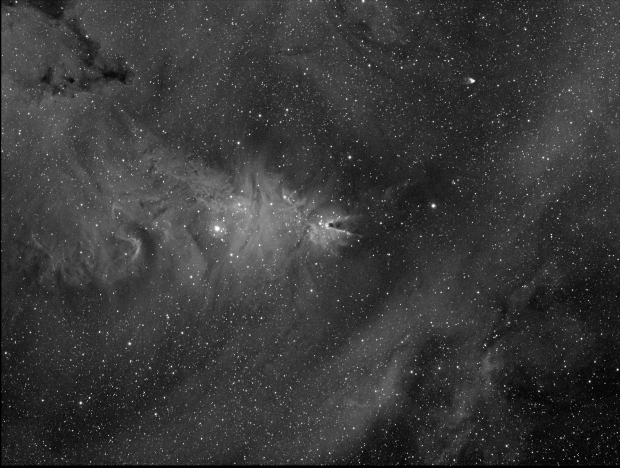
Since obtaining the ZWO1600MM-Cool mono camera narrowband imaging has been nothing less than a revelation to me. Whilst tone mapping using the Hubble Palette produces quite spectacular and colourful results, applying the aforementioned stretching to the just the stacked Ha-wavelength subs can often result in equally exciting black and white (grey) images which show exquisite detail. One such image taken in March was the Cone Nebula, which showed the more extensive nature of the HII-region as well as the Cone and Fox Fur Nebulae (below).
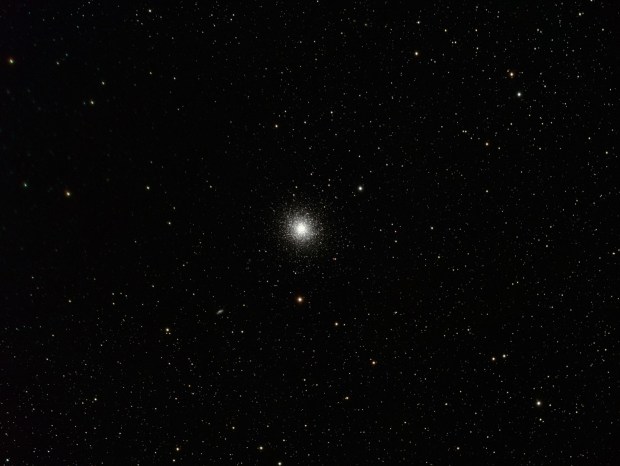
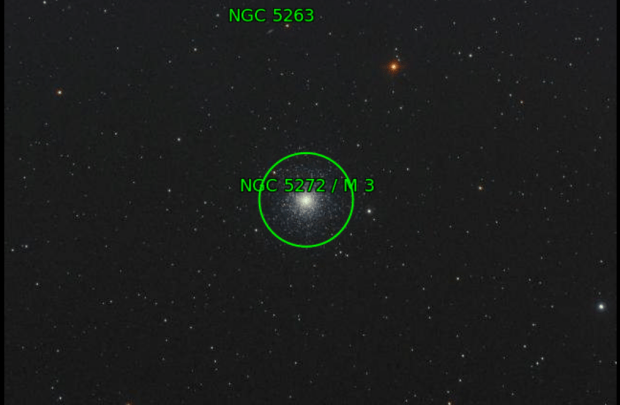
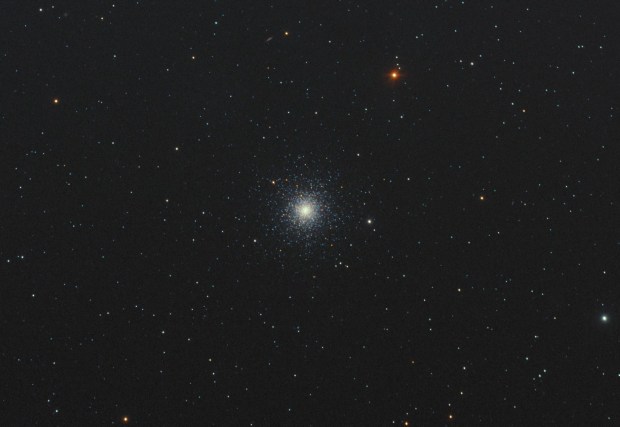
With the passing of winter’s narrowband targets by the end of February, I moved on to broadband imaging in March. Of all the DSO features, I am perhaps most fascinated by globular clusters but had previously obtained mixed results with a DSLR camera. Using the CMOS based ZWO1600 mono camera, I was now able to obtain much noticeably better colour and detail of these exciting but enigmatic objects (see Favourite Images section for M13 & below for M3).
I can be put-off by some of the more technical requirements associated with astrophotography and, I‘m ashamed to say, that my approach is first to – ignore it, then maybe undertake some research but do nothing, then consciously put it off again and then, when there’s absolutely no alternative – give it a try. I am not a technophobe, quite the opposite, but often find technology and the people who design and write about it unclear to the point of making no sense sometimes or at least misleading; it seems somewhat paradoxical that I even got onto astrophotography given these issues! Notwithstanding, when I eventually summon the courage to tackle such problems, almost always I get it to work, eventually. Such has been the case with Plate Solving this year.
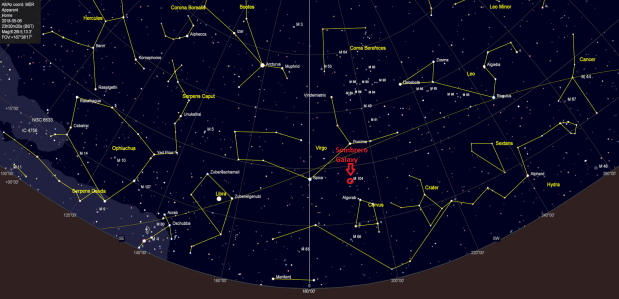
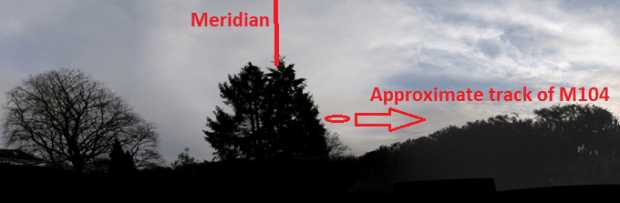
With sight lines limited by houses, hedges and tall trees to the east, south and west, I’ve hitherto had to make do with average imaging windows of up to 2-hours, either to the east or west of the Meridian and depending on the object’s declination – a lower levels the Meridian view is itself hidden by two tall trees, obscuring up to 30o vertically and 10o either side. Naturally these constraints limit the image integration times severely, with an inevitable impact on the quality of images, notably with higher noise, less colour and detail. The answer of course is plate solving and during February this year I finally bit the proverbial bullet.
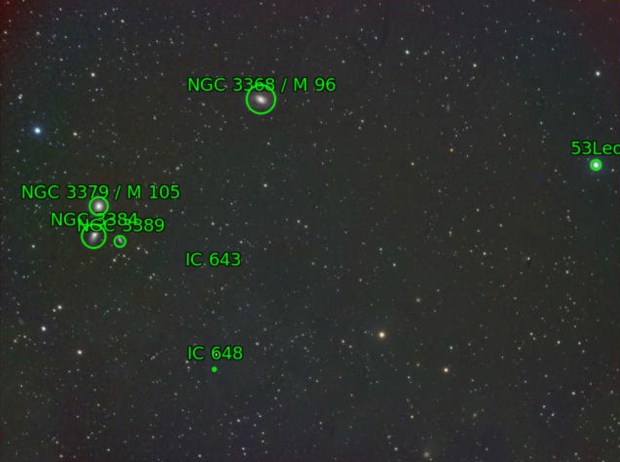
Since changing to the ZWO 1600MM-Cool camera I have used Astro Photography Tool (APT) for image capture and camera control, with great success. The software is quite comprehensive and it is excellent to use, though like most software can be a little idiosyncratic in places. This is the point where I either give-up, try other software or, as is the case with APT, turn to their excellent product Forum. Armed with the APT manual and answers from the Forum, I soon managed to plate solve and obtain images of the Leo Triplet over two consecutive nights, which subsequently aligned and stacked well – at last!
APRIL TO JUNE
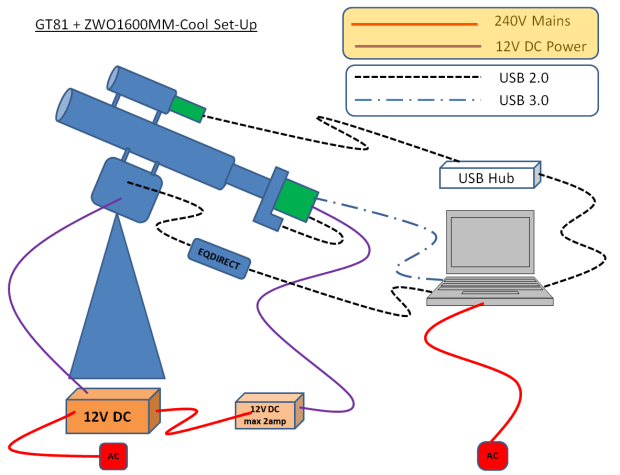
For the past year or more I’d been thinking about the possibility of moving the observatory to the end of the back garden during the spring and summer period, so as to provide a platform from which to view the northern sky, which as previously mentioned is otherwise completely obscured by my house. The principal issue was how to operate the equipment some 30-metres away? From the experience of others it seemed that both WiFi and Bluetooth can have big reliability issues and I am always keen to keep it simple, so for now I chose to try and use a long ethernet cable to link the operating / capture computer with a control computer indoors.
I had intended to set-up on the lawn but after I had recently extended the paving around a nearby shed in the corner of the garden, cut back some of the bushes and cleared out the shed it, was obvious that this was a preferable location; the paved base was more stable and provided a dry foundation on which to work but, furthermore, the adjacent shed could house the operating computer. Despite successful tests indoors using an ethernet cable between the two computers and Teamviewer software, only when the equipment was set-up in position outside did I finally discover it no longer worked; I still don’t know why and the problem remains work in progress (when I can be bothered to look at it again).

The Shed & equipment set-up

Working inside The Shed
Notwithstanding, it was obvious that I could instead comfortably operate the mount and camera myself from the shed and duly set about establishing what has now become Fairvale Observatory South or the Shed Observatory (see photos above); the principal observatory location by the house now becomes Fairvale Observatory North or Patio Observatory. Having established myself at the end of the garden with a not unreasonable view of the north sky over the roof of my house, I eagerly set about imaging some northern classics over the next few months. Imaging in both narrowband and broadband I was pleased to obtain decent pictures of the Bode & Cigar galaxies and the Elephant’s Trunk Nebula before taking a break in June and July when there’s no astronomical darkness; I have imaged at this time of the year before but it’s sometimes good to take a break.
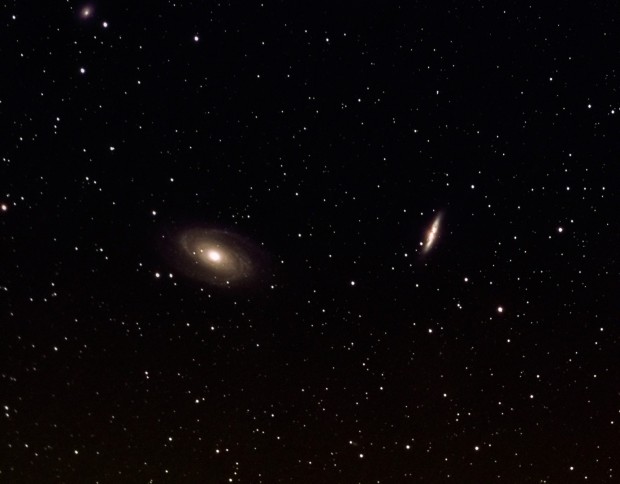
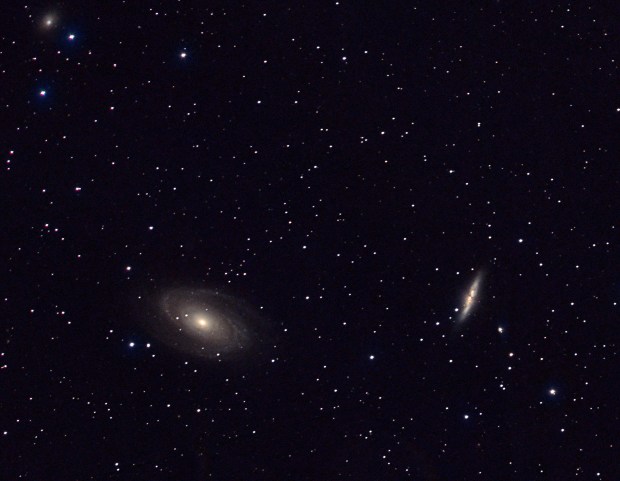
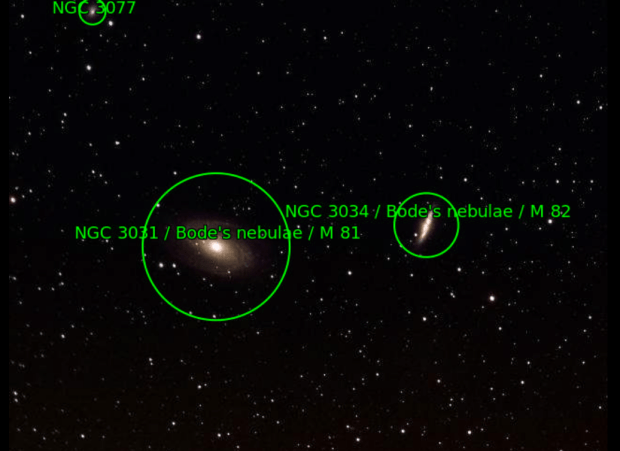
My very first image of the northern sky M81 Bode & M82 Cigar Galaxies (LRGB)
Now I know the observatory works from this location, I plan to move there sooner in 2019 in order to spend more time with new set-up, hopefully improving on the aforementioned objects as well as trying new ones. All-in-all the new location was a big success as well as being great fun. Strangely I was surprised to find that the experience of guiding could be more demanding in the north sky but of course thinking about it more, as the views essentially centre on Polaris on which RA lines converge the tracking needs to be more extreme in order to move the same angular distance when compared to a southward view. However, anxious not to upset the established settings too much, my set-up was shoddy and, as a result, guiding error was generally poor from this locality. Next time I’ll pay more attention to this and hopefully achieve better guiding and subs.
JULY TO SEPTEMBER
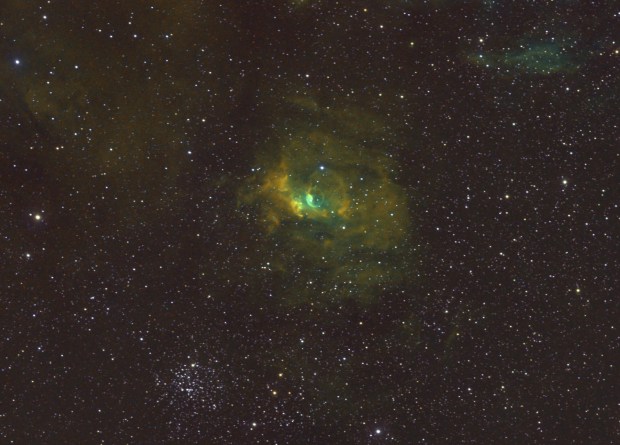
After a break of nearly 8-weeks I was eager to get back to the ‘new’ observatory at the bottom of the garden. Furthermore, much of the summer through into September was dominated by a heatwave which was accompanied by clear skies, night after night! As a result I was able to get some very encouraging results of the Heart (see Favourite Images section above) and Soul Nebulae and finally, to my surprise, the unusual Bubble Nebula (see image below).
OCTOBER TO DECEMBER
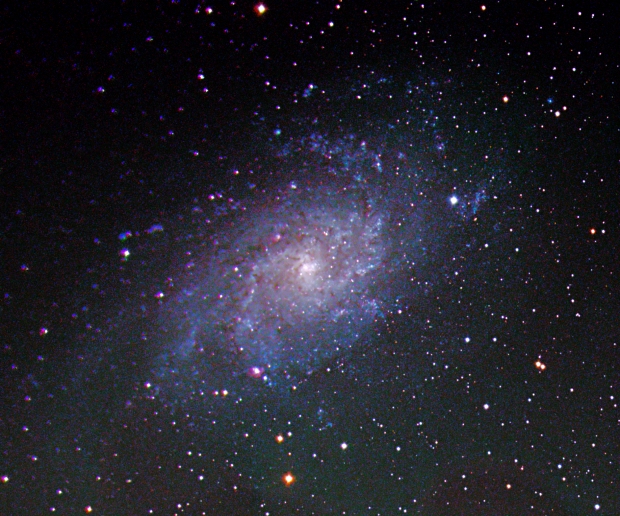
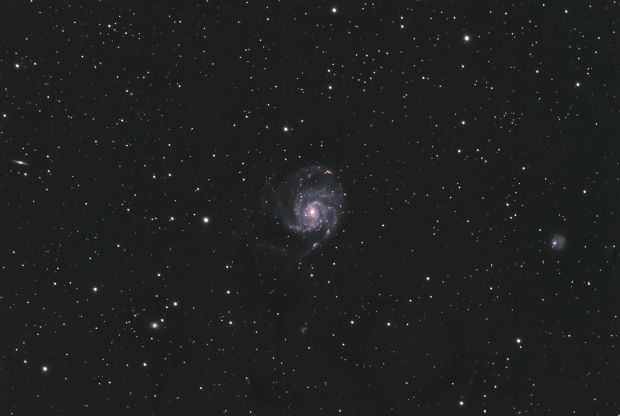
Needless to say, once back at Fairvale Observatory North the clouds rolled in and, furthermore, suitable objects for my equipment are initially sparse at this time of the year. Since obtaining the ZWO1600MM-Cool camera I’ve concentrated on nebulae and narrowband imaging. Though I’ve managed a few decent LRGB images, it’s fair to say that there’s room for improvement here and therefore finished the year on M33 the Triangulum Galaxy (see below) and subsequently M45 the Pleiades. Despite being a good size for my scope it’s become clear to me that M33 is actually a tricky object and I was not satisfied with the final image – again better guiding and longer integration next time will almost certainly help. However, Pleiades subsequently came out well (see Favourite Images section above) but the delicate interplay of the blue star light and interstellar dust does require careful post-processing.
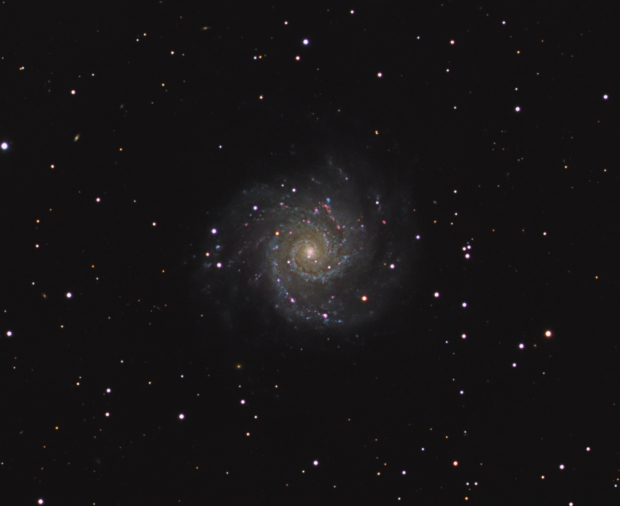
As it was my birthday and it’s been something of an overdue trip since first conceived in 2015, I travelled to Olly Penrice’s Les Granges Observatory at the beginning of November. It’s a great set-up and Olly was a real pleasure to work and learn from. As a somewhat remote location in the Hautes-Alpes region of Provence, when it’s clear the SQM values at Les Granges can exceed 22 and for the first two nights we were able to image M74 the Phantom galaxy in HaLRGB under such conditions using his TEC 140, though following some rain during the day seeing conditions were mixed on the first night.
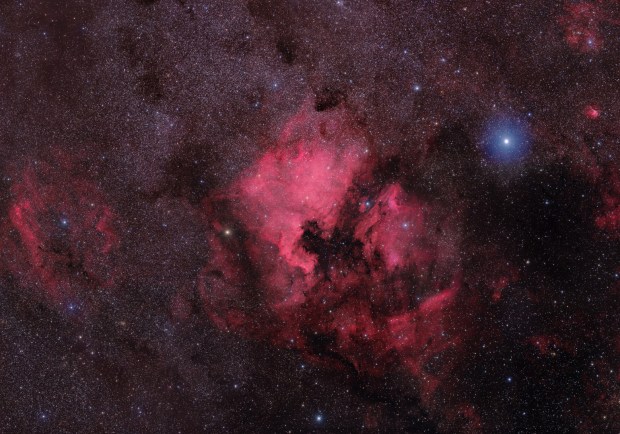
Unfortunately the clouds had followed me from the UK and for the rest of the time there we were unable to image, though it did allow me to spend some useful and enjoyable time processing with Olly. Other than processing the M74 image and learning some new techniques, using data previously acquired by Olly and with his help, I was able to compile a wonderful 9-panel HaLRGB widefield mosaic image of the North America Nebula and surrounding region (see above).
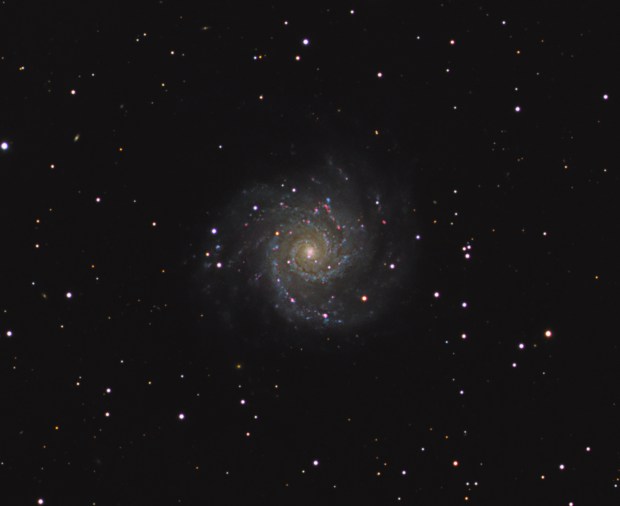
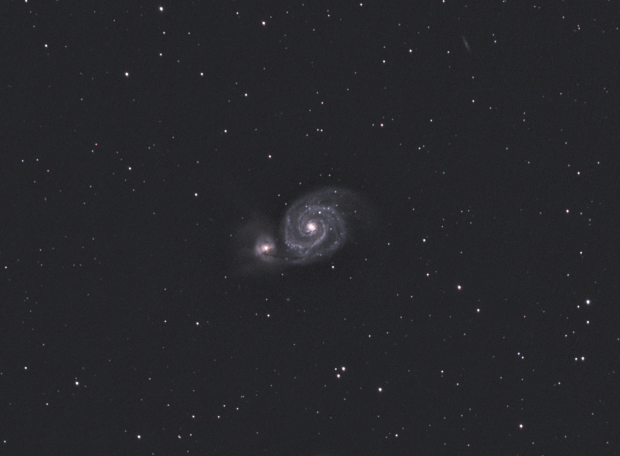
Notwithstanding the mixed weather conditions, I was able to obtain my first good, face-on image of a spiral galaxy (see Favourite Images section above), which with some additional subs from Olly’s previous sessions using an 14″ ODK scope turned into a truly spectacular image (see below) of this less than popular object.

ASTROIMAGING RECORD 2018
| No |
Date |
Type |
Object |
Name |
| 1 |
Jan 2018 |
DSLR |
New Zealand
|
Milky Way, Lenticular Clouds etc. |
| 2 |
09/02/18 |
NB |
NGC 2244 |
Rosette Nebula |
| |
|
|
|
|
| 3 |
11/02/18 |
NB |
NGC 2264 |
Cone Nebula |
| |
|
|
|
|
| 4 |
11/02/18 |
BB |
M44 |
Beehive Cluster |
| |
|
|
|
|
| 5 |
11/02/18 |
NB |
Abell 21 |
Medusa Nebula |
| |
|
|
|
|
| 6 |
11/02/18 |
BB |
NGC 2392 |
Eskimo Nebula |
| |
|
|
|
|
| 7 |
24/02/18 |
NB |
IC 405 |
Flaming Star Nebula |
| |
|
|
|
|
| 8 |
24/02/18 |
BB |
Moon |
|
| |
|
|
|
|
| 9 |
19/04/18 |
BB |
M65 + M66 |
Leo Triplet |
| |
|
|
|
|
| 10 |
05/05/18 |
BB |
M3 |
Globular Cluster |
| |
|
|
|
|
| 11 |
06/05/18 |
BB |
M104 |
Sombrero Galaxy |
| |
|
|
|
|
| 12 |
06/05/18 |
BB |
M13 |
Globular Cluster |
| |
|
|
|
|
| 13 |
18/05/18 * |
BB |
M81 & M82 |
Bodes & Cigar Galaxies |
| |
|
|
|
|
| 14 |
20/05/18 |
NB |
NGC 7822 |
Nebula |
| |
|
|
|
|
| 15 |
22/05/18 |
NB |
IC 1396 |
Elephant’s Trunk Nebula |
| |
|
|
|
|
| 17 |
16/08/18 * |
NB |
IC 1805 |
Heart Nebula |
| |
|
|
|
|
| 18 |
02/09/18 |
NB |
IC 1848 |
Soul Nebula |
| |
|
|
|
|
| 19 |
03/09/18 |
NB |
NGC 7635 |
Bubble Nebula |
| |
|
|
|
|
| 20 |
09/10/18 |
BB |
M33 |
Triangulum Galaxy |
| |
|
|
|
|
| 21 |
28/10/18 |
BB |
M33 |
Triangulum Galaxy |
| |
|
|
|
|
| 22 |
2/11/18 |
BB |
M74 |
Phantom Galaxy |
| |
|
|
|
|
| 23 |
17/11/18 |
BB |
M45 |
Pleiades |
| |
|
|
|
|
| 24 |
18/11/18 |
BB |
IC 2118 |
Witch’s Head Nebula |
| |
|
|
|
|
*multiple evenings Underlined = BAA published


")
")