A Wider Perspective

I like to think and operate at both ends of the spectrum: sometimes considering detail and its implications and often exquisite beauty, whilst on the other hand taking a wider view will often provide broader insight and answers – notwithstanding, I am usually drawn towards the latter.  There was no shortage of scope for such thoughts in my career as a geologist and now as my hobby in astronomy.  I have become fascinated with parts of the Universe and captivated by imaging them: galaxies, nebulae, star cluster etc. but the wider view is often even more astounding and perplexing.
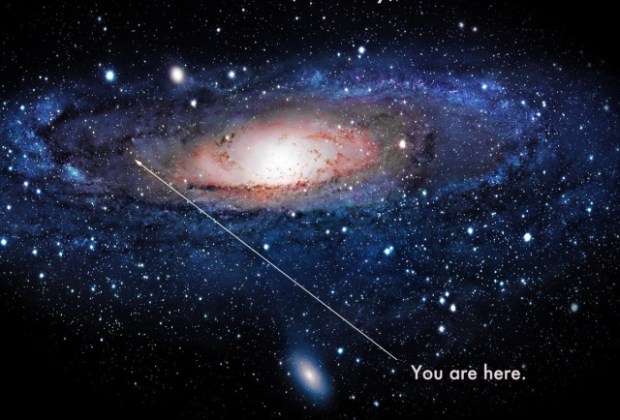
you-are-here-2

My nascent astroimaging has already produced some rewarding photographs, which using the fast William Optics GT81 refractor has enabled me to obtain images of up to 3o FOV. In fact this became something of a theme last year, successfully imaging features such as the Sadr Region and as they say, one thing has led to another.  Wanting to image even wider views there’s mostly only one alternative, using a camera and lens.  I’ve tried this before, on a tripod and fixed to the ALT-AZ EQ6 mount but with mixed success.  Meanwhile, I came across excellent pictures taken using lightweight tracking mounts on a tripod and as a result the way forwards became obvious; after scanning the Classified advertisements online for a while I was fortunate to find and purchase a second-hand Vixen Polarie mount last September.

Probably my favourite object, which can rightly be considered the signature image of the winter night sky and is therefore around at the moment, is the constellation of Orion and especially its numerous and often exciting constituent parts: M42, Horsehead & Flame Nebulae etc.  After waiting for weeks for the clouds to clear, I briefly got a chance to image Orion using the Vixen Polarie early in November, whilst at the same time using the WO GT81 to obtain yet another picture of the irresistible Great Orion Nebula M42. 

Picture saved with settings embedded.

Orion’s Sword – including the wonderful Great Orion Nebula M42 et al : WO GT81 + modded Canon 550D & FF | 14 x 180 secs @ ISO 1,600 | 9th November 2015

The Vixen Polarie is a deceivingly simple and well-made solution to obtaining long exposure images of the wider night sky using a camera and lens.  As stability remains essential for the mount and camera to operate at their best, I also purchased a decent Manfrotto tripod and suitable ball heads to attach the Polarie.  After that it was simple, well not quite! Trying out the Polarie at the same time as using the GT81 and being first time out was a mistake.  I fumbled setting up the equipment and initially even forgot to turn on the tracking, leaving only a short time to grab a few images before the clouds rolled in once again!  Not surprisingly the results were mixed and I was left frustrated.  With continuing poor seeing conditions, it was to be a further month before I had an opportunity to properly use the Vixen Polarie again – this time with a new Sigma 10 – 20 mm ultra-wide angle lens I had just purchased.
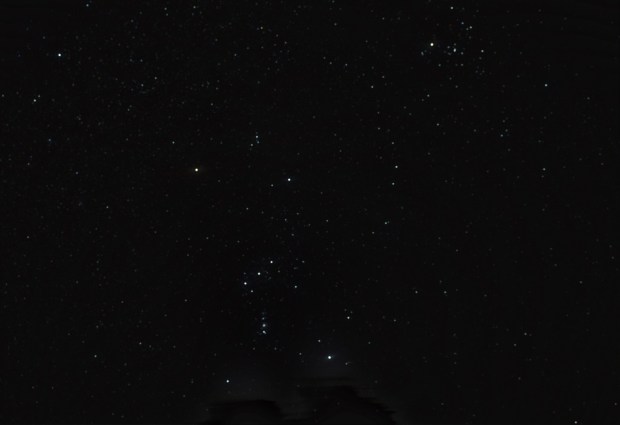
Picture saved with settings embedded.

Vixen Polarie & Canon 700D + 18 – 55mm lens | 19 x 60 secs @ ISO 800 | 9th November 2015

Having by now spent more time looking at the manual (we all get there, in the end) and concentrating on imaging using only the Polarie, this time I was able to achieve a good set-up and remembered the correct sequence of operation.  As the mount sits high on the tripod I am just about able to see Polaris in a small gap between the roof of my garage and house, something hitherto impossible when using the lower positioned AZ-EQ6 mount.  As a result I am able to achieve a reasonably good visual polar alignment, though a polar scope made specifically for the Vixen Polarie would improve this further; probably something for another time?  Nevertheless, such an alignment at Fairvale Observatory is a first and was a major breakthrough that has already permitted exposures of 4 minutes and could probably go to 5 to 6 minutes or more.
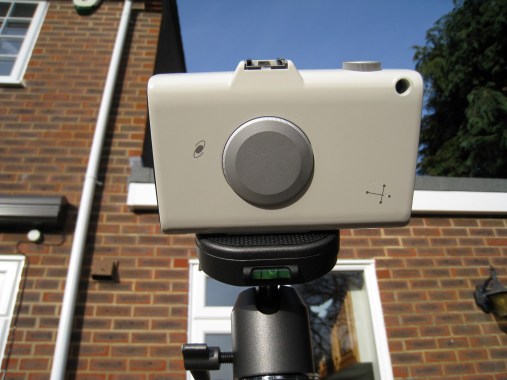
IMG_2135 (Large)

The high position of the Vixen Polarie on the tripod provides an otherwise elusive view of Polaris between the garage / utility room and the main house for polar alignment, at last! Alignment of the mount is carried out by viewing through the hole in the top right of the Polarie – better alignment can be achieved by using a polar scope which fits through the middle of the Polarie mount.

Once polar aligned, fixed on the front of the Vixen Polarie the camera then rotates to follow the celestial sphere and chosen object in order to achieve a sharp image with long exposures.  For this purpose there are 4 tracking rates: sidereal, half sidereal, lunar and solar.  With no interesting foreground here I concentrated on the sky by using the sidereal rate; for more scenic shots with the landscape incorporated, using half-sidereal provides a compromise in order to achieve a non-blurred image of the sky and landscape, though this method is inevitably limited to shorter exposures than sidereal.
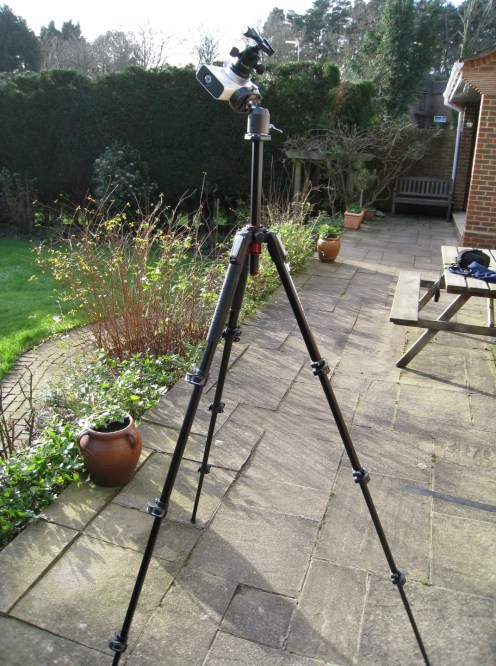
IMG_2124 (Large)

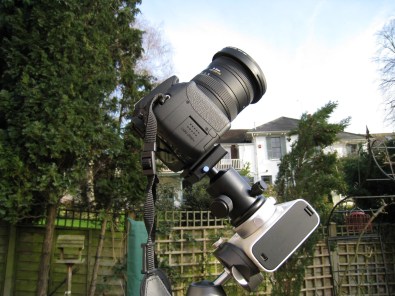
Vixen Polarie mount on Manfrotto tripod – a lightweight, portable tracking method for widefield astroimaging
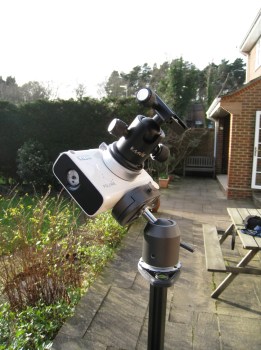
IMG_2125 (Large)

Vixen Polarie – close-up showing x2 ball head fittings
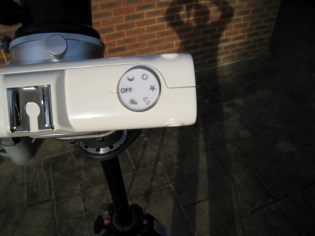
IMG_2131 (Large)

Vixen Polarie – tracking speed settings
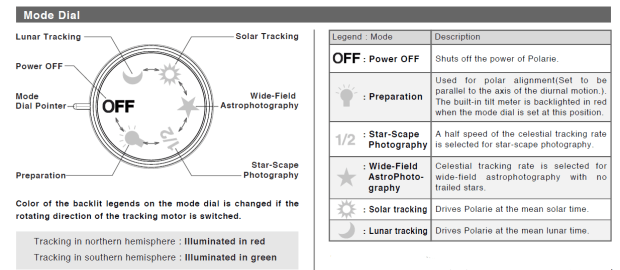
VP Dial

IMG_2136 (Large)

Vixen Polarie with DSLR attached & ultra-wide lens

I have adapted a somewhat basic red dot finder to fit on top of the DSLR camera using the hot shoe, which was immediately helpful to accurately locate the desired target area.  However, as previously experienced, once again achieving focus proved quite difficult, basically requiring just trial and error; I intend to look into a more efficient method but in the absence of a Bahtinov mask this is likely to be the best technique for now.  A laptop can be used for image capture but maintaining the themes of portability and simplicity, I successfully used an intervalometer to control exposures.

Whilst initially my target was the Orion constellation, I’ve long held the ambition to image Barnard’s Loop, a much larger and elusive feature surrounding the constellation and more difficult to photograph.  I had tried this before last January with limited success but ever since acquiring the Vixen Polarie this has been my No1 imaging goal.
Orion Constellation 220115 Stacked1L2C3GX (Large)

The Orion Constellation & Barnard’s Loop (up / north is left) : AZ-EQ6 Mount + Canon 550D & 200mm Telephoto | 180 secs @ ISO 1,600 & calibration | 22nd January 2015

Unable to see with the naked eye, only using long exposure photography unveils the majesty of Barnard’s Loop, an emission nebula to the left (east) of the Orion constellation. Shaped as a large-C, the loop completely encompasses the eastern side of the constellation and is thought to be a recent supernova front moving out from Orion and illuminated by stars from within the nebula, as well as part of the Orion Molecular Cloud Complex.  Discovered and named after astrophotographer E. E. Barnard in 1895, at some 14o or 300 million light-years across Barnard’s Loop is enormous; however, the entire Molecular Cloud is about 30o in size!
pleyades31_02

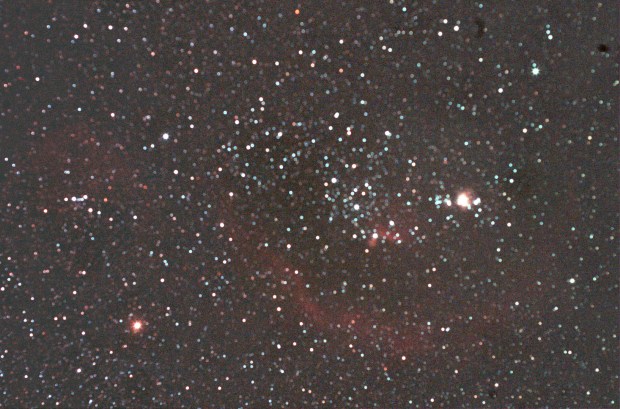
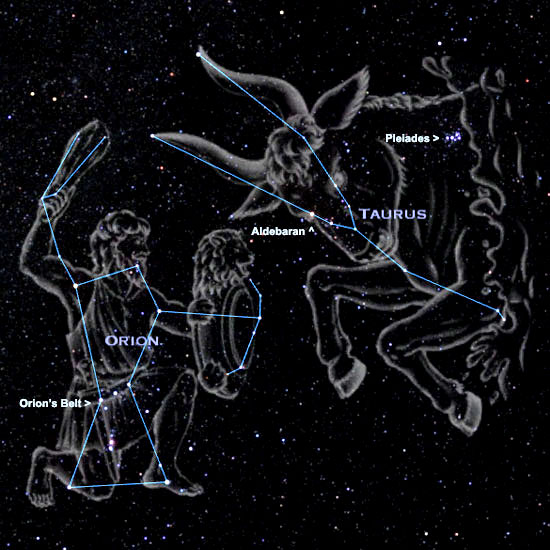
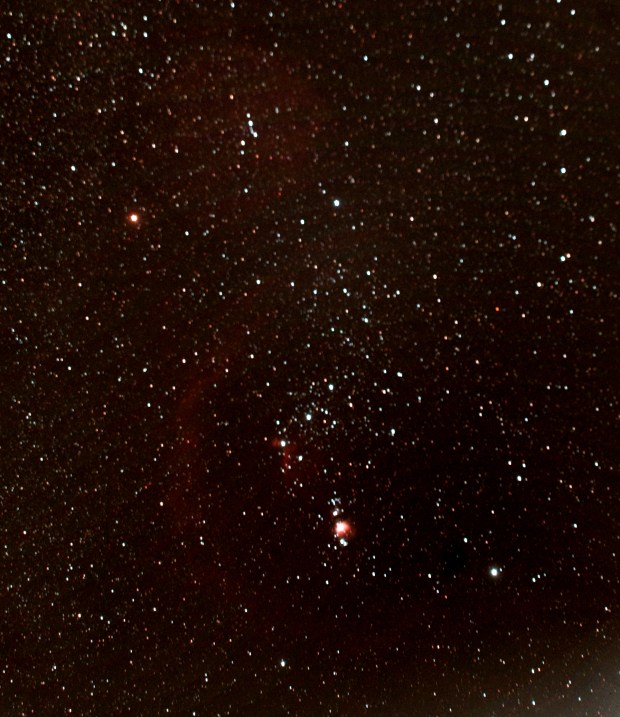
The Orion constellation was originally conceived in Greek mythology as the Hunter, pursuing Taurus the Bull to the west, with the stars tracing out a shape of a hunter holding a shield and club in each hand, a belt around the waste with a sword attached.  What they could not have known at the time is that he also has a head, in the form of the Lamda Orionis Nebula (Sh2-264), located centrally and above Betelgeuse and Bellatrix.
Picture saved with settings embedded.

Barnard’s Loop & Lamda Orionis Nebula : Vixen Polarie & modded Canon 550D + Sigma UWA @ 20mm | 11 x 240 secs @ ISO 1,600 + darks | 7th January 2016

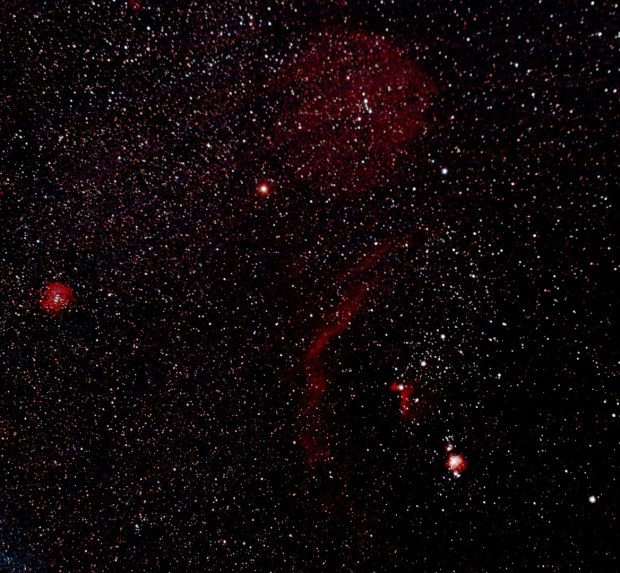
I was able to image Barnard’s Loop on 7th and 14th January; at ISO 1,600 the first images showed the Loop but certainly left room for improvement, as a result I shot the subsequent images at ISO 800 and obtained a noticeably better outcome – though I had to push post processing to reveal the features.  The Loop and head are clearly evident but I’ve been intrigued to see other objects also revealed, albeit without the detail obtained with prime focus imaging using the telescope: Great Orion Nebula, Horses Head & Flame Nebulae and surprisingly on the left (east) of the Loop the Rosette Nebula.  Looking at other’s images of Barnard’s Loop it is clear that I will need to take significantly more subs to properly reveal the full beauty of this wonderful and very large feature – dark skies would be nice too – but for the moment I am pleased with my first outing using the Vixen Polarie, which holds great promise for capturing a wider perspective of the Universe.
Picture saved with settings embedded.

Barnard’s Loop & Lamda Orionis Nebula + Rosette Nebula on far left : Vixen Polarie & modded Canon 550D + Sigma UWA lens @ 20mm | 14 x 240 secs @ ISO 800 | 14th January 2016

Reflections – 2015

Launched in August 2014, 2015 is the first full year of Watch This Space (Man) and despite some personal set-backs it’s been an interesting year astronomically, with much to write about.  Whilst I have made progress with my imaging, it was not what I would have wished for but nonetheless I have been pleased with the outcome.  Continuing on from last year, Reflections is a recap and thoughts on all that happened to me astronomically in 2015 and looks forward to the coming year.

Although this website is just intended as my record of A personal discovery of the Universe through astronomy and astrophotography, it has been pleasing to see that over the year the site has attracted 1,310 visitors from 77 countries around the world and over 2,700 views; you are all most welcome.  This was not the intention of the blog but I am humbled by the interest and would be very pleased to hear from anyone who would like to get in touch with queries, comments or just to say hello – contact details are in the About section.

Reflections 2015

JANUARY TO MARCH

The first quarter turned out to be my most active and successful period of the year for reasons that will become apparent later.  Strictly speaking my image of the Rosette Nebula posted on 5th January was taken on 29th December 2014 but what an image to start the year with, clearly I was doing something right by now.  Notwithstanding, from looking at pictures of the same object taken by other more accomplished photographers, it was evident that something was missing – red!  This was an easy to problem to solve and I immediately set out on a quest to find a suitably modified camera with the IR filter removed.  Soon thereafter I was lucky to find an excellent second hand modded Canon EOS 550D, which has now become my main imaging camera of choice and with all that extra red Ha-light has led to a quantum improvement of many images since.  Such cameras are very popular so I felt lucky to have secured this one.

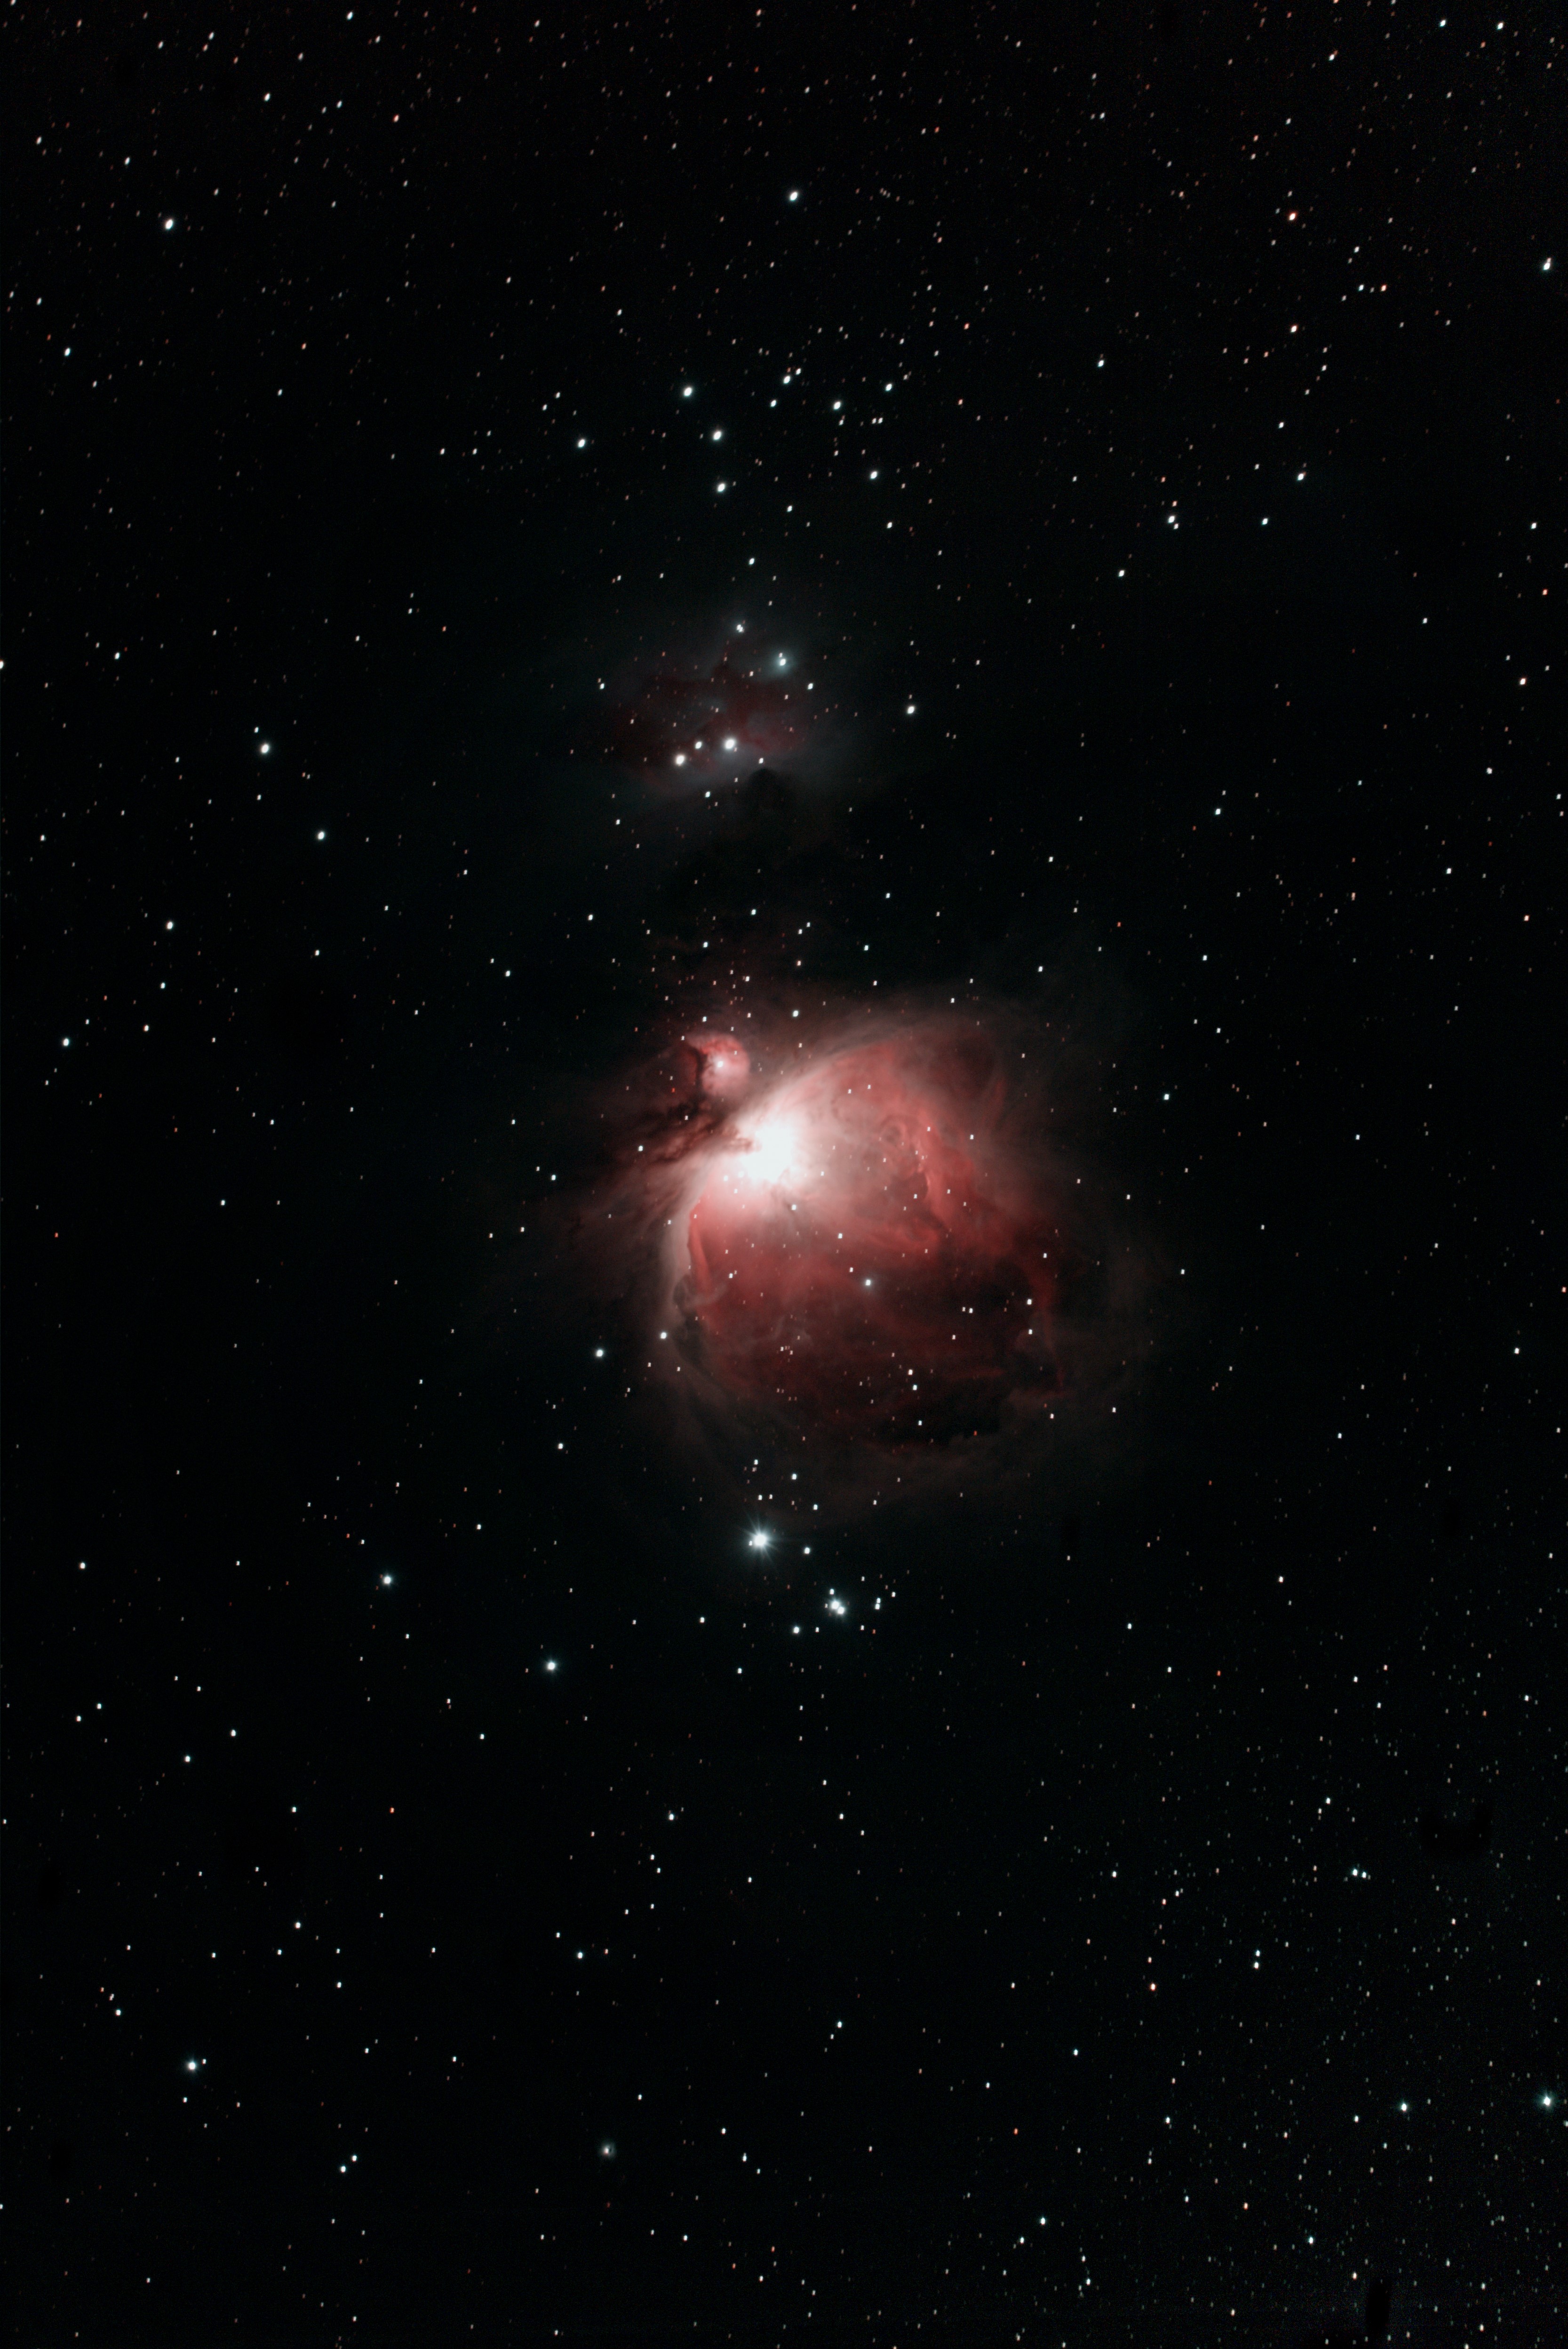
Orion's Sword: M42 The Great Orion Nebula, Running Man Nebula & NGC 1981 Star Cluster WO GT81 + modded Canon 550D & FF | 10 x 180 secs @ ISO 800 & darks calibration | 8th February 2015

Orion’s Sword: M42 The Great Orion Nebula, Running Man Nebula & NGC 1981 Star Cluster
WO GT81 + modded Canon 550D & FF | 10 x 180 secs @ ISO 800 & darks calibration | 8th February 2015.  Modification of the camera by removing the IR filter increased red Ha-light.

EQMOD / ASCOM is a popular free software project developed by amateurs that, amongst other things, provides computer and planetarium linked control of the mount; with other compatible linked programmes such as APT (Astrophotography Tool) and PHD (Push Here Dummy) control can be extended to cameras and for autoguiding.  At the start of the year I successfully started using Carte du Ciel planetarium linked with EQMOD for computer controlled alignment and mount control, which as expected was very useful – particularly when it got really cold and I was able to take the equipment indoors and operate the equipment remotely.  However, later in the year I have encountered connection problems which are, as yet, not fully resolved.

Whilst EQMOD is an excellent project which provides first class mount control when working, it requires additional faffing about and problems on a different level of scale, which with limited imaging conditions in the UK and having to set up outside from scratch each time is a pain.  For this reason and others I have not yet moved to autoguiding, which I know will be highly beneficial to imaging but for the moment has proved to be a step too far for me.  Such is the fickle nature of all this that I’m now considering other ways of achieving the same end, perhaps with professional software control and a stand-alone guider, such as the Lacerta M-GEN – of course a dedicated observatory would help a lot but seems unlikely at the moment!

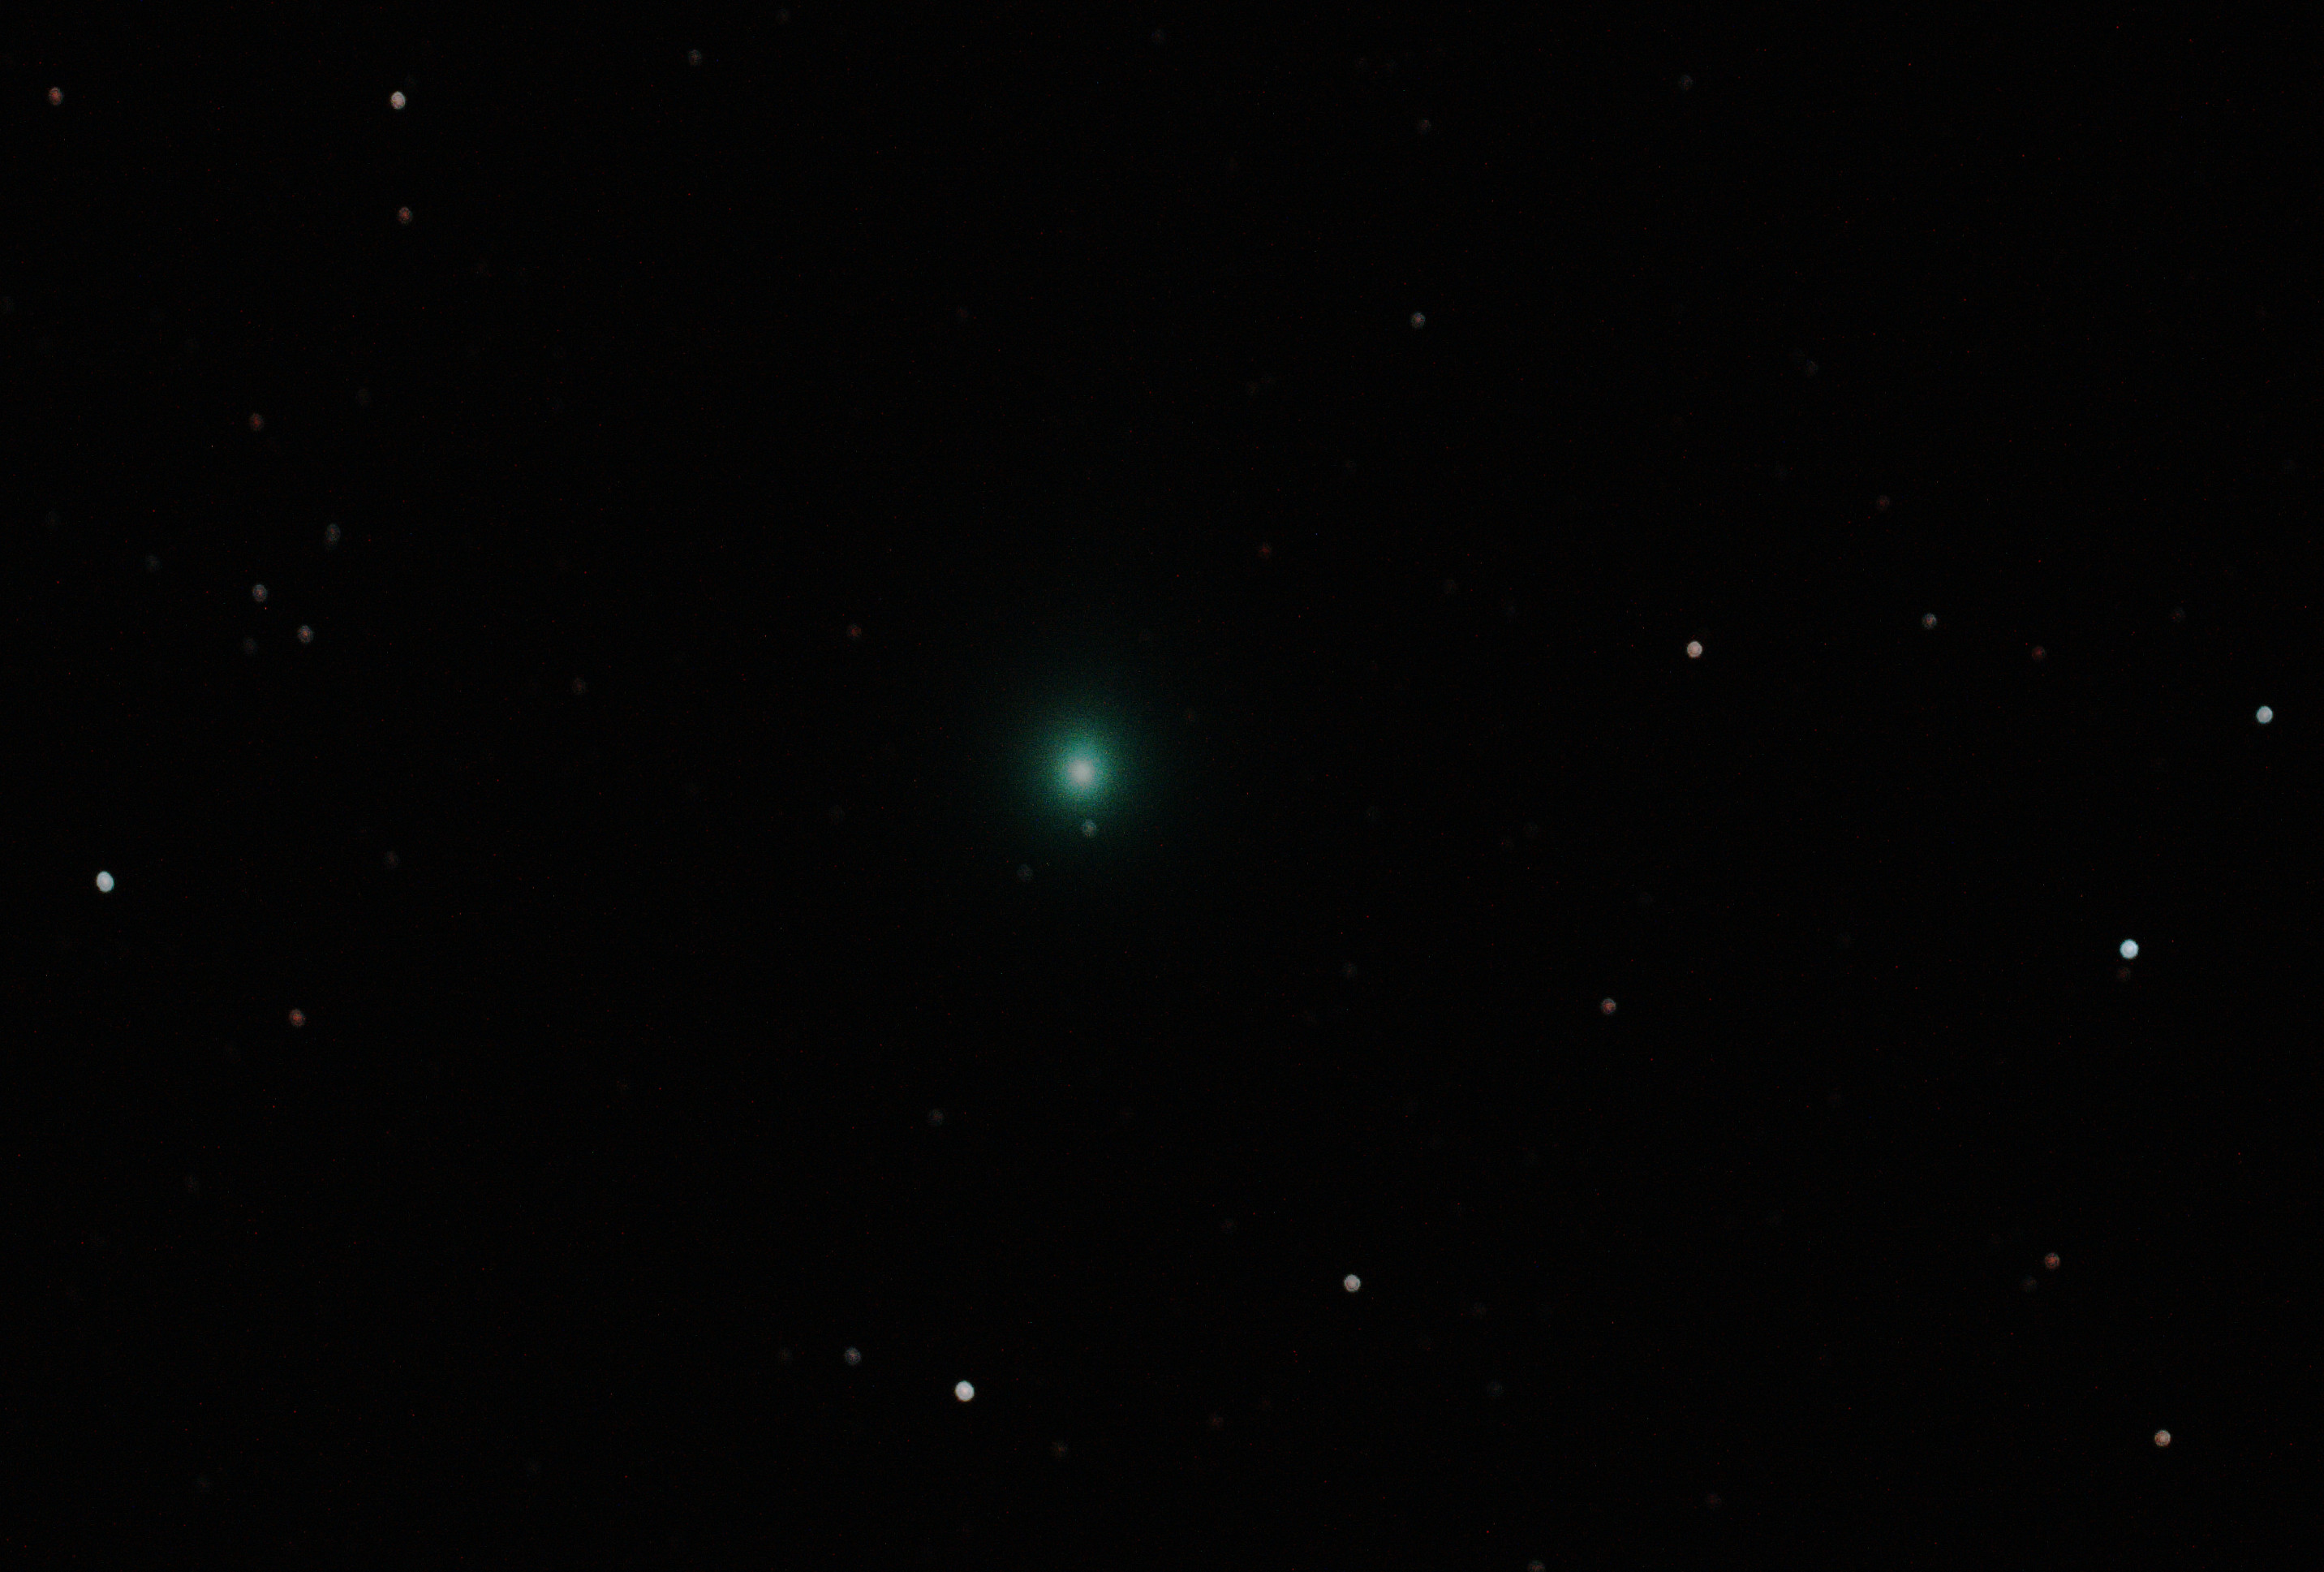
I have previously found the early winter sky of Orion, Taurus, Pegasus and Monoceros very productive with beautiful imaging objects such as M42 and the Horsehead Nebula.  However, this year looking more closely at the late-winter / early spring skies turned out to be just as exciting, with a veritable playground of galaxies to choose from during February and March.  Notwithstanding, the highlight during the winter was successfully imaging Comet Lovejoy, a first for me that required changes to  normal DSO and planetary imaging techniques as this ephemeral object was speeding across the night sky at over 70,000 mph – post processing also turned out to be quite different.

C/2014 Q2 Comet Lovejoy WO GT81 + Canon 550D (modded) & FF | 40 x 20secs @ ISO1,600 + darks | 16th January 2014

C/2014 Q2 Comet Lovejoy
WO GT81 + Canon 550D (modded) & FF | 40 x 20secs @ ISO1,600 + darks | 16th January 2014


No Date Object* Name
1 16/01/15 C/2014 Q2 Comet Lovejoy
2 16/01/15 C/2014 Q2 Comet Lovejoy
3 16/01/15 NGC 2244 Rosette Nebula
4 22/01/15 M42 etc Orion Nebula
5 22/01/15 M45 Pleiades
6 22/01/15 Comet Lovejoy
7 22/01/15 Comet Lovejoy
8 22/01/15 Banard’s Loop
9 22/01/15 Banard’s Loop
10 22/01/15 Orion Constellation
11 24/01/15 NGC 1909 Witch Head Nebula
12 24/01/15 NGC 2392 Eskimo Nebula
13 24/01/15 M44 Beehive Cluster
14 24/01/15 IC-443 Jellyfish Nebula
15 08/02/15 M42 Gt Orion Nebula etc
16 08/02/15 Barnard 33 Horsehead Nebula etc
17 21/02/15 M65 Leo Triplet (Galaxies)
18 21/02/15 M105 M96 Group (Galaxies)
19 24/02/15 Venus & Mars
20 25/03/15 NGC 2903 Spiral galaxy – Leo
21 25/03/15 NGC 3842 Galaxy cluster: Leo
22 25/03/15 M 88 Spiral galaxy: Virgo cluster
23 25/03/15 M100 Spiral galaxy: Virgo cluster
24 26/03/15 NGC 4438 Markarian’s Chain
25 26/03/15 M104 Sombrero
26 26/03/15 M53 Globular cluster


*Record of quarterly photographic images in 2015, excluding other widefield pictures

APRIL TO JUNE

Things took a turn for the worse in April when I went into hospital for a knee replacement operation.  All went well but it is a major operation and recovery has been slow and often painful, thus prohibiting any real astronomy until September.  It did however provide the time and opportunity to read about astronomy and pursue some MOOC astronomy courses.

After a period of convalescence, I did manage to obtain some widefield camera shots of the planets, the ISS and simple night sky images in the summer.  Whilst not as satisfying as prime focus photography, it was interesting and kept me sane during this otherwise difficult time.

1st July 2015. Bingo = conjunction; though one day later Jupiter has now moved to the right of Venus.

1st July 2015. Conjunction of Jupiter to the right of Venus.

No Date Object Name
27 11/04/15 NGC 4438 Markarian’s Chain
28 11/04/15 NGC 4565 Spiral galaxy-side


JUNE TO SEPTEMBER

This period was more of the same until on 19th September, when at last I managed to set-up Fairvale Observatory for the first time since March, what a relief.  As a bonus I was particularly chuffed to achieve a good image of the Andromeda Galaxy but the highlight of this period and the year was the lunar eclipse at the end of the month on 28th September.

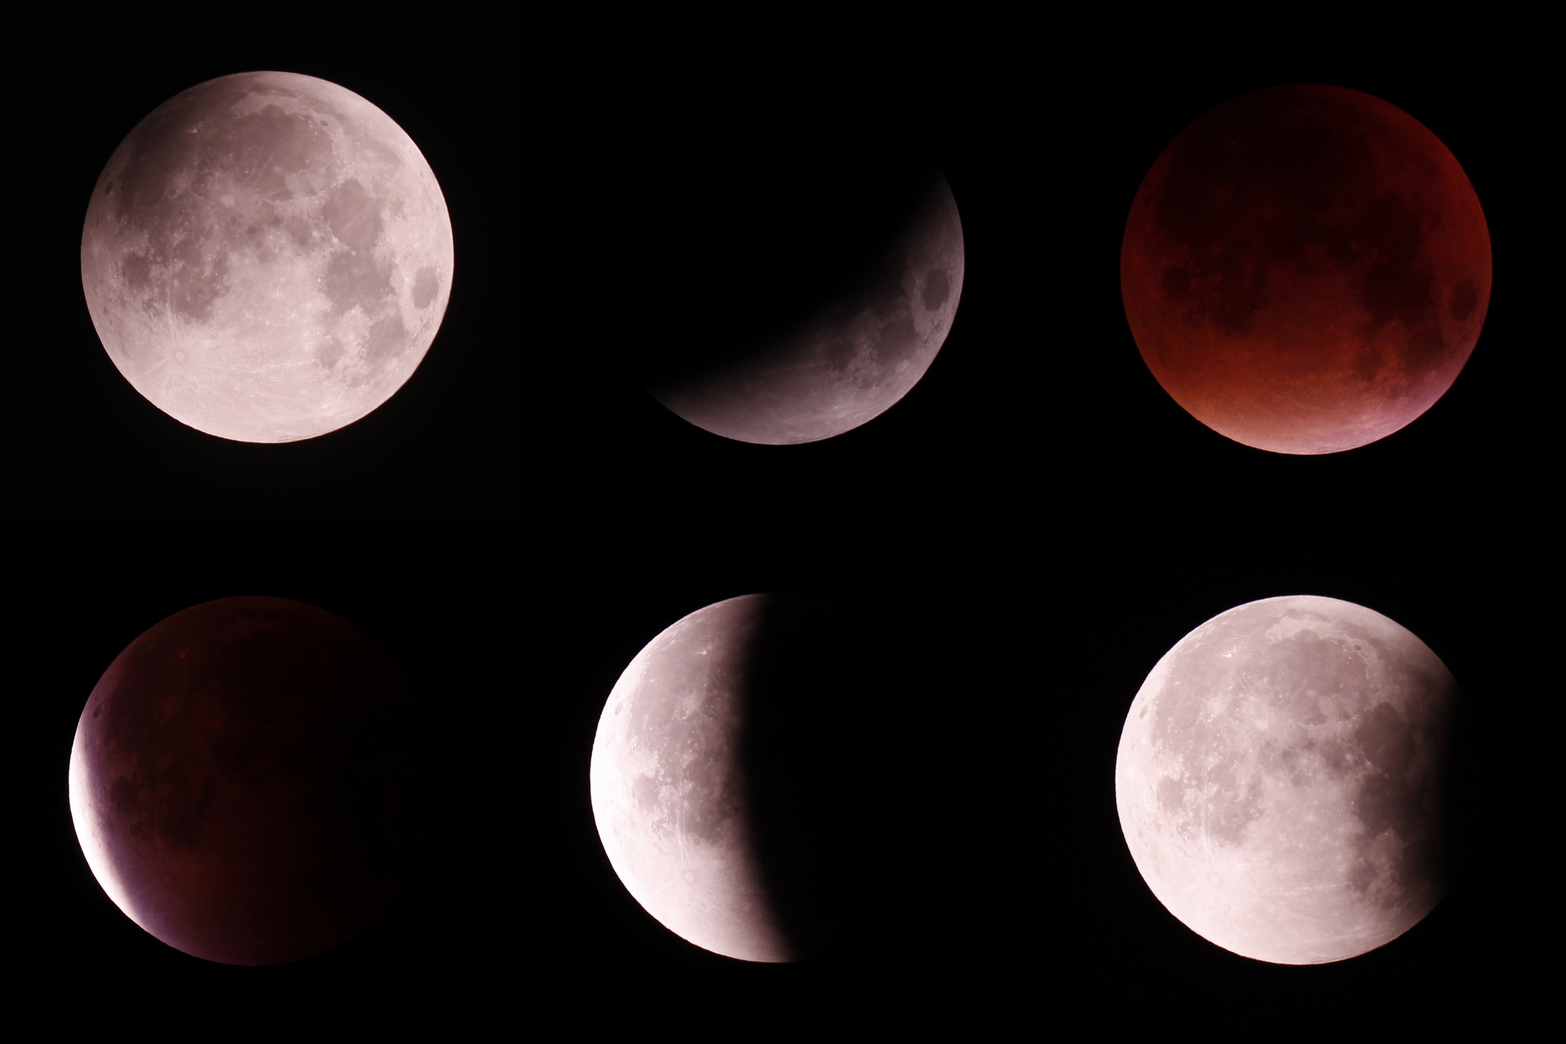
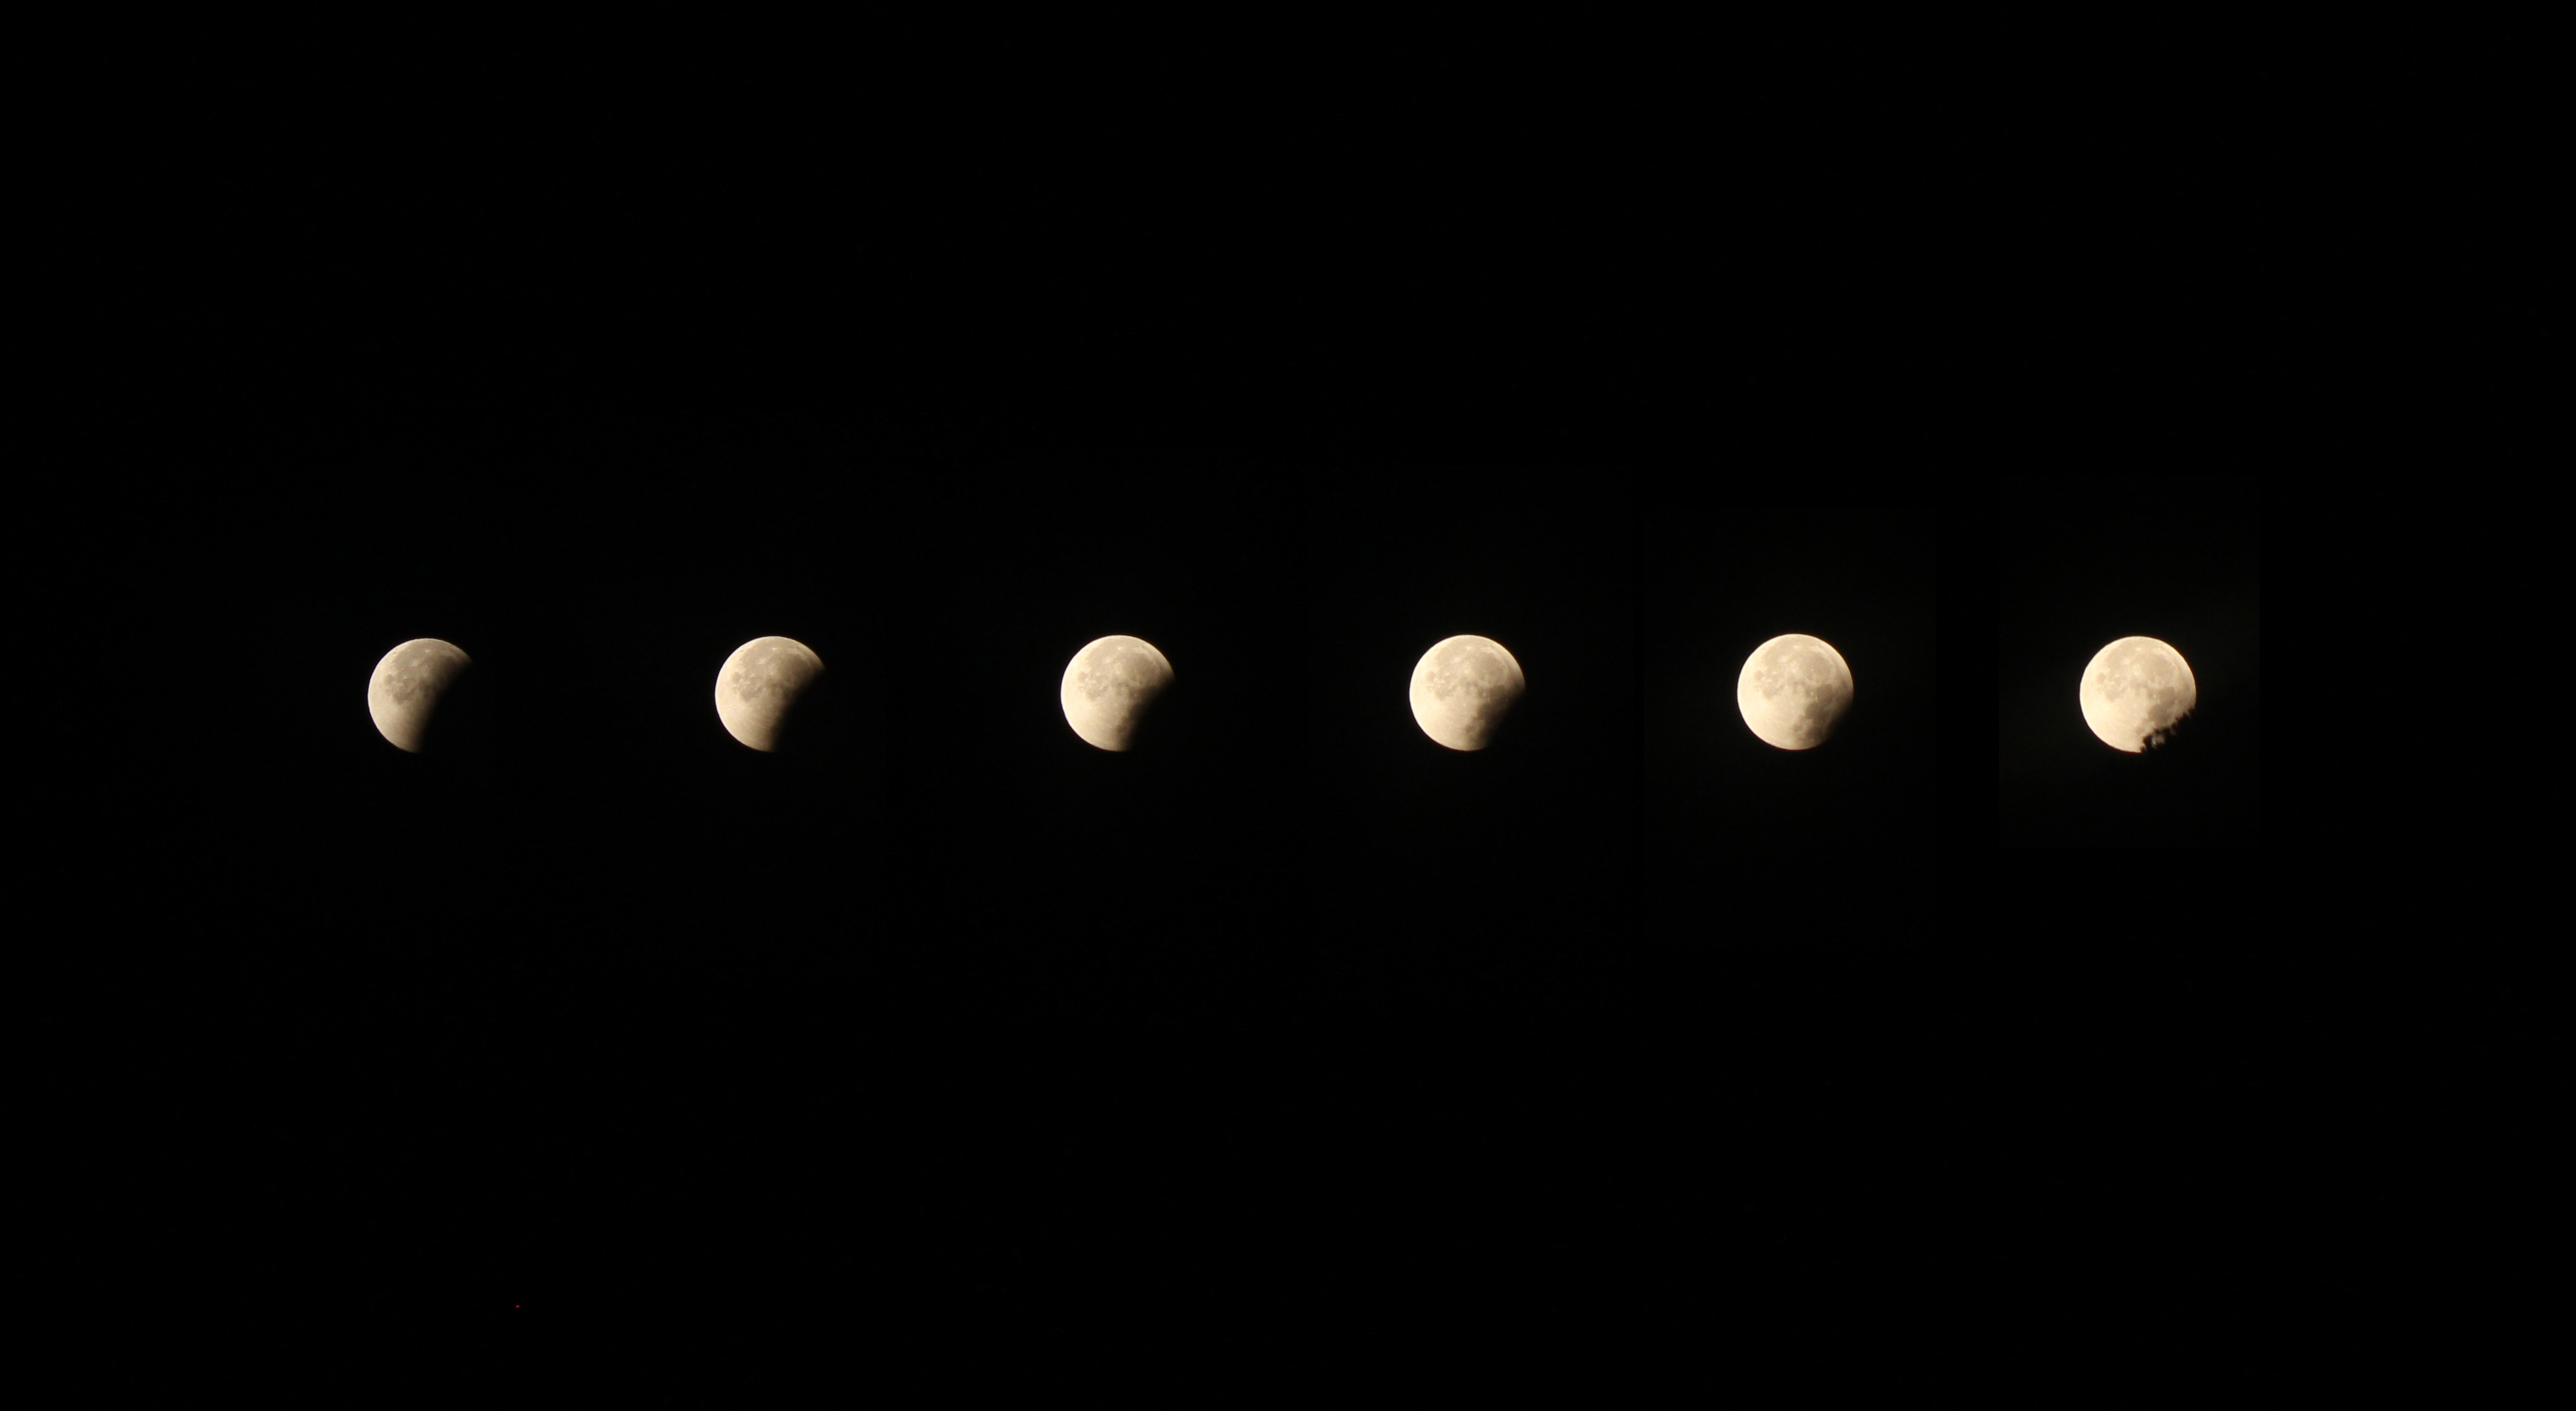
For once everything was perfect: a clear sky all night with a perfect view of the eclipse from start to finish.  I stayed up all night and would have to say it was one of the best, if not the best event I have so far experienced since taking up astronomy; apart from being an outstanding imaging opportunity, the ambiance throughout the eclipse was spellbinding.  I was therefore very pleased to obtain an excellent set of images of the entire eclipse, mainly using a prime focus camera set-up with the WO GT81 telescope but also with an alternative  camera and telephoto lens on a tripod.  The memory of that night will stay with me for a long while and, in part, helped to make up for the lost time since my operation in April.

Eclipse Animation 28th September 2015

Eclipse Animation 28th September 2015

No Date Object Name
29 19/09/15 IC 5070 Pelican Nebula
30 19/09/15 NGC 6979 Pickering inc Veil Nebula
31 19/09/15 M15 Globular Cluster
32 19/09/15 M31 Andromeda
33 28/09/15 Lunar Eclipse Entry @ 1 sec intervals
  28/09/15 Lunar Eclipse Totality
  28/09/15 Lunar Eclipse Entry @ 1 sec intervals
34 28/09/15 Lunar Eclipse Exit – camera + tripod
35 30/09/15 IC 1318 Sadr Region (+NGC 6910)
36 30/09/15 IC 1318 Sadr Region – Pt2


OCTOBER TO DECEMBER

The final quarter of the year has been very frustrating due to the almost complete absence of suitable imaging conditions, mainly due to cloud cover but even when there was a few clear nights it was of course a full Moon – you can’t win!  I was particularly unhappy as this time marks the arrival of the constellation Orion and all its wonderful imaging opportunities, for which I had new plans.

Given the short focal length of the William Optics GT81 and relatively small aperture, used with a APS-C cropped sensor DSLR camera the resulting field-of-view is a quite large and, where possible, this year I’ve therefore concentrated on objects of 2.5o to 3.0o apparent dimensions.  Together with the modded camera this has resulted in some exciting new images of old and new objects.

However, large as the field-of-view is with this set-up, I have become increasingly aware of the simply enormous scale of some nebulous features such as Barnard’s Loop.  As a result I have become more interested in widefield imaging using just a camera and tripod.  Like prime focus imaging, widefield imaging will also benefit from achieving longer exposures through the use of tracking.  Early in this period I was fortunate to purchase a Vixen Polarie lightweight tracking mount for this purpose, but due to the aforementioned conditions I have unfortunately been unable to use it very much.  In fact it’s fair to say that other than some brief experimentation, it’s hardly been used at all so far.  Notwithstanding, I can see the potential and have high hopes for future imaging opportunities when the clouds part and the Moon is absent.

The year finished with a couple of other purchases that I hope will assist with imaging in 2016:

  • A new laptop – running Windows 10 with a core i7 Intel chip, 2 TB hard drive, 16 GB RAM, dedicated AMD graphics card and an HD 17.3” screen, which I hope will help improve post processing.  Running my preferred Windows 7 operating system, I will continue to use the smaller 13” i5 chip laptop for mount and camera control.
  • Ultra-Wide Angle lens – the truth is I’ve recently acquired this wonderful Sigma 10 – 22mm  f3.5 lens for a trip to the Grand Canyon in April, however, I will of course also be using it with the Vixen Polarie when the skies clear.
No Date Object Name
37 09/10/15 NGC 6888 Crescent Nebula
38 09/10/15 M 74 Spiral galaxy (near Pegasus)
39 09/10/15 NGC 7814 Little Sombrero
40 09/10/15 NGC 7479 Barred spiral galaxy
41 09/10/15 M 31 Andromeda galaxy
42 08/12/15 NGC 1499 California Nebula
43 08/12/15 IC 405 Flaming Star Nebula
44 08/12/15 NGC 2264 Cone Nebula
45 09/12/15 M42 Great Orion Nebula etc
46 08/12/15 Orion Constellation


Favourite Images

Despite the lack of activity this year I have been fortunate to obtain some good images and I can only hope 2016 will be just as rewarding.  Acting as judge and jury, my personal favourites in no particular order are:

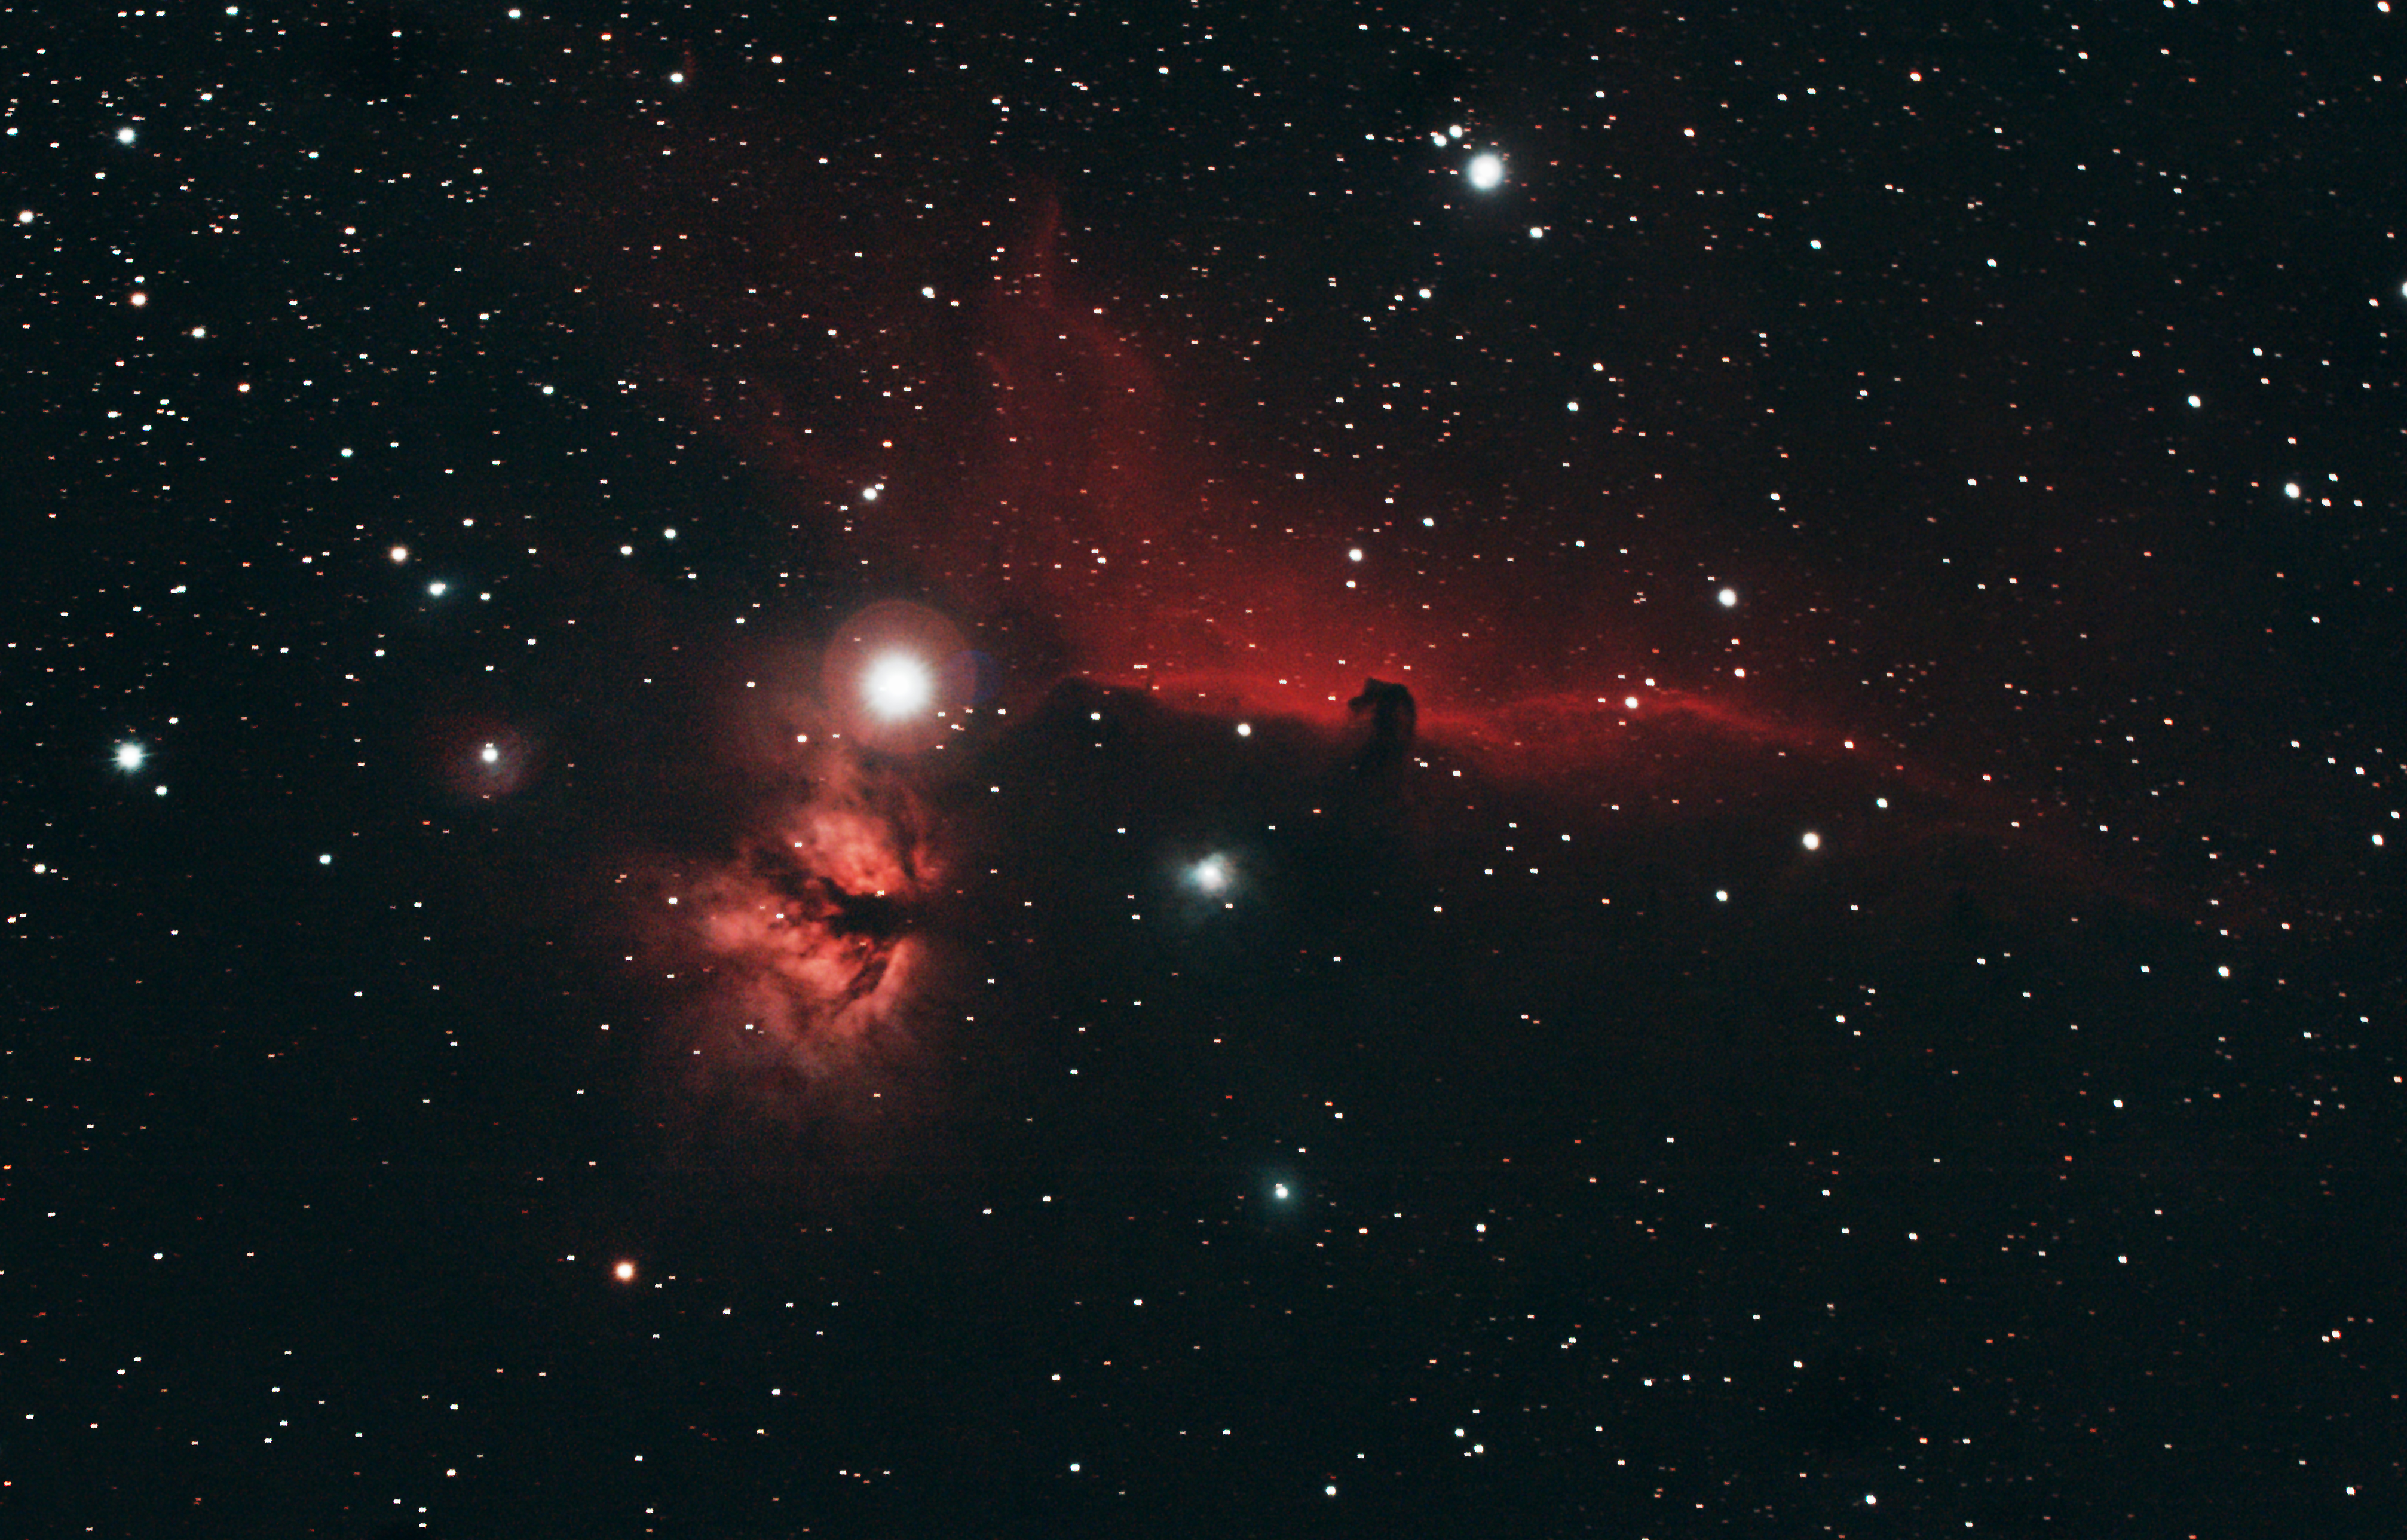
NGC 2024 Flame Nebula & Horsehead Nebula WO GT81 + modded Canon 550D & FF | 10 x 180 secs @ ISO 800 & darks calibration | 8th February 2015

NGC 2024 Flame Nebula & Horsehead Nebula
WO GT81 + modded Canon 550D & FF | 10 x 180 secs @ ISO 800 & darks calibration | 8th February 2015


Eclipse: Inward sequence from umbral contact to totality WO GT81 + Canon 700D + FF | 1/500 to 1/3 sec @ ISO 100 | 18th September 2015

Eclipse: Inward sequence from umbral contact to totality
WO GT81 + Canon 700D + FF | 1/500 to 1/3 sec @ ISO 100 | 18th September 2015


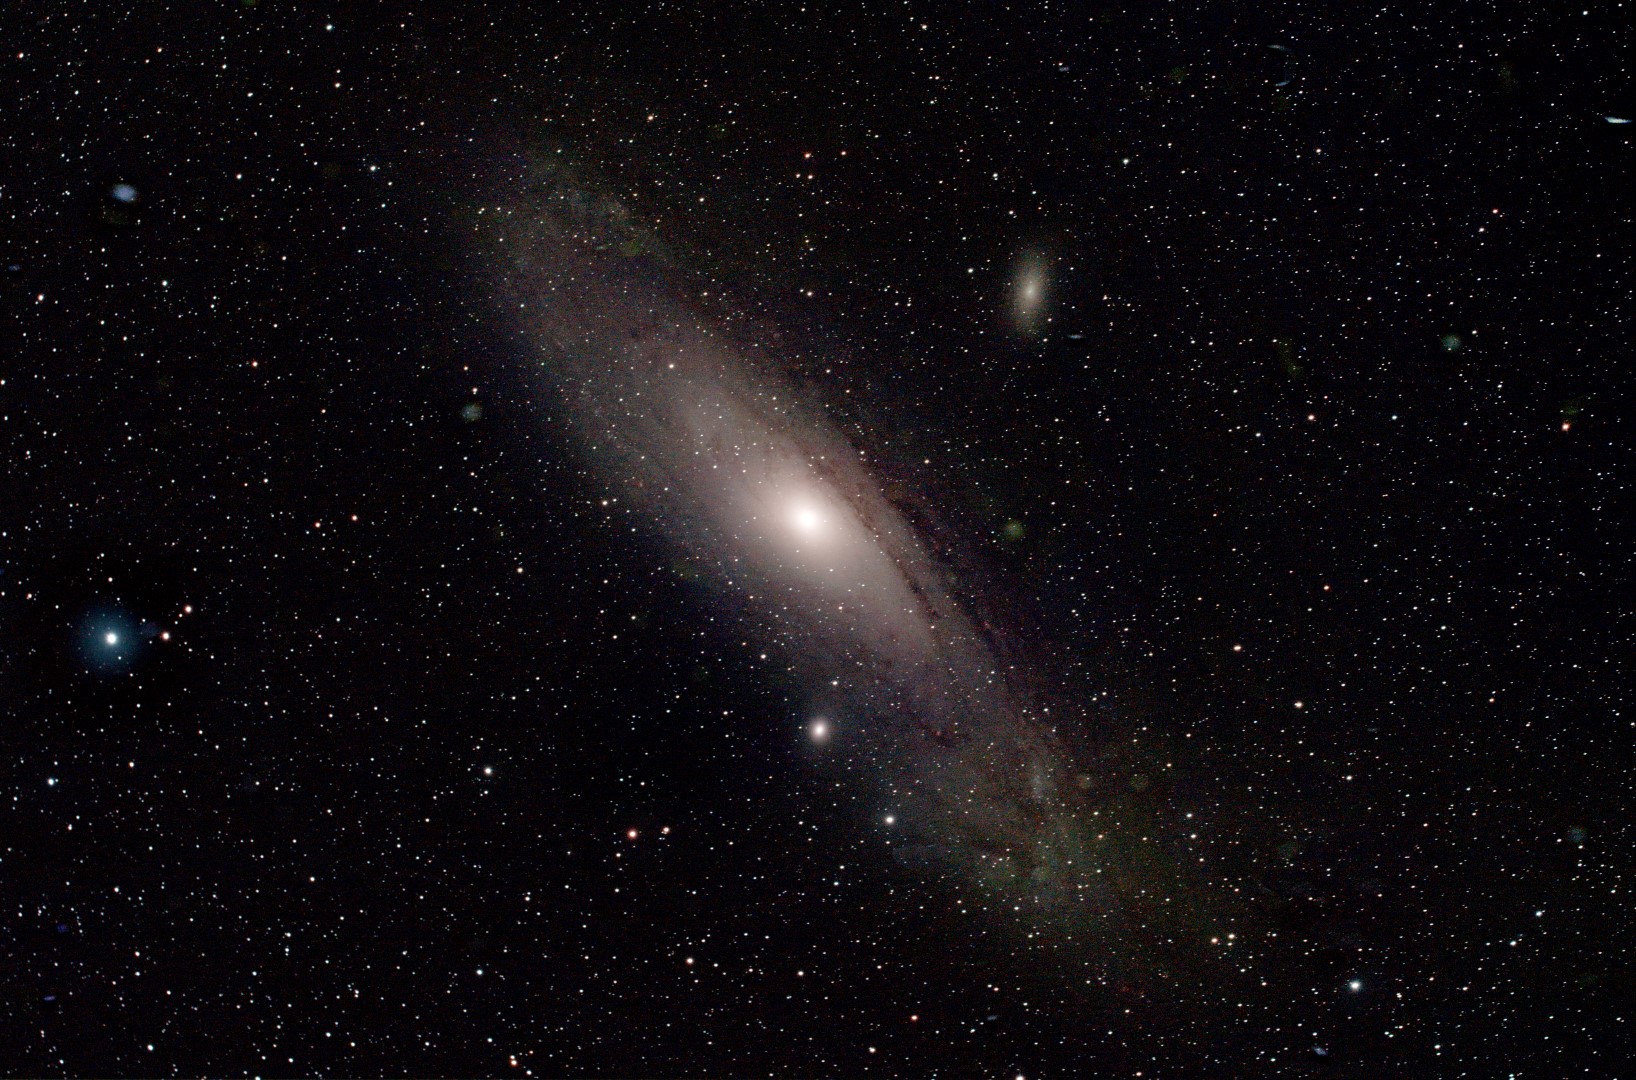
M31 Andromeda Galaxy WO GT 81 + modded Canon 550D + FF | 9 x 120 secs @ ISO 1,600 | 19th September 2015

M31 Andromeda Galaxy
WO GT 81 + modded Canon 550D + FF | 9 x 120 secs @ ISO 1,600 | 19th September 2015


??????????????

Goals for 2016
After the year that’s just finished I am reluctant to set out goals for 2016 but here goes:
  • Increase imaging exposure times: This is a euphemism for (a) improving equipment set-up and alignment, and (b) start autoguiding. As previously outlined, I have been struggling with both of these issues but one way or another I have to overcome the problems in order to obtain exposure times of at least 5-minutes and hopefully longer;
  • Improve processing: I was pleased to get to grips with Photoshop in 2015, albeit using a very old version, which together with other minor improvements to processing has added to the quality of the final images.  However, I know that even now there is more to be teased out of the existing imaging data for which I am already considering new software;
  • Start widefield imaging: First I just need clear skies in order to get out and start using the Vixen Polarie tracking mount from Fairvale Observatory, with the initial objective of imaging Barnard’s Loop, which has hitherto proved elusive to my current set-up.  However, one of the attractions of the Polarie-DSLR-Tripod combination is its portability, which I’d like to put to good use in 2016 by visiting dark sky areas in the UK.

There are other possible developments which at the moment seem unlikely to eventuate but you never know: a larger probably SCT telescope, a cooled CCD camera, and / or a permanent observatory (well I can dream can’t I?).


So all things considered 2015 was a good but not great year.  As a fundamental and important development I had really hoped to start autoguiding and thus increase exposure times but it was not to be.  Certainly the loss of astronomy time between April and September was a major set-back in many different ways.  Notwithstanding, during the remaining times available when I did manage to get outside I believe I achieved some of my best images to date and discovered many new and exciting objects in the night sky, which can’t be bad.  In particular, I am sure the lunar eclipse in September will remain a highlight of my astronomy experiences for many years to come.

Harvest Moon at Totality WO + Canon 700D + FF | 1/3rd Sec @ ISO 400 | 28th September 2015

Harvest Moon at Totality
WO + Canon 700D + FF | 1/3rd Sec @ ISO 400 | 28th September 2015


I’m now looking forwards to 12-months of uninterrupted astronomy, clear skies and plenty to report in the WTSM blog at the end of 2016!

Watch this space!

The big picture unveiled

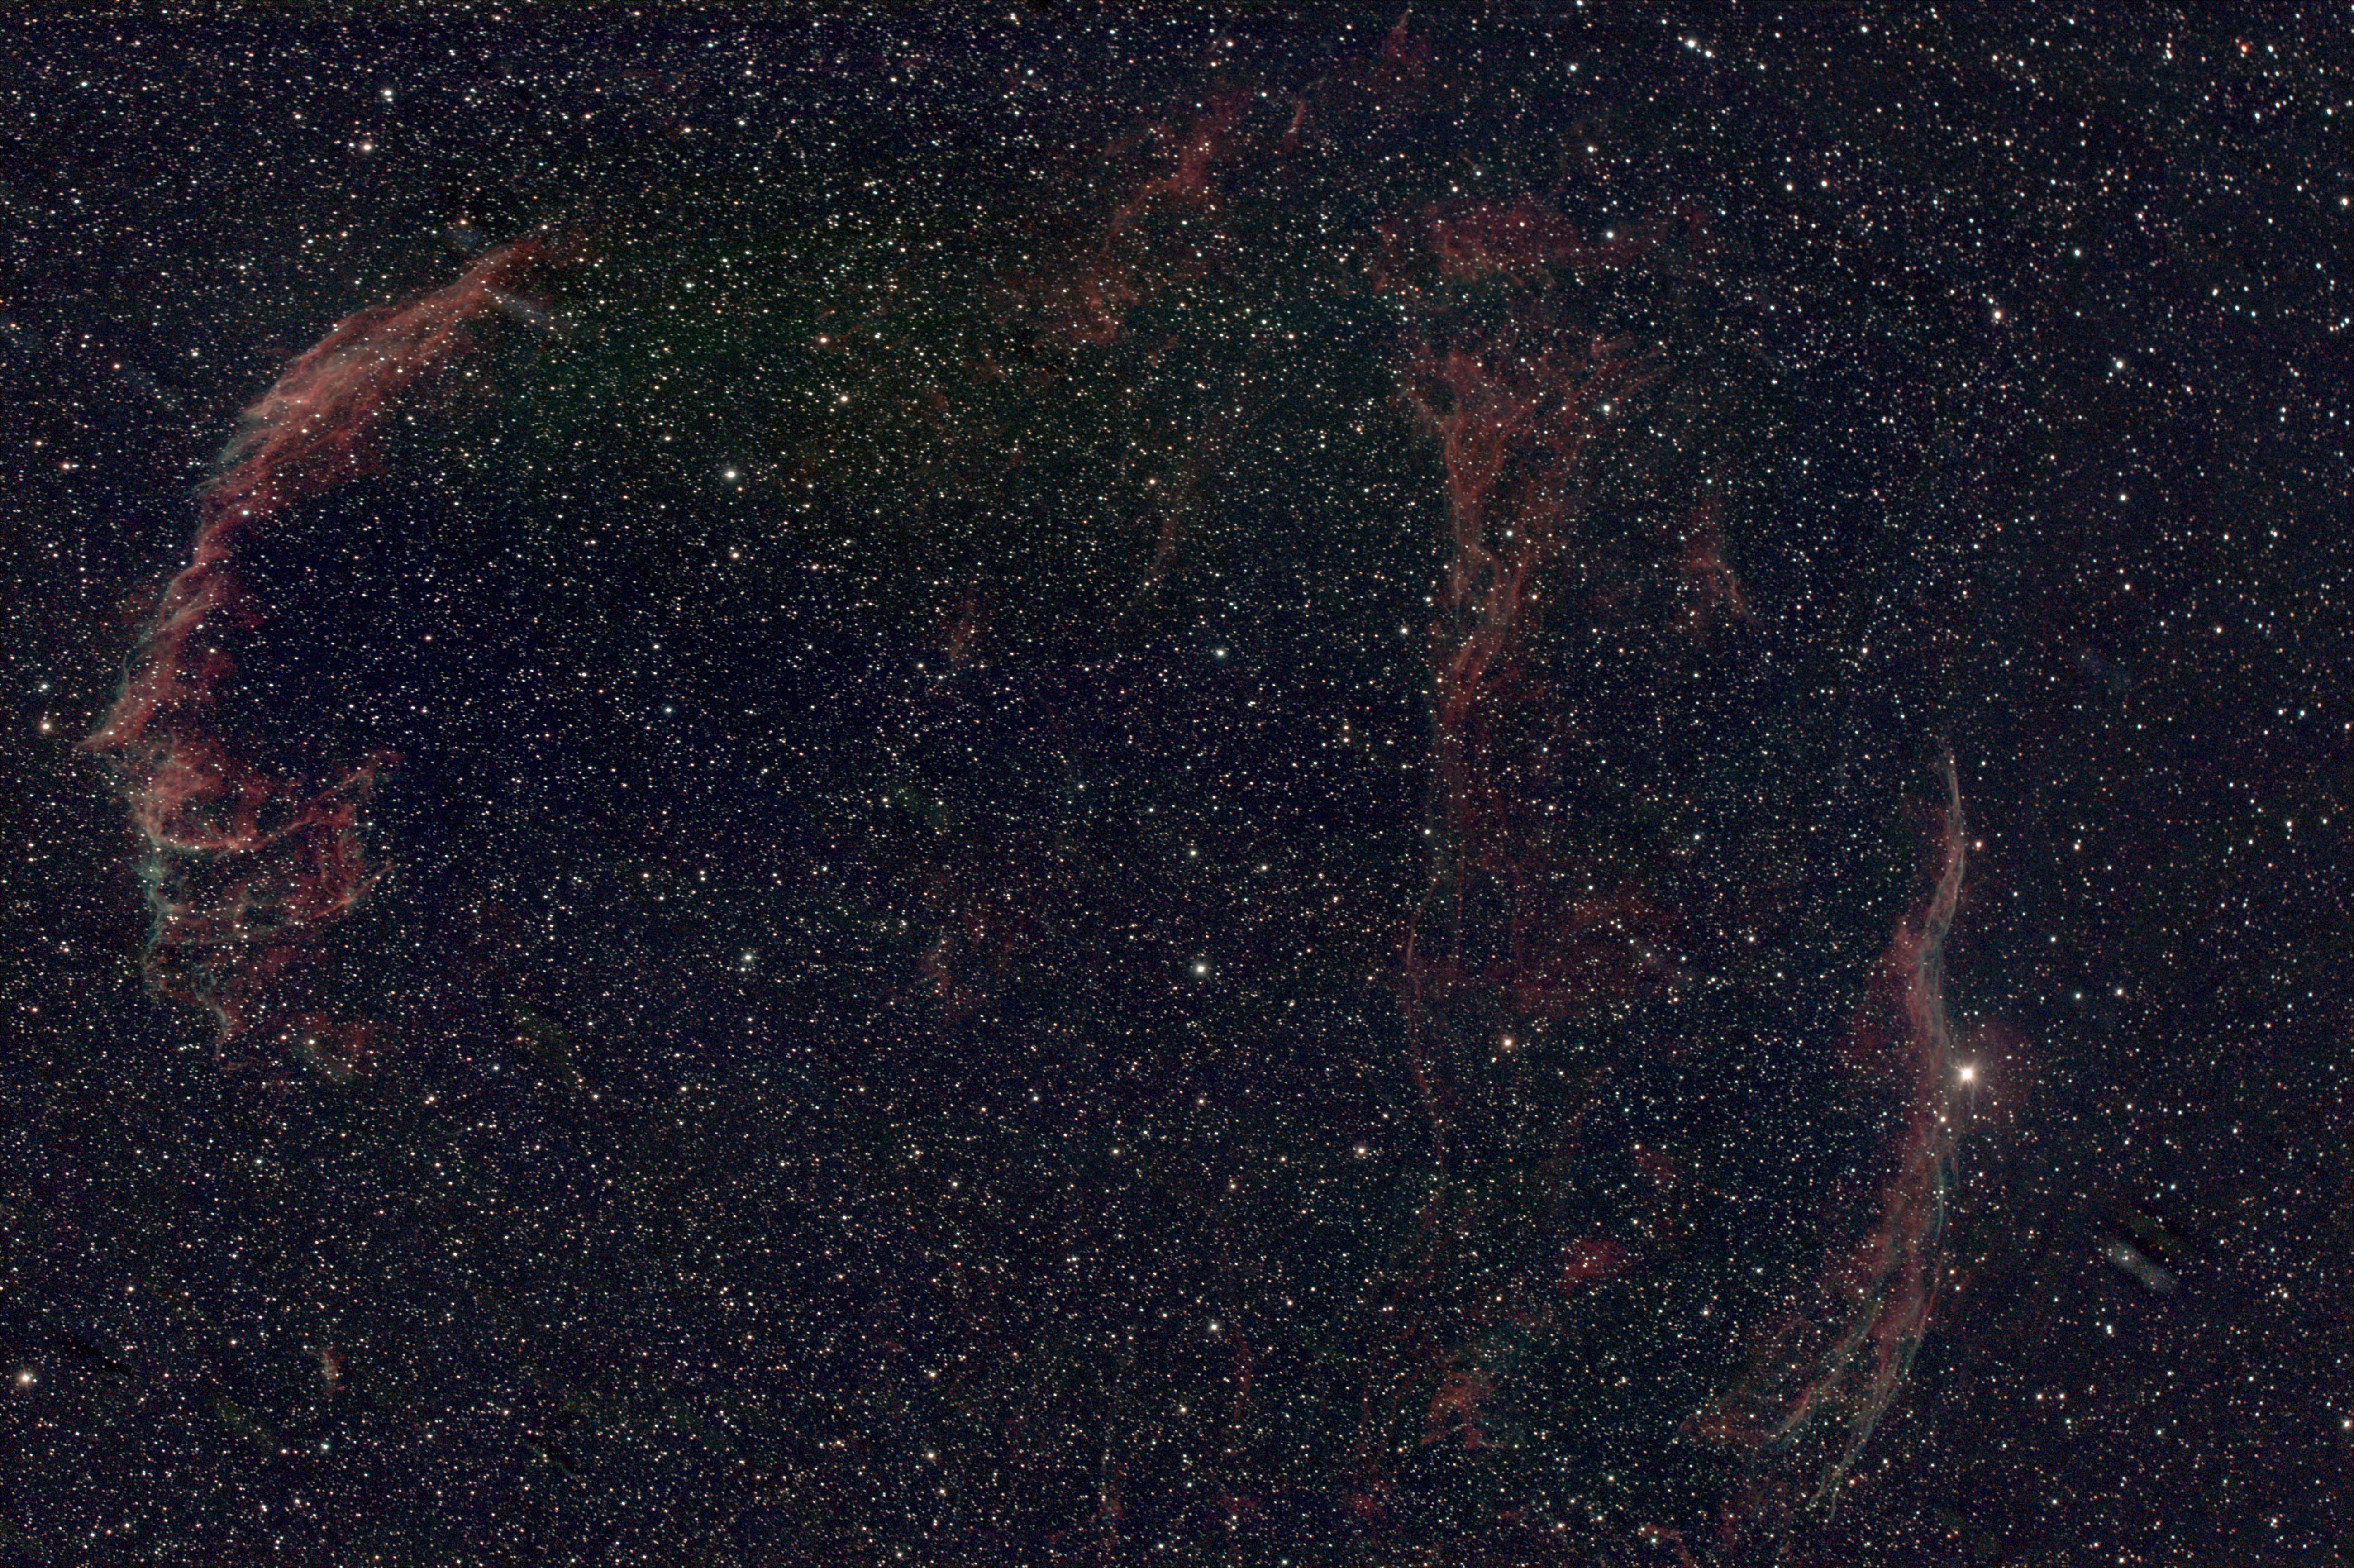
About this time last year I successfully imaged first NGC 6960 the Western Veil, AKA the Witch’s Broom Nebula and shortly afterwards NGC 6992 the Eastern Veil, which includes NGC 6995 AKA the Bat Nebula.  In themselves they are both wonderful parts of the larger but perhaps more elusive (photographically speaking) Veil Nebula.  Located in the constellation Cygnus, the Veil Nebula or Cygnus Loop is formed from the remains of a supernova that exploded in our galaxy about ten thousand years ago and at a distance of almost 1,500 light-years, now spans a 3o area of the sky or 80 light-years in diameter.  At the time I struggled to get these images but was very pleased with the outcome.

cygnus

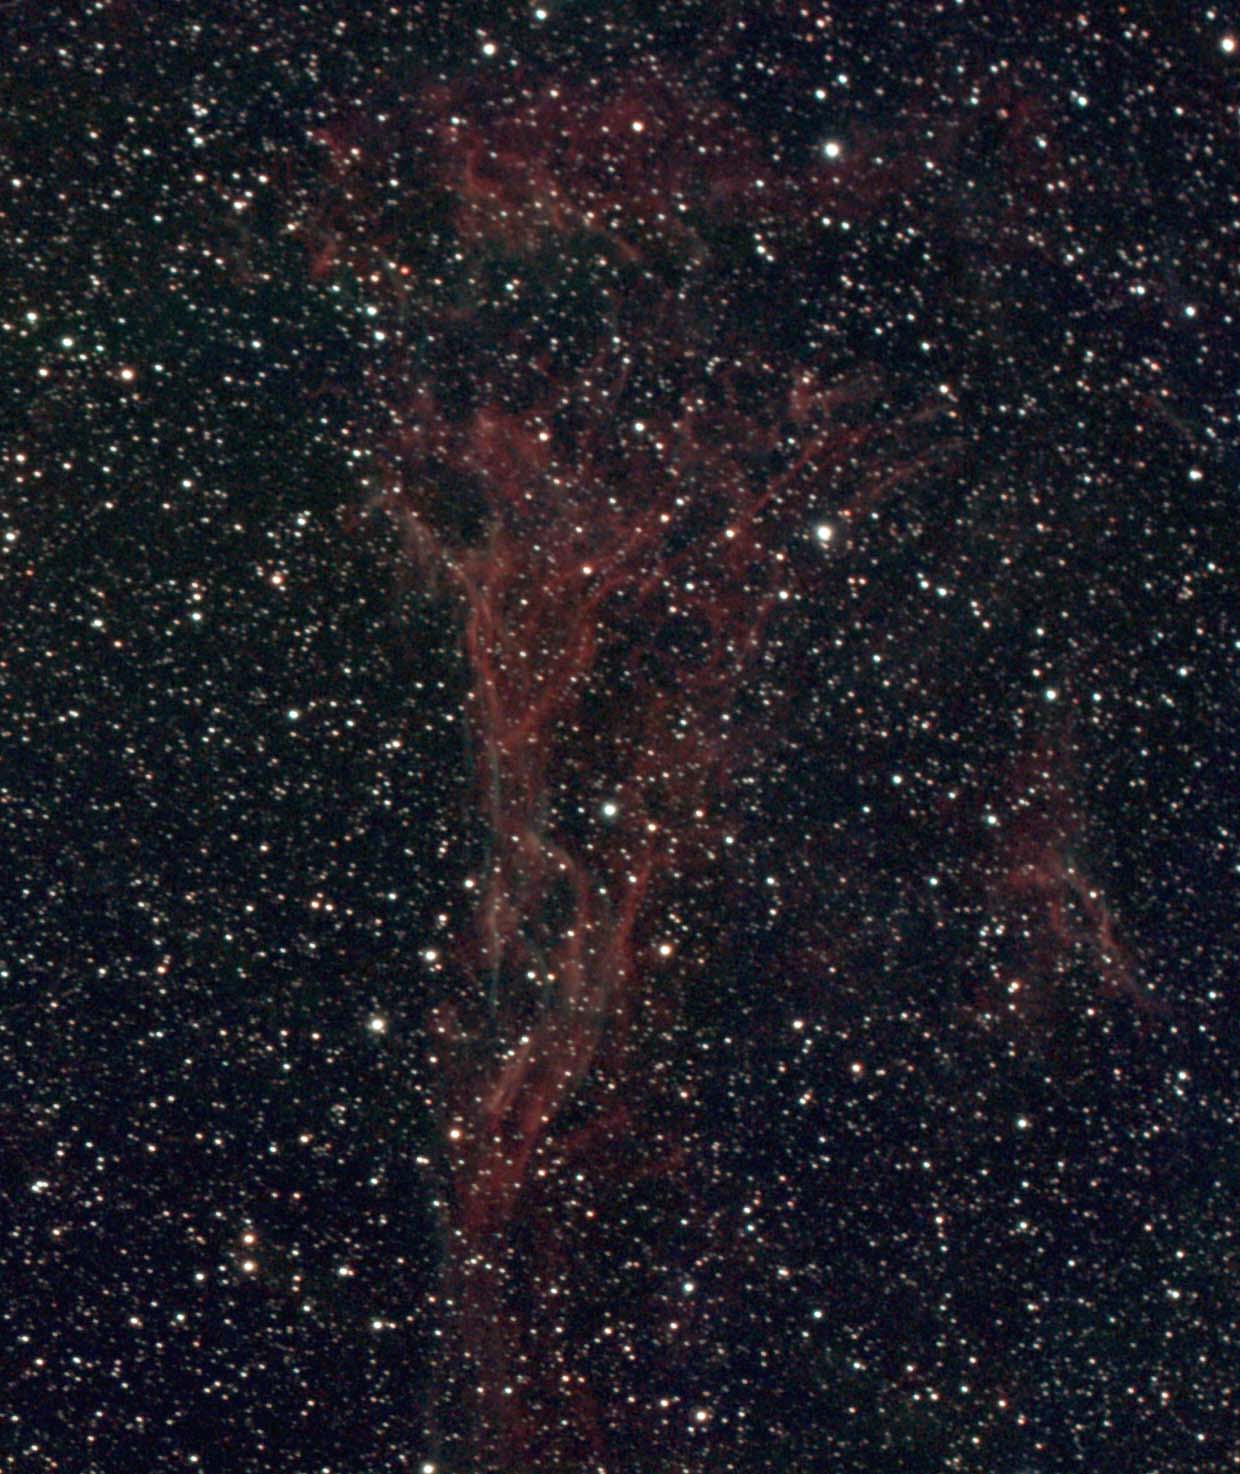
One year on and I was now thinking about other parts of the Veil, in particular Pickering’s Triangle.  The Triangle might be thought of as the third central section of the Veil, situated between the Eastern and Western Veils but slightly further north.  At some 52 x 35 arcminutes it is itself a significant feature, which surprisingly does not have an NGC catalogue number of its own.

Pickering's Triangle

Pickering’s Triangle

Notwithstanding the success of Pickering’s Triangle, in the end I got much more than I bargained for.  This time using a modded camera, I was able to capture the entire Veil Nebula in one photograph – progress indeed.

The Veil Nebula AKA Cygnus Loop: Ultraviolet view ref. NASA

The Veil Nebula AKA Cygnus Loop: Ultraviolet view ref. NASA

Light from the bulk of the Veil Nebula is very faint and notoriously difficult to image, whilst furthermore much of it is Ha in nature – hence this time finding its way to the camera’s sensor having had the IR filter removed.  The result is a staggering view of the entire supernova, with the Witch’s Broom in the west (right), the Eastern Veil (left) and Pickering’s Triangle nestled in between.  However, in addition extensive regions of delicate, wispy nebulous filaments can be seen flowing everywhere in between – hence the name of Veil.

Veil Nebula / Cygnus Loop WO GT81 & modded Canon 550D + FF | 30 x 180 sec exposures @ ISO 1,600 | 19th September 2015

Veil Nebula / Cygnus Loop
WO GT81 & modded Canon 550D + FF | 30 x 120 sec @ ISO 1,600 | 19th September 2015

Whilst I am very pleased with the resulting photograph, there’s still more to achieve another time.  Apart for the added potential that would be gained from longer, guided exposures, the use of Ha and OIII filters would also uncover even more of the Veil’s diaphanous beauty.


At the limit

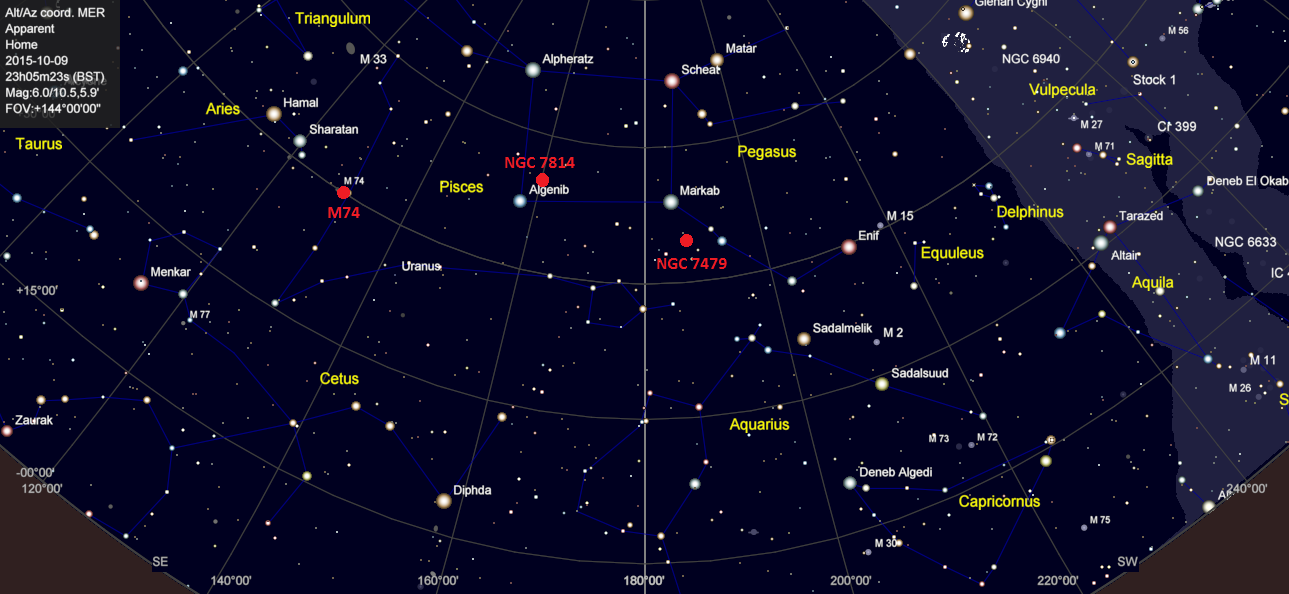
Earlier this month the weather and clear skies produced particularly good imaging conditions that resulted in some excellent pictures; it’s already a distant memory as the weather has since turned cold and cloudy day-after-day – or at least every night except when there’s a full Moon!  With these images knowingly in the bag and the telescope well aligned, I took the opportunity to indulge in a short session imaging some galaxies that happened to be around the Meridian at this time which, as it turned out, were located in proximity to the constellation of Pegasus.

pegasus ANOTATE

Two of the objects (M74 & NGC 7814) were confined to just ten shots and the third fifteen, all at 180 seconds exposure and ISO 1,600.  For such dim and distant objects this in itself was obviously insufficient but still it was fun to experiment.  As expected the resulting images are feint and noisy but the object’s form can be clearly seen and, in the case NGC 7814 – the Little Sombrero, even the edge-on dust lanes are evident.

In order to better understand the limits of the equipment, a comparison of the images with the objects’ physical information given side-by-side illustrates the problems and possibilities for the future.  The truth is that these are all at or beyond the realistic limit of my current set-up but I was interested to see what results could be achieved and I always enjoy their beauty, even if imperfectly captured.

Picture3

Apart from the obvious problem of size, mainly a function of distance in this case, their apparent magnitude is also challenging.  It is interesting to consider that using the 18 megapixel Canon 550D and WO GT81, each camera pixel which measures 4.30μm samples just 1.855 arc seconds per pixel and therefore even the largest of these objects (M74) spans an area of just about one tenth of a degree (0.10o).  Better alignment and longer exposure should tease out more detail but as the recorded image of each object is no more than 2% of the total image the reality is that I am pushing my luck.

Still it is fun and I have managed to capture a few of the photons that left these galaxies so long ago.  As my equipment, techniques and knowledge continue to improve then hopefully so will the limits.  Watch this space!


Rock On!

Due to my viewing limitations at Fairvale Observatory planning is essential, with the best imaging range mainly restricted to a zone between 65o and 85o and within +/-20o of the Meridian.  Furthermore, as I am mostly using the William Optics GT81 telescope at the moment, imaging targets should preferably be large – something between 1o & 2o is perfect, such as  the Rosetta Nebula at 1.3o or Andromeda Galaxy at 190’ x 60’.  As luck would have it these conditions are favourable for a number of objects at the moment and I have been somewhat spoilt for choice: North America Nebula, Veil Nebula and Andromeda.

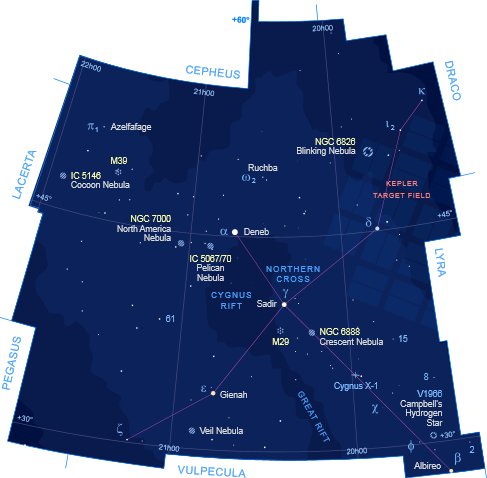
Notwithstanding, for some reason I have until now overlooked the Sadr Region IC 1318, which is also large and in a similar part of the sky as the aforementioned North America and Veil Nebulae but perhaps overshadowed by their notoriety.  In reality it is an enormous area of nebulosity containing many features worthy of imaging which are perfect at this time of the year from my location.

cygnus

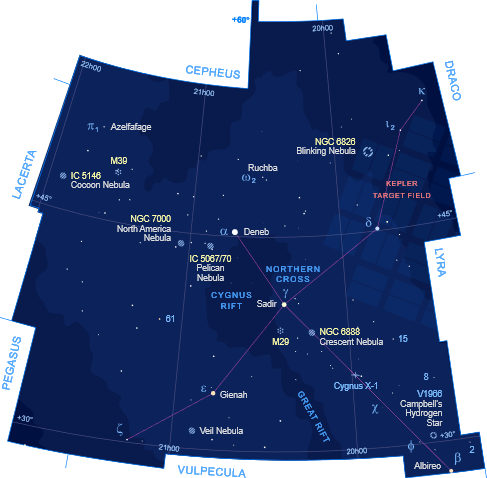
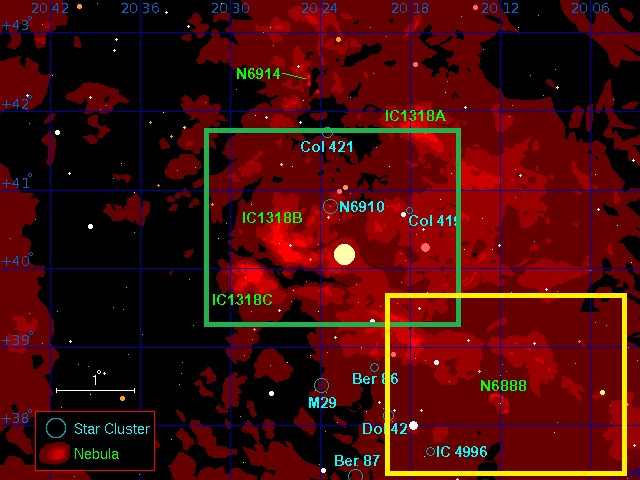
Sadr Region: green rectangle indicates the approximate area of IC 1318 image, yellow rectangle the NGC 6888 Crescent Nebula. image

Sadr Region: green rectangle indicates the approximate area of IC 1318 image, yellow rectangle the NGC 6888 Crescent Nebula image.

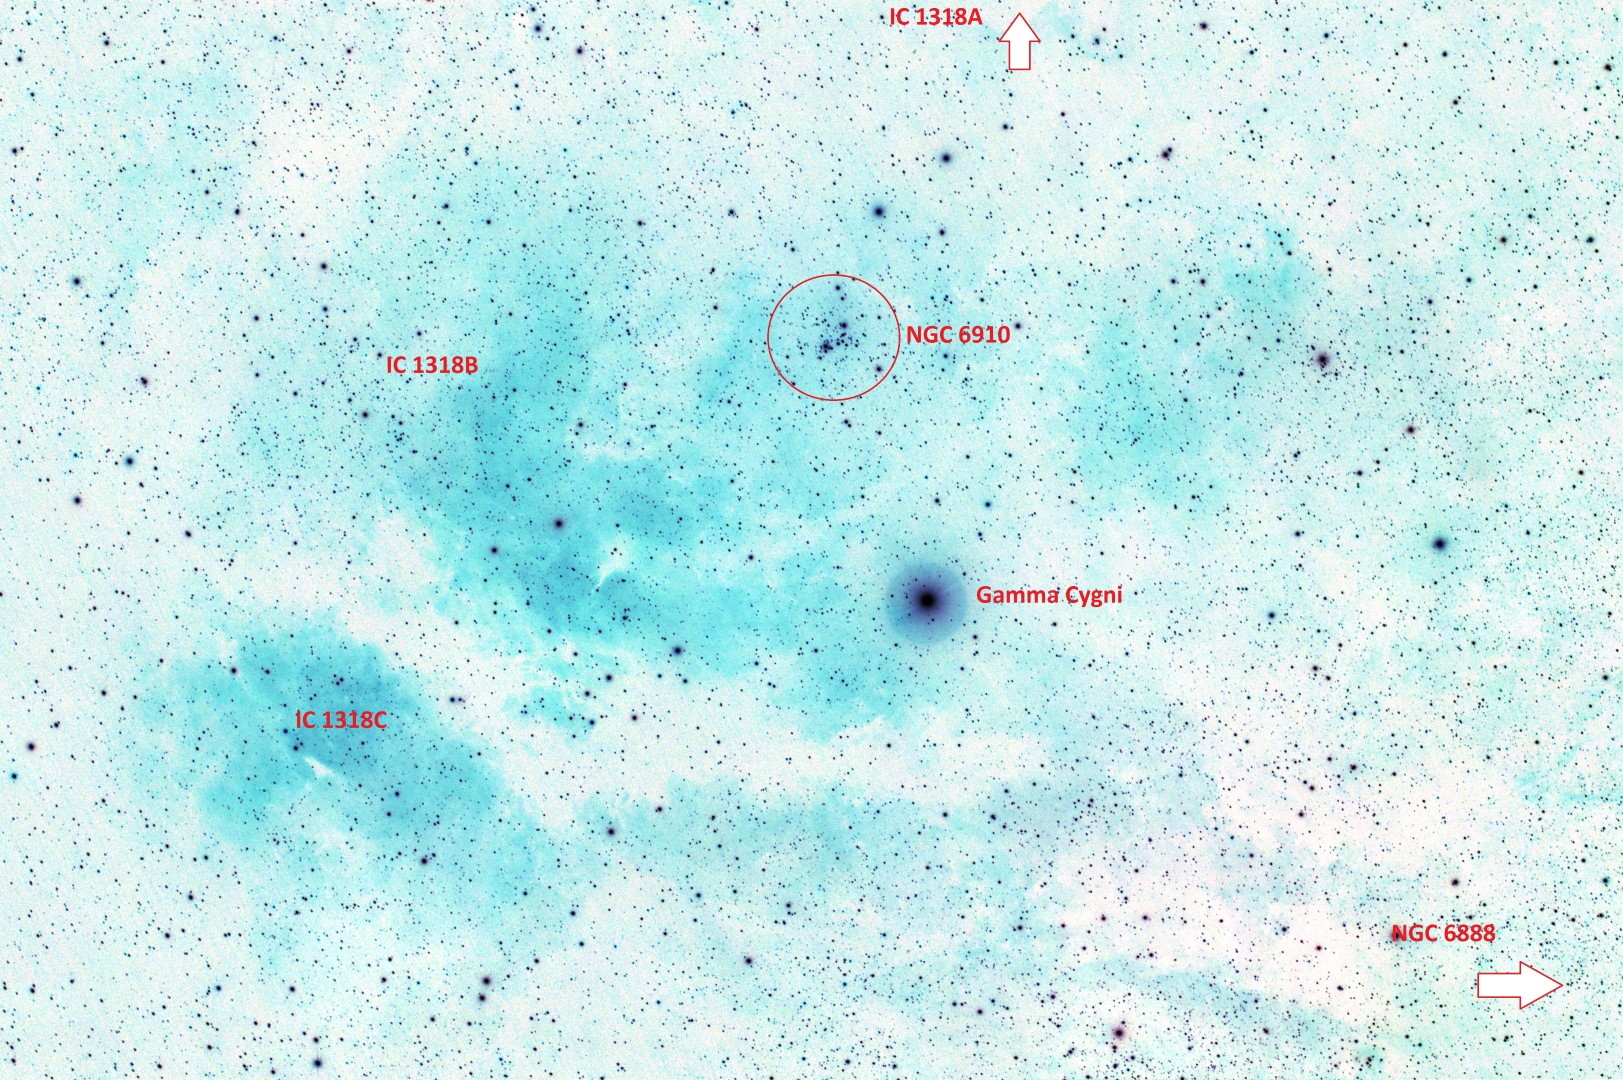
IC 1318 is a diffuse emission nebula surrounding the star Sadr or Gamma Cygni, which is at the centre of the Cygnus Cross and on the plane of the Milky Way.  The Sadr region is located deep within the Orion arm of the Milky Way about 3,000 light-years from Earth, with Gamma Cygni actually situated closer in the foreground. Such is the size of IC 1318 that its three constituent parts, A – B – C, extend over some 200 light-years or about 4 degrees, which is well beyond the FOV of the WO GT81; how could I have overlooked his enormous area of nebulosity before?  As a result of its size and complexity I also chose to image two other interesting features nearby.

IC 1318 Sadr Region - image inverted & annotated

IC 1318 Sadr Region – image inverted & annotated

IC 1318 Sadr Region WO GT81 + modded Canon 550D & FF | 30 x 120 secs @ ISO 1,600 | 30th September 2015

IC 1318 Sadr Region
WO GT81 + modded Canon 550D & FF | 30 x 120 secs @ ISO 1,600 | 30th September 2015

Situated just above Sadr is the small star cluster of NGC 6910 AKA Rocking Horse Cluster.  Although only 10’ in size the cluster is visually quite prominent, though I struggle to see the little horse that others have identified.  Notwithstanding, it is an interesting and attractive part of the Sadr region.

NGC 6910 The Rocking Horse Nebula as recorded by StarObersever.eu - located just above Gamma Cygni in the previous image.

NGC 6910 The Rocking Horse Nebula as recorded by StarObersever.eu – located just above Gamma Cygni in the previous image.

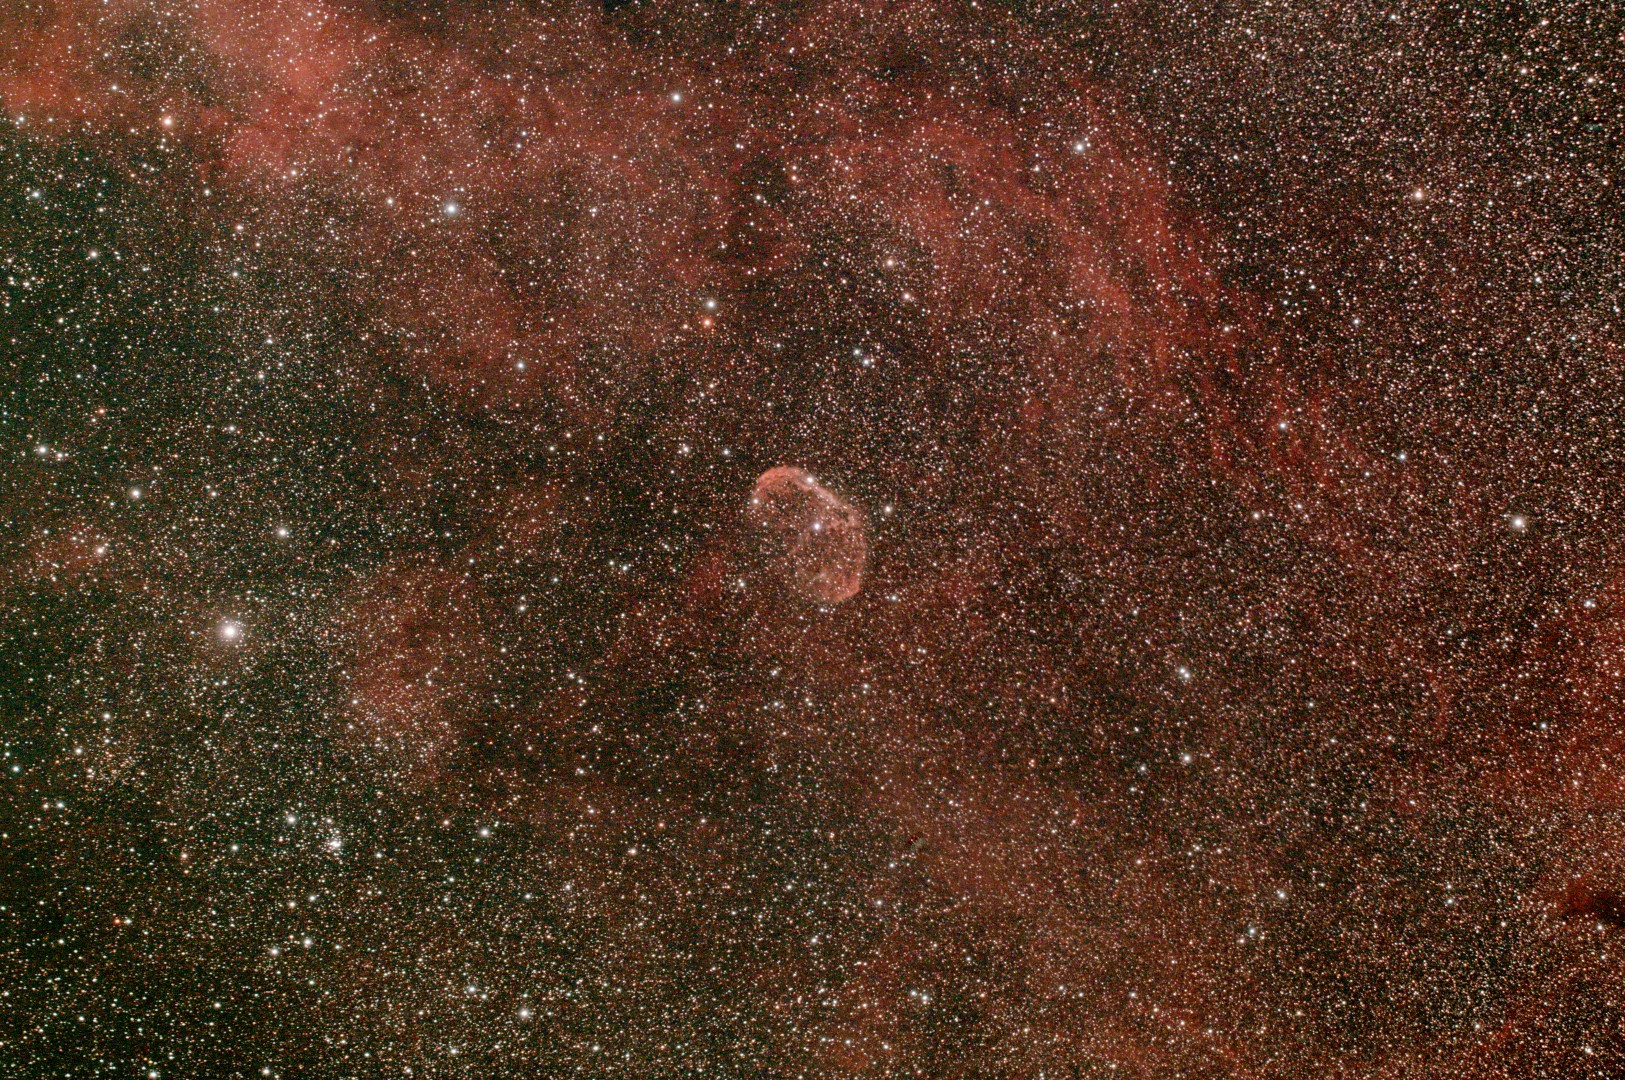
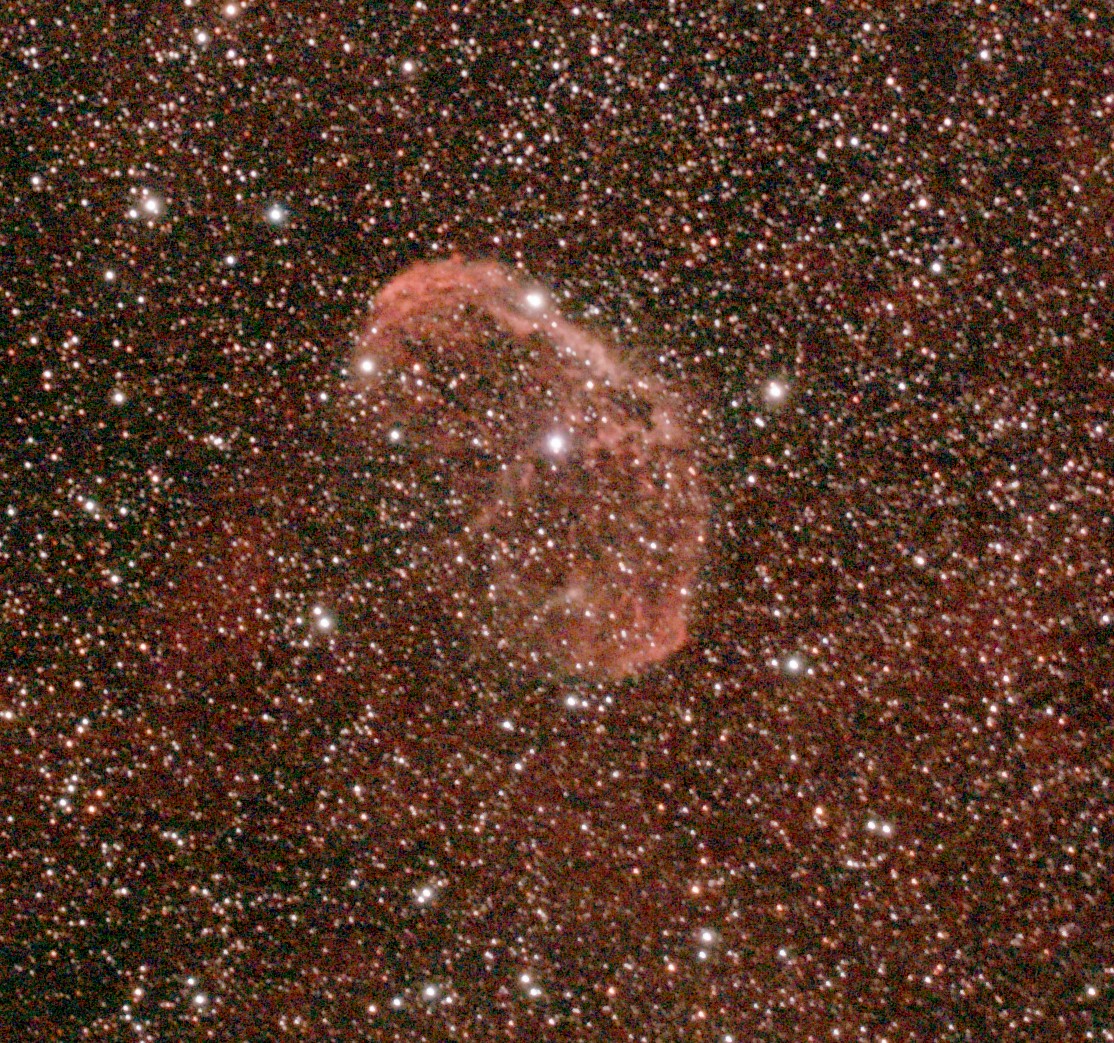
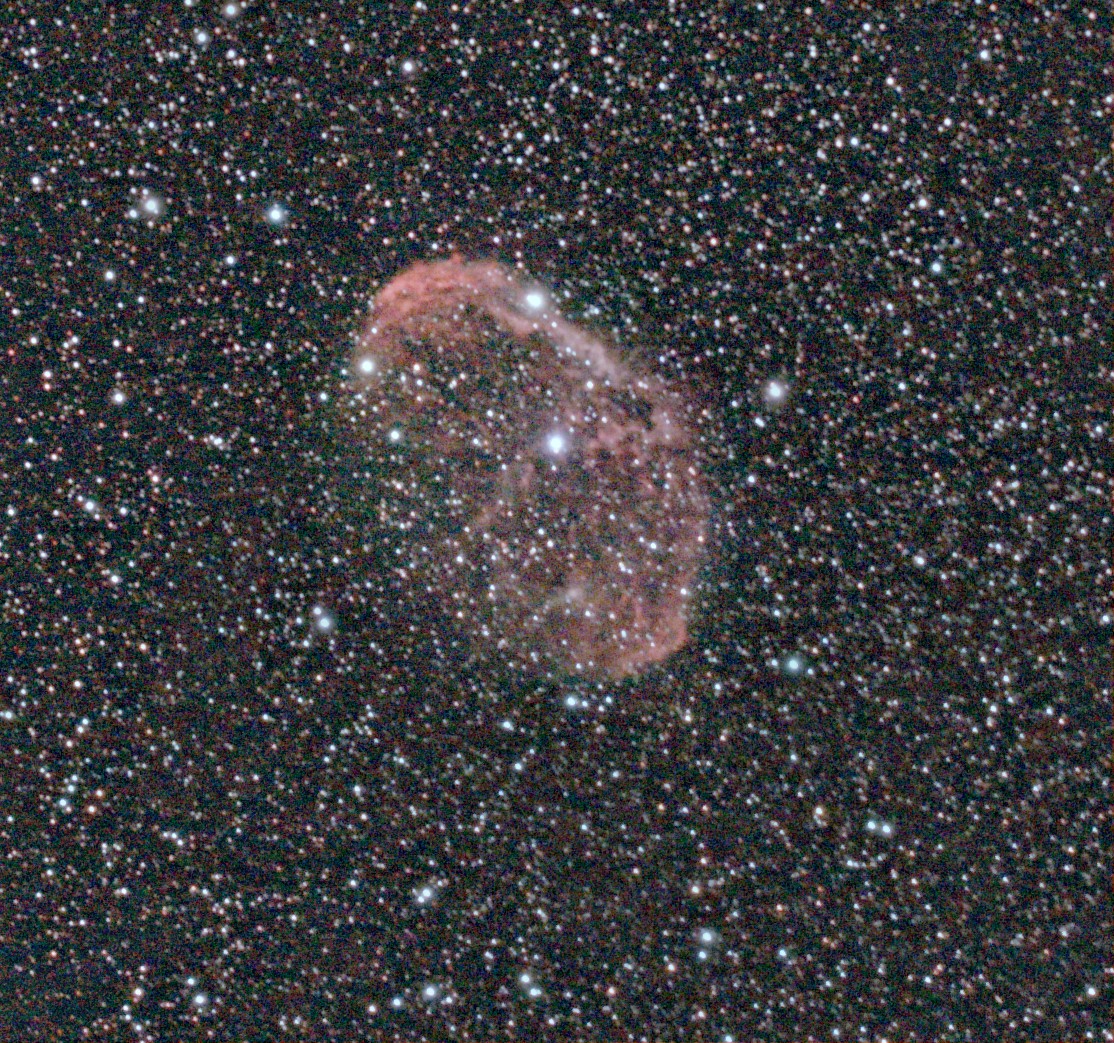
Located about 2 degrees south west of Sadr is the Crescent Nebula NGC 6888, which is not unlike the Jellyfish Nebula in appearance but is younger in its evolution.  An emission nebula, NGC 6888 is formed by a stellar wind from the Wolf-Rayet star WR 126 colliding with a slower moving wind ejected when the star previously became a red giant. The result is an illuminated shell-like feature consisting of two shock waves, one moving inward and the other outward, producing this amazing spectacle which measures some 25 light-years across.  Near the end of its existence, the star will eventually end its life in a spectacular supernova explosion – now that would be an image.
NGC 6888 Crescent Nebula WO GT81 + modded Canon 550D & FF | 20 x 180 secs @ ISO 1,600 | 9th October 2015

NGC 6888 Crescent Nebula
WO GT81 + modded Canon 550D & FF | 20 x 180 secs @ ISO 1,600 | 9th October 2015

Crescent Nebula - cropped

Crescent Nebula – cropped

Crescent Nebula - cropped + GradientXTerminator applied

Crescent Nebula – GradientXTerminator applied

Whilst IC 1318 has proved to be an excellent and productive imaging target for my equipment, it has become clear that it represents a much, much larger area of nebulosity that incorporates or is at least immediately adjacent to NGC 7000, the North America Nebula.  At a rough estimate this larger area spans a distance of some 2,000 light-years and is some 50-times bigger than the Sadr region.  Like other major areas of nebulosity (Barnard’s Loop) such a scale is way beyond the ability of my equipment and most others without resorting to a mosaic technique.

However, my interest in seeing and potentially imaging the bigger picture has been piqued and I have recently purchased a Vixen Polarie tracking mount, which can be fixed onto a camera tripod with a standard camera and lens in order to take long exposures without forming star trails. This set-up has two advantages over prime focus + telescope imaging: (i) it is highly portable and can easily be taken anywhere in a rucksack, and (ii) by using a camera lens of say <=50mm focal length it is possible to achieve a much wider FOV and thus photograph some of these very large nebulous areas in one image.

Alas the Sadr region is now moving on and it is probably too late to tackle using the Polarie mount but it will be something to look forwards to again next autumn and meanwhile Orion is just round the corner.  Watch this space for developments!

Harvest Time

Thanks to Copernicus and Kepler et al, astronomical events are highly predictable; unfortunately the same cannot be said about the weather.  Since taking up astronomy and despite favourable predictions of clear skies, I have frequently been thwarted by incoming cloud or worse.  When communicating with each other astronomer’s often use the closing of “Clear Skies”, no wonder given the continuous battle we have just to see the sky at night, let alone image it!

Such was my experience in 1982.  At the time I lived and worked in northern South Africa, close to the border with Botswana and the Kalahari Desert.   A lunar eclipse was forecast and in this part of the world there was usually a good chance of a clear sky.  Unfortunately, it was not to be this time either.  We saw glimpses of the eclipse through brief gaps in the otherwise thick cloud that was blowing across the sky.  I’ve missed other eclipses for the same reason, lunar and solar, and as a result have developed a somewhat resigned mindset towards such events, with the probability that the sky would most likely not be clear.  And so despite encouraging forecasts, my expectation for this week’s lunar eclipse was more of the same.

The lunar eclipse of 28th September was very unusual.  At mid-eclipse the Moon was just one hour past its closest approach to Earth in 2015, creating an effect now popularly termed a ‘Supermoon’.  Moreover, the rare combination of this and a full eclipse at the same time results in a distinctive red moon at totality.

I have learnt the hard way that in astronomy Rule-1 is perseverance.  I therefore carried out all the necessary research on the eclipse, undertook a dry run the previous evening and set-up all the equipment in the early evening before heading for forty winks – it was after all hopefully going to be a long night.  The weather had been clear and sunny earlier in the day but was forecast to cloud over shortly after midnight, just before umbral contact!  The sky was clear when I went out later but ominously there were clouds in the west.  Notwithstanding, the sky remained clear all night and the eclipse was nothing less than spectacular.

Total Lunar Eclipse 18th September 2015

Total Lunar Eclipse 18th September 2015

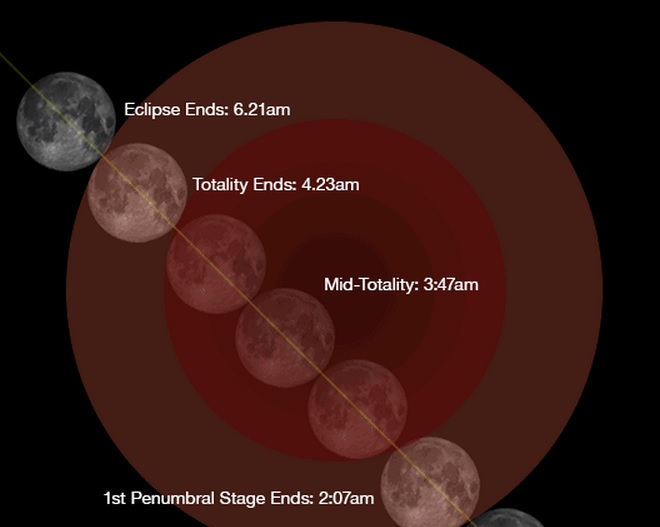
The precision with which astronomical events are plotted is incredible and, guided by various articles and charts all was in place well before the end of the penumbral stage at 2.07am.  Shortly before darkness started to show on the top, eastern edge of the Moon and then exactly at 2.07am the eclipse shadow touched and then crept inexorably across the Moon’s surface.  This was the main phase of the eclipse when the Moon enters the central, dark part of the shadow called the umbra, eventually reaching totality at 3.11am.

Totality lasted 1 hour 12 minutes, during which I just watched through a pair of 10 x 50 binoculars, which probably was the best way of actually viewing the Moon throughout the eclipse.  Of course, with the brightness of the full Moon obscured by the eclipse during this time, the rest of the night sky was plunged into blackness, thus bringing the stars, nebulae and galaxies back to life.  As the Moon was passing through the lower part of the Earth’s umbral shadow, the southerly edge appeared relatively bright during much of totality.  Totality finished promptly at 4.23am as the light started to move across the Moon’s surface once again like an unstoppable wave.  The Moon finally exited the umbra at 5.27am and the show was over until October 2033, on which occasion the Supermoon eclipse will unfortunately not be visible from the UK – I did say it was rare.   However, there will be another total lunar eclipse in July 2018, so it’s not all bad news.

Given my history, this was naturally my first time imaging a lunar or any other eclipse and I am very pleased with the results.  Other than requiring a clear sky, as usual preparation was the key: understanding the timing and dynamics of the event and considering the imaging possibilities.  The most obvious problems to overcome were the Moon’s tracking and movement of the eclipse itself, with its associated impact on changing brightness and contrast for imaging.

The previous evening had also been clear, so I tested a basic DSLR + tripod set-up using an intervalometer to trigger the shots at 5-minute intervals.  With the 200mm telephoto lens 8 pictures were successfully recorded as the Moon tracked across the image frame, at 100mm this increased to 12 pictures; however, the track tended to move out of the side of the frame early as the Moon follows an inclined rather than horizontal track.  Altogether it was a successful and useful experiment for the next evening.

On the night I used the William Optics GT81, with a Canon 550D camera and field flattener, which continuously tracked the Moon and eclipse,  imaging at 1-minute intervals throughout the period inward and outward of the umbra and manually during totality.  Using a fixed ISO 100, it was necessary to continually change the exposure time every five or so minutes in order to compensate for the aforesaid changing light conditions.  In addition, I again used the intervalometer with the Canon 700D and the 55- 250 mm telephoto lens on a camera tripod.

Eclipse: Inward sequence from umbral contact to totality WO GT81 + Canon 700D + FF | 1/500 to 1/3 sec @ ISO 100 | 18th September 2015

Eclipse: Inward sequence from umbral contact to totality
WO GT81 + Canon 550D + FF | 1/500 to 1/3 sec @ ISO 100 | 28th September 2015

Eclipse: Exit sequence to full Moon Canon 550D + tripod | >=1/160 sec @ ISO 400

Eclipse: Exit sequence to full Moon
Canon 700D + tripod | >=1/160 sec @ ISO 400

Eclipse animation

Eclipse animation

The results from both methods turned out well.  With superior optics and tracking, the WO telescope images were naturally better in quality and magnification.  However, the alternative simple camera set-up also produced a pleasing record of the eclipse, perhaps in some way capturing the mood better?

The entire event lasted just over 3-hours, during which found it necessary to look away from the imaging process at times just to enjoy this unusual and exciting spectacle.  The name Harvest Moon is given to the full moon closest to the Autumn Equinox, recognising the time of year at which the crops have been gathered and can itself be an attractive sight.  The coincidence with an eclipse makes for a rare and dramatic occasion, which this time I was able to enjoy completely cloud free from beginning to end – well that’s a first.

Harvest Moon at Totality WO + Canon 700D + FF | 1/3rd Sec @ ISO 400 | 28th September 2015

Harvest Moon at Totality
WO + Canon 550D + FF | 1/3rd Sec @ ISO 400 | 28th September 2015

The Pelican & The Phoenix

As we pass the Autumn Equinox the promise of long and exciting Winter skies is not far off but there are still some wonderful late Summer features around worth imaging before they move away from the Meridian and out of view from Fairvale Observatory.  Following a major operation earlier in the year I’ve been unable to move the heavy equipment outdoors until very recently and have therefore almost completely missed the Summer skies; even as I’ve been getting better in recent weeks, poor skies and other circumstances have stopped my return to astronomy – until now.

Up until shortly before midnight the Cygnus constellation is favourably located close to the Meridian at the moment and at a very high, southerly altitude – perfect for my location – it was therefore here that I chose to make my long awaited resumption to astroimaging last Saturday.  The weather forecast in the morning showed clear skies for that night but by early evening had changed to cloud and looked like being another lost opportunity; on this basis the Flamsteed Astronomy Society had already cancelled their planned evening astronomy session.  However, unlike previous attempts in recent weeks when clear skies were forecast and the cloud rolled in unannounced, this time the outcome was very different, with a clear moonless sky throughout the night – I sometime wonder if the weather forecasters have windows and bother to look outside!

cygnus

Located northeast of the first magnitude star Deneb and some 1,600 ly from Earth is NGC 7000 or the North America Nebula, an enormous H II region that in outline resembles the North American continent.  I first encountered this emission nebula at a similar time last year, which was my first experience of such a feature and I was therefore thrilled to capture part of it in my picture; my blog title at the time captures my feelings – WOW!  However, taking the image using the longer focal length Skywatcher 150PL with a smaller field-of-view (FOV), the picture only captured part of the ‘USA’ and the ‘Gulf of Mexico’.  Furthermore, using an unmodded camera much of the red H-alpha light that is characteristic of these nebulae was not recorded.

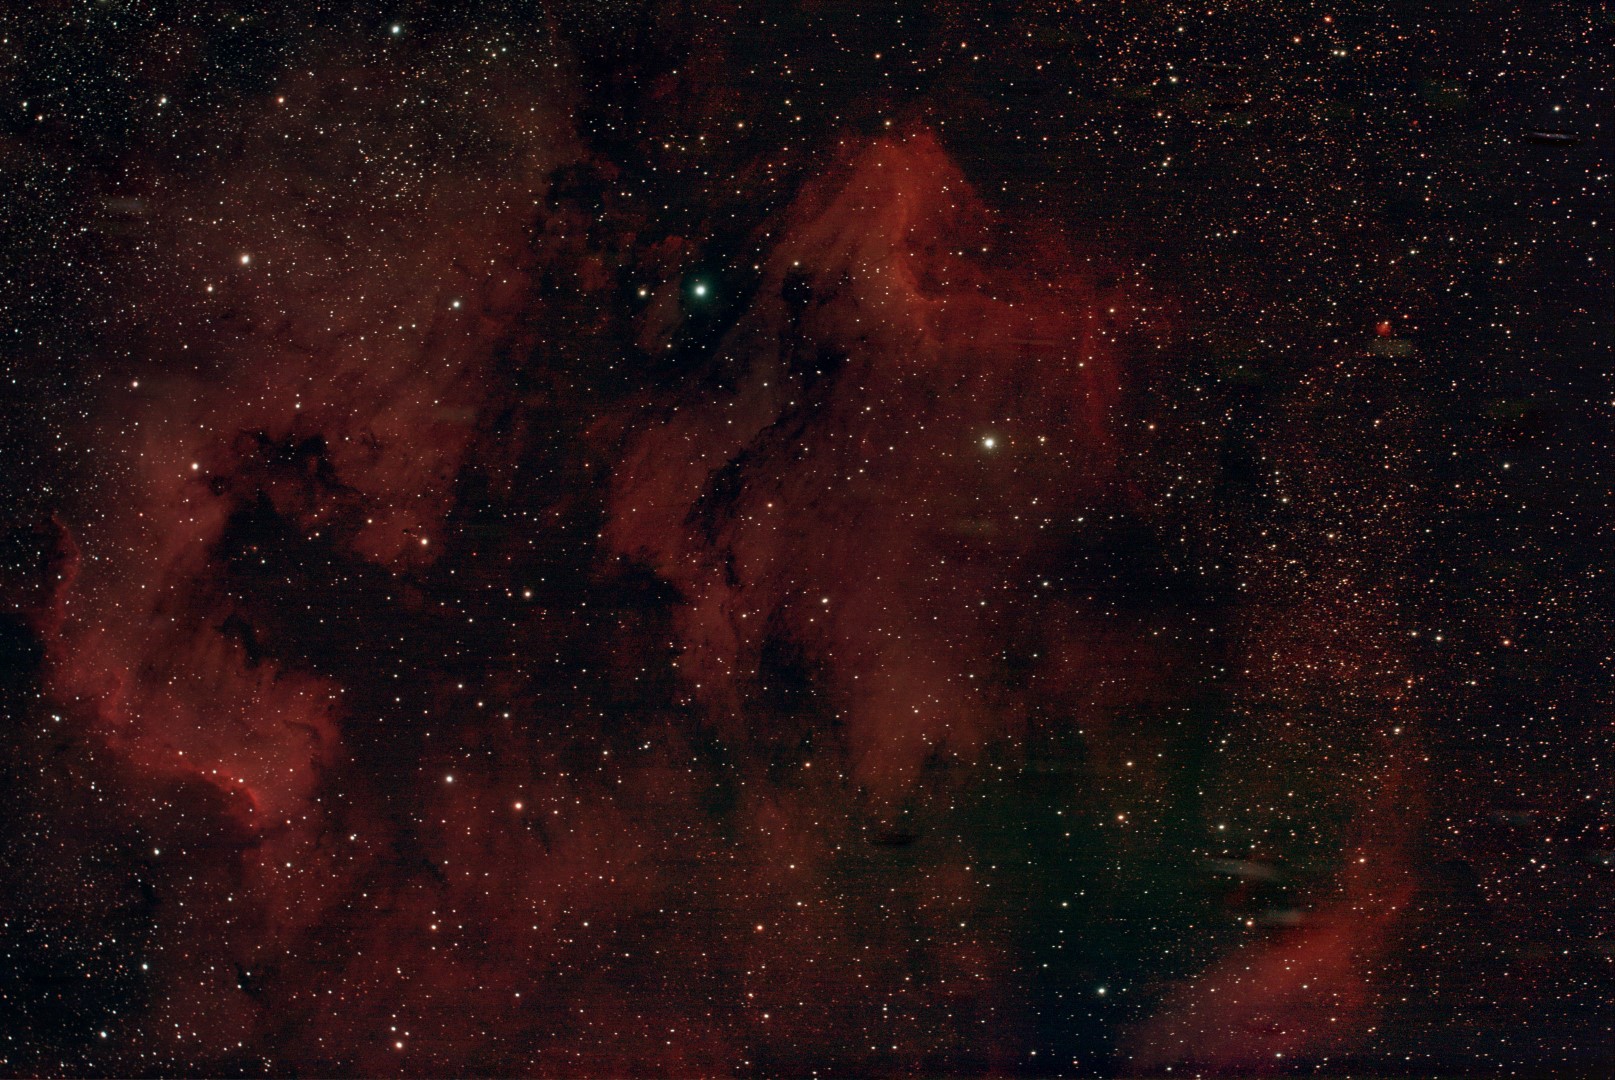
Since then my equipment has changed in a number of important ways, so that the William Optics GT81 with a wider FOV would now enable me to image more of the nebula, whilst using a modded DSLR camera would also record much more of the H-alpha light; an additional year’s experience also helped.  This time my target was the related IC 5070 and IC 5067 H II regions otherwise known as the Pelican Nebula, situated just west of NGC 7000 and close to Deneb.

The Pelican Nebula, IC5070 & IC 5067. WO GT81 & modded Canon 550D + FF | 30 x 120 secs @ ISO 1,600 + calibration | 19th September 2015

The Pelican Nebula, IC5070 & IC 5067
WO GT81 & modded Canon 550D + FF cropped | 30 x 120 secs @ ISO 1,600 + calibration | 19th September 2015

With an apparent magnitude of +8 the Pelican is generally less bright than its larger +4 neighbour but is no less exciting.  The bright double star Cygnus 57 and binary Cygnus 56 shine conspicuously just in front of the ‘bird’ and within the ‘body’ respectively.  In addition a bright area at the northern top of the ‘bird’s head’ is an active area of star formation, which ionizes the gases creating the glowing red area.

Whilst missing the impact of being my first H II nebula last time, the larger image of the North America Nebula now captures most of the ‘continent’ and encompasses ‘Central America’.  As a result the picture clearly shows the Cygnus Wall, another bright area of star formation that runs along ‘Baja California’ / ‘northern Mexico’ area.

NGC 7000 The North America & Pelican Nebulae WO GT81 + modded Canon EOS 550D + FF | 30 x 120 secs @ ISO 1,600 + calibration | 19th September 2015

NGC 7000 The North America & Pelican Nebulae
WO GT81 + modded Canon EOS 550D + FF | 30 x 120 secs @ ISO 1,600 + calibration | 19th September 2015

The combined Pelican and North America Nebulae span some 50 ly across, which when imaged together makes a wonderful picture of these spectacular features.  I would be happy with this image at any time but after nearly six months away from astroimaging it’s a very pleasing result.  I feel re-invigorated, like the phoenix has risen again.

180 Degrees

Viewing from Fairvale Observatory is far from ideal but I have no choice and need to make the most of it:

(i) Without going down the garden (which is not practical and would then totally obscure the southerly view) my house blocks the entire northern sky, critically including Polaris;

(ii) We have very high +/-12ft hedges surrounding the garden;

(iii) Directly east is a large house that completely obscures the horizon;

(iv) South east and south are very large trees;

(v) To the west is a wooded hill, thus blocking the horizon in that direction, and

(vi) Some 7-miles to the south is Gatwick Airport which produces significant light pollution, as well as aircraft that regularly fly through my images as well as others from Heathrow, also not far away.

It’s a miracle I am able to undertake any astrophotography and I long for the day I live somewhere with better conditions.

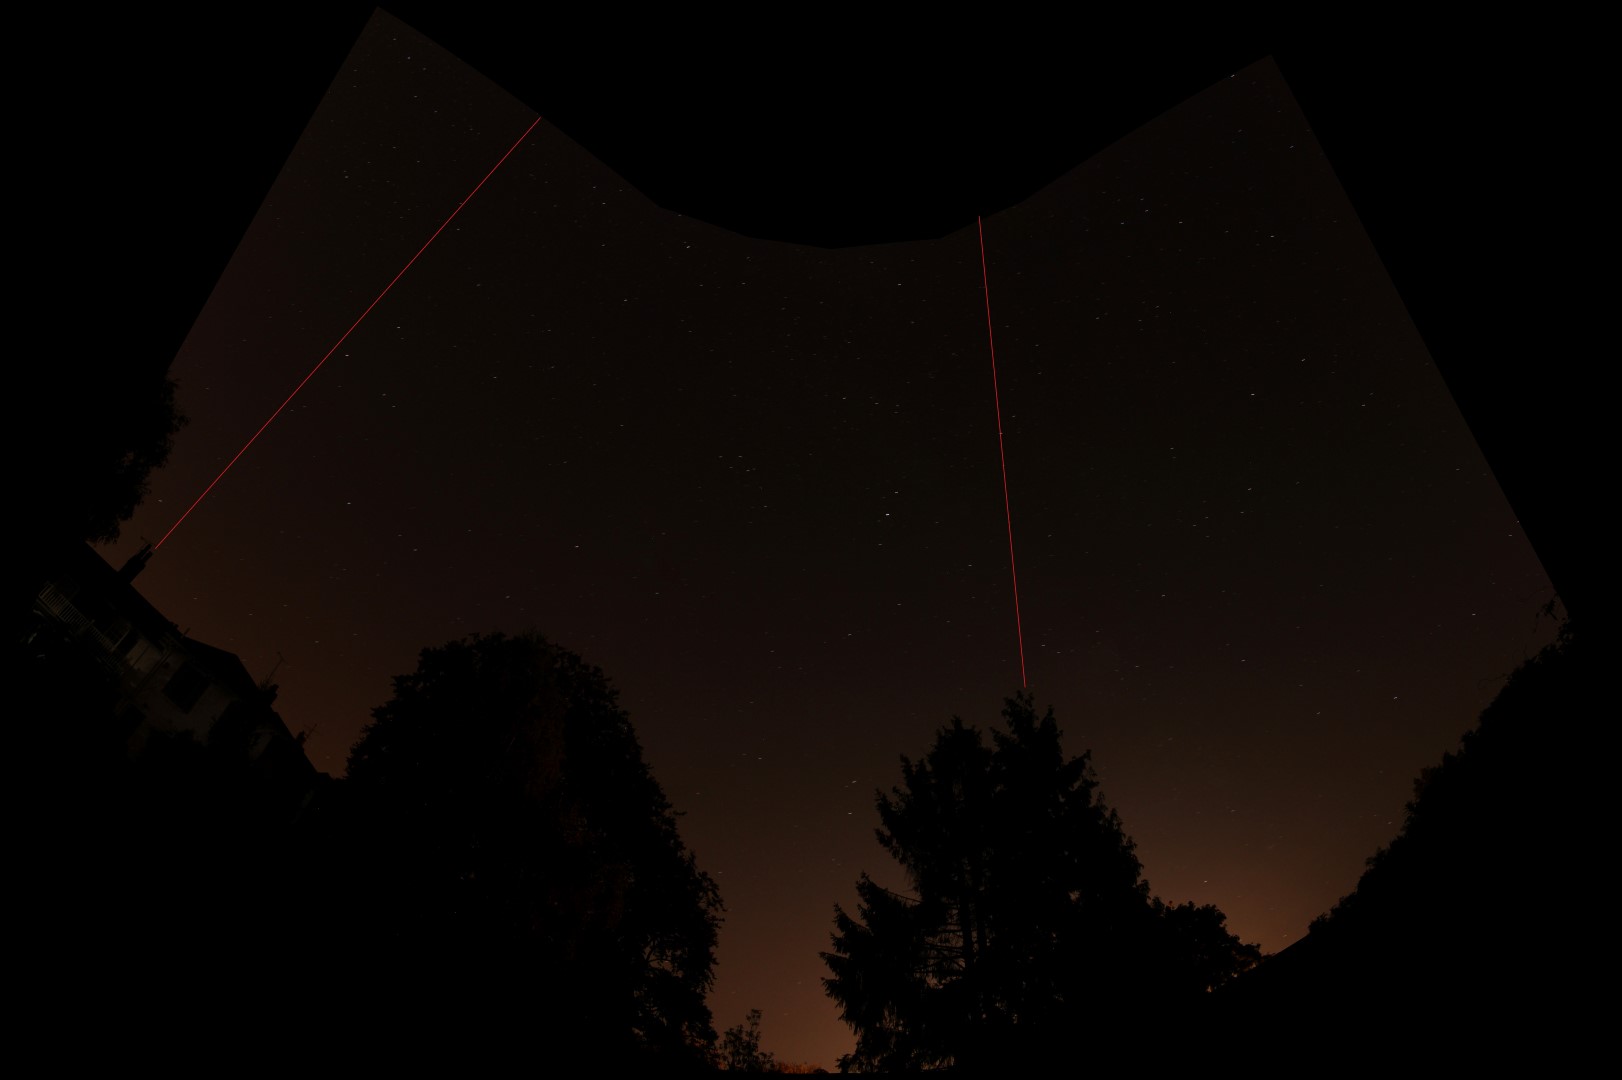
In the meantime I have to make do with the 180o I have available.  For the record and with great skies and good weather, this week I compiled a photo mosaic of the aforesaid view – which illustrates some of the aforementioned problems and is in itself an interesting picture. The scene is stitched together from six DSLR shots that encompass most of the east to west panorama but in order to achieve this, the resulting photograph becomes severely distorted.

The principal view is directly south, with the Meridian pretty much straight ahead.  Low angle viewing and imaging is almost completely impossible but depending on the timing and some crafty shooting, the mid-angle objects can be accessed as they pass between the trees. The best imaging is therefore mostly restricted to a 20o range between about 65o and 85o and within +/- 20o of the Meridian; high angle east and west views are feasible but seeing in these directions is impacted by the greater atmospheric distance through which the light has to travel.

For now this is my night time playground: it is challenging and can be frustrating but with clear skies, preparation and patience it’s good fun and much can still be achieved.

Night sky panorama from Fairvale Observatory + obstacles: the tree on the left is very large +200 year-old copper beech, the coniferous trees  due south are closer to the property boundary - thus increasing their impact   on seeing.  The red line on the left approximately marks the East and the central red line is the Meridian.

180 degree night sky panorama from Fairvale Observatory + obstacles: the tree on the left is a very large +200 year-old copper beech, the coniferous trees due south are closer to the property boundary – thus increasing their impact on seeing. The red line on the left approximately marks the East and the central red line is the Meridian.

Equivalent Cartes du Ceil planetarium view at the same time.

Equivalent Cartes du Ceil planetarium view at the same time.

By Jove

As a visual and photographic spectacle, in my opinion Jupiter comes a close second to Saturn among the planets.  The so-called ‘King of the Planets’, Jupiter is more than twice as massive as all the others combined. Notwithstanding its size, Jupiter has the shortest ‘day’ of any planet, rotating fully in just 9-hours and 50 minutes – as a result creating a significant equatorial bulge that measures 88,760 miles in diameter and 83,082 miles from pole-to-pole.  However, as a gas giant the planet does not rotate en masse, with the outer regions moving slower than the equatorial region leading to a series of distinctive belts and zones, most notable of which is the Great Red Spot – a massive storm on the edge of the South Equatorial Belt.

Partly because of its vast size and resulting gravitational field, Jupiter is thought to have played a dominant role in shaping the present Solar System.  The planet we see today is not alone, with 67 moons so far identified, the four largest discovered by Galileo 400 years ago being easily visible from Earth.  In order of distance from Jupiter the moons of Io, Europa, Ganymede and Callisto are extremely diverse in nature – ranging from the highly volcanic Io to the frozen world of Europa, whilst Ganymede and Callisto may have sub-surface oceans and are bigger than the planet Mercury.


Despite being by far the largest planet in the Solar System and the fourth brightest object after the Sun, Moon and Venus, my attempts to image Jupiter and its Jovian neighbours have so far met with only mixed success.

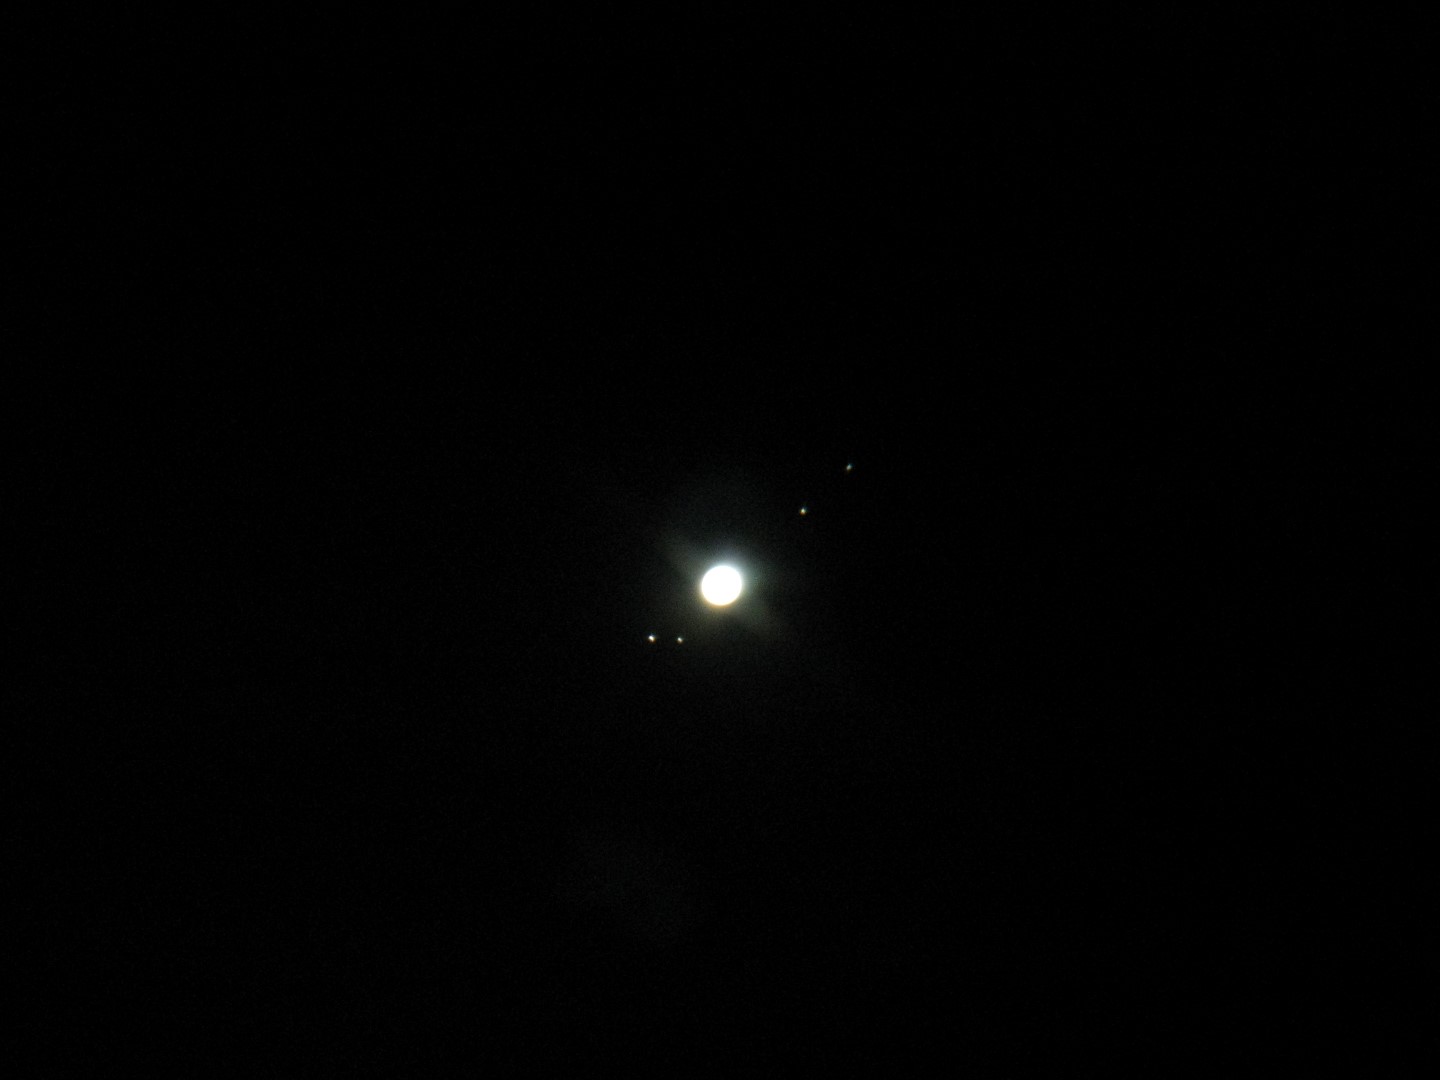
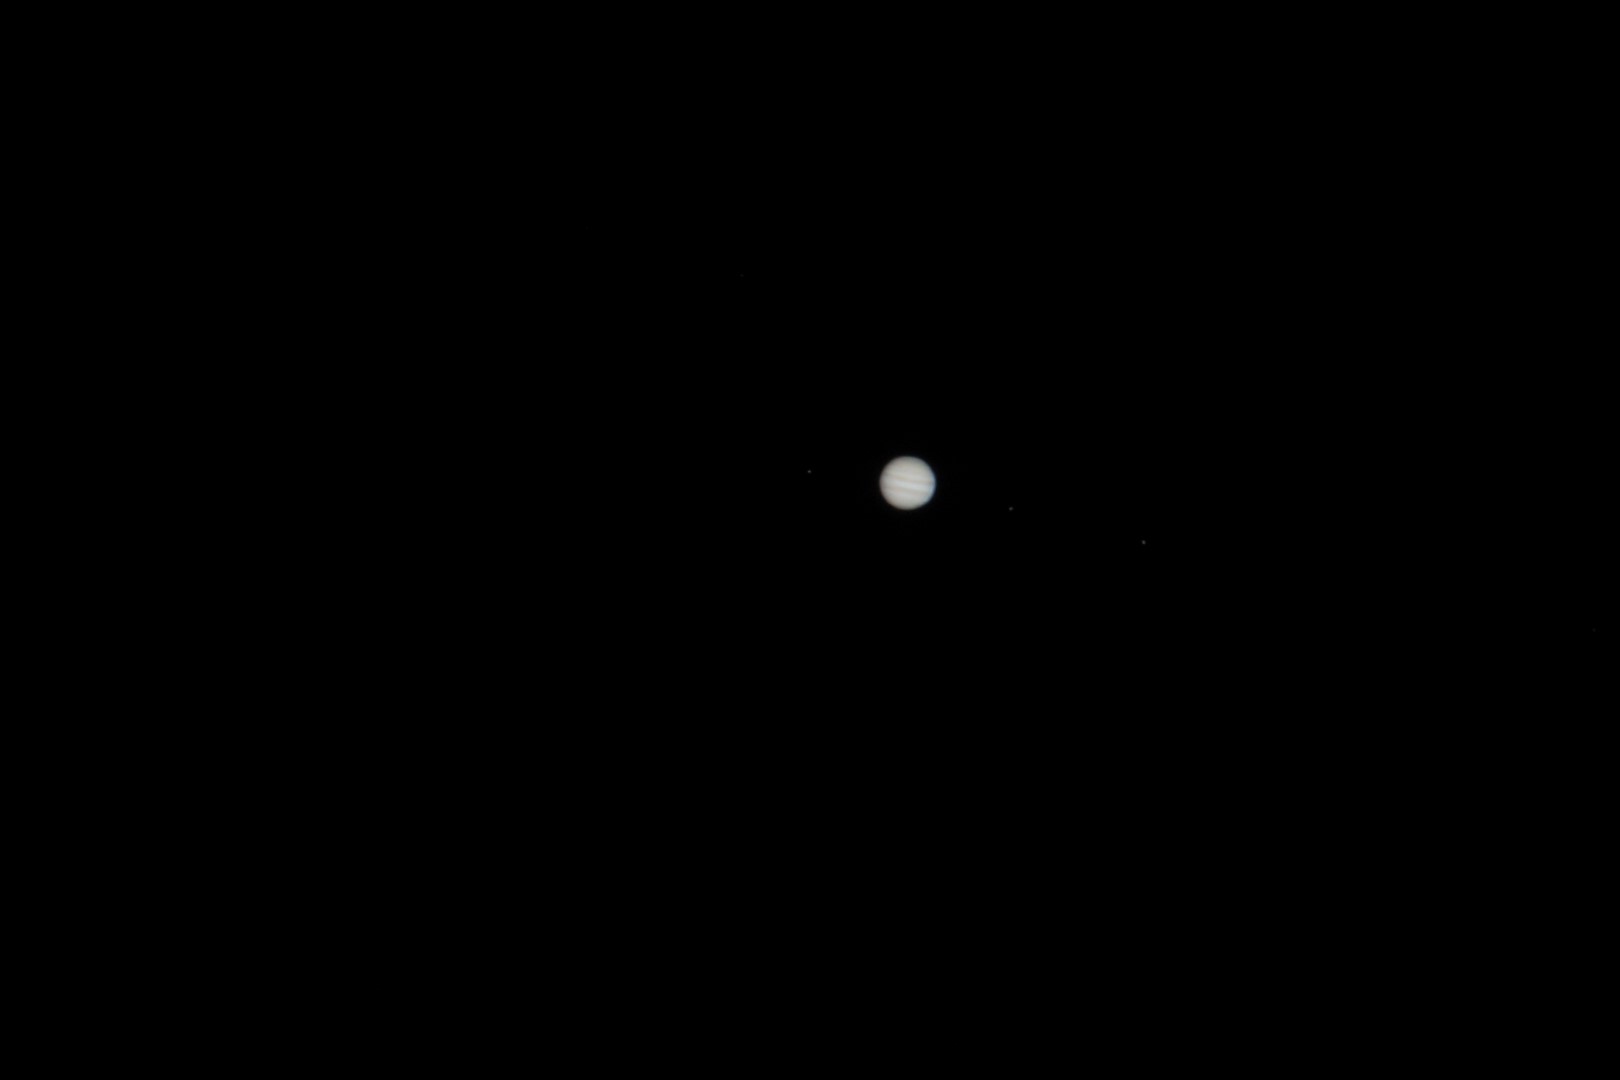
Most people’s first view of Jupiter is likely to be through binoculars or a basic telescope, which will   show the very bright planet accompanied by a number of its Gallilean moons, depending on their orbital position i.e. when located behind the planet they will, of course, not be visible.  Having viewed Jupiter a few times like this, my first attempt to image the planet and its moons was just such a view simply using the William Optics 81mm refractor, a x2 Barlow and my Canon 700D DSLR.  Compared to Jupiter the moons are not as bright and to capture their presence it is necessary to boost either the ISO or exposure time, which then overexposes the bright planet resulting in loss of detail – in this case the distinctive coloured gas bands. Conversely, with a lower ISO or exposure this detail once again becomes apparent but some or all of the moons are then lost in the image.  The way round is to combine two sets of images taken at different camera settings, thus obtaining the best of both worlds, literally.  For the moment however this remains work in progress.

Jupiter  - overexposed but  shows all four Gallilean moons.

January 2014, Jupiter – overexposed but shows all four Gallilean moons | 1 sec @ ISO 400


upiter - lower exposure shows the gas belts but the moons, though there, are now very difficult to see.  1/3rd sec @ ISO 800

Jupiter – lower exposure shows the gas belts but the moons, though there, are now very difficult to see. 1/3rd sec @ ISO 800

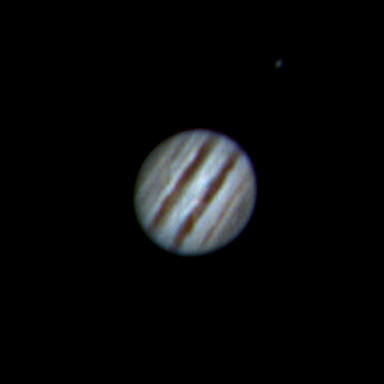
Personally I like the wider view of Jupiter and its moons but inevitably the holy grail has to be a close-up image showing details of the planet’s characteristic gas belts, which requires the use of a CCD video, in my case a ZWO ASI 120MC camera.  Having mostly concentrated on DSO photography to-date using a DSLR, my use of the ZWO camera is limited and with mixed success.  Using this camera and the Skywatcher 150PL reflector telescope I have previously managed images of Saturn, Mars and the Moon but this time I used the William Optics refractor instead.

CCD imaging is a very different technique to DSLR and it’s fair to say that I still have much to learn. Notwithstanding, using Registax for processing I obtained some reasonable first-time Jupiter images but will need more practice to improve the detail; the quality might also be improved using WinJUPOS software during processing, which applies a de-rotational programme to the fast moving planet thus reducing blur – however, I have yet to understand let alone master this software.  Also, whilst the quality of the William Optics telescope is far superior to the Skywatcher 150PL, it is obvious that its relatively short focal length is not really adequate for good planetary imaging.

21st February 2015. Jupiter up close WO 81GT81 | ZWO 120 MC

21st February 2015. Jupiter up close
WO 81GT81 | ZWO 120 MC

So far this year Jupiter had already provided a number of different opportunities for imaging.  Between February and April the planet moved across the southern sky in all its glory, whilst more recently it moved into close conjunction with Venus at the end of June and there’s more to come.

On 26th August from our vantage point on the Earth, Jupiter will appear very close to the Sun in the sky as it passes around the far side of the solar system from the Earth.  At closest approach, Jupiter and the Sun will appear at a separation of only 0°52′, making Jupiter totally unobservable for several weeks while it is lost in the Sun’s glare.  At around the same time, Jupiter will also be at its most distant from the Earth – receding to a distance of 6.40 AU – since the two planets will lie on opposite sides of the solar system.  Over following weeks and months, Jupiter will re-emerge to the west of the Sun, gradually becoming visible for ever-longer periods in the pre-dawn sky. After around six months, it will reach opposition, when it will be visible for virtually the whole night, by which time I have hopefully mastered some new techniques for imaging this Jovian King of the Planets.

Canon Koppernigk’s Conjunction

This time of the year is something of a fallow period for astronomers: short nights combined by with the complete absence of astronomical darkness and fewer DSOs.  I have personally found this year more difficult than usual as since April 25th, following an operation to replace my left knee, I have been physically unable to set-up Fairvale Observatory and undertake astronomy of any sort.  Notwithstanding, once over the initial few weeks of pain, I have tried to use the extra time afforded me usefully.

download

I have been reading Arthur Koestler’s excellent book The Sleepwalkers, which charts the history of man’s understanding of the universe and astronomy.  Speaking of fallow periods, in the book I’m just past the very long period of inactivity and general superstition regarding the cosmos that occurred during the Middle Ages, which followed the more enlightened thinking of the Greeks, particularly Pythagoras; taking account of the Greek’s progress in understanding the Universe, our astronomical knowledge might have been 1,500 years more advanced today were it not for this prolonged medieval hiatus!  Fortunately Copernicus (his better known Latin name) finally initiated what has become today’s heliocentric model of the Solar System, although his seminal work On the Revolutions of the Heavenly Spheres was only published just a few hours before his death after a delay of 30-years, such was his reluctance to put forwards such thoughts at that time.

Next, I have just completed the 6-week AstroTech MOOC course organised by Edinburgh University, which covered the scientific logic behind astronomical discoveries and the technology that lies behind them.  This was my third astronomy MOOC and provided some interesting insight into telescope and imaging technology, as well as filling time during my recovery.

Finally, as my (limited) mobility has slowly started to improve, the night sky has recently provided a fascinating show of its own that did not require the observatory’s paraphernalia and, furthermore, beautifully demonstrated the principles originally outlined by Copernicus in 1543.

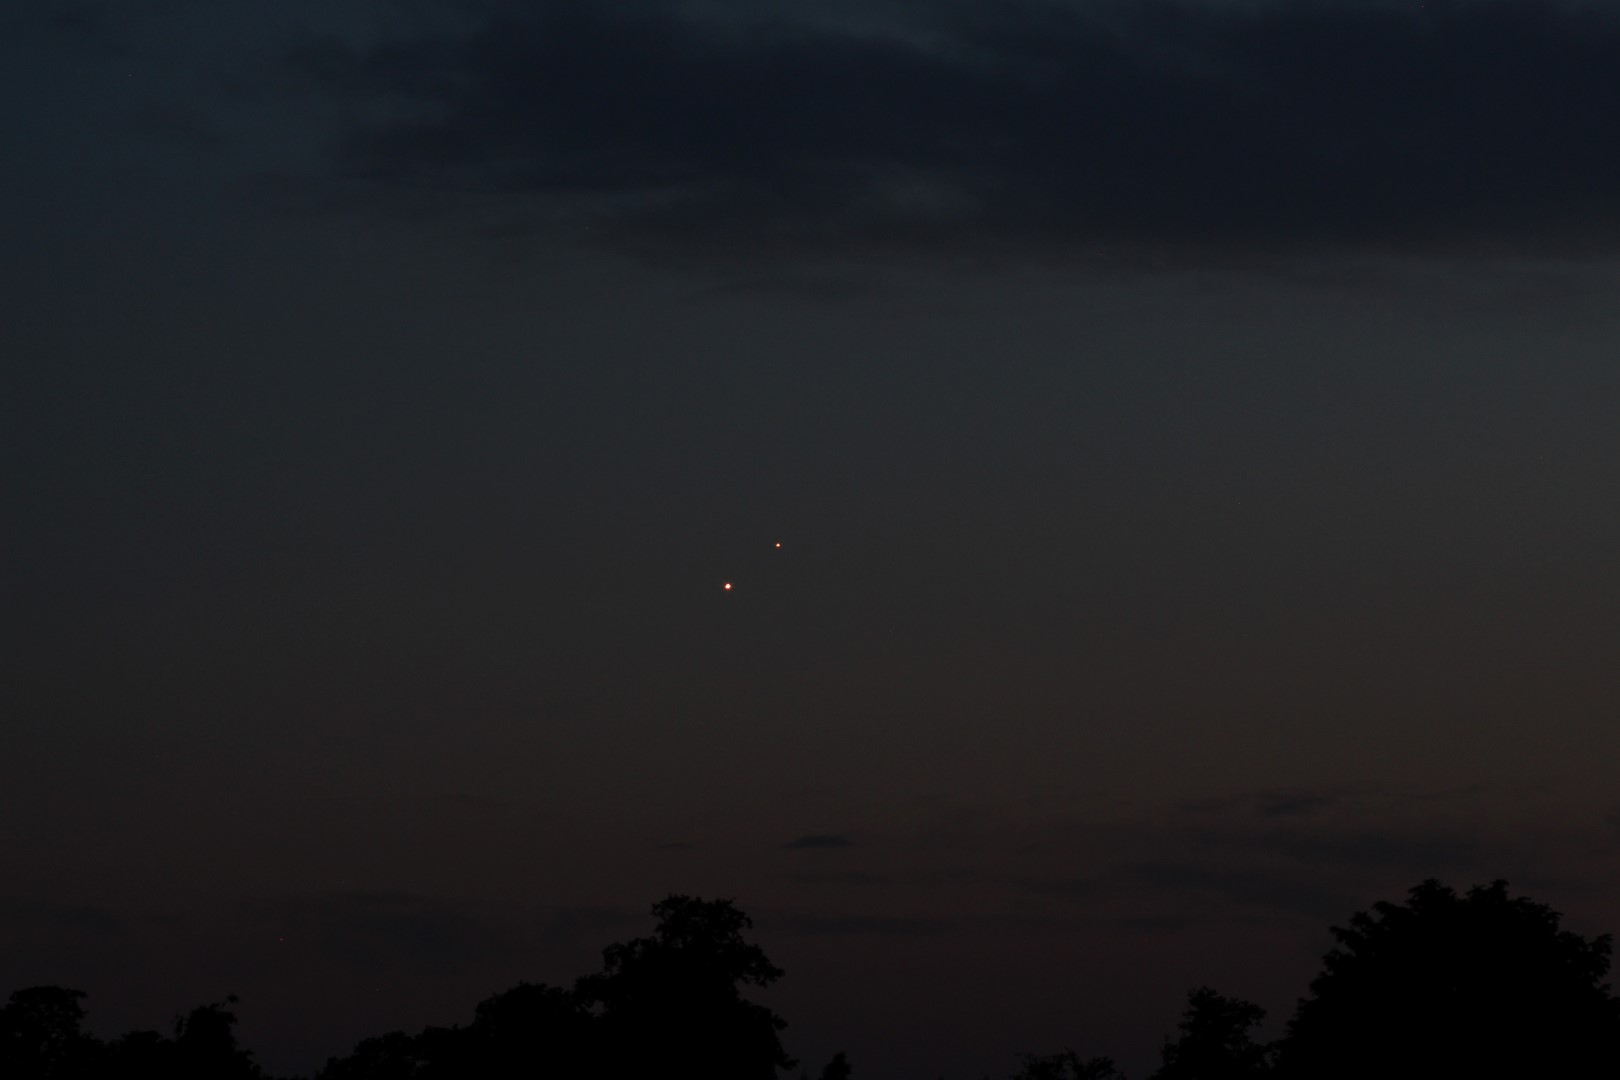
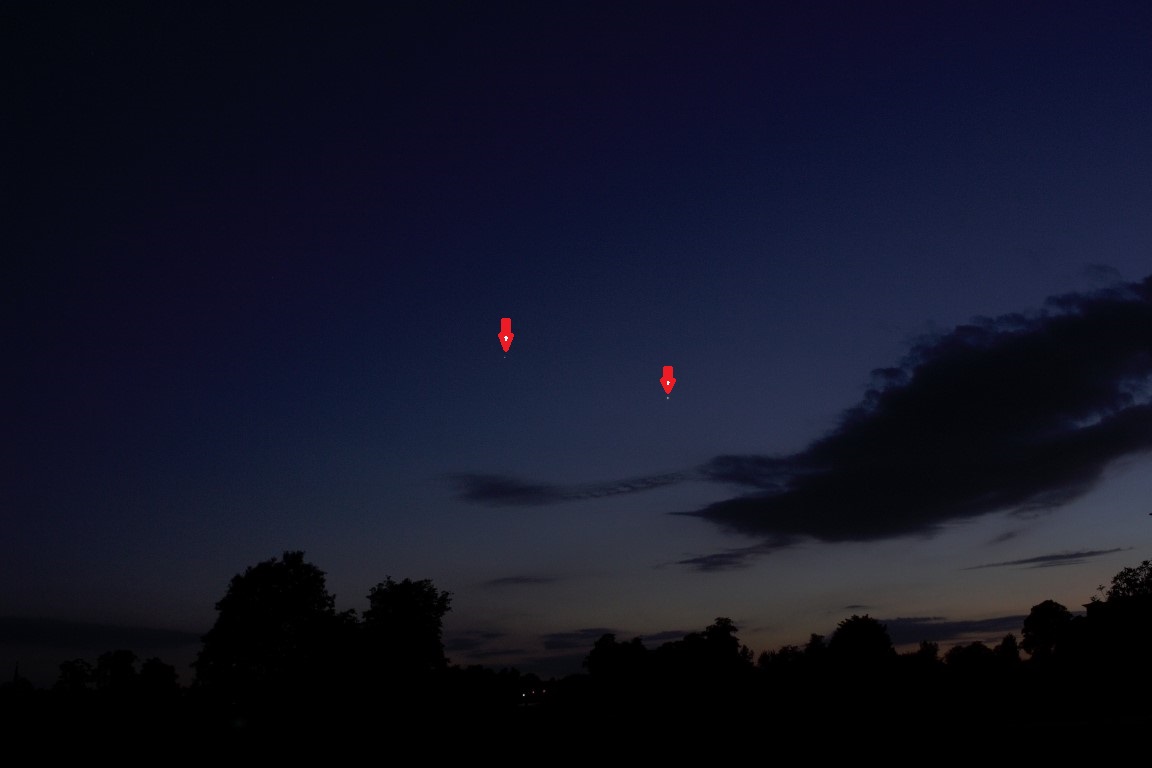
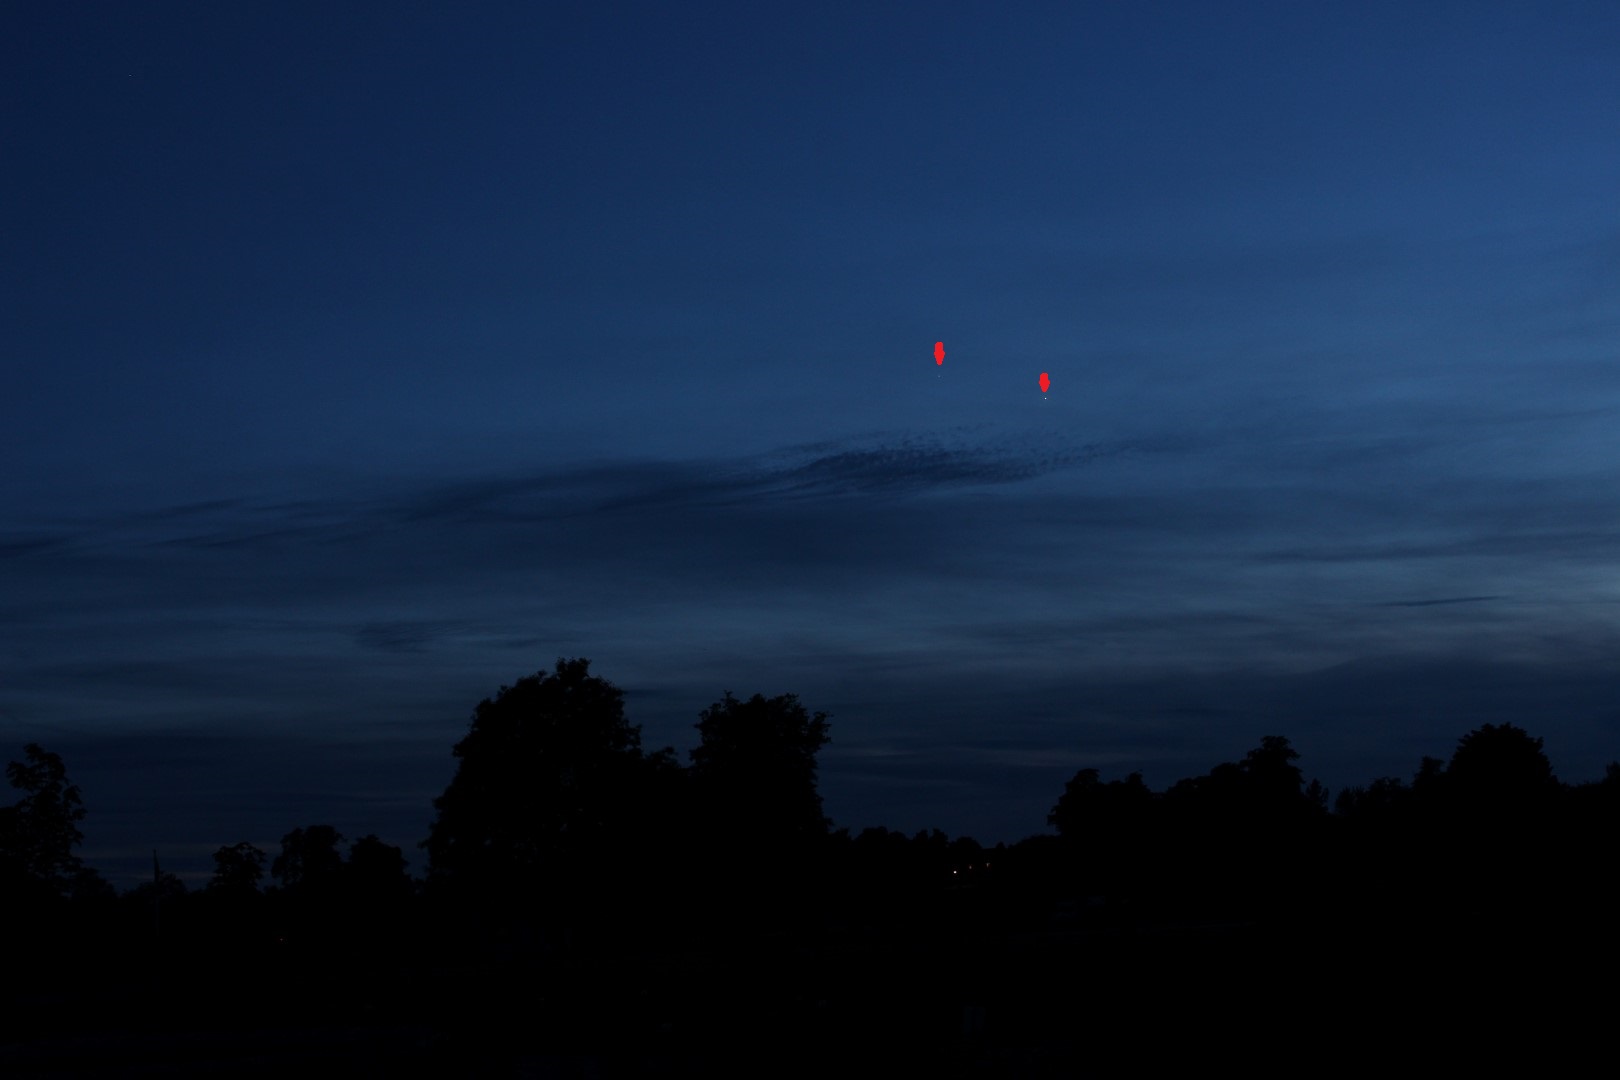
During the latter part of June Venus and Jupiter moved inexorably towards very close conjunction by the end of the month.  Reaching just under ¾ of a degree separation on 30th June and 1st July this is a rare event, which with a clear sky could be easily viewed with the naked eye.  Better still, I set out to photograph the two planet’s journey during the preceding 12 days, thus illustrating Copernicus’ revolutions around the sun of these two heavenly spheres.  Whilst any school child will today understand this process, it is a frightening thought that belief in such a mechanism could once have led to the death penalty!

Obscured from view at Fairvale Observatory as Venus was just 17 ½o above the western horizon, I had to travel to a nearby location which provided a clearer westerly viewpoint of both planets at their low attitude.  In order to obtain a series of comparable images and thus show the real spatial changes occurring up to conjunction, all pictures were taken from exactly the same location.  With my Canon EOS 700D fixed on a photographic tripod I shot a series of images over a 50 minute period using either the 18mm or 55mm telephoto settings, playing with ISO and speed settings as darkness progressed; this was roughly the time the two planets took to disappear below the Earth’s horizon after achieving Civil Darkness.

The resulting photographs show Jupiter apparently advancing on Venus before at conjunction ‘passing’ close by on the aforementioned days.  Whilst Jupiter is the third brightest object in the night sky (after the Moon & Venus) and nearly 12 times the size of Venus or 1,400 times by volume, the planet looks very small by comparison to Venus.  This of course is the effect of perspective, with Jupiter currently some 565 million miles distance from Earth, whereas Venus is only 48 million miles; furthermore although at -1.8 the apparent magnitude (brightness) of Jupiter is high, at -4.4 Venus is much brighter.

18th June 2015: Jupiter left, Venus right - trees on the horizon provide a reference scale as the planets move towards each other during the month in subsequent photographs

18th June 2015: Jupiter left, Venus right – trees on the horizon provide a reference scale as the planets move towards each other during the month in subsequent photographs.

25th June 2015 + 7-days

25th June 2015 + 7-days

30th June 2015 + 5 days.  Nothing - dark thunder clouds completely obscure the western sky during conjunction!!!

30th June 2015 + 5 days. Nothing – dark thunder clouds completely obscure the western sky during conjunction!!!

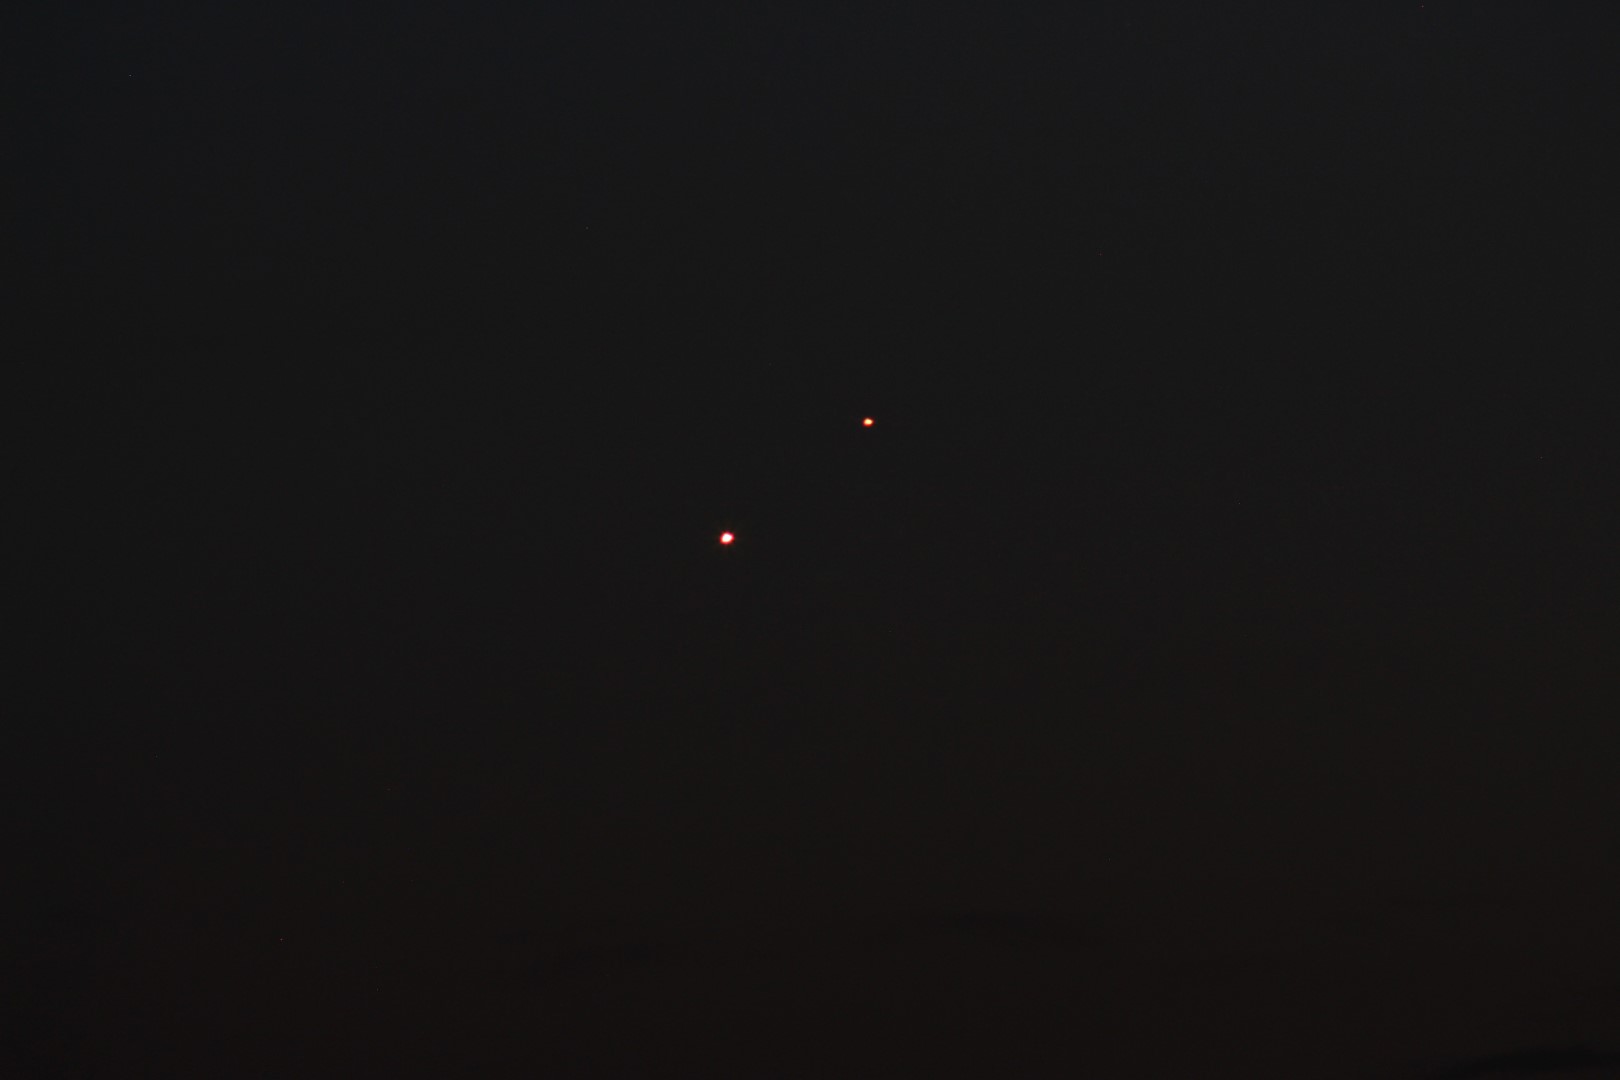
1st July 2015. Bingo = conjunction; though one day later Jupiter has now moved to the right of Venus.

1st July 2015. Bingo = conjunction; though one day later Jupiter has now moved to the right of Venus.

1st July 2015. Close-up of the conjunction using 55mm telephoto setting and ISO 400 - Venus now left & Jupiter right.

1st July 2015. Conjunction close-up using 55mm telephoto setting and ISO 400 – Venus now left & Jupiter right.

Unfortunately I am expecting it will be at least another month before I have recovered sufficiently to consider setting-up Fairvale Observatory again, by which time Astronomical Darkness will thankfully be slowly returning.  In the meantime I’m looking forwards to the next section of The Sleepwalkers which covers Kepler and Galileo and hopefully exciting developments from the New Horizon Pluto fly-by and more from the Rosetta Mission and the re-awakening of its Philea lander.  Given clear skies there should also still be plenty to see without the observatory: The Perseids, Saturn and of course at the centre of our Solar System as determined by Copernicus, the Sun, which will be at aphelion on 6th July – though you wouldn’t think so judging by the high temperatures currently prevailing in the UK and Europe!