What Comes Around Goes Around

RGB HaOO XXX2

It’s nearly 4-years since I started astronomy, like so many inspired after observing Saturn through a telescope.  Not just any telescope but the 13” Astrographic Refractor at the Observatory Science Centre in Herstmonceaux.  Built in 1890 specifically to make use of the then new technique of astrophotography, the telescope was first employed as part of the worldwide Carte Du Ciel project to map the entire night sky by photography and subsequently for a crucial test of Einstein’s then new theory of General Relativity.  Soon thereafter I was to view the aforesaid planet once again with my first, newly purchased Skywatcher 150PL Newtonian telescope.  Inevitably something of a lesser view than that at Herstmonceaux it was nonetheless just as exciting, if not more so.  I was hooked!

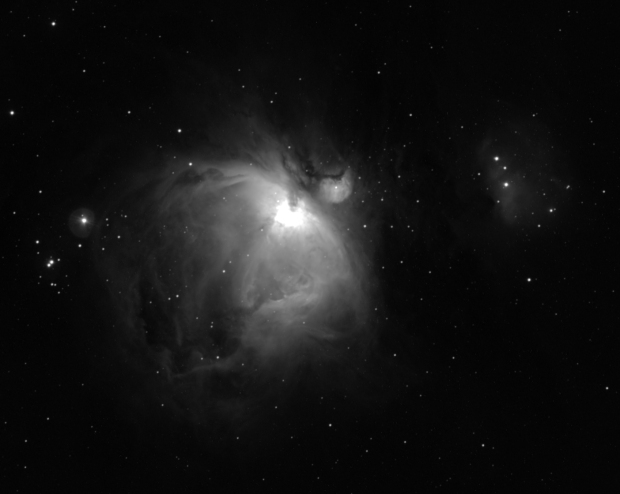
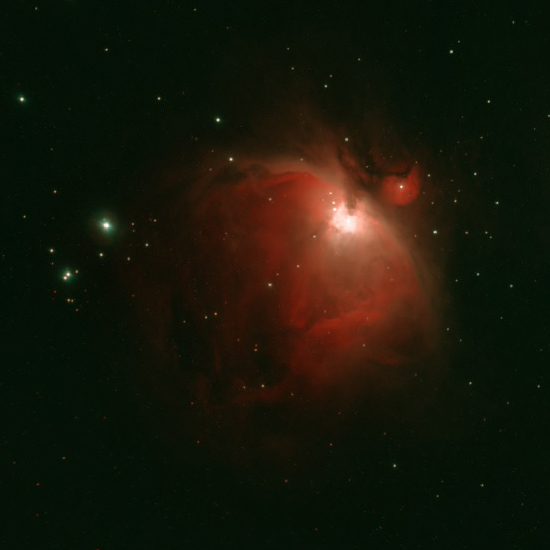
I then attempted afocal imaging using a compact camera held up to the telescope eyepiece but with poor results, except in one respect.  By clamping the camera onto the front of the eyepiece and achieving longer exposures, nebulosity otherwise unseen with the naked eye was revealed in the resulting image, in this case Orion’s Nebula.  As crude as the image was, for me the penny had dropped and I’ve been pursuing images of the hidden beauty of the night sky ever since.

rosette map

ngc2237map

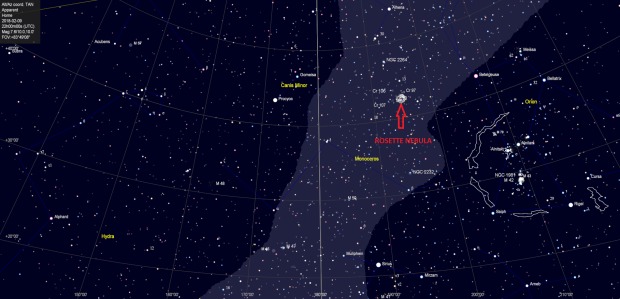
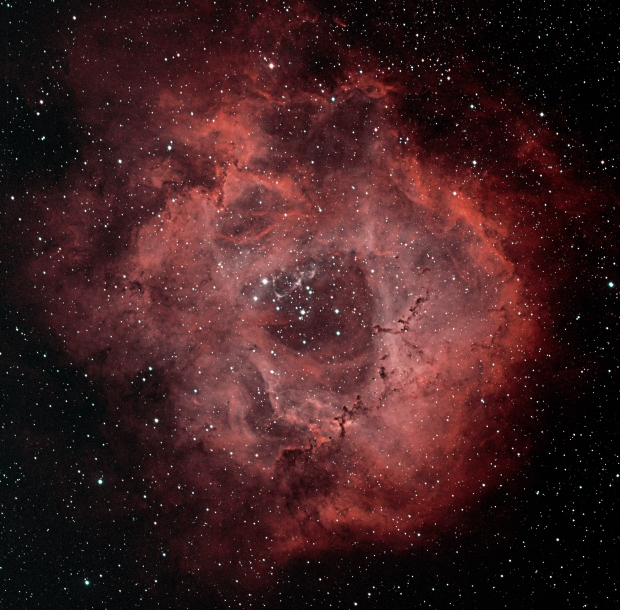
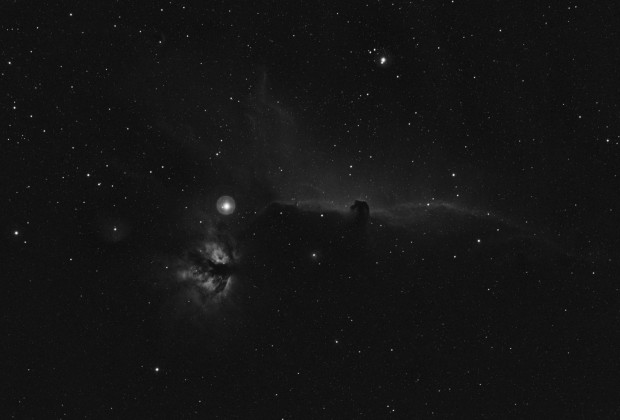
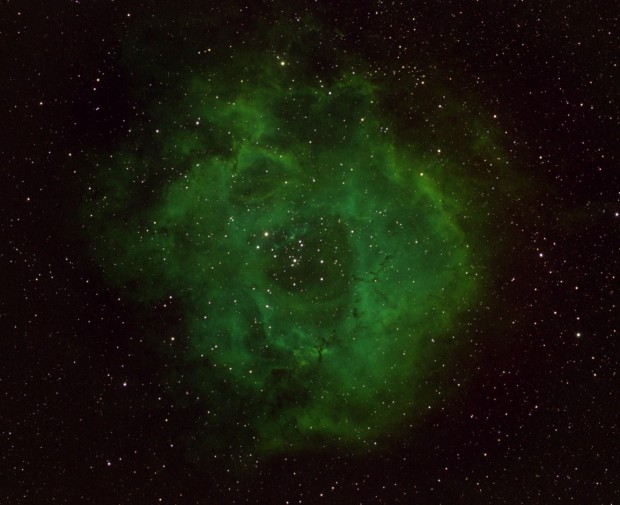
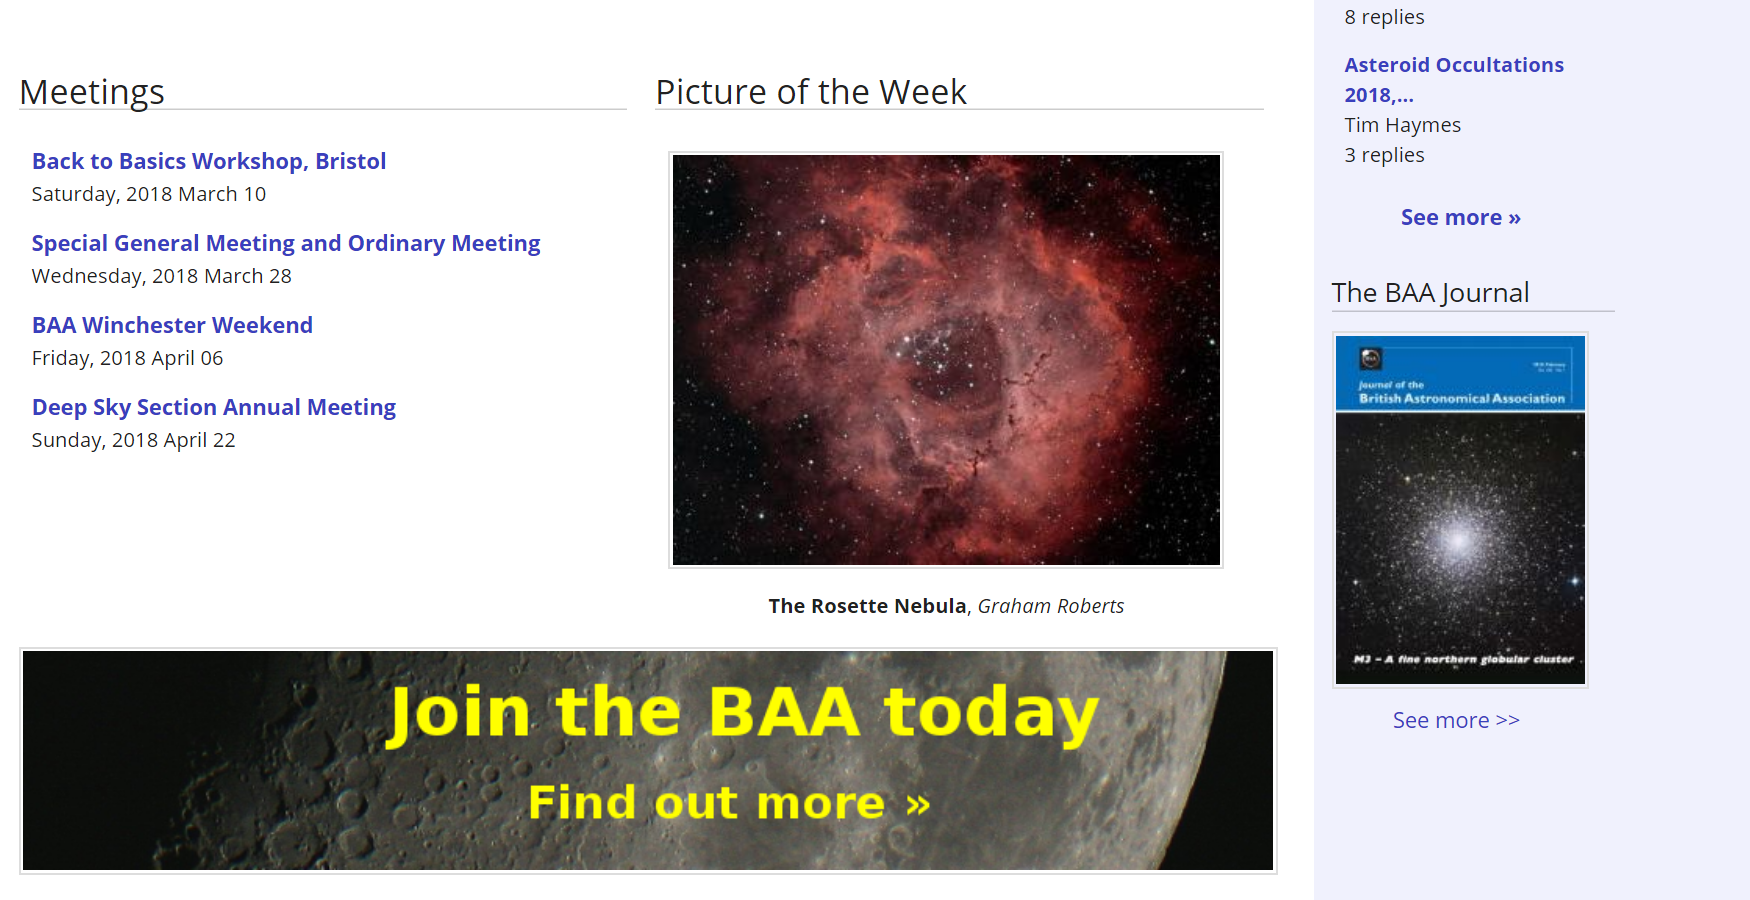
Like mariners, through astronomy I have by now become accustomed to the seasonal procession of the night sky wonders throughout the year, none more so than the Rosette Nebula.  About 100 light-years across and 5,000 light-years from Earth, the Rosette Nebula is surely one of the annual highlights for most astrophotographers?  Located just east of Orion, the Rosette is at its best between December and February, so that I was first able to image this beautiful object myself at the end of 2014.

As a very large HII region the Rosette Nebula emits light mainly at narrowband wavelengths, which produces wonderful but mainly red colours when imaged with a modded DSLR camera.  As my astrophotography and equipment have since developed, it has become a pleasure and challenge to image objects as they return each year such as the Rosette, thereby also charting my own improvements or otherwise from year-to-year.  Its size makes the Rosette an especially attractive target for smaller telescopes such my own with an 81mm aperture, which nicely fills much of the sensor of an APS-C camera.

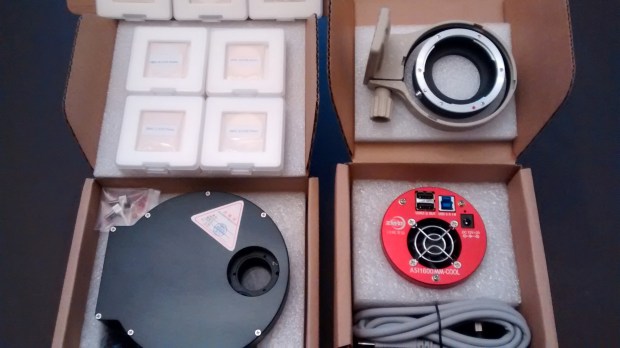
Despite having purchased a new ZWO1600MM-Cool mono camera at the end of 2016, by the time I was ready to use it at the end of the following March, the Rosette Nebula had almost disappeared over the western horizon for another year.  Notwithstanding, in the limited time remaining I managed to capture a few Ha-OIII-SII subs, thus marking first light for the camera, which ironically resulted in one of my favourite images for 2017.  Using narrowband for the first time it was immediately possible to see the potential of the new camera when imaging this type of object.

Returning from an extended overseas trip at the end of January this year, 10-months had passed since my last encounter with the Rosette Nebula last March and I found myself with the first real opportunity to image the nebula properly with the ZWO1600MM-Cool camera.  Since last year I’d acquired more knowledge and experience with the camera, plus this time the Rosette was now in the south eastern quadrant and provided significantly more imaging time than before.

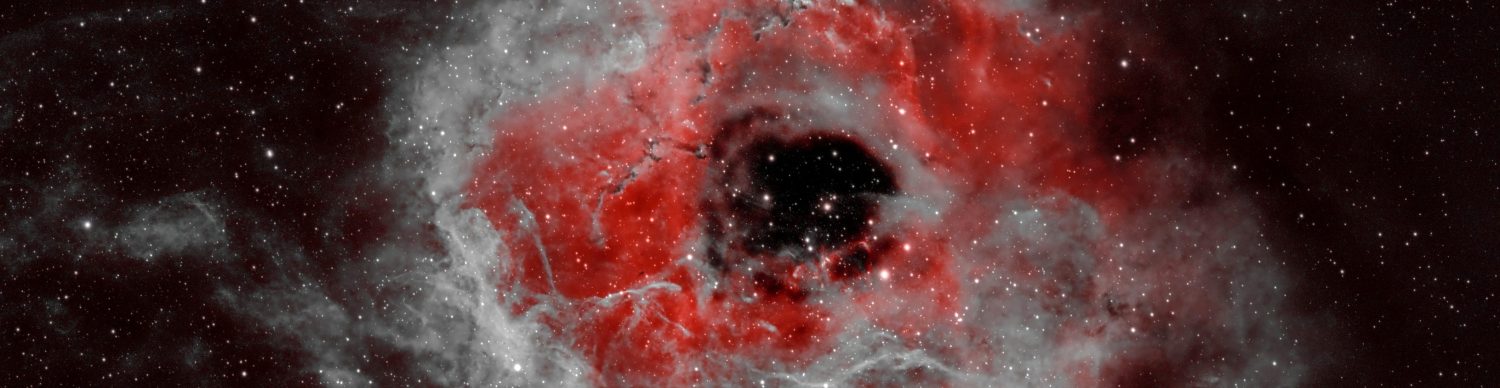
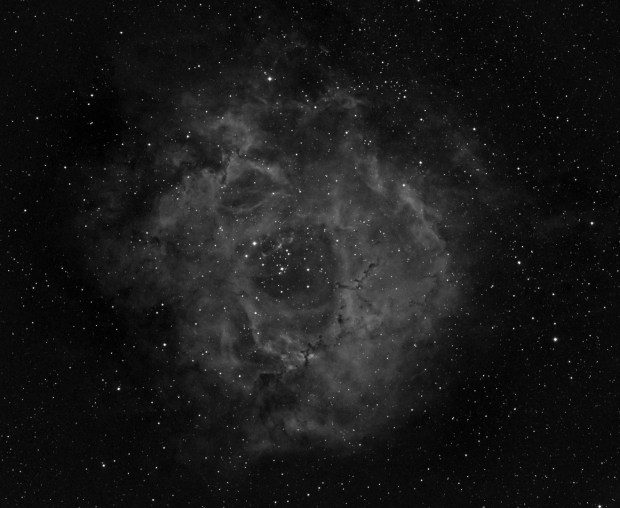
After a break of nearly two months I needed to sort out the equipment, refocus the camera and start a new alignment model in EQASCOM.  For the first time I also decided to use longer exposure times of 300 seconds, which altogether produced a good Ha+OIII Bi-Colour image (top of page – awarded BAA Picture of the Week 4th March 2018); whilst much longer exposures are used with conventional CCD sensors, such is the sensitivity of the CMOS mono sensor in the ZWO camera that 5-minute exposures provide exceptionally good quality data.  Overall the impact of longer exposure, good focus, tracking and much longer total integration time had a noticeably positive impact on noise and overall image quality, though there’s still room for improvement – there always is!

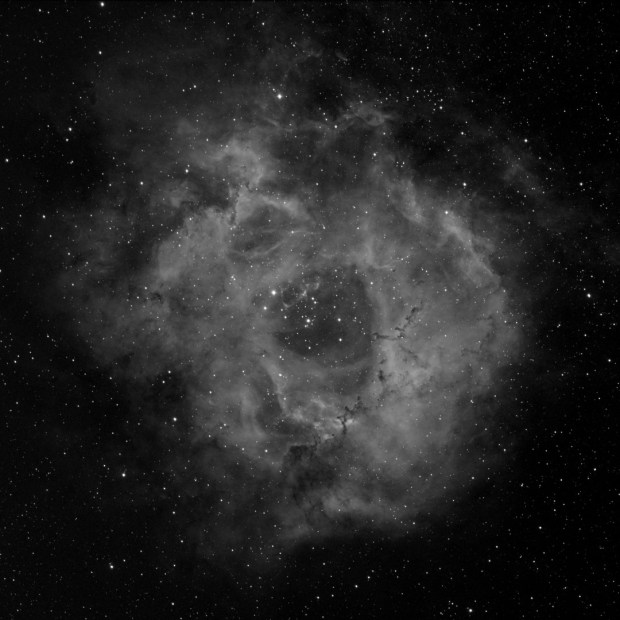
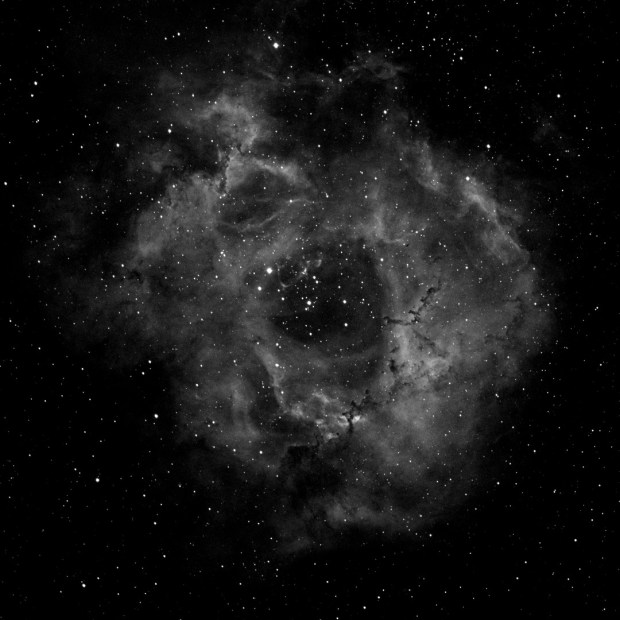
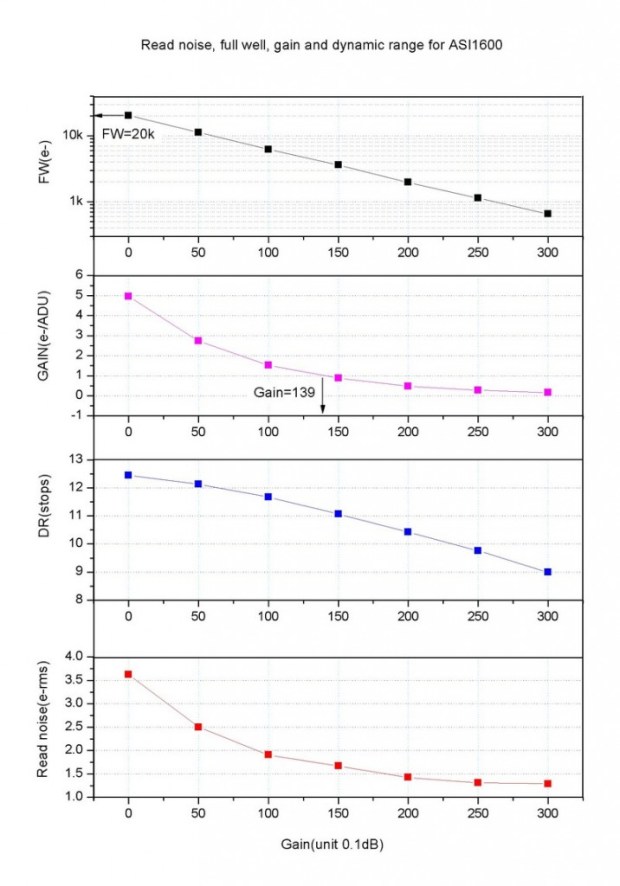
To some extent, even after a year I’m still in the experimental phase with this camera.  For most of 2017 I used a high gain setting of 300 but this time I chose the Unity gain setting of 139 and for interest also imaged at a shorter exposure of 180 seconds.  Comparison between the two settings for Ha images – Unity gain at 300 and 180 seconds – shows that for such a nebulous type of feature as the Rosette, Unity gain works very well at the longer 300 second exposure (first image below) but not 180 seconds (second image below), which is too short to collect sufficient data.

Picture saved with settings embedded.

Picture saved with settings embedded.

Notwithstanding, in the past I have found shorter exposures at Unity or less have generally been more suitable for brighter objects such as star clusters or galaxies like Andromeda.  An alternative SHO Hubble Palette image below of the Rosette Nebula at Unity gain and 300 second exposure also compares more favourably with the same image taken last year using less subs, higher gain and shorter exposure time.

Untitled-2 Crop2 (Large)
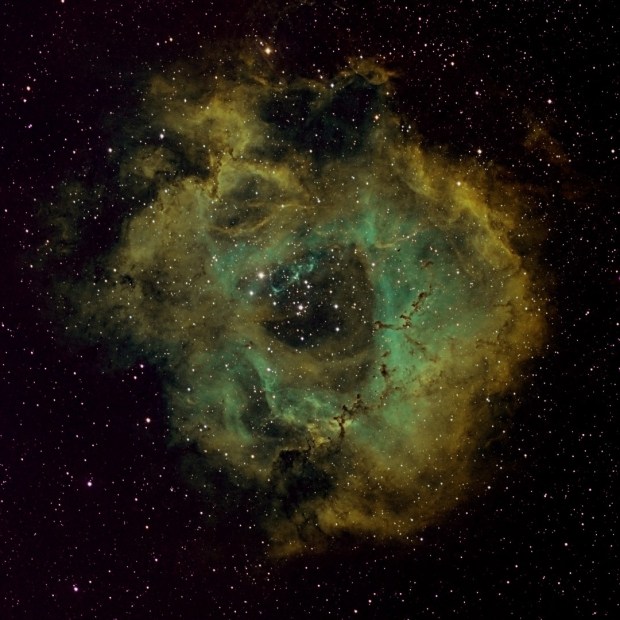
When the object is right, such as the Rosette Nebula, narrowband imaging using the ZWO camera produces exceptional results.  This is evident in these recent images where it’s now possible to clearly see structural elements of the nebula, as well as the star fields located within.  Frankly I am very excited by these new images and can’t wait for next year to come around again!

Postscript: Research at Leeds University just published suggests that the Rosette Nebula is a disc but I believe my eyes and this image and many others which says otherwise!

IMAGING DETAILS
Object Rosette Nebula     NGC 2244 + 2237, 2238, 2239 & 2246   
Constellation Monoceros
Distance 5,000 light-years
Size Approx. 100 light-years or 1.3o
Apparent Magnitude +9.0
 
Scope  William Optics GT81 + Focal Reducer FL 382mm  f4.72
Mount SW AZ-EQ6 GT + EQASCOM computer control
Guiding William Optics 50mm guide scope
  + Starlight Xpress Lodestar X2 guide camera & PHD2 control
Camera ZWO1600MM-Cool (mono)   CMOS sensor
  FOV 2.65o x 2.0o    Resolution 2.05”/pix   Max. image size 4,656 x 3,520 pix   
EFW ZWOx8 + ZWO LRGB & Ha OIII SII 7nm filters 
Capture & Processing Astro Photography Tool,  Deep Sky Stacker & Photoshop CS2
Exposures 12 x 300 sec Ha, 6 x 300 sec  OIII & SII  (Total time: 120 minutes)
  @ 139 Gain  21 Offset @ -20oC  
Calibration 5 x 300 sec Darks  20 x 1/4000 sec Bias  10 x Flats Ha, OIII & SII @ ADU 25,000  
Location & Darkness Fairvale Observatory – Redhill – Surrey – UK        Typically Bortle 5
Date & Time 9th February 2018 @ 22.00h


Brave New World

brave-new-world-16-638 CROP

In my quest to understand astronomy and in particular the big picture, I have just successfully completed another MOOC course at the University of Edinburgh on the Higgs Boson and particle physics.  From earlier studies which included the Special Theory of Relativity and the Universe, the next step was obvious: moving from the very big to the very small in order to better grasp where we might be with the elusive unified theory and I was not disappointed. An added bonus to the course was the participation of Professor Peter Higgs himself, in which he discussed how he had arrived at his conclusions and the development of subsequent matters that led to the actual discovery of the Higgs Boson at the Large Hadron Collider in Cern, Switzerland in 2012; watching and listening to him speak felt like having a personal chat with Einstein and was quite a privilege!

regular_6831d527-0d4e-4c39-be8e-d4200ffcebbb

A chat with Professor Peter Higgs!

Frankly I found the nature of the subject very difficult and at times bewildering but its potential impact on astronomy was finally something of an epiphany for me.  The Higgs and related items results in two profound results:

  • There was no Big Bang.
  • The existence of a multiverse, of which our Universe is but a part.

I am not sufficiently able to articulate how these conclusions are arrived at nor is this the place, but when the full content of particle theory, the Higgs, General Relativity are applied to cosmology, the aforementioned outcome is, like all good science, simple and beautiful – click here for lecture notes Higgsmooc part1  + Higgsmooc part2  and accompanying presentations 7.11_Quantum Vacuum_& Cosmology + 7.12_The HB_scalarfieldsand inflation.

I’m pleased to say there have also been other breakthroughs for me since achieving first light with the ZWO 1600MM-Cool CMOS camera.  I am still at the experimental stage and with the spectacle of the winter sky rapidly departing, suitable objects are much more limited, with the few remaining HII objects low and very far to the west of the early evening sky.  However, before the Milky Way disappeared completely I managed to obtain some useful imaging experience by targeting some old favourites.

M42

Passing Shots: Orion & Rosette Nebulae

Having already battled a number of issues with the new camera – basic LRGB image capture, using Astro Astronomy Tools, achieving focus, guiding, alignment, processing and post-processing – for the moment everything has come together, including some warmer nights and clear skies.  Over a few evenings I therefore undertook imaging in LRGB as well as Ha, OIII and SII, with some excellent results that augur well for the future.

The camera’s sensitivity and ability to image at short exposures enables much less imaging time than conventionally used with CCD cameras – one of the reasons I decided to purchase this camera.  In addition, shorter exposures make perfect alignment and tracking less important, though still a desirable set-up.  The downside is it produces a prodigious number of images, which leads to a somewhat challenging processing burden – but it’s worth it.

Despite my DSLR experience, CCD processing and especially post-processing, is significantly more complex.  I was surprised to find only one decent online video on LRGB processing by Rankin Studio, without which the task would have been even more difficult and taken much longer to learn – thanks David.  Ironically I have found narrowband processing easier, probably because there are just less filters and resulting image sets required, however, the restricted wavelength also provides whole new opportunities that I’ve already started to exploit.

Picture saved with settings embedded.

Orion Nebula + M43 & Running Man Nebulae in Ha: William Optics GT 81 & ZWO 1600MM-Cool + x0.80 field flattener | 15 x 180sec Gain 139 Offset 21 @ -18C & full calibration | 25th March 2017

Just before they disappear from our night sky until next winter I was fortunate to be able to image both the Horsehead and Orion nebulae, everyone’s favourites and I’m no exception.  With limited time available in the early evening sky it was only possible to capture a limited number of images before it moved outside my view in the west but even with these few images the power of the camera has already become self-evident.

Picture saved with settings embedded.

Horsehead Nebula in Ha: William Optics GT81 & ZWO 1600MM-Cool + x0.80 field flattener | 19 x 180 secs Gain 139 Offset 21 @ -18C & full calibration | 27th March 2017

Given the need to use less filters and thus less time I have started out with narrowband imaging – as a completely new medium for me that holds great promise aesthetically and scientifically, I was also keen to give it a try and on this occasion used Ha and OIII.  Having sorted an earlier problem with the EFW managing the filters is a breeze and can easily be automatically sequenced in the APT capture software.  Notwithstanding, as previously indicated image capture is really only just the start – though good data is always the key to the final image – and processing and post-processing is both complex and takes considerable time.

M42 Bicolour & balance

Orion Nebula in bi-colour: Ha red channel + OIII green and blue channels

On this occasion the individual Ha subs are themselves very revealing, showing new details when compared with previous DSLR images.  But it is with the bi-colour image that the exciting opportunities provided by using narrowband imaging become apparent – I can see I’m going to enjoy this!  I’ve also taken the opportunity to further explore and understand the nature of these types of images and their constituent parts by manipulating the colour channels, with some startling results.

NGC 2244 HOS-1LCLCrop (Large)

Rosette Nebula in HOS: William Optics GT 81 & ZWO 1600MM-Cool + x0.80 Field Flattener | 15 x 180 sec Gain 300 Offset 10 Ha, OIII & SII @ -20C + calibration | 24th March 2017

Not far from M42 is another of my favourites which I’d already used to achieve First Light with this camera using Ha – the Rosette Nebula (NGC 2237, 2238, 2239, 2244 & 2246).  This time I decided to use all the narrowband filters – Ha 656nm, OIII 672nm, SII 500nm all 7nm bandpass – and subsequently experimented with processing using the Hubble Palette with stunning results.  As the name indicates, this technique was originally developed for processing images taken with the Hubble Space Telescope which put simply, uses different mixes of each narrowband filter in different processing channels e.g. Ha in the red channel, OII in green and SII in blue, for short known as HSO.

NGC 2244 SHO Final1

Rosette Nebula in  SHO

The outcome of my new adventure into narrowband imaging has been nothing less than a revelation.  Like so much of my preceding astroimaging, I knew about much of it before but doing it yourself and seeing the results is both exciting and very satisfying; like Peter Higgs I feel I have entered a new world!

First Light

tumblr_mks1wnG4CI1rx06nvo1_500

If nothing else, I have learned from life – walk before you run.  I have spent the past three years trying to learn about astronomy and astrophotography using a DSLR but late last year decided it was time to raise my game.  I was reluctant to go to a CCD mono camera as it involves greater complexity and, perhaps more significantly, during the aforesaid period clear skies have been in very short supply – making long, guided exposures over protracted periods something close to impossible where I live.  However, with the recent advent of the new CMOS cameras and their rave reviews, against my better judgement I took the plunge and bought a ZWO ASI 1600MM-Cool with a matching ZWO x8 EFW and 31mm LRGB, Ha, OIII and SII filter set.

IMG_20161208_141923447 (Large)

Wow! As expected, it’s a whole new world compared to DSLR and, as well as continuing week-after-week cloud cover, I have been battling with numerous set-up and processing issues. Still, rule number one with this hobby is patience and perseverance and I’m pleased to say I have just achieved First Light with the camera.

At first I set up the camera indoors on a tripod to test the equipment and quickly found that the camera and EFW would not work together; in addition to a USB 3.0 data socket, the camera also has two useful USB 2.0 sockets which can be used to power and control other equipment.  After more than 3-weeks, much help online and a mixed response from the manufacturer, ZWO suggested I try another USB driver which they sent me and it worked – so why not supply that in the first place or ensure users are aware of the issue and provide a solution from the outset?  Whilst the actual equipment is well specced, well made and well priced compared to CCD camera – though far from cheap, I found ZWO’s web-based technical guidance and general support poor and would expect better with such expensive equipment.  In retrospect, perhaps it is not a surprise as I had a USB problem when I purchased their ZWO ASI 120MC camera, with a similar response and outcome i.e. there is a theme here, which is a pity as their equipment itself is innovative and very well made.

During brief periods between the clouds I subsequently managed to try-out the camera in order to understand focus, capture and processing. Despite prior experience with the DSLR and software, this turned out to be new territory which I am still exploring. Briefly:

Focus – With the new camera I was faced with two fundamental focusing issues:

  • Establishing the correct optical train – I want to continue using the William Optics x0.80 focal reducer with the ZWO camera, thereby increasing the speed of the scope from f5.9 to f4.72. I therefore purchased a Canon EOS adapter to use with the existing EOS convertor which has previously worked successfully with the DSLR.  Despite the apparent complexity, the resulting set-up is within 0.50mm of the optimum distance and seems to work OK – with one exception. Whilst the locking pin on the EOS adapter works i.e. it locks, there is some unacceptable lateral play, which for now I have solved with the addition of a piece of electrical tape! I’m advised this is normal for such adapters but it seems like a poor product to me if this is the case.    ZWO cam_EFW_FF_annotated (Large)
  • Operating focus – after months of battling with focus when I started out DSLR imaging, I eventually discovered the Bahtinov mask and assumed this wonderfully simple method would work just as well with the new ZWO camera; of course, after my initial trials it was apparent this wasn’t going to be the case.  Not that the mask doesn’t work but in order to achieve good focus with the smaller pixels of the ZWO ASI 1600 requires much greater accuracy, which I’m pleased to say has now been achieved by using APT’s Bahtinov Aid (based on Neils Noordhoek’s Bahtinov Grabber), so that I am now getting much better results.  However, as the focus point can change with seeing conditions and when using different filters, it is apparent that I’ll need to return to this matter again to finesse the operation, probably by using an electronic focuser.

Capture – At the heart of my philosophy is the KISS principal – Keep It Simple Stupid! When working with the DSLR I therefore only ever used the Canon EOS Utilities software for image capture – it is simple, did what I needed and worked.  Moving to a mono camera with filters, the increase in complexity is exponential and inevitably requires more sophisticated image capture software.  Judging by the experience of others Sequence Generator Pro seems to be one of the best low cost programmes that will do this job and I have purchased a copy for US$99 and the accompanying Framing and Mosaic Wizard for an additional US$39.  However, in applying the KISS principal during the early stages of getting to know and understand the new equipment and processes, for now I’m using Astro Photography Tool (APT) – something I’ve had for a while but not used before.  It is a very capable programme that manages sequencing, cooling, filter management etc. well, with excellent support from its author Ivo but importantly seems easier to use than SGP, albeit inevitably with its own idiosyncrasies.  It’s early days but so far so good.

Processing – Mono images differ in a number of fundamental ways to DSLR other than just colour, which requires a quite different approach to processing and post-processing, in particular:

  • the images are FITS not RAW;
  • mono images are taken with a variety of filters which subsequently need to be compiled.

Despite successfully working with Deep Sky Stacker (DSS) for some time, I was not aware of any changes required when processing FITS files, which are the product of the ZWO 1600 camera; useful pre-assessment of the files can be carried out using the ESA/NASA free Fits Liberator software.  As a result my first try of the Beehive Nebula based on just Luminance subs was covered in bizarre ‘green spider-like’ artefacts after stacking in DSS.  These disappeared when transferred into Photoshop but then became covered in Bayer matrix-like coloured squares!

Thanks to help from the SGL Forum it was apparent that I had failed to turn-off the FITS colour option in Settings before stacking – unchecking this and restacking immediately resulted in a half-decent image of the open star cluster.  Meanwhile, since purchasing the ZWO camera I have read and watched numerous videos on post-processing and using LRGB files available online for practice, I have been able to start experimenting with this technique prior to obtaining my own data from the new camera.  It is much more complex and I’ve got a long way to go but the experience gained from DSLR processing has nevertheless helped immensely; walk before you run pays off in the end!

And so last week I managed my first reasonable image of the Rosette Nebula (NGC 2244) using only Ha-subs, which this object has in abundance.  I consider this marks the camera’s First Light and am pleased with the result but realise there’s still much more to learn, weather permitting!

Picture saved with settings embedded.

Rosette Nebula in Ha | William Optics GT81 + ZWO ASI 1600MM-Cool & x0.80 focal reducer + guided | 15 x 180 secs + darks & bias calibration Gain 300, Offset 10 | 21st March 2017

  • This guided image is 15 x 180sec Ha-subs + darks and bias, gain 300, offset 10 + minor stretching in Photoshop. The corners – particularly the bottom right – look like there may be some vignetting in the stacked image?  I haven’t managed to achieve any decent flats yet (another story) but I assume these would help eliminate this effect? However, I am surprised as I’m using the ZWO x8 EFW with larger 31mm filters, which with the focal length of 382mm (f4.72) should not result in vignetting.
  • Clearly my experimentation is ongoing with this new technology and I particularly need to understand better what is the ‘best’ gain and offset setting for different types of objects.
  • Whilst the CMOS chip is bigger than standard CCD sensors it is still smaller than a standard DSLR and with smaller pixels too (3.80nm v 4.30nm), the result when used with the focal reducer is a 29% reduction of the field-of view from 3.34o x 2.23o to 2.65o x 2.0o, which on-screen translates to increased magnification and allows me to get at some of the galaxies which hitherto have been too small; the benefit is minor but is worth having nonetheless.


1600-Gain-RN-DR-FW-vs-gain-716x1024

m9x4Jzv

From Cloudy Nights Forum – compiled by Jon Rista

All-in-all the ZWO ASI 1600mm-Cool is an excellent piece of kit that has the potential to open up new vistas for my astroimaging.  At a fundamental level it does all the basic stuff very well and the addition of cooling is a major improvement which  reduces noise still further.  I’m particularly looking forwards to experimenting with narrowband and bi-colour imaging – not least in order to keep working when the Moon’s about, unlike broadband imaging.  However, the cameras intrinsically low read noise and ability to capture fine detail using only short exposures is surely set to mark the next revolution in astrophotography and furthermore reduces the need for very precise guiding; it’s clear the other manufacturers are scrambling to catch-up with this leading edge technology.  Timing is everything in life and I’m pleased to be part of this hobby at such an exciting moment.