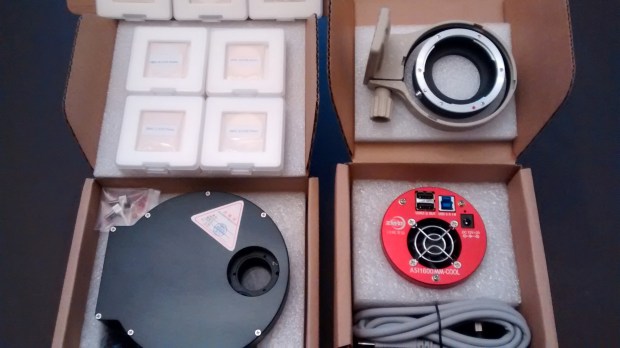
If nothing else, I have learned from life – walk before you run. I have spent the past three years trying to learn about astronomy and astrophotography using a DSLR but late last year decided it was time to raise my game. I was reluctant to go to a CCD mono camera as it involves greater complexity and, perhaps more significantly, during the aforesaid period clear skies have been in very short supply – making long, guided exposures over protracted periods something close to impossible where I live. However, with the recent advent of the new CMOS cameras and their rave reviews, against my better judgement I took the plunge and bought a ZWO ASI 1600MM-Cool with a matching ZWO x8 EFW and 31mm LRGB, Ha, OIII and SII filter set.
Wow! As expected, it’s a whole new world compared to DSLR and, as well as continuing week-after-week cloud cover, I have been battling with numerous set-up and processing issues. Still, rule number one with this hobby is patience and perseverance and I’m pleased to say I have just achieved First Light with the camera.


At first I set up the camera indoors on a tripod to test the equipment and quickly found that the camera and EFW would not work together; in addition to a USB 3.0 data socket, the camera also has two useful USB 2.0 sockets which can be used to power and control other equipment. After more than 3-weeks, much help online and a mixed response from the manufacturer, ZWO suggested I try another USB driver which they sent me and it worked – so why not supply that in the first place or ensure users are aware of the issue and provide a solution from the outset? Whilst the actual equipment is well specced, well made and well priced compared to CCD camera – though far from cheap, I found ZWO’s web-based technical guidance and general support poor and would expect better with such expensive equipment. In retrospect, perhaps it is not a surprise as I had a USB problem when I purchased their ZWO ASI 120MC camera, with a similar response and outcome i.e. there is a theme here, which is a pity as their equipment itself is innovative and very well made.


During brief periods between the clouds I subsequently managed to try-out the camera in order to understand focus, capture and processing. Despite prior experience with the DSLR and software, this turned out to be new territory which I am still exploring. Briefly:
Focus – With the new camera I was faced with two fundamental focusing issues:
- Establishing the correct optical train – I want to continue using the William Optics x0.80 focal reducer with the ZWO camera, thereby increasing the speed of the scope from f5.9 to f4.72. I therefore purchased a Canon EOS adapter to use with the existing EOS convertor which has previously worked successfully with the DSLR. Despite the apparent complexity, the resulting set-up is within 0.50mm of the optimum distance and seems to work OK – with one exception. Whilst the locking pin on the EOS adapter works i.e. it locks, there is some unacceptable lateral play, which for now I have solved with the addition of a piece of electrical tape! I’m advised this is normal for such adapters but it seems like a poor product to me if this is the case.

- Operating focus – after months of battling with focus when I started out DSLR imaging, I eventually discovered the Bahtinov mask and assumed this wonderfully simple method would work just as well with the new ZWO camera; of course, after my initial trials it was apparent this wasn’t going to be the case. Not that the mask doesn’t work but in order to achieve good focus with the smaller pixels of the ZWO ASI 1600 requires much greater accuracy, which I’m pleased to say has now been achieved by using APT’s Bahtinov Aid (based on Neils Noordhoek’s Bahtinov Grabber), so that I am now getting much better results. However, as the focus point can change with seeing conditions and when using different filters, it is apparent that I’ll need to return to this matter again to finesse the operation, probably by using an electronic focuser.
Capture – At the heart of my philosophy is the KISS principal – Keep It Simple Stupid! When working with the DSLR I therefore only ever used the Canon EOS Utilities software for image capture – it is simple, did what I needed and worked. Moving to a mono camera with filters, the increase in complexity is exponential and inevitably requires more sophisticated image capture software. Judging by the experience of others Sequence Generator Pro seems to be one of the best low cost programmes that will do this job and I have purchased a copy for US$99 and the accompanying Framing and Mosaic Wizard for an additional US$39. However, in applying the KISS principal during the early stages of getting to know and understand the new equipment and processes, for now I’m using Astro Photography Tool (APT) – something I’ve had for a while but not used before. It is a very capable programme that manages sequencing, cooling, filter management etc. well, with excellent support from its author Ivo but importantly seems easier to use than SGP, albeit inevitably with its own idiosyncrasies. It’s early days but so far so good.
Processing – Mono images differ in a number of fundamental ways to DSLR other than just colour, which requires a quite different approach to processing and post-processing, in particular:
- the images are FITS not RAW;
- mono images are taken with a variety of filters which subsequently need to be compiled.
Despite successfully working with Deep Sky Stacker (DSS) for some time, I was not aware of any changes required when processing FITS files, which are the product of the ZWO 1600 camera; useful pre-assessment of the files can be carried out using the ESA/NASA free Fits Liberator software. As a result my first try of the Beehive Nebula based on just Luminance subs was covered in bizarre ‘green spider-like’ artefacts after stacking in DSS. These disappeared when transferred into Photoshop but then became covered in Bayer matrix-like coloured squares!


Thanks to help from the SGL Forum it was apparent that I had failed to turn-off the FITS colour option in Settings before stacking – unchecking this and restacking immediately resulted in a half-decent image of the open star cluster. Meanwhile, since purchasing the ZWO camera I have read and watched numerous videos on post-processing and using LRGB files available online for practice, I have been able to start experimenting with this technique prior to obtaining my own data from the new camera. It is much more complex and I’ve got a long way to go but the experience gained from DSLR processing has nevertheless helped immensely; walk before you run pays off in the end!
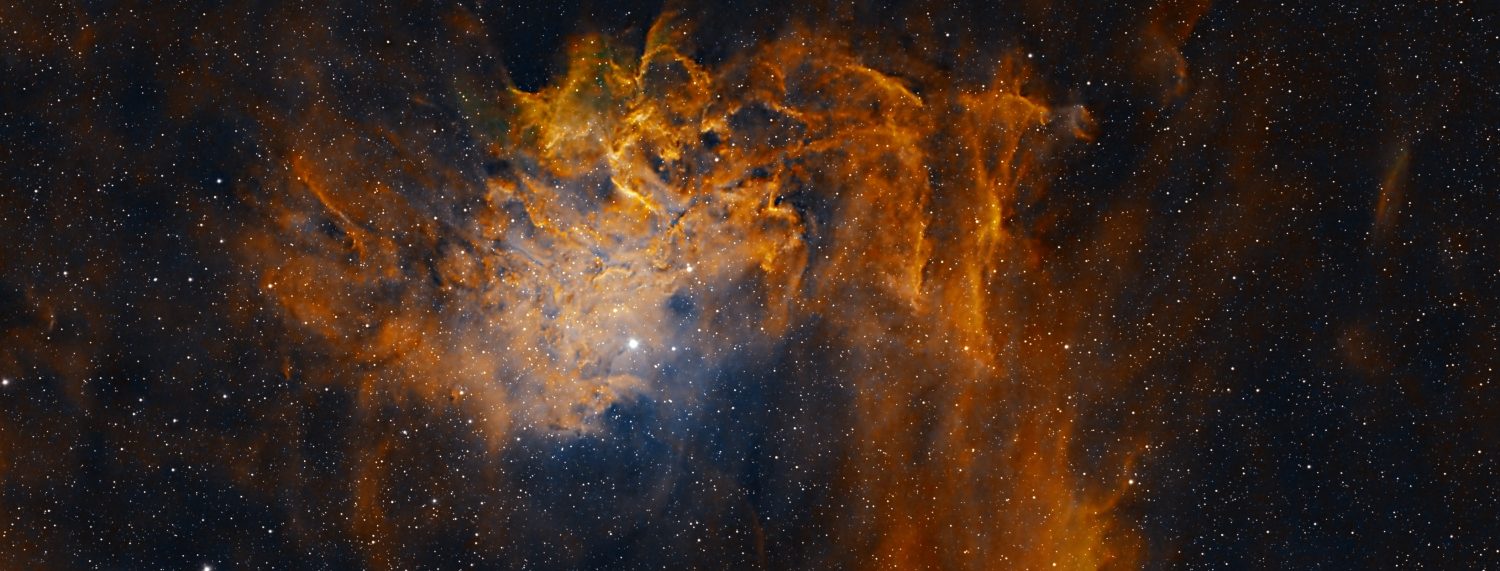
And so last week I managed my first reasonable image of the Rosette Nebula (NGC 2244) using only Ha-subs, which this object has in abundance. I consider this marks the camera’s First Light and am pleased with the result but realise there’s still much more to learn, weather permitting!
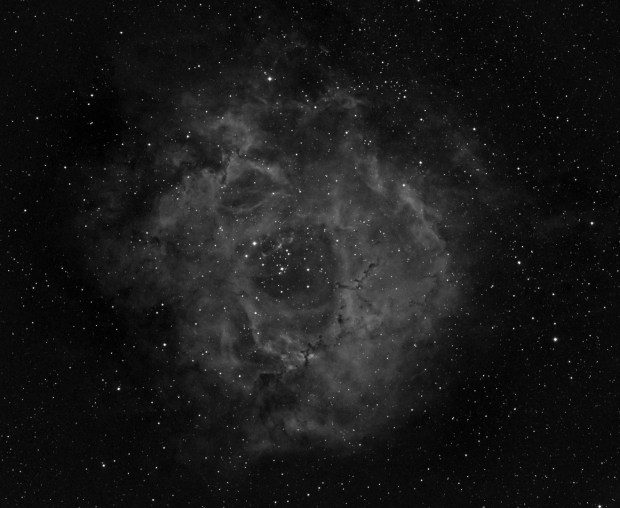
Rosette Nebula in Ha | William Optics GT81 + ZWO ASI 1600MM-Cool & x0.80 focal reducer + guided | 15 x 180 secs + darks & bias calibration Gain 300, Offset 10 | 21st March 2017
- This guided image is 15 x 180sec Ha-subs + darks and bias, gain 300, offset 10 + minor stretching in Photoshop. The corners – particularly the bottom right – look like there may be some vignetting in the stacked image? I haven’t managed to achieve any decent flats yet (another story) but I assume these would help eliminate this effect? However, I am surprised as I’m using the ZWO x8 EFW with larger 31mm filters, which with the focal length of 382mm (f4.72) should not result in vignetting.
- Clearly my experimentation is ongoing with this new technology and I particularly need to understand better what is the ‘best’ gain and offset setting for different types of objects.
- Whilst the CMOS chip is bigger than standard CCD sensors it is still smaller than a standard DSLR and with smaller pixels too (3.80nm v 4.30nm), the result when used with the focal reducer is a 29% reduction of the field-of view from 3.34o x 2.23o to 2.65o x 2.0o, which on-screen translates to increased magnification and allows me to get at some of the galaxies which hitherto have been too small; the benefit is minor but is worth having nonetheless.
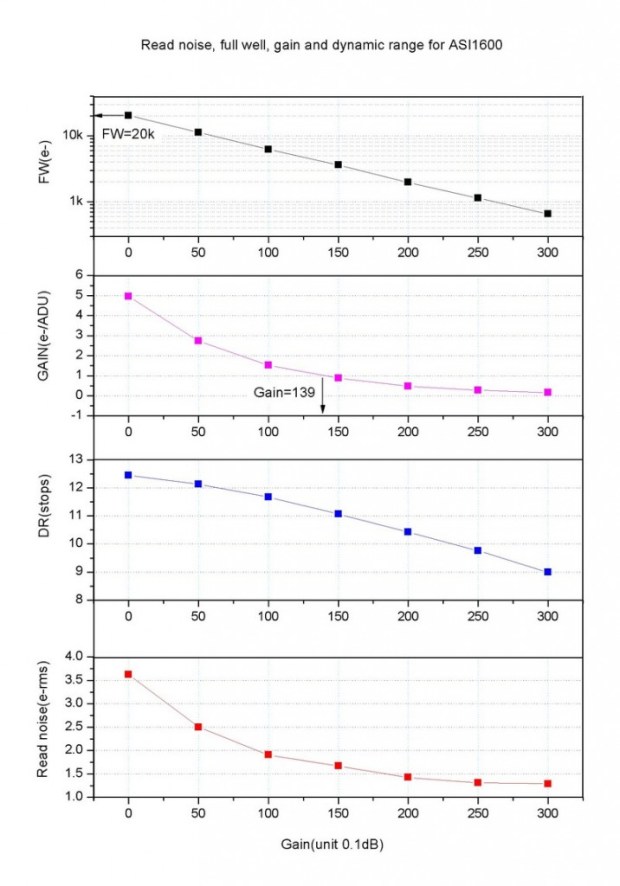
From Cloudy Nights Forum – compiled by Jon Rista
All-in-all the ZWO ASI 1600mm-Cool is an excellent piece of kit that has the potential to open up new vistas for my astroimaging. At a fundamental level it does all the basic stuff very well and the addition of cooling is a major improvement which reduces noise still further. I’m particularly looking forwards to experimenting with narrowband and bi-colour imaging – not least in order to keep working when the Moon’s about, unlike broadband imaging. However, the cameras intrinsically low read noise and ability to capture fine detail using only short exposures is surely set to mark the next revolution in astrophotography and furthermore reduces the need for very precise guiding; it’s clear the other manufacturers are scrambling to catch-up with this leading edge technology. Timing is everything in life and I’m pleased to be part of this hobby at such an exciting moment.
")
")