Lace up the Nikes

There is no doubt in my mind that the Orion Constellation is the most spectacular of the year and right now comes into imaging view at Fairvale Observatory at about 11pm, about the same time the waxing Moon disappears over the horizon; for once the timing is perfect.  So before the presence of the Full Moon later this week rules out astrophotography, last Saturday evening provided an excellent opportunity.

The Orion Constellation

The more I look at the Orion Constellation the more there is to see and image, as well as some other attractive objects that will be around until at least the New Year and in some cases well beyond.  One lesson I have learned early on with astrophotography is the need for good planning: what’s around to image? when is it in the best location i.e. near the Meridian? what equipment is needed and is it working? set it up in good time and ensure good alignment.  Given the aforementioned favourable conditions and the arrival of Orion, my list of objects this month is considerable:

Early evening: M32 Andromeda Galaxy & NGC 1499 California Nebula.

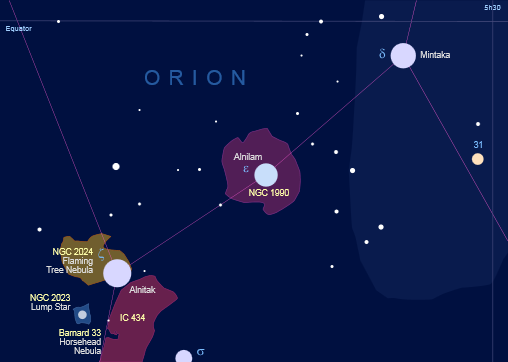
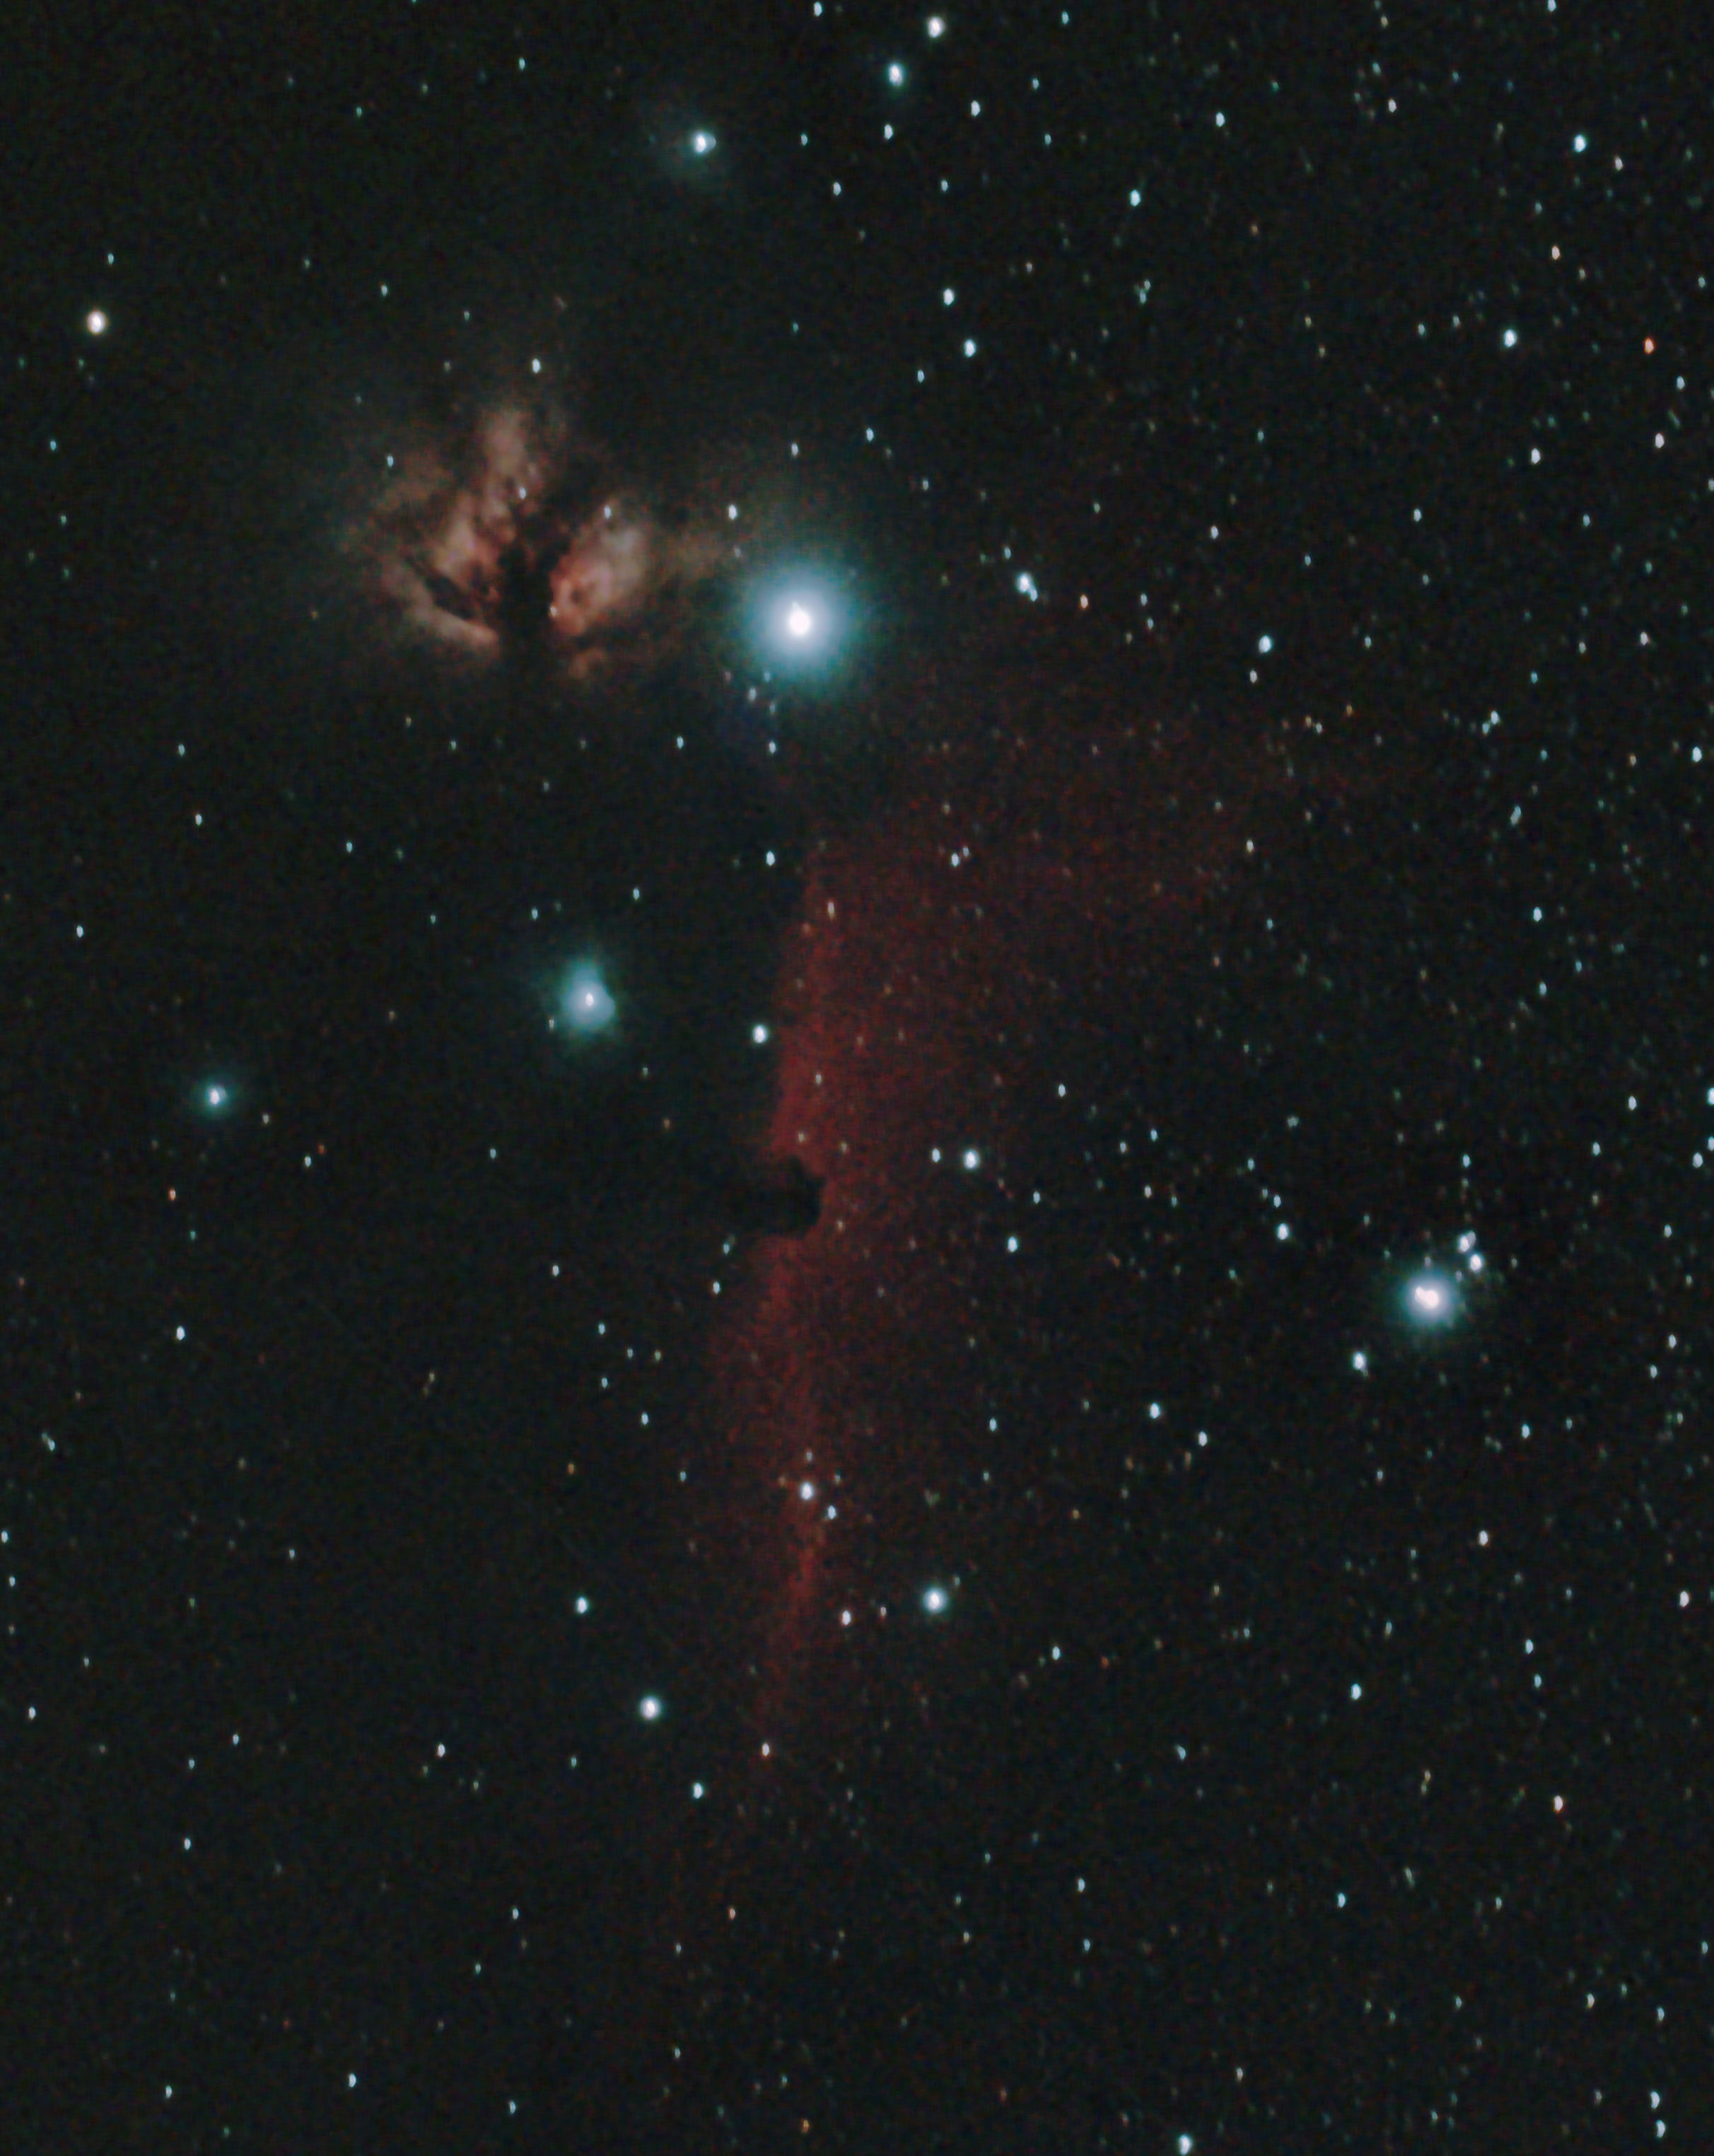
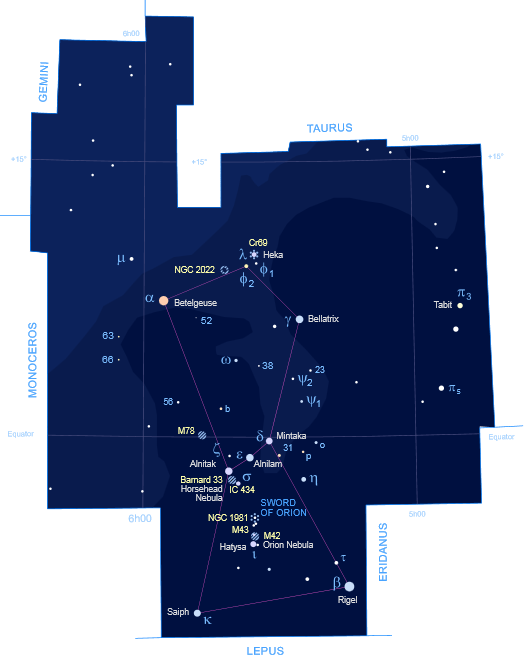
Late evening / midnight: Orion Constellation – NGC 2024 Flame Nebula, IC 434 Horsehead Nebula, M42 & M 43 Great Orion Nebula, NGC 1977 Nebula, NGC 1981 Emission Nebula, NGC 1909 Witch Head Nebula, SH 2-276 Barnards Loop, SH 2-264 Angelfish Nebula, M78 reflection nebula and more.  Other – M1 Crab Nebula, Hyades (Taurus), M77 barred spiral galaxy and Jupiter, which together with its four moons is also looking very nice after 1 a.m. at the moment.

With such an array of possibilities it can be difficult to know where to start but having recently achieved good images of the Great Orion Nebula and the Flame and Horsehead Nebulae, the next target was an easy choice – it had to be NGC 1977, which with the William Optics GT81 field-of-view also takes in NGC 1981 and M42, three for the price of one!

Orions Sword. Top to bottom: NGC 1981 Open Star Cluster, NGC 1973/75/77 Nebulae, M42 & M43 Great Orion Nebula & the binary star Hatsya. WO GT81, Canon 700D + FF | 30 x 120 secs + darks/bias/flats @ ISO 800

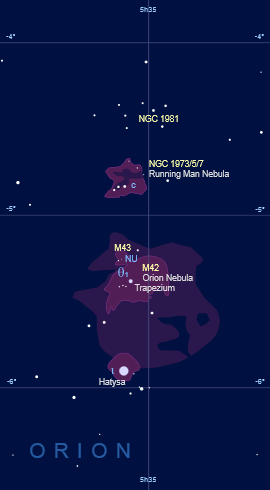
Orion’s Sword. Top to bottom: NGC 1981 Open Star Cluster, NGC 1973/75/77 Nebulae, M42 & M43 Great Orion Nebula & the binary star Hatysa.
WO GT81, Canon 700D + FF | 30 x 120 secs + darks/bias/flats @ ISO 800

There is so much going on in this photograph that merits attention.  The view encapsulates all the major components that form Orion’s Sword, notably from top to bottom: the open star cluster NGC 1981, the star Theta Orionis C in the Trapezium cluster – itself within M42 and the star Hatysa (Iota Orionis), which forms the tip of the sword.  Obviously M42, The Great Orion Nebula dominates the scene but two other major features are worthy of attention too.

Orion's Sword - detail

Orion’s Sword – detail

The aforementioned NGC 1981 is an open cluster of about 20 stars located 40 light years closer to Earth than M42.  But it is what’s between M42 and NGC 1981 that was my main target this time:  the reflection nebulae of NGC 1977 and related NGC 1973 & 1975, AKA the Running Man Nebula, so named because it looks like a running man!  The three nebulae are illuminated by the blue light shining from young stars that are forming within each area of nebulosity, which are separated by dark zones of interstellar dust in the form of a man running – not unlike Eadweard Muybridge’s pioneering photographic images of motion taken at the end of the 19th Century, I am sure he would have appreciated the analogy.

NGC 1973/75/77 The Running Man Nebula (rotated - North is left)

NGC 1973/75/77 The Running Man Nebula                     (rotated – North is left)

Eadweard Muybridge's photographic studies of a running man, late-19th Century

Eadweard Muybridge’s photographic studies of a running man, late-19th Century

The Horse & Flame

With the full moon early in the month and some truly awful weather, I have been unable to get out at Fairvale Observatory since October 31st!  Notwithstanding , this has been an opportunity to spend time learning more about the dark art of processing, which can sometimes be more important than image capture itself, so is hopefully time well spent.  Apart from the usual assistance of Mr Google, I have purchased the excellent online ‘book’ of Jerry Lodriguss, Photoshop for Astrophotographers – which I am slowly working through, and watched the equally excellent YouTube tutorials by Doug German on the same matter.  It is often said that a picture is worth a thousand words, and Doug’s tutorials are probably the easiest and most accessible way into the use of Photoshop for astrophotography – I also enjoy his dry sense of humour.  Finally, I am currently trialling Russell Croman’s Gradient Exterminator, which is intended to remove the external light gradient that inevitably creeps into even the best of images; it’s early days but I think I like it – it’s tricky to use and Doug German’s video tutorial is very helpful in this regard too.

The extended absence of clear night skies for astronomy also benefits subsequent viewing as the sky has changed, in this case a lot.  We have now moved on to winter skies, which are best exemplified by the constellation of Orion here in the northern hemisphere.  I was initially successful in imaging the iconic Orion Nebula early in October but only by getting up very, very early.  At Fairlvale Observatory it now comes into view at about 10pm and after 11pm can be imaged.  With clear skies finally arriving last Sunday evening, albeit accompanied by very cold temperatures, I was finally able to get out again – this time to spend more time with Orion.

In my ignorance, what has surprised me about Orion is the extensive presence of spectacular nebulae throughout the constellation: M42 Orion Nebula, M43 De Mairan’s Nebula, NGC 1973/5/7 The Running Man nebula, M78 between Alnitak and Betelguese etc, etc.  But, I had also somehow overlooked the ‘Horse & Flame’, located above the Orion Nebula nearby the lower end of Orion’s belt: Mintaka – Alnilam – Alnitak.  In close proximity to Alnitak (a triple star), which with an apparent  magnitude between  +2.0 and +4.0  is a problem for imaging, the sky is full of spectacular nebulae – notably  the Flame Nebula and the iconic Horsehead  Nebula.  Having latterly learnt of their presence in the same part of the sky, I had to try and image them.

orionsbelt

The Horsehead  Nebula is a cloud of interstellar dust and gas that, as a result of it’s density, appears dark against the surrounding red nebulous ‘curtains’.  The resulting shape looks like, well a horse’s head and has therefore become an iconic and well known image.  However, located on the other north-eastern side of Alnitak is perhaps the real star (no pun intended) of the show, the Flame Nebula – NGC 2024.  A combination of dark gas and dust with glowing hydrogen gas, energised by ultraviolet light emitted from Alnitak.  Such is the form of these materials that the resulting effect is that of a burning flame.  I was therefore thrilled that after my enforced indoor sojourn to be able to capture the Horse and Flame (sounds like a pub I’d like to visit!) together in one beautiful picture.

The Horsehead and Flame Nebulae. The Horse is located directly below (south) the large bright star Altinak triple star which forms the eastern end of Orion's belt, about half way down the image, sticking its 'head' into the red curtain nebulosity. The Flame is just to the left (east) of Altinak. WO GT81, Canon 700D + FF | 28 x 90 secs + darks/bias/flats ISO 1,000 | Photoshop processed + Gradient Exterminator

The Horsehead and Flame Nebulae. The Horse is located directly below (south) the large bright Alnitak triple star which forms the eastern (left) end of Orion’s belt, about half way down the image, sticking its ‘head’ into the red curtain of nebulosity. The Flame is just to the left (east) of Alnitak.
WO GT81, Canon 700D + FF | 28 x 90 secs + darks/bias/flats ISO 1,600 | Photoshop processed + Gradient Exterminator

The Bat

It’s Halloween time of the year and I don’t like it.  My problem is that in the UK this used to be a minor event, treated as a bit of fun for some and ignored by most.  However, it’s been given the North American makeover and pumped up as a big deal, mainly on commercial grounds. Grrrrr!

Less seasonable has been the weather, which thankfully continues to be warm and sunny with occasional clear night skies. Hooray!  A great combination enhanced further by the appearance of winter astronomy objects and since last weekend’s change of clocks 1-hour backwards, darkness from early evening.  What’s not to like for the astronomer?  Starting at 6 pm I was therefore able to spend more than 7 hours on Monday night imaging a procession of DSOs as they approached and passed the meridian.  Moreover, I achieved almost perfect alignment and for the first time was able to obtain good exposures of between 120 and 180 seconds; had I tried I suspect even longer periods could have been achieved.

First off the rank was the Veil Nebula, part of the even larger Cygnus Loop, a massive supernova remnant.  Located about 1,470 light years away and between 5,000 and 8,000 years old, much of this this emission nebula is not in the visible spectrum and what is is feint and difficult to image.  I have already obtained a good photograph of the Western Veil of the nebula, also known as NGC 6960 or the Witch’s Broom https://watchthisspaceman.wordpress.com/2014/10/04/the-witchs-broom/ .  Now with such good conditions and my best ever alignment, I decided to turn my attention to the Eastern Limb, or NGC 6992 and NGC 6995.

Cygnus Loop (Veil Nebula)  in untraviolet light. Image area of the Western Veil highlighted by red box.

Cygnus Loop (Veil Nebula) in untraviolet light. Image area of the Eastern Veil highlighted by red box.

Using the new CLS light pollution filter and 30 x 120 second exposures, the resulting image from the camera immediately showed the full extent of this magnificent object, even before processing. Post processing the feature really comes to life, with large billowing waves of nebulous ionized gas and interstellar dust. The brighter, right-hand side (northern) of NGC 6992 trails off to the left (southerly) section of NGC 6995, also known as the Bat Nebula – well it is Halloween!

Eastern Veil Nebula - NGC  6992 (right) & NGC 6995 (left). WO GT81 + Canon 700D & FF | 29 x 120 secs + darks/bias?flats @ ISO 1,600

Eastern Veil Nebula – NGC 6992 (right) & NGC 6995 (left).
WO GT81 + Canon 700D & FF | 29 x 120 secs + darks/bias/flats @ ISO 1,600

NGC 6995 AKA The Bat Nebula (look carefully and you'll see him!)

NGC 6995 AKA The Bat Nebula (look carefully and you’ll see him!)

The Witch’s Broom

With polar alignment and tracking now working quite well, I have been hunting around for potential new targets before moving on to the next challenges of computer control and auto-guiding.  Within the constraints of my limited sight lines, light pollution, weather and a rapidly encroaching full moon, I decided to tackle the somewhat elusive Veil Nebula.  Although the apparent magnitude of 7.0 is not unduly challenging, the delicate nature and low surface brightness of this very large ionized gas cloud can make it difficult to image.

Located in the Cygnus constellation, the Veil Nebula is a very large but feint supernova remnant about 1.400 ly from Earth that exploded between 5,000 and 8,000 years ago i.e. quite recently.  The Veil Nebula, Cirrus and Filamentary Nebula usually refer to those parts that can be viewed, the rest of the feature not being in the visible spectrum; the Veil is one of the largest, brightest features in the x-ray sky.  So big is the Veil that various sections are recorded as separate NGC numbers: 6960, 6992, 6995, 6974, 6979 and IC 1340.

Located close to the binary star system 52 Cygni, the classic view is of the Western Veil or NGC 6960, AKA the “Witch’s Broom”, “Finger of God or “Filamentary Nebula”, which spans across 35 light-years and I therefore set out to photograph.  Following the recent success of the North America Nebula I undertook a test shot at the same settings: 90 seconds at ISO 1,600.  However, the resulting picture looked excessively washed out and so changed to 90 seconds at ISO 800, which seemed to work better – though you never really know until the late stages of post-processing.  Despite forecasts to the contrary, the cloud rolled in after just six shots but two hours later and still tracking, the clouds parted leaving a clear sky and just enough time to take another twenty shots.

Initial processing was not encouraging.  Truth be told there’s still a lot to learn with this part of astro-imaging but, with some difficulty and courtesy of Mrs G, a good image of the Witch’s Broom was eventually teased from the data.

NGC 6960 AKA The Witch's Broom Canon 700D | 20x90 sec + darks.bias/ flats @ ISO 800

NGC 6960 AKA The Witch’s Broom
Canon 700D | 20 x 90 sec + darks/bias/ flats @ ISO 800


Focus is everything

FOCUS: The state or quality of having or producing clear visual definition – Oxford English Dictionaries.

Splashed the cash and got the equipment, done the reading and asked all the right questions on the astronomy forums, got a clear night, time to catch those images – what can go wrong? Having recently purchased and got a new AZ-EQ6 mount and WO scope working OK visually, it was time to embark on my new DSO photographic quest. Not for the first time I unfortunately underestimated just how difficult this astrophotography is; forgetting that I’d already battled before to image with the Newtonian 150PL using both the DSLR and ZWO webcam (more on that another time).

This time the challenge was using the new WO Field Flattener http://www.williamoptics.com/accessories/flattener6A_features.php. So – set up scope, align mount/scope, find object, centre and visually focus.  Then attach the field flattener (FFL) to the DSLR and slide directly into the focus tube, focus and take images – easy?  No! Even now I am not sure what went wrong but after three evenings and numerous questions on the Stargazers Lounge forum (SGL), I was completely unable to get a clear picture through the camera, let alone an image.  Initially I just thought the set up was wrong (whilst all the WO various equipment is excellent, none of it comes with instructions.  I am told this is par for astronomy but, when you are forking out this kind of money I find that quite unacceptable) or I needed yet another piece of equipment to achieve focus (surprisingly the ‘expert’ dealer from where I bought it wasn’t even sure on this!), spacers perhaps? By now I was very concerned.

Another clear warm night soon came and with perseverance low and behold a result.  This time I was much more meticulous: visually focusing on the bright star Arcturus, then switching to the DSLR + FF.  Using the Canon EOS Utility and Live View, with the ISO set very high I was at last able to see something on the screen, which with very fine adjustment came into focus as a small, very bright dot. Placing my other recently discovered brilliant invention, the Bahtinov mask http://en.wikipedia.org/wiki/Bahtinov_mask

Bahtinov mask

over the objective lens I was able to refine the focus perfectly:

Bahtinov Focused Image(Medium)

Now carefully transferring the scope and refining the position via Live View I was ready for a serious attempt on my first DSO, M13 The Great Globular Cluster in the constellation of Hercules:

M13 DSS Final 300714 cropped

WO GT 81 + FF 10x16sec at ISO800

Bingo + what a relief! Like my first crude afocal image of the Orion Nebula last year, getting the picture was exhilarating.  OK it’s not brilliant and I have seen the image in numerous publications and online but, it was mine, having captured those photon’s which had been travelling for the past  25,000 light-years on my camera, just outside my back door. WOW!

http://apod.nasa.gov/apod/ap120614.html

I hope to improve on this one day, once I have mastered all the other software, guidescope etc but I doubt I’ll feel quite the same next time.  In the end, focus was everything, it is very difficult to achieve and only goes to show just how difficult this astrophotography is but after the light spent so long getting here, the least I can do is focus it right on my camera sensor, which requires a fraction of a millimeter accuracy.

Later on the same night I also captured M57, the Ring Nebula (more another time).  Apart from refining this process (which I can see will take what ever’s left of my lifetime) my next ambition is to capture a galaxy out my back door, I can’t wait!