Much of life is about meeting and dealing with challenges. Who hasn’t put off a task in the hope either that it will go away, somebody else will deal with it or an easier solution might be found? Whatever anybody says to the contrary, astrophotography is not easy and throws up many such challenges from the very beginning, which will usually have to be dealt with if progress is to be made. Amongst such challenges a few have the potential to transform the process and / or outcome of imaging but can also irrationally at first appear as a stumbling block rather than an opportunity and, as a result, get put aside until another day.
My list of such obstacles so far confronted consists of:
I have experienced many other challenges but excluding processing itself – which is another story – overcoming these four tasks has each time had a material positive impact on my astrophotography.
It’s fair to say that with technology, problems and life in general, wherever possible I like to adopt the KISS principle (Keep It Simple Stupid). Unfortunately such a philosophy is often difficult, if not impossible to follow with astrophotography and most of the time there is just no alternative but to work through the unavoidable difficulties step-by-step in every excruciating detail, which usually requires lots of patience, perseverance and time. In understanding and finding a solution the almost endless and invaluable online help from others should not be overlooked, without which I would probably still be back at the proverbial square one. The availability of such friendly help and the extensive free but still excellent software is surely one of the defining characteristics of astronomy and astrophotography, which not only makes it easier but more enjoyable.
Notwithstanding, when I look back at the aforementioned list of tasks which took me months or even years to address and solve, I wonder now why I had been so daunted beforehand. Once I found the courage to work through the problems, I discovered that I too was able to set-up and carry out such techniques that hitherto I’d thought beyond my abilities. It was very satisfying but, more to the point, each such breakthrough took me to another level of imaging.
Ever since moving on from DSLR to using the ZWO1600mm-Cool mono camera and EFW, I realised that if I was ever going to truly master astrophotography I would need to achieve much longer integration times, which could only mean one thing – the apparently black art of plate solving. I had read about plate solving and understood the principle but at first was too busy learning the new camera and then either just kept putting it off or, with so much bad weather, used the rare clear night just to enjoy imaging. Notwithstanding, an all too brief warm and clear spell recently occurred and I decided to give it a try.
Aside from the innate underlying complexity of such techniques I am first put off by the instructions. I do read them but as always with technical items they appear to have been written by an alien – poorly written, idiosyncratic and altogether difficult to understand. In this case I chose to use PlaneWave’s PlateSolve2 software incorporated within the excellent image capture software Astro Photography Tool (APT) as Point Craft and to be fair, the author’s (Ivo from Hungary) instructions are comprehensive but still difficult to understand; thankfully the related APT Forum helps enormously to resolve resulting difficulties and misunderstandings. However, like riding a bike you will not learn by reading a book but need to get on and do it!
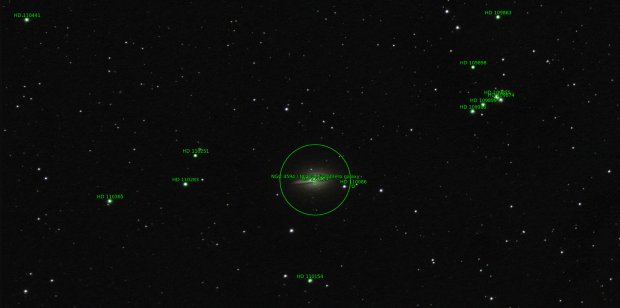
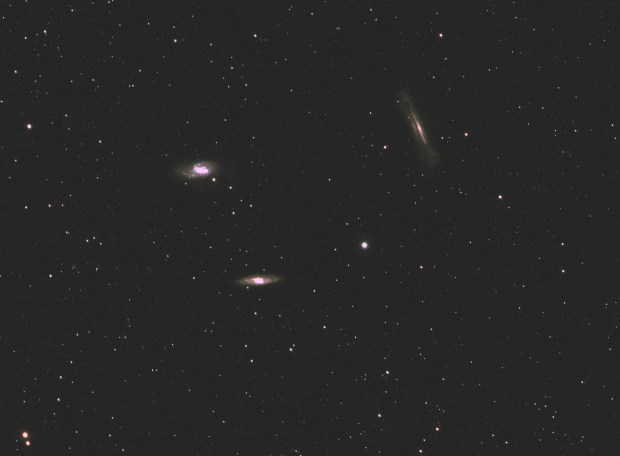
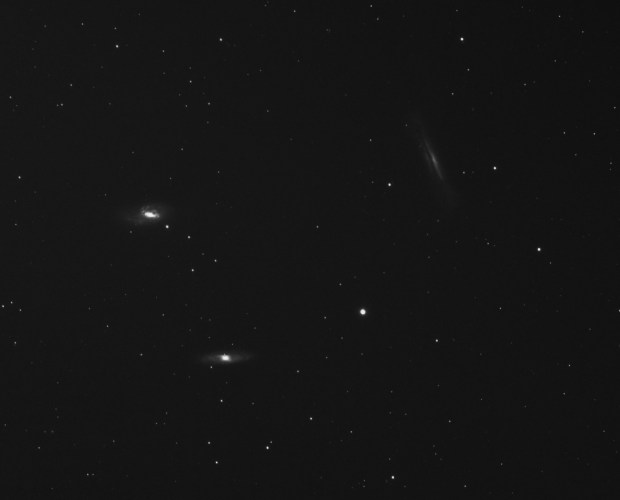
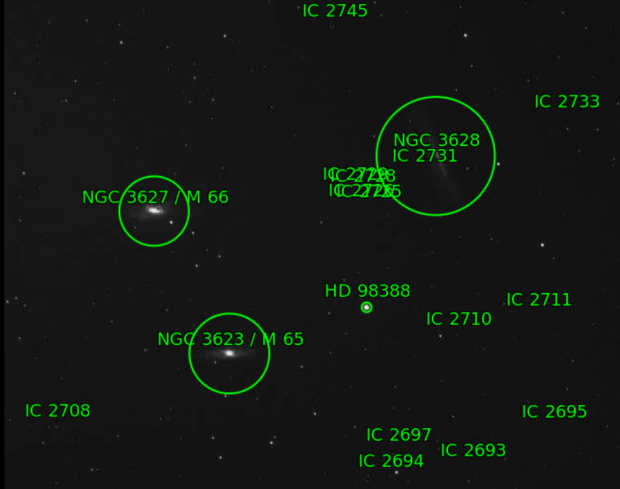
Having installed the necessary software and star catalogues for plate solving my first night was for various reasons a disaster, thankfully the good weather continued for the subsequent two evenings and I was therefore able to continue. To learn the technique I needed a suitable target and at this time of the year the Leo Triplet formed an easily recognisable composition that met the bill, though the detail of each galaxy remains difficult to resolve with my set-up. My approach was first to verify I could Solve an image i.e. identify the exact RA and DEC position of the image (location and orientation) using the plate solving software and then using this image and solved data:
- Re-position the camera exactly over the target in the same part of the sky
- Do the same but after a Meridian flip, and finally…
- Do the same using the original image but over two nights
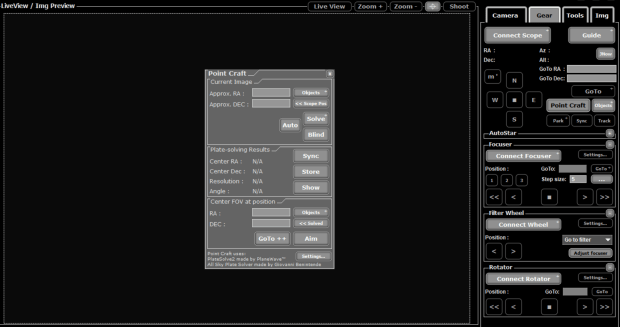
APT PointCraft input screen: After connecting the scope, solving the image (upper box) and framing the image (lower box), the GoTo++ function can be used to return the scope and imaging location to the originally solved and framed position in order to resume imaging.
I’m not going to say I’ve cracked it but I did achieve all the above tasks and am now confident that I’m on my way to obtaining longer integration times with the help of plate solving. After some failures I was finally able to realign the camera to within 2 pixels, which is quite amazing accuracy achieved by the software. I was even pleased with the resulting test images, which however emphasised the aforementioned need for much greater integration times; top-of-the page image from separate image sets on 19th April, image below from image sets on 20th April. Of course increased times will also require clear skies and a return to more suitable targets.
 Despite my aversion towards much of the so-called modern world I am not a technophobe, I embrace and often enjoy many of today’s technical developments. However, I am of the opinion that many of the problems with such technology arise at the interface between the technology and mankind – technology is now (mostly) digital and we are analogue i.e. incompatible. Furthermore, such difficulties are often compounded by the lack of intuitive operation and inability of those creating such devices or software to explain to normal human beings how to use them – surely altogether a limiting factor for the ultimate development of the modern world itself? Notwithstanding and somewhat ironically, my experience indicates astrophotography may also be a metaphor for life. Often working in the unknown, difficult, complex and frustrating but at times very rewarding – a bit like spinning plates really? And so on to my next plate – watch this space!
|
IMAGING DETAILS |
| Object |
The Leo Triplet M65 + M66 + NGC 3628 |
| Constellation |
Leo |
| Distance |
35 million light-years |
| Size |
M65 8.7’ x 2.45’ M66 9.1’ x4.2’ NGC 3628 15.1’ x 3.6’ |
| Apparent Magnitude |
M65 +10.25 M66 + 8.9 NGC 3628 + 10.2 |
| |
|
| Scope |
William Optics GT81 + Focal Reducer FL 382mm f4.72 |
| Mount |
SW AZ-EQ6 GT + EQASCOM computer control |
| Guiding |
William Optics 50mm guide scope |
| |
+ Starlight Xpress Lodestar X2 guide camera & PHD2 control |
| Camera |
ZWO1600MM-Cool (mono) CMOS sensor |
| |
FOV 2.65o x 2.0o Resolution 2.05”/pix Max. image size 4,656 x 3,520 pix |
| EFW |
ZWOx8 + ZWO LRGB & Ha OIII SII 7nm filters |
| Capture & Processing |
Astro Photography Tool + PS2, Deep Sky Stacker & Photoshop CS2 |
| Image Location |
Centre RA 11:19:59 DEC 13:31:01 |
| Exposures |
1.Main image 60 sec x35* LRGB (Total time: 100 minutes) *15 East & 10 West
2. Second image 180 sec x 5 LRGB (Total time: 60 minutes) |
| |
@ 300 Gain 50 Offset @ -20oC |
| Calibration |
1. 15 x 60 sec Darks 20 x 1/4000 sec Bias 10 x Flats LRGB @ ADU 25,000
2. 10 x 60 sec Darks 20 x 1/4000 sec Bias 10 x Flats LRGB @ ADU25,000 |
| Location & Darkness |
Fairvale Observatory – Redhill – Surrey – UK Typically Bortle 5 |
| Date & Time |
19th & 20th February 2018 @ 22.00h approx. |