

Converting from a DSLR to the ZWO1600MM-Cool camera feels in part like I’m starting out all over again and is exciting. I’m getting used to the new field-of-view and its implications for framing, which is complicated further by using separate mono filters that can often make it difficult to identify on screen the chosen imaging target. I’m also learning to use Astro Photography Tool (APT) for image capture, which is turning out to be an excellent programme, though at times somewhat idiosyncratic in nature. APT contains useful Histogram and associated Stretch tools, which when applied to test shots prior to data capture can reveal underlying target detail which is otherwise unseen and thus enables suitable framing to be chosen.
With a set mount location, better polar alignment, calibrated PHD2 and a basic star alignment model established in EQ-ASCOM early in the summer, the process of imaging has now become much more efficient. After adding a few supplementary alignment points local to the target and some other minor adjustments, I have recently been able to set-up and start imaging in much less than one hour; excluding the physical set-up, imaging is possible within 30-minutes. Contrast this with one or two hours when previously using various Synscan handset procedures and setting up the DSLR camera, I think it’s fair to say I have at last crossed the proverbial Rubicon! Using a cooled sensor and compiling a calibration library has also been very helpful in streamlining imaging sessions, which all-in-all has made my astrophotography much more productive – qualitatively and surprisingly quantitatively too, despite all the extra subs and calibration required.
I’m currently working through familiar targets with Ha-OIII-SII subs to produce Hubble Palette based images. It’s true to say that the use of narrowband filters has also been nothing less than a revolution for my imaging, in terms of process and results. I’m particularly pleased that I purchased the ZWO x8 EFW and matching LRGB + narrowband filters with the new camera – 31mm parfocal filters also help minimize the need to re-focus for different wavelengths.
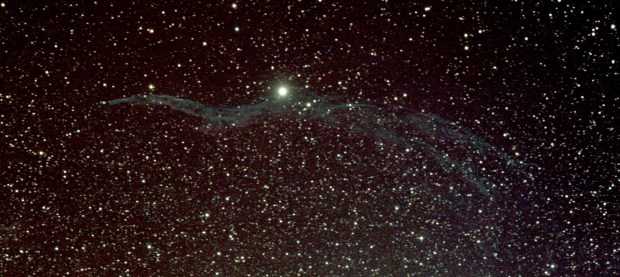
The Witch’s Broom (NGC 6960): WO GT81 & Canon 700D camera + 0.80x Focal Reducer | 20 x 90 sec + calibration @ ISO 800 | October 2014
It’s about 4-years since I embarked on my nascent astrophotography journey and soon thereafter I first attempted to image the notoriously difficult Veil Nebula – which of course is why I had to try. At the time I did not know one end of the Veil from the other of this very large but faint and widely dispersed supernova and was pleased to achieve a recognizable image of the Western Veil or Witch’s Broom (NGC 6960). This July I set out to re-image the same feature for the first time using the ZWO1600MM-Cool camera in narrowband.
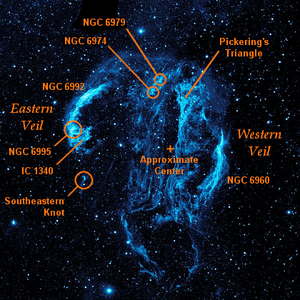
The Veil Nebula AKA Cygnus Loop: Ultraviolet view ref. NASA
The full extent of the Veil is broadly demarcated by the Western and Eastern Veil Nebulae, with other generally more diffuse but related areas in between. All-in-all the entire feature is some 3o or 110 light-years across. The ZWO1600MM-Cool has two notable features that differentiate it from conventional CCD mono cameras, those being larger sensor size and high sensitivity when using only short exposures. Unity of the sensor is 139 but like many other new users I’ve successfully been using a much higher Gain, in my case 300 with an Offset of 10; others have reported very good results as high as 600 Gain at just 30 second exposure, which though data heavy is very useful in helping to circumvent the UK’s fickle weather conditions and the need for perfect polar alignment, which was a major factor in deciding to purchase this type of mono camera.
Being still unfamiliar with the camera’s field-of-view using the William OpticsGT81 refractor and x0.80 focal reducer combination, on this occasion I centred the Broom just above the centre of the frame, thus adding the possibility of capturing other parts of the nebula located to the east and just below the Broom in this case. As I’ve yet to master or even attempt mosaics or a Meridian flip with plate solving, for the moment my imaging is limited by the transit period defined from about 110o east to the Meridian or similarly to the west and between a 30o to 80o azimuth, which equates to just over 2 hours per target each side of the Meridian. The nature of the object and lack of darkness at this time of the year can often restrict this available time even further. Notwithstanding, on this occasion I was able to obtain 20 x Ha and 18 x OII 180 sec subs in order to produce a final bicolour image.
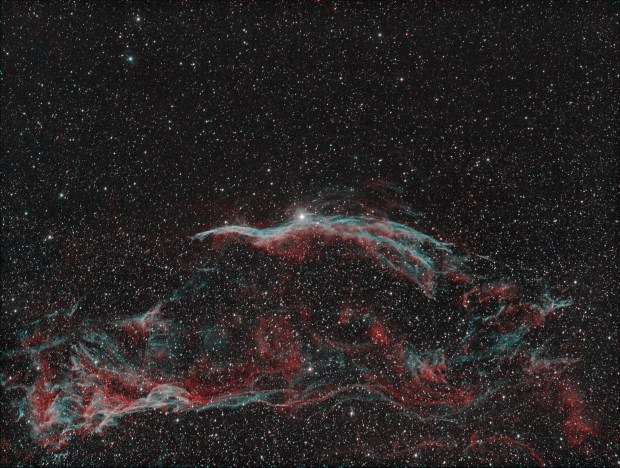
The Witch’s Broom NGC 6960 & Pickering’s Triangle NGC 6979 Ha-OIII-OIII Bicolour: WO GT81 & ZWO1600 + 0.80x Focal Reducer | 180 sec x 20 Ha & 18 OIII Subs + calibration @ Gain 300 , 10 Offset & -20C | 31st July 2017
With a good set of subs the stacked and collated Ha-OIII image has turned out well, with nebulous filament details typical of the Veil that had not previously been clear when using a modded-DSLR camera now clearly visible. Furthermore, on this occasion the aforesaid framing included detail of both the Broom and as something of a bonus Pickering’s Triangle, altogether forming a very pleasing image.
At this stage I would usually crop the Witch’s Broom and finesse the resulting image in Photoshop. However, following a prior line of thought and questioning on the SGL Forum, this time I tried to use the Drizzle_technique during stacking to enhance the quality of The Broom itself. Unfortunately it didn’t take long to discover that, as so often is the case with astrophotography, drizzling is a good deal more complicated than just placing a check in the Drizzle box.
Originally developed for use with the Hubble Space Telescope, drizzle is a digital processing method for the linear reconstruction of under-sampled images, thus improving the apparent resolution of the image. Deep Sky Stacker is an excellent piece of software and provides the facility of x2 and x3 Drizzle but unlike some commercial packages has limited memory that is used for this task. As a result after attempting to use Drizzle whilst stacking a number of times in DSS, the process crashed at the end of each sequence. Finally another SGL Forum query provided the answers: (i) DSS lacks memory required to stack and process the original sub using Drizzle, but (ii) Drizzle will work by applying the Custom Rectangle Mode in DSS to a select a specific, smaller area of the sub. It took me a while to figure this out but eventually I manged to process the Witch’s Broom area of the image successfully. I’ve concluded that Drizzle is certainly a feature worth deploying during stacking from time to time but only where the main target is poorly sampled and where the specific object will fit within the Custom Rectangle Mode defined by DSS – it should also be noted that the resulting data size also increases very substantially when using Drizzle.

Witch’s Broom (as above) + 2x Drizzle
All-in-all it continues to be a great surprise just how different and often complex the techniques are with a mono camera and filters compared to a one-shot DSLR camera, both during capturing and processing. I was previously aware of these issues and some related shortcomings but so far the results have justified the additional effort; I’m not sure I would say the same about a conventional mono CCD camera, that requires much longer imaging times which in my opinion are not suitable for the average user and weather conditions in the UK. I know there’s still much to master – Plate Solving + Mosaics + Meridian Flips + Sequence Generator Pro etc. – and I’ll soon need to start a completely new alignment star model for winter and recalibrate PHD2 guiding but the past few months have really been good fun and very productive.
